Replacing the vacuum brake booster on a VAZ 2110, VAZ 2111, VAZ 2112
Welcome! Vacuum brake booster - designed to make the brake pedal much easier to press, it only works when the engine is running, but when the engine is turned off, the vacuum booster will not work, all this is due to the fact that when the engine starts, the air filter housing begins to suck in air from the environment and it enters the intake manifold, air is taken from the manifold a little and goes into the vacuum chamber and therefore it starts to work only when the engine starts.
Note! To replace the brake booster, you will need: A set of all kinds of wrenches, as well as a couple of screwdrivers, and also for this task, a socket head and a wrench will be very convenient!
Summary:
Where is the vacuum brake booster located? It is screwed to the car body with four nuts, or rather not the itself, but its bracket, the vacuum booster itself is secured to this bracket with two nuts, but they are easiest to remove as an assembly, i.e. unscrew the four nuts that secure the bracket to the body and then remove them, and when the vacuum booster with the bracket is in your hands, you will need to unscrew the two nuts and separate them from each other, but we will talk about this later in this article, a little lower .
When do you need to change the vacuum brake booster? If the brake booster fails, a hiss may appear when you press the brake pedal, and the speed may also go up and then down, in addition, the brake pedal will become difficult to press (This is equivalent to the fact that the car is turned off) basically this is there are all the symptoms that indicate that the vacuum booster has failed, it does not always happen that they all appear together in the car, but a couple of them will still appear when the vacuum booster becomes unusable (the main ones most likely, namely, tight brake pedal and floating speed).
Note! By the way, the vacuum booster can be checked for serviceability as follows: With the engine off, press the brake pedal 5 times and when the last press is made, hold the pedal to the floor, immediately after which start the car, if the pedal falls a little, this will indicate that that the vacuum booster is fully operational!
Design and operating algorithm
The first passenger cars produced in the last century were not equipped with “vacuum seals”. To sharply slow down the car in case of emergency braking, the pedal had to be pressed with a force of about 80 kg. The device of the vacuum brake booster installed on modern vehicles makes it possible to reduce the mentioned force to a light press.
To diagnose malfunctions of this unit, you need to know its design and operating principle. The amplifier is a cylindrical metal housing, inside of which the following elements are located:
- a diaphragm pushed by a return spring;
- air valve with two channels - atmospheric and vacuum;
- in the center of the body there is a rod connected at one end to the brake pedal, the other to the main cylinder, and a diaphragm is attached to it;
- vacuum supply pipe from the engine intake manifold connected to the check valve.
In fact, the body of the “vacuum generator” is divided by a membrane into 2 separate chambers. The first is supplied with vacuum from the power unit, while in the second the air pressure is equal to atmospheric pressure. The chambers communicate with each other through the channels of the air valve, which alternately open when the driver presses and releases the pedal.
The classic vacuum brake booster works according to the following algorithm:
- Until the driver activates the brake system, both chambers communicate via a vacuum channel. Since the pressure in them is the same, the pusher and rod remain motionless.
- After pressing the pedal, the rod moves forward and the connection between the two chambers through the vacuum channel is interrupted. The valve opens another passage connecting the atmospheric chamber with outside air.
- Due to the pressure difference, the diaphragm bends towards the vacuum, thereby helping to put pressure on the pusher and the piston of the main hydraulic cylinder.
- When the driver takes his foot off the pedal, the valve produces the opposite effect - it closes the atmospheric channel and opens the vacuum channel. The pressure in the chambers is equalized, the spring pushes the membrane back to its original position.
If the brake pedal is held down by the driver, the diaphragm also stops and exerts a constant force on the rod. Thanks to the described operating principle of the VUT, the driver’s work is greatly facilitated, and the system responds to the pedal much faster.
The vacuum brake booster operates due to different pressures in the chambers. In this case, in the initial position, the pressure in both chambers will be the same and equal to the pressure created by the vacuum source.
When you press the brake pedal, the pusher transmits force to the follower valve, which closes the channel connecting both chambers. Further movement of the valve facilitates the connection of the atmospheric chamber through a connecting channel with the atmosphere. As a result, the vacuum in the chamber decreases. The pressure difference in the chambers moves the piston rod of the master cylinder.
When the braking ends, the chambers are reconnected and the pressure in them is equalized. The diaphragm, under the action of the return spring, takes its original position. The vacuum cleaner works proportionally to the force of pressing the brake pedal, i.e. The harder the driver presses the brake pedal, the more efficiently the device will work.
A vacuum booster (or VUT) is the most common type of mechanism for boosting brakes. It operates on the principle of reducing pressure or simply vacuuming. Structurally, it forms a single whole with the main cylinder and includes several important components:
- a housing divided by a diaphragm into 2 parts - a vacuum and an atmospheric chamber;
- a valve that closes the bridge between the parts of the vacuum chamber;
- a mechanical (or electric) pump necessary to ensure uninterrupted operation as the main or additional source of vacuum (may not be present on some gasoline cars);
- return type spring - needed to move the diaphragm to its initial position after pressing the brake pedal.
The operation of a vacuum unit is based on the vacuum or difference in air pressure in both chambers. In the initial position it is the same, but after pressing the brake, the channel connecting both halves of the VUT is blocked. In this case, air begins to flow into the atmospheric section, where the vacuum decreases. This creates a force on the diaphragm, which moves the master cylinder piston against the spring force.
How to replace the vacuum brake booster on a VAZ 2110-VAZ 2112?
Removal: 1) First, unscrew all the screws that secure the soundproofing material (Most of the nuts are indicated by red arrows), then unfasten the belt securing the expansion tank of the cooling system (the tank is indicated by a blue arrow) and slightly lifting it up, remove it from the place where it is located (K the hoses are connected to it, do not disconnect them under any circumstances, otherwise liquid will flow out, which will stain your car. Of course, you can put some kind of container and drain all the liquid from the expansion tank, but why do this if you can do without it and work it will go away much faster), then carefully place the tank somewhere and fix it and then take out the left (look in the direction of the car) part of the soundproofing material and put it aside.
Note! The same thing will need to be done with the right side, in order to remove it, you first need to move the rear window washer reservoir to the side (On VAZ 2110 cars, this reservoir is not present, it is only present on the VAZ 2111 and VAZ 2112), to do this, disconnect the two wires that fit it (see photo 3), unfasten the belt that holds it (see photo 4) and carefully remove it (If there is a lot of liquid in the tank, then you don’t have to remove it, just carefully place it on the wing, if there is none or you have pumped it all out, then disconnect all the remaining tubes from the tank and after that, remove it completely from the car) and to complete the removal of the right side of the soundproofing material, use a 10 mm socket wrench, unscrew the two nuts (see photo 1) and Using a thin flat screwdriver, pry up the hose holder for the vacuum brake booster (see photo 2) and disconnect it too, and essentially, you can remove the soundproofing material so that it does not interfere with removing the vacuum brake booster from the car!
Repair of VUT VAZ 2110, 2111, 2112
I had time to overhaul the vacuum brake booster over the weekend.
A repair kit was purchased
we pull out the valve with the hose from the vacuum booster (hereinafter referred to as VUT), unscrew the nuts securing the master brake cylinder and carefully move it away from the VUT, it turns out something like this...
From the interior, unscrew the 4 nuts securing the brake pedal
carefully remove the pedal from the car body (slowly) and this is what we see...
unscrew on the other side
remove the cotter pin and disconnect the brake pedal from the VUT...
There is a spring inside the VUT so that it does not fly out during disassembly, from the side of the main brake cylinder we screw 2 nuts to the end (see photo)
carefully unbend all rolled edges of the VUT
After bending, we carefully try to move the 2 halves of the VUT apart (from each other) and at the same time slightly unscrew the nuts until they are as in the photo
in my case, the o-ring was torn (circled in red)
in my case the o-ring was torn (circled in red)
remove it by prying it off with a screwdriver and replace all the rubber bands with new ones, plus I put everything on sealant
something like this... and put it in place
prying it with a screwdriver and, if necessary, turning the screwdriver in a circle, we try to lift it to the pole (see photo. It will turn out like on a distant pin)
use a screwdriver to pry the diaphragm in a circle and separate it from the VUT body.
remove the diaphragm and replace it with a new one...
in my case, 1 of the VUT halves was a little rusty, we clean it, treat it with zinc, wait, remove the zinc, degrease, dry and paint with primer,
Assemble the VUT in the reverse order; when assembling the contact point between the diaphragm and the 2 halves of the VUT, I smeared a thin layer of sealant, installed the spring, connected the 2 halves of the VUT together, immediately put nuts on the studs and tightened the VUT. Then I used a straight screwdriver and a hammer to bend the edges of the VUT.
ready for installation in the car
smeared sealant on the brake pedal housing at the point of contact with the VUT
I collected everything, started the car, silence near VUT. Then I turned off the engine, pressed the brake pedal 2 times (easy to press) and 3 times with medium force. I forgot to mention that during the repair I also needed lithol, I lubricated the studs under the rubber bands and the rod that presses on the main brake cylinder, having previously removed the old grease.
In my case, the symptoms of a faulty VUT were: - air noise near the VUT; — engine idle speed 920-960 (instead of the usual 840-880); — when you press the brake, the engine speed jumps to 1100, you release the pedal 640-700; — the idle speed of the engine sometimes floated on its own and the car began to tremble.
I will say this, there is nothing complicated in this repair, I took the VUT apart for the first time and everything worked out. The price of a new VUT is 1300 rubles. on the market, a repair kit - 350 rubles, the difference is noticeable.
Brake system components for VAZ 2110, 2111, 2112
On the selection of brake system components for front-wheel drive VAZs. I'll start with myself, or rather with what I've ever had
Source: www.spike.su
Replacing the vacuum booster of a VAZ 2110 with your own hands
The brake system of passenger cars is based on hydraulics. However, it was not without air. Responsible for pneumatics - vacuum booster. Over time, the air assembly wears out. As a result, replacing the VAZ 2110 vacuum booster is inevitable. Sometimes, the procedure is interconnected with the repair of the master cylinder. But, in some cases, it is possible to replace the vacuum seal without disconnecting the brake pipes from the cylinder. We will tell you in detail below how to replace the vacuum booster on a VAZ 2110 with your own hands.
How to determine that the vacuum seal is faulty
A brake booster doesn't fail overnight. At first, the pneumatic unit shows signs of malfunction for a long time to the car owner, which can be easily ignored. The fact is that the car continues to drive acceptably, with virtually no effect on performance characteristics.
But at the same time, the driver’s attention may be attracted by such symptoms as:
- the speed increases, accompanied by hissing when you press the brake;
- The brake pedal began to behave differently when the engine was turned off.
the engine adjusts from time to time;
Helpful information! It’s easy to check the serviceability of the vacuum seal on a VAZ 2110. With the engine off, pump the brake pedal as if you were bleeding the brakes. At the lowest point, fix the position and start the engine. If the pedal sinks to the floor, then the amplifier is working.
How to remove the vacuum seal on a VAZ 2110
If self-diagnosis suggests a malfunction of the amplifier, then removing the vacuum seal on a VAZ 2110 is a matter of technique. To begin with, you should prepare a metalworking tool. It's good if there is a service kit. In his absence, you need to prepare the keys: three heads: 10 mm, 13 mm and 17 mm, a wrench with an extension, a pair of Phillips and slotted screwdrivers, and pliers.
Then, you can remove the vacuum seal on the VAZ 2110 in the following order:
- We disconnect the negative terminal from the battery (these are the rules of plumbing);
- We unscrew the upper screws that secure the soundproofing material to the engine shield;
- Disconnect the rubber band securing the expansion tank;
- Without disconnecting the connections of the coolant hoses, we move the tank to the side;
- Now it becomes possible to move back the sound insulation;
- Disconnect the terminal from the fluid level sensor on the brake cylinder cover;
- Holding the return valve, pull out the air supply hose from it;
- Next, you need to disconnect the vacuum seal and the brake cylinder. To do this, you need to unscrew the two outer fastening nuts;
- In order not to disconnect the brake pipes, smoothly moves the unscrewed cylinder away from the booster;
- Let's go to the salon. On the shield, along the perimeter of the brake pedal, we find four studs that are secured with nuts. We unscrew them;
- Then we disconnect the finger that connects the pedal and the amplifier pusher rod;
- After this, you can return to the engine compartment and remove the unscrewed unit.
With the amplifier removed, the pedal bracket will remain. It is secured with two nuts. It should be removed and reinstalled on a new vacuum unit for your VAZ 2110. Assembly occurs in the reverse order. After you managed to change the vacuum seal on a VAZ 2110, you do not need to bleed the brakes, because the brake pipes were not disconnected.
For reference! Most of the parts of the front-wheel drive LADA family are interchangeable with each other. VUT was no exception, with one small nuance: the stock in 2108-21099 is slightly longer than that of the “ten”. Therefore, to answer the question: will the vacuum cleaner from the VAZ 2109 fit the VAZ 2110? You can answer in the affirmative - yes. But the brake pedal will be located a little higher.
Repair of VUT VAZ 2110, 2111, 2112
I had time to overhaul the vacuum brake booster over the weekend.
A repair kit was purchased
we pull out the valve with the hose from the vacuum booster (hereinafter referred to as VUT), unscrew the nuts securing the master brake cylinder and carefully move it away from the VUT, it turns out something like this...
From the interior, unscrew the 4 nuts securing the brake pedal
carefully remove the pedal from the car body (slowly) and this is what we see...
unscrew on the other side
remove the cotter pin and disconnect the brake pedal from the VUT...
There is a spring inside the VUT so that it does not fly out during disassembly, from the side of the main brake cylinder we screw 2 nuts to the end (see photo)
carefully unbend all rolled edges of the VUT
After bending, we carefully try to move the 2 halves of the VUT apart (from each other) and at the same time slightly unscrew the nuts until they are as in the photo
in my case, the o-ring was torn (circled in red)
in my case the o-ring was torn (circled in red)
remove it by prying it off with a screwdriver and replace all the rubber bands with new ones, plus I put everything on sealant
something like this... and put it in place
prying it with a screwdriver and, if necessary, turning the screwdriver in a circle, we try to lift it to the pole (see photo. It will turn out like on a distant pin)
use a screwdriver to pry the diaphragm in a circle and separate it from the VUT body.
remove the diaphragm and replace it with a new one...
in my case, 1 of the VUT halves was a little rusty, we clean it, treat it with zinc, wait, remove the zinc, degrease, dry and paint with primer,
Assemble the VUT in the reverse order; when assembling the contact point between the diaphragm and the 2 halves of the VUT, I smeared a thin layer of sealant, installed the spring, connected the 2 halves of the VUT together, immediately put nuts on the studs and tightened the VUT. Then I used a straight screwdriver and a hammer to bend the edges of the VUT.
ready for installation in the car
smeared sealant on the brake pedal housing at the point of contact with the VUT
I collected everything, started the car, silence near VUT. Then I turned off the engine, pressed the brake pedal 2 times (easy to press) and 3 times with medium force. I forgot to mention that during the repair I also needed lithol, I lubricated the studs under the rubber bands and the rod that presses on the main brake cylinder, having previously removed the old grease.
In my case, the symptoms of a faulty VUT were: - air noise near the VUT; — engine idle speed 920-960 (instead of the usual 840-880); — when you press the brake, the engine speed jumps to 1100, you release the pedal 640-700; — the idle speed of the engine sometimes floated on its own and the car began to tremble.
I will say this, there is nothing complicated in this repair, I took the VUT apart for the first time and everything worked out. The price of a new VUT is 1300 rubles. on the market, a repair kit - 350 rubles, the difference is noticeable.
Repair of vacuum brake booster VAZ 2110
One of the most common problems with the brake system of a VAZ 2110 car is the hissing of the vacuum brake booster. In today's article we will look at the main malfunctions of the vacuum brake booster, how to check it, the procedure for removing and replacing it, as well as adjusting the rod of the vacuum brake booster on the VAZ 2110
How to make a replacement?
Replacement is carried out using a set of keys and screwdrivers. The vacuum brake booster is located under the hood, so work can be done in the garage or outside. The replacement takes place as follows:
- First you need to disassemble the wall of the VAZ 2110 engine compartment, then remove the frill. This element is attached using a seal and upholstery;
Important! The most unpleasant moment in dismantling the vacuum brake booster is unscrewing the four nuts in the interior. To get to them you will have to remove several elements of the dashboard.
Malfunctions of the vacuum brake booster VAZ 2110
Devices from different manufacturers may vary in characteristics and quality, and the price of the VAZ 2110 vacuum amplifier may also vary. Since the functioning of its mechanism affects the operation of other parts and components, and above all the car engine, it is worth not saving and carefully monitoring its serviceability.
If there is a hissing sound from under the hood, a burnt smell of oil is felt in the cabin, and the brake works like a stopped car only after repeatedly pumping the brake pedal with your foot, then you should immediately contact a car service center for diagnostics and, if necessary, replacement of this device.
Table of dozens of faults in the vacuum brake booster and methods for eliminating them
Troubleshooting
When the identified signs indicate a malfunction of the VAZ 2110 vacuum brake booster, you can try to provide first aid to your car yourself. In normal condition, the braking system should hold it in place at an inclination of 25º to a horizontal surface. If it doesn’t cope well, you should loosen the locknut and tighten the cable.
Then you need to check the full lever stroke, it is necessary that it is approximately 2-4 teeth. After tightening the locknut tightly, it is worth performing a series of safety brakes while simultaneously monitoring the stroke of the lever. Moreover, the rotation of the wheels when the lever is lowered to the end should be free, without force. If such a test reveals the inability of the amplifier to cope with braking, this indicates the need to replace it.
Many car services provide such a relevant service today as tuning the brake system of the VAZ 2110; the price of the unit in case of replacement is still higher than its improvement. It also affects the rear brake discs, in addition to the booster, which is upgraded by installing a special washer. This seemingly insignificant detail can significantly influence the operation of the amplifier and the braking process as a whole.
How to check the vacuum brake booster of a VAZ 2110
You can check the vacuum brake booster “tens” for proper operation yourself. To do this, press the brake pedal repeatedly with the engine off. This method checks the uniformity of pressure in the cavities. Everything is fine. Then, when you hold your foot on the brake pedal, the engine starts. If the pedal is moved forward simultaneously with the foot, then the amplifier is operational. Otherwise, you need to make sure that the problem is this and not a problem with the tip flange or its fastening.
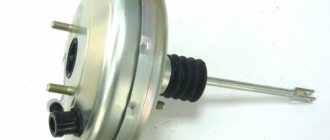
Vacuum brake booster VAZ 2110
The pedal may still not function properly due to a faulty connection of the fitting on the engine exhaust pipe to the hose. This also has a detrimental effect on the performance of the braking system and its efficiency. when the valve body does not stick.
Why does the VUT fail?
The vacuum brake booster is designed to improve the usability of the braking system. A car without VUT would brake very hard - the force transmitted to the pedal in this case would be very significant, which would affect driving safety for the worse.
The VUT is usually located directly behind the engine shield. Structurally, this element is made in the form of a non-separable metal block connected to the main brake cylinder and the brake fluid reservoir.
The vacuum sealer includes the following elements:
- Frame.
- Separating membrane (made from flexible material).
- Check valve.
- Brake pedal pusher.
- Hydraulic cylinder rod.
- Return spring.
- Follow-up valve.
The principle of operation of the vacuum seal is based on the difference in atmospheric pressure, as a result of which a vacuum is created, which ensures the formation of pressure (and at the same time the transmitted force) in the brake system.
Inside the VUT there is a diaphragm in the form of a partition. Each of the chambers (cavities) separated by a diaphragm is sealed. Moreover, the chambers are equal to each other in volume.
One of the chambers communicates freely with the atmosphere (it is called the atmospheric part), the second is connected to a hose leading from the engine exhaust pipe. On this side, a lower pressure compared to atmospheric pressure is formed. This cavity is called vacuum; it is located on the GTZ side.
The atmospheric chamber, located closer to the brake pedal, contains a reverse valve. It is designed to prevent a decrease in pressure in the intake manifold of the engine. Due to this, fuel cannot enter the VUT mechanism.
The amount of vacuum in this cavity is controlled by a follow-up valve. The vacuum chamber, thanks to the reverse-acting valve, maintains the pressure at the same level. In other words, the membrane experiences the same pressure values from both chambers. The follower valve moves through a pusher, which is connected to the brake pedal. The purpose of the spring is to ensure that the diaphragm returns to its normal state after stopping braking.
In some situations, when the car is equipped with an emergency braking mechanism, the rod is equipped with a specialized electromagnetic drive.
The braking system is designed to stop the car in various situations on the road. The safety of the driver, passengers and other road users depends on the degree of its reliability. A special device - a vacuum brake booster - will help to enhance the car's braking and prevent premature wear of the brake system.
Thanks to this device, it is not necessary to exert much force on the brake pedal, which reduces driver fatigue. The amplifier consists of several elements:
- frame;
- pusher;
- return spring;
- diaphragm;
- brake cylinder piston rod;
- follow-up valve.
The body of the device is divided by a diaphragm into two compartments (chambers) - one is called vacuum, it is located on the back of the brake pedal; the opposite chamber is atmospheric, installed directly behind the brake pedal.
To operate, a vacuum chamber requires a source of vacuum. This is often the area of the engine after the throttle valve. An alternative is a special vacuum pump. It ensures uninterrupted operation of the brake booster even when the engine is not running.
Depending on the position of the pedal, the atmospheric chamber is connected using a valve:
- When the pedal is released - with a vacuum chamber.
- When the pedal is depressed - with atmosphere.
The pusher is connected directly to the brake pedal, it transmits mechanical energy to the follower valve.
The vacuum chamber is connected to the brake master cylinder. The pressure difference causes brake fluid to be pumped into it.
The return spring is designed to return the diaphragm to its original position at the end of the braking process.
Structurally, the vacuum amplifier is a sealed round-shaped housing. It is installed in front of the brake pedal in the engine compartment. The main brake cylinder is located on its body. There is another type of device - a hydraulic vacuum brake booster, which is included in the hydraulic part of the drive.
Brake booster circuit diagram
The vacuum brake booster consists of the following elements:
- frame;
- aperture (for two cameras);
- follow-up valve;
- brake pedal pusher;
- brake hydraulic cylinder piston rod;
- return spring.
The body of the device is divided by a diaphragm into two chambers: vacuum and atmospheric. The first is located on the side of the main brake cylinder, the second on the brake pedal side. Through the check valve of the amplifier, the vacuum chamber is connected to a source of vacuum (vacuum), which on cars with a gasoline engine is used by the intake manifold before supplying fuel to the cylinders.
Vacuum pump
In a diesel engine, the source of vacuum is an electric vacuum pump. Here the vacuum in the intake manifold is insignificant, so the pump is a mandatory element. The check valve of the vacuum brake booster disconnects it from the source of vacuum when the engine is stopped, as well as in cases in which the electric vacuum pump fails.
The diaphragm is connected to the piston rod of the main brake cylinder from the vacuum chamber side. Its movement ensures the movement of the piston and the injection of brake fluid to the wheel cylinders.
When to change the vacuum brake booster
If the brake booster fails, a hiss may appear when you press the brake pedal, and the speed may also go up and then down, in addition, the brake pedal will become difficult to press (This is equivalent to the fact that the car is turned off) basically this is there are all the symptoms that indicate that the vacuum booster has failed, it does not always happen that they all appear together in the car, but a couple of them will still appear when the vacuum booster becomes unusable (the main ones most likely, namely, tight brake pedal and floating speed).
By the way, the vacuum booster can be checked for serviceability as follows: With the engine off, press the brake pedal 5 times and when the last press is made, hold the pedal to the floor, immediately after which start the car, if the pedal falls a little, this will indicate that that the vacuum booster is fully operational!
How to remove the vacuum brake booster of a VAZ 2110
We remove the vacuum booster and brake pedal assembly after removing the engine compartment upholstery, trim and windshield trim.
- Replacing the vacuum brake booster on a VAZ 2110. The reason for the replacement was that a hissing sound appeared when pressing the brake pedal, which could cause the engine to stall at any moment, the brake pedal became tight. To replace the vacuum booster, it is necessary to disassemble the rear wall of the engine compartment; remove the rubber seal (1), unscrew the upholstery (2) and remove the frill (3).
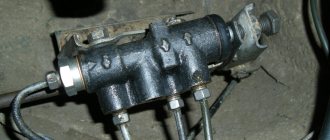
- Disconnect the block from the brake fluid level sensor, disconnect the hose from the vacuum booster, and unscrew the two nuts of the brake master cylinder.
- After that, carefully remove the main brake cylinder (without unscrewing the brake pipes) from the vacuum booster to a distance sufficient to remove the vacuum booster.
- Inside the car, under the dashboard (under the instrument panel), unscrew the four nuts and remove the wires from the frog. The most difficult thing in replacing the vacuum booster is unscrewing these four nuts, they are very inconveniently located.
- We remove the vacuum booster along with the pedal assembly.
- Remove the locking plate and push out the vacuum pusher mounting pin.
- Unscrew the vacuum booster from the pedal assembly.
- We install a new vacuum booster, pay attention to the correct installation, the pedal is at the bottom, and the hose fitting is at the top. Next we assemble in reverse order.
Step by step replacement
1. Open the hood and disconnect the connector that goes to the brake fluid float in the reservoir.
2. Now we need to remove the brake master cylinder. There is no need to unscrew the tubes.
Using a wrench and a 17mm socket, unscrew the two nuts securing the cylinder and move it a little to the side.
Be careful not to drop the nuts into the engine compartment. There are also washers installed under the nuts; don’t forget to remove them.
3. Disconnect the hose from the vacuum booster.
4. Next we go to the salon.
5. The studs from the vacuum booster go into the cabin and are screwed in with nuts, of course, in the cabin.
6. Using a wrench and a deep socket, unscrew the four nuts securing the vacuum booster.
7. Remove two wires from the “frog” of the brake light.
8. Remove the vacuum booster along with the bracket and brake pedal.
9. Next, you need to disconnect the vacuum booster rod from the brake pedal. To do this, you need to remove the lock marked below.
To remove the lock, you need to turn it and pull it towards you using pliers.
Slide it down and remove the rod.
10. After removing the rod, you need to unscrew the two nuts from the bracket itself. Don't forget to remove the washers.
11. Remove the bracket with the brake pedal from the vacuum booster.
12. Let's start assembly. We take a new vacuum booster and put it on the bracket mounting studs.
Make sure that the vacuum booster rod is level and without distortions at the place of attachment to the brake pedal.
13. We put on the washers and tighten the two nuts securing the bracket.
14. We insert the pedal fastening rod from below to the vacuum booster rod and lock it with a lock from above.
15. Put everything in place and tighten the four fastening nuts from the interior side.
16. Connect the wires to the “frog” of the brake light.
17. Connect the hose to the vacuum booster.
18. We put it on the studs and screw the main brake cylinder.
Symptoms of malfunction
- When pressing the pedal, too much force must be applied for braking to be effective.
- When you press the pedal, the engine starts to work intermittently and the speed drops.