Why Hydronic won't start
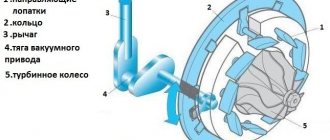
Hydronic heater circuit
Reasons for heater failure:
The Hydronic heater is a complex technical product, so malfunctions and breakdowns are inevitable.
- broken wiring, oxidation of connecting terminals in the electrical circuit of the device;
- a weak response to the power button indicates insufficient battery charging;
- the control unit blocked the heater due to exceeding the minimum or maximum threshold values of the supply circuit voltage;
- breakdown of the control unit, sensors and other parts of the device.
Hydronic starts but stalls after a minute
Diagnostics of the Hydronic heater
This is usually caused by:
- the formation of air jams in the cooling system, as a result of which the temperature sensors of the device overheat, and the control unit turns off the fuel supply;
- low quality coolant;
- disruption of fuel supply to the heater burner. In addition to disruption (clogging) of the fuel wire and breakdown of the metering pump, this can be caused by low quality fuel and excessive contamination of the fuel tank. Diesel Hydronic does not start in cold weather due to gelation in diesel fuel, so it is recommended to install fuel heating.
HYDRONIC error codes
Checking the battery charge
If the preheater does not start, and “Error” appears on the display of its modular timer, then by independently identifying the malfunction and eliminating it, you can diagnose the device. It is better to check the heater and remove errors and the malfunctions that caused them as a preventive measure. Heater error codes and brief description of the malfunction:
Diagnostics of all elements of the Hydronic heater can only be performed while it is operating.
- 011, 012—voltage thresholds exceeded. Most often caused by battery discharge, generator breakdown, broken wiring, oxidation of contacts;
- 012, 014 - overheating or possibility of overheating. Impaired coolant circulation, leakage, air pockets. Failure of the circulation pump, temperature sensors;
- 015 - controller blocked due to overheating. The reasons are the same as for errors 012 and 014. The error must be removed;
- 017 - emergency shutdown caused by overheating. The reasons are stated above;
- 020, 021 - spark plug malfunction;
- 030, 031, 032, 038, 039 — the air intake fan speed has changed. The main reasons are increased resistance to rotation due to contamination, open circuit of the fan power supply, shorted wiring, oxidation of contacts;
- 041, 042 – malfunctions related to the circulation pump and its power supply;
- 047, 048 – breakdowns in the fuel supply system associated with the metering pump;
- 050 – blocking of the control unit due to unsuccessful starts. It is necessary to delete the error after troubleshooting;
- 051, 052 - exceeding the permissible time. Failures related to the flame sensor, operation of the metering pump, air supply to the combustion chamber;
If other error codes are displayed, it is best to contact a specialist, as special tests will be required on professional diagnostic equipment. Repairing the Hydronic “brains” is an activity for electronics professionals; semiconductors can fail even from the slightest discharge of static electricity caused by touch.
Eberspacher preheaters
The company successfully produces additional heating systems and car engine heaters. Such installations are especially relevant for residents of the northern regions of Russia with a harsh cold climate. Autonomous heaters prepare the engine for easy starting, warm up the system and the interior. Drivers know that a cold start requires significant resources. Cold and viscous oil does not fully lubricate parts. Also, the engine uses a lot of fuel to warm up the system. Preheaters solve these problems using much less resources.
Eberspacher products
Devices from the Eberspächer company can be divided into two types:
- Airtronic;
- Hydronic.
The Airtronic series are air heaters. They are mainly used for heating the interior. This is a cylindrical unit with a combustion chamber inside. Fuel is supplied to the heater via a pump from the vehicle's fuel system. To maintain combustion, air is also supplied to the combustion chamber. The air blower drives it around the combustion chamber, which is then heated and supplied to the passenger compartment. Air heaters can be installed in the passenger compartment or in the engine compartment of a car.
The Hydronic series refers to liquid engine pre-heaters. This is an autonomous engine starting assistance system in cold weather, which has two functions: warming up the engine and heating the interior.
What can you do yourself?
Modular timer Hydronic
If you decide to repair and start Hydronic yourself, then start with the simplest. First, evaluate the heater’s response to the switch on command. A complete lack of response indicates a wiring problem or a blockage of the control unit, as well as a discharged battery. If the heater supply voltage was below the minimum threshold value of 10.2 V for 20 seconds, the controller was blocked. If there are no measuring instruments, the state of charge of the battery can be assessed by the operation of the sound signal, the light of the headlights when they are turned on briefly, etc. Carefully inspect all electrical connectors belonging to the Hydronic circuit. A wiring break could occur due to excessive oxidation of the contacts, which can be checked by tugging the connections to see if they break.
One of the reasons for heater failure is antifreeze leakage. Check its level in the system and visually assess the quality of the coolant.
Using a simple probe (lamp + wire), check whether voltage is supplied to the pump, metering pump, or ignition system. Assess how freely air flows into the combustion chamber and exhaust gases are removed from it. Inlet and exhaust pipes clogged with dirt, ice, and snow may be the reason why the Hydronic autonomous heater does not start. Air locks in the cooling system can be caused by a faulty valve in the expansion tank cap (or radiator neck). But this can only be established by removing the cover in advance. If the subsequent start-up is successful, replace the cover. If you have discovered that the malfunction lies in a failed part (assembly) of the heater, then the repair will be reduced to replacing the latter. Therefore, if the warranty period of the heater has not expired, and it was installed by, as they say, “officials”, then the possible delivery of the car by tow truck to the workshop will be justified - the prices for spare parts for HYDRONIC are considerable. To ensure uninterrupted operation of the device in the future, read the factory installation and operation manual for Hydronic. Most likely, a careful study of the factory requirements and recommendations will indicate to you errors made out of ignorance.
Read more: Tequila jose cuervo especial reviews
PZD KamAZ is a liquid-type diesel heater.
What is PZD
A pre-heater on KamAZ is necessary to warm up a cold engine equipped with a liquid cooling system. It also prevents glass from icing up.
Device
The device includes the following elements:
- heat exchanger;
- burner;
- air blower;
- glow plug;
- flame sensor;
- thermal safety mechanism;
- temperature indicator;
- inlet and outlet pipe;
- flame swirler and solenoid fuel valve;
- exhaust pipe;
- high pressure fuel pump and harness;
- stabilizer and fan;
- pump unit and fuel tank valve.
Technical characteristics of the engine pre-start fuse:
| Heating capacity, kW | 12+1 |
| Fuel fluid consumption, l | During operation - 1.6 |
At idle - 0.7
Principle of operation
The PZD is connected to the liquid system of the heating and cooling device of the vehicle. The system must be filled with coolant.
The heating device itself does not depend on whether the engine is running or not.
The heating device is powered by the vehicle. When the diesel engine is turned on, fuel begins to flow from the plunger-type electromagnetic fuel pump through the glow plug bushing. The fuel liquid is combined with air, which is supplied by a special supercharger. The air flow passes through the pipe. The resulting mixture begins to ignite from the hot spiral of the glow plug, after which the glow plug turns off.
The combustion process is maintained due to the continuous supply of fuel-air mixture. Hot gases heat the walls of the heat exchange mechanism. Exhaust gases passing through the pipe are released into the atmosphere.
LiveInternetLiveInternet
This manual is a guideline only and applies to the Renault Duster diesel 2012 model year. It is assumed that no technical modifications have been made to the vehicle by the installation of additional equipment that could affect the installation procedure described below. Otherwise, depending on the modification and equipment, the installation procedure may differ from that described in this manual.
INFORMATION ABOUT THE LEGALITY OF USE OF THE INSTRUCTIONS The installation instructions are valid for cars whose engine capacity and gearbox correspond to the data presented in the table. Vehicle specifications, options. Engine capacity hp/kW Gearbox 1461 cm3 109/81 Manual transmission 6
ATTENTION! These installation instructions do not apply to right-hand drive vehicles. Installation is not recommended for vehicle models not listed in this manual.
FIRST START OF THE HEATER After installing the heater, check that all wires, clamps, and electrical connections are well installed and secured. Follow the vehicle manufacturer's instructions when filling the hydronic heating system. Remove air from the liquid heating system. During the first start-up, check the fluid circuit and fuel supply pipes for leaks. If malfunctions occur with the heater during the first start-up, then it is necessary to use diagnostic equipment to troubleshoot problems.
HEATER KIT FOR INSTALLATION Qty. Name Catalog number 1 D4WS with installation kit 25 1 Bushing (plastic passage) 20 1 Corrugated hose 10 1 Fiberglass sleeve 25 Antifreeze hose 20 1690 81 0001 1 Control device* * - the control device is optional.
INSTALLATION TIME The recommended time for installing the heater is 10 n/h.
ATTENTION! This installation kit contains all the necessary equipment to install the heater on the vehicles specified in this manual.
SPECIAL TOOLS REQUIRED Torque wrench (5…50 Nm) Pliers for standard clamps Terminal crimping tool
TIGHTENING TORQUES If the tightening torque is not specified, tighten the threaded connection according to the table. Type of threaded connection Tightening torque M6 10 Nm M8 20 Nm M10 45 Nm
Save to Album
Heater installation location
Hydronic is installed behind the right headlight 1. Heater 2. Fluid pump 3. Heater muffler 4. Air intake 5. Relay 6. Fuses 7. Control unit 8. Dosing pump 9. Fuel intake
Save to Album
Preparing the car for heater installation
Remove the front bumper Remove the right headlight Remove the rear seat to gain access to the fuel pump module.
Save to Album
Preparing the car for heater installation
Remove the trim panel between the steering wheel and the left air vent to install the control device. The heater is installed behind the right headlight. Bend the upper mounting points of the heater bracket as shown in the photo.
Save to Album
Preparing the car for heater installation
To mount the heater bracket on a body element, use Z-shaped muffler mounting brackets (not included in the universal mounting kit, purchased separately). Z-shaped brackets are attached as shown in photo 8. It is possible to make them yourself from the mounting plate included in the installation kit. Secure the assembled bracket to the car body using M6 bolts and threaded bushings. Install the heater onto the mounting bracket using the special bolt from the mounting kit.
Save to Album
Air supply and exhaust gases of the heater
Install the muffler using the L-shaped bracket as shown in the photo. Secure the air intake pipe to the heater with the clamps included in the standard installation kit. Route the air pipe so that the outlet is not directed towards the vehicle.
Save to Album
Air supply and exhaust gases of the heater
From the exhaust pipe included in the standard installation kit, cut two parts in place and secure them with clamps to the muffler and heater pipes.
WARNING Due to high exhaust temperatures, keep the exhaust pipe clear of hoses, electrical harnesses, and other vehicle components. If necessary, use a thermal insulation sleeve (No. 25 1676 80 0001). The exhaust pipe outlet should not be directed towards the direction of vehicle movement, as well as components and assemblies that may be damaged by high temperatures of exhaust gases. When the exhaust pipe passes through a plastic boot, it is recommended to use a heat-insulating sleeve (20 1549 65 00 02). At the lowest point of the air pipe, it is recommended to drill a hole with a diameter of 2.5-3 mm to drain condensate.
Save to Album
Organization of fuel supply to the heater
DANGER Before installing the fuel system, remove the fuel tank cap and ventilate it. After installation, close it. Remove the fuel pump module. Disconnect electrical and fuel connectors. Drill a hole with a diameter of 8.5-9 mm in the fuel pump module, as shown in the photo. Bend the fuel intake in place, install it in the fuel pump module, having first shortened it to the required length. Given the depth of the fuel tank, it is recommended to leave approximately 25mm from the bottom. Please note that the fuel pick-up must not interfere with moving parts of the fuel pump module such as the fuel level sensor float. Install the fuel pump module back into the tank, connect the standard fuel lines and electrical connectors.
ATTENTION! The length of the fuel line must not be increased in any way! Install a 4×2 mm fuel line (blue) onto the fuel intake tube using a rubber hose. Secure the connection with clamps included in the installation kit.
Save to Album
Organization of fuel supply to the heater
Secure the dosing pump using an L-shaped bracket to the standard threaded rod. When installing the dosing pump, the permissible installation position must be observed.
CAUTION The metering pump should always be positioned with the discharge side facing up, as shown in the illustration. In this case, installation at any angle exceeding 15° is acceptable, but installation at an angle from 15 to 35° is preferable. 1. Installation at an angle of 0° - 15° is not allowed. 2. Installation at an angle of 15° - 35° is preferred. 3. Installation at an angle of 35° - 90° is allowed.
Install the fuel lines to the metering pump on the suction side (blue) and discharge side (white) using rubber hoses and clamps
ATTENTION! When connecting fuel lines and hoses, always connect them end to end to avoid the possibility of bubbles forming. 1 – correct; 2 – incorrect.
Lay the 4x1.5 fuel pressure line together with the cable harness from the metering pump to the heater. Connect the fuel line, securing the connection with clamps. The power supply harness for the metering pump can be shortened locally and connected to the connector on the heater using the crimp terminals included in the kit.
Save to Album
Connecting the heater to the vehicle cooling system
CAUTION Before connecting to the vehicle's cooling system, the coolant must be drained. When installing liquid hoses, avoid chafing. Install the liquid pump using an angle holder into the standard threaded hole using an M6 bolt, as shown in the photo. 1. Liquid pump. 2. Corner holder. 3. Fasteners.
Save to Album Schematic diagram of connecting the heater to the car cooling system.
Schematic diagram of connecting the heater to the liquid system of the car. 1. Hydronic heater. 2. Liquid pump. 3. Connecting elements. 4. Interior heater heat exchanger. 5. Car engine
Save to Album
Connecting the heater to the vehicle cooling system
Connect the heater liquid pipes to the vehicle's cooling system in accordance with the diagram shown in the figure.
ATTENTION! The direction of coolant flow must be taken into account. If necessary, it is recommended to study the technical documentation for this car model. The connection of liquid pipes should be made using brass bushings and metal clamps included in the installation kit. If necessary, use corrugated hose.
Save to Album
Electrical circuit for climate control and ventilation control.
CAUTION Wire colors may not match! Read the technical documentation for this vehicle (electrical circuit diagrams for climate control and ventilation) Legend: Relay (2.5.7) – Interior fan control relay, included in the standard heater installation kit; Fuse (2.7.5) - Fuse for the vehicle cooling system fan, included in the standard heater installation kit; (2.1) – Heater control unit;
Save to Album
Heater wiring installation
CAUTION Before installation, remove the heater fuses from the block. Install the relay block and fuse block onto the bracket included in the installation kit. Remove fuses. Connect the red (+) and brown (-) heater wires to the battery. It is allowed to connect the brown (-) wire of the heater to the standard ground connection point on the car body.
Save to Album
Heater wiring installation
Route the electrical harness for the heater control into the vehicle interior. If necessary, use a bushing. Disassemble the engine compartment mounting block to gain access to the interior fan control relay. Cut the yellow power wire of the fan relay block and make electrical connections in accordance with the diagram shown in the figure.
Save to Album
Installation of electrical wiring and heater controls
When connecting, it is recommended to use the crimp electrical connectors included in the universal installation kit.
Installation of the Minitimer control device Lay the control cable to the Minitimer installation site. Measure and cut off excess length of cable wires. Crimp the wires with the contact terminals from the Minitimer kit. Install the block from the Minitimer kit onto the contacts of the wires of the control cable from the heater. Install fuses and relays into holders.
Save to Album
Completion of installation
Connect the car battery. Install all dismantled parts. Check that all wires, clamps, and electrical connections are well installed and secured. Remove air from the liquid cooling system and check the tightness of all connections. It is recommended to fully comply with all vehicle manufacturer's instructions when filling and bleeding the liquid heating system. Secure all loose wires with fixing tapes. Follow the instructions and safety regulations contained in the technical description. ATTENTION! For the Hydronic to function correctly, before turning off the ignition, the interior heater temperature regulator must be as open as possible (High position), the air damper position must be in the “window blower” position.
This manual, instructions for installing the Eberspacher Hydronic D4 WS engine preheater (Eberspacher Hydronic 4 kW, spaced type), describes the installation process with diagrams, both electrical and circuit diagrams, that must be followed for correct installation, and subsequently normal operation of the equipment , during operation. If desired, it is also possible to install any other equipment, an engine heater that has similar technical data, for example Webasto Thermo Top Evo 4D (Webasto Thermo Top Evo 4)
Error codes
Error codes PJ 14TS:
- If the LED blinks once, then the breakdown may be due to overheating of the heat exchanger or the temperature difference reported by the overheating and temperature sensors.
- If the LED element flashes 2 times, the error may be caused by the exhausted number of engine starts.
- The LED flashing three times is a preheater malfunction due to flame interruption.
- When the LED flashes 4 times, the problem may be a faulty spark plug or blower motor.
- 5 times means the flame indicator is broken.
- 6 times are errors in the operation of the overheating and temperature sensors.
- When the LED flashes 7 times, it is recommended to check the integrity of the circulation pump, fuel cell, control relay and heater.
- If the LED flashes 8 times, it means that the connection between the control panel and the control unit has been lost.
- 9 times - the voltage was turned off or reduced.
- 10 times - exceeding the time allotted for ventilation.
Read more: Trim springs on Priora
Why doesn't it start
If the preheater does not work, the reason for this may be the following:
- The electric motor of the pumping mechanism does not start.
- The fuel liquid in the PZD boiler does not ignite.
- The fuse was turned off.
- Electric motor relay failure or switch failure.
- An open circuit that connects the wires between the relay and the electric motor.
- Malfunction of the engine itself.
- There is no spark between the spark plug electrodes.
- The overheating and temperature sensors failed.
- Disconnected or reduced voltage in the system.
- The spark plugs have failed.
- The blower motor was damaged.
- There is no communication between control systems.
- The number of engine starts has been exhausted.
- Overheating of heat exchange equipment.
- The flame indicator has failed.
- The supply pipe was damaged.
Heater control devices
Control systems are purchased separately. There are three control options:
- stationary;
- remote;
- mobile.
The stationary versions include an EasyStart Timer and an EasyStart Select control. The devices are installed inside the car. Easy and advanced controls, feedback, frost-resistant display and many other functions.
The remote devices have two key fobs: EasyStart Remote and EasyStart Remote+, which is distinguished by the presence of a timer and display. The operating range of the devices is 1,000 meters.
Mobile application EasyStart Text+
The EasyStart Text+ mobile application is available for smartphones. Communication with the device via GPS. Has all the necessary control functions.
The Eberspächer company has established itself well in the market for additional heaters for cars. These are reliable and proven devices. Any driver will find a suitable heater model for his car.
How to start
Instructions on how to start the preheater:
- Turn on the battery switch.
- Turn the valve on the fuel tank and fill the starting system with fuel fluid.
- Check the operation of the device using a special pump.
- Set the PZD switching handle to position III.
- Press the power button for the electric heating system.
- If the ambient temperature is above -40°C, then the time should be set to 60 seconds, and if -50°C and below, then 90 seconds.
- Move the switch handle to position I.
- Hold the control lever and wait for the characteristic hum in the heat exchange mechanism. This sound indicates that the burner has ignited.
- Release the lever.
If the hum is smooth, then all systems are working properly, but if not, then repair of the engine heating is necessary.
If the startup was unsuccessful, you need to move the switch to position 0 and repeat the procedure again after 1 minute. After 2 unsuccessful attempts, it is recommended to inspect the device for damage.
It is well known that Hydronic heaters are among the leaders in the market for such devices, successfully competing with Webasto and other manufacturers. At the same time, during the operation of a preheater from any company, the owner may encounter the fact that the equipment begins to malfunction during operation.
Owners are faced with the fact that the Hydronic starts up every once in a while or the Hydronic heater smokes and does not start. Considering that an autonomous pre-heater is quite complex and expensive equipment, any such malfunction of the unit becomes a cause for concern.
Any failures associated with the fact that Hydronic diesel or gasoline units do not start indicate a problem and the need for diagnostics to troubleshoot.
Next we will talk about why the Hydronic or the Hydronic preheater does not start and stalls after a minute, and also for what reason the Hydronic does not start, it says error, etc.
Read in this article
Malfunctions of engine preheaters and methods for eliminating themEngine preheaters have been installed on domestic cars for more than 10 years. Operating experience has shown that if the recommended operating rules for pre-heaters are followed, they work quite reliably and remain operational for the entire service life of the vehicle. At the same time, significant shortcomings were identified that could only be eliminated by making changes to the design of the heaters.
These disadvantages include: loss of tightness of the heater boiler due to active corrosion of the walls of the boiler made of carbon steel;
insufficient efficiency and durability of glow plugs for heaters running on diesel fuel; reduction in the quality of diesel fuel atomization of the injector at low temperatures, leading to deterioration of the ignition conditions and operation of the heater;
low reliability and durability of some heater components (for example, sealing cuffs of liquid and fuel pumps).
Currently, on most pre-heaters, these shortcomings have been taken into account and appropriate changes have been introduced into the design of the heaters and their components, in particular:
the vast majority of heater boilers are made of sheet stainless steel grade XI8H10T;
spark plugs are used as ignition devices for diesel heaters of the latest models, which have sufficient durability and reduce energy consumption and the time to ignite the heater;
To improve the quality of atomization of cold diesel fuel and prevent clogging of the injector flow sections and filters with paraffin falling out of the fuel, fuel heaters are introduced into the design of diesel heaters, providing heating of the fuel during the period of ignition of the heater and during its operation. Some gasoline heaters provide electric heating of the fuel valve during the ignition of the heater;
Frost-resistant grades of rubber with a lesser tendency to age are used as the material for the sealing cuffs.
A number of other changes have been introduced into the design of modern pre-heaters, which were discussed in more detail in the previous sections.
At the same time, during operation of the heaters, some malfunctions may occur that can be eliminated during the maintenance of the heaters. Typically, these malfunctions, the causes of their occurrence and methods of elimination are covered in detail in the vehicle operating instructions, and many of them are typical for a given heater design and a given installation on a car.
All these malfunctions can be divided into the following groups: related to the fuel supply system
heater and associated with the fuel ignition system.
The nature of malfunctions, causes and solutions for heaters operating on diesel fuel and gasoline are different due to differences in their design, so they are given separately for gasoline (Table 1) and diesel (Table 2). Moreover, the tables show those malfunctions that are not associated with breakdown or damage to heater parts not provided for in the spare parts and accessories, and can be eliminated under road conditions.
Hydronic autonomous heater does not start: possible reasons
Let's start with the fact that problems with the engine heater are usually detected with the onset of cold weather, since the device is usually not used during the warm season. Moreover, if the Hydronic does not start in cold weather, then the heater simply cannot continue to be used for its intended purpose. In both commercial and civilian passenger cars, this can make it impossible to start a cold internal combustion engine.
In such a situation, the first thing you need to figure out is whether the equipment is under warranty or the warranty period has already expired. If the heater is still under warranty, then the right decision would be to abandon any attempts to diagnose and troubleshoot problems yourself. To solve the problem, you should take the car to specialists.
If the warranty for the Hydronic preheater has expired, then you can try to identify and fix the breakdown yourself. At the initial stage, a superficial diagnosis is carried out, that is, such a check does not involve the use of special equipment. Let's move on to the possible reasons for the failure to start the heater.
- First of all, if after pressing the start button the device does not react at all, then this may indicate that the contacts in the circuit are open or have oxidized. The wiring may also be damaged.
- There is a reaction to pressing the button, but the heater still does not ignite. In this case, the cause may be a weak or discharged battery.
- If Hydronic is restarted a couple of times, but the fuel is not ignited, then fuel may not be supplied to the device. This phenomenon often occurs after the vehicle has been idle for a long time, when the pressure in the fuel supply system decreases naturally.
- An air lock may also form in the fuel line, as a result of which no fuel is supplied to the heater during the first start-up. Another cause of blockages in the fuel supply system is often a low level or complete absence of fuel in the fuel tank.
- A quick shutdown of the heater after a successful start may indicate that problems have arisen in the engine cooling system or airing has occurred. In this situation, the heater overheats, after which an emergency shutdown of the device occurs.
- Another reason for Hydronic shutdowns may be antifreeze or antifreeze in the engine cooling system. A decrease in its quality and density can lead to the heater not working. To check, just open the expansion tank and assess the condition of the coolant.
Read more: How to listen to music from a flash drive on your computer
The manufacturer recommends performing routine cleaning of the heater at least once every 24 months. It is important to remember that in some cases (for example, frequent and prolonged operation of the device, low fuel quality) the engine heater needs to be cleaned more often.
- Unsuccessful starts of the heater or malfunctions in its operation are also often caused by severe clogging of the exhaust pipe of the device. In winter, snow, ice freezing and other reasons cannot be ruled out that block the normal exit of gases from the heater. Both in the case of cleaning the combustion chamber and other unscheduled work, these cases are not covered by the warranty.
- With the onset of cold weather, summer diesel fuel tends to freeze or become waxy in the power system and filters. If problems arise with the heater on diesel engines, you should make sure that high-quality winter diesel fuel is filled into the tank.
To check, you need to fill in winter or arctic diesel, after which the power unit is started and warmed up. Next, you can start Hydronic and let it work. This approach will allow you to flush waxed summer fuel out of the system.
- It should be noted that frequent failures are caused by an air lock that can form in the cooling system due to problems with the valve in the radiator cap. This element is called a breathing valve.
If the degree of vacuum is not reduced, gases that are in a dissolved state begin to escape from the coolant. The release of these gases leads to the appearance of traffic jams, and only then the traffic jams cause failures and overheating of the autonomous heater.
In such a situation, to check, you should slightly unscrew the radiator cap and park the vehicle. Subsequent successful startup of the heater will indicate that the malfunction is related to the valve in the lid. For normal operation of the heater, the cover will need to be replaced.
Eberspacher Hydronic D10
Warmers: myths and reality
For most people, a car is an integral part of a busy business life and a faithful companion for relaxing with family or friends.
The approach of cold weather forces motorists to think about how to avoid typical “seasonal” problems: an engine that does not want to start, frozen windows, a frozen interior. Drivers focused on the quality and comfort of car operation know a reliable solution to these problems - installing an autonomous pre-heater. Doubting motorists recall various myths associated with the operation of autonomous heaters. We will try to figure out whether there is truth in them.
Myth 1
The heater drains the battery.
Let's consider the process of starting a car in cold weather. The average battery capacity is approximately 60 A/h. When the air temperature outside is -15C and below, the battery capacity drops by about 15-20%, in fact we get 45-50 A/h. To start a warm engine, about 15 A is required. The current consumption of the Eberspacher heater is minimal, and over the entire operating cycle of the heater it is about 1.5–3 A. Approximately 42-47 A/h remains. This is more than enough to start the engine. When starting a cold engine, the resistance and starting currents are much higher, and the starter is more likely to fail when cranked, and engine wear also increases.
The battery density will not be enough to start the engine even if the driver does not use the climate control system of his car correctly - when the standard “stove” is turned on, it “sucks” about 10–15 A. Experts recommend doing this: set the maximum temperature at minimum speed “ stoves”, and also operate the car for at least half an hour after the heater has been operating.
Conclusion: a warm engine requires much less electricity to start than a cold one.
Myth 2
The heater “eats” a lot of fuel.
For the cargo segment, the economic effect of using Eberspacher heaters is calculated using special programs, where initial data is entered on idle periods, engine idling, diesel fuel consumption, etc. As many years of experience have shown, all heaters reach the payback point after the first season of operation , i.e. for 5-6 winter months. For the passenger segment, calculations are based on the personal experience of each car owner. On average, during a night of operation, an engine with auto-start, when turned on regularly, “eats” about 3 liters of fuel. The Eberspacher Thermo Top heater only needs to be turned on once, just before the trip, even if the car has been parked in the cold for a month. During a half-hour standard cycle at maximum temperature loads, it consumes only about 200 g of fuel.
Conclusion: the heater and a warm engine together consume less fuel than a cold engine with automatic start.
Myth 3
The heater may cause a fire.
Over the 100 years of the brand’s existence, not a single case of a car fire due to a low-quality Ebespecher product has been recorded. Eberspacher heaters meet the most stringent fire safety standards. An interesting fact: at the stand of the manufacturer in Germany there is a heater that has been operating continuously for 40 (!) years - this is how the quality of the alloy from which it is made is tested.
The product is fully certified in Russia and has the approval of the Russian Gosstandart. The reliability of the equipment is indicated in the warranty card in Russian. Problems can only occur if the pre-heater is installed incorrectly. That is why all craftsmen involved in installing Eberspacher undergo mandatory training every two years. Installers usually display certificates of completion of specialized training near their workplace.
It is important to understand that a certified Ebespecher product is not only a branded heater, but also its high-quality installation. The company is very attentive to the quality of its product and accompanies it right up to installation, and carries out further diagnostics during operation. Be careful when choosing an installation center.
Conclusion: the use of the Eberspacher heater is absolutely safe when installed by a certified product in a certified center by trained technicians.
Myth 4
The heater is only useful on very cold days, of which there are few. And in general, my car is in a warm garage, I don’t need a heater.
It is advisable to use a heater from the day when the morning temperature drops below +5C. And even in the European part of Russia there are more than two hundred such days a year, to say nothing of the Ural climate. And even if you park your car in a warm garage at night, during the day you still leave it in the open air - near an office, a store, a restaurant, when you come to visit or go out into the countryside. And in all these cases, the Eberspacher heater will be indispensable. You can also use the heater in an unheated garage if it is equipped with an exhaust hood. By the way, according to company statistics, more than half of the owners of Eberspacher heaters have garages.
Conclusion: a heater will be useful in any situation.
Thus, the benefits and safety of the Eberspacher installation are obvious. Preheaters create comfort when operating a vehicle in unpredictable weather conditions and significantly save the driver’s time.
For installation in passenger cars, a series of Thermo Top heaters has been developed for gasoline and diesel engines with a volume of up to 2 liters or more. You can get recommendations on choosing and installing a specific model from our managers.
For most people, a car is an integral part of business life and a faithful companion on vacation. The approaching cold weather is forcing motorists to think about how to avoid typical “seasonal” problems, when the engine does not want to start, and the driver has to sit in a frozen cabin with frosted windows.
Car owners, focused on the quality and comfort of car operation, have already found a reliable solution to these problems - they install pre-heaters. Doubting motorists recall various myths associated with the operation of autonomous heaters. We continue to figure out how true these stories are.
Myth 5
When installing a heater, interference occurs in the operation of the vehicle and its systems.
The Eberspacher product is called “autonomous” because it is installed without interfering with the car’s complex electronic systems (such as an immobilizer, etc.). Also, the car owner can install additional security devices of any complexity - Eberspacher does not interfere with their operation in any way.
The heater is installed in the engine compartment and is connected to three vehicle systems: fuel (fuel is supplied by a separate pump through the fuel intake from the vehicle tank), cooling system and to the on-board network (battery). Thanks to the compactness of Ebespächer heaters and a wide range of installation positions, their installation is simplified as much as possible. When the device is installed in a certified center, the car itself remains under warranty.
Conclusion: when installing Ebespecher autonomous heaters, interference in the vehicle systems is minimal.
Myth 6
It is cheaper to install an alarm system with auto start, because the result will be the same.
Firstly, autostart significantly reduces the car’s protection against theft, which is why many insurance companies have begun to add extra charges when insuring a car with such an alarm system. Secondly, unlike Eberspacher, when autostarting, the engine starts cold, during which the piston group, converter, lambda probe and spark plugs wear out greatly. To put it simply, the engine “shudders when cold.” Over the course of a season, this is comparable to wear and tear from running an additional few tens of thousands of kilometers. Often the autostart is set to turn on automatically when the temperature in the circuit drops to a certain value, which leads to repeated starts while the car is parked. This negatively affects the systems that maintain the operating temperature of the engine and requires high fuel consumption (we remind you that the Eberspacher heater consumes a little more than half a liter of fuel per hour of operation). It also increases the likelihood of quickly draining the battery. Finally, autostart does not guarantee starting the engine in severe frost.
The operating principle of the Eberspacher heater is completely different. It turns on once immediately before the trip, warming up the engine and the standard heating radiator (“stove”). The driver sits in the warm interior of the car and starts the warm engine.
In addition, if an engine breakdown occurs, for example, on the highway in winter, then thanks to the Eberspacher connected to the standard heating system, the cabin will be warm. And the driver and passengers will be able to wait for help without fear of freezing and getting sick in the cold. This is another difference from autostart, which in such a situation with a broken engine is absolutely useless.
Conclusion: unlike Eberspacher heaters, alarms with auto-start, due to a different operating principle, significantly reduce engine life during cold starts and do not guarantee starting at very low temperatures. The main function of the alarm should still be to protect the car from theft.
Myth 7
The engine cannot operate simultaneously with the heater. Otherwise it will overheat.
Simultaneous operation of the engine and heater is possible, and in some cases even necessary. For example, when a car with a diesel engine drives along a highway in cold weather, the engine quickly cools. The driver turns on the Eberspacher, and it works as an after-heater, raising the temperature of the internal combustion engine and thereby preserving the battery charge. This, by the way, is another undeniable advantage compared to autostart - the latter does not provide additional warm-up.
The heating process is regulated automatically: when the temperature in the circuit reaches a threshold, the heater operates at partial load, temporarily turning off if the liquid temperature exceeds the set one. Antifreeze (antifreeze) heated to the required level circulates, thus preventing engine overheating.
When installing a heater, professional craftsmen also strictly ensure that the fluid circulation circuits in the heater and in the engine are aligned. Violation of this technology can actually cause the heater to overheat. But this is only possible if the installation was carried out by an unqualified technician who was not trained at Ebespächer.
Conclusion: the Eberspacher heater and the engine can operate simultaneously, and with professional installation of the heater, engine overheating is excluded.
Myth 8
A heater is too expensive.
The benefits of the Eberspacher heater are incomparably greater than those of various heating devices (for seats, steering wheels, windows, etc.). After all, it guarantees engine starting in any weather and preserves its resource. When installing Eberspacher, the load on the battery is also significantly reduced. If you don’t change your car once a year, the heater will pay for itself in a couple of seasons. This is possible due to lower fuel consumption during Eberspacher operation compared to regular starts and operation of a cold engine during autostart (see “Myth 2”) and savings on repairs. Well, the health and safety of the driver is, in principle, priceless.
Conclusion: installing an Eberspacher heater fully pays for itself due to saving engine life and reducing fuel consumption at start-up. In addition, the health and safety of the driver and passengers is more valuable than any money.
Thus, the benefits of installing Eberspacher are obvious. Preheaters significantly save both engine life and driver time, ensuring reliable and comfortable operation of the vehicle in any weather conditions.
Note to motorists
Eberspacher heaters are manufactured and completely assembled at the plant in Germany. The product is certified in Russia and approved by the leading institute for auto certification in Russia.
Self-diagnosis function Hydronic
The causes of starting problems or malfunctions during operation can also be diagnosed using the heater timer. The timer has a useful function that consists of recording and storing errors in the memory of this element.
As a result of such actions, error codes are displayed on the screen. The device is capable of recording up to 5 such codes. To view the entire list, click on the button with the arrow pointing to the right. After reading the Hydronic errors, you should look at the technical manual or other sources for options for deciphering the codes. In some cases, this helps to quickly localize the problem and fix the problem.