Nissan Pathfinder fuses and relays
The full-size crossover Nissan Pathfinder has been produced since 1986 in 4 generations.
1st and 2nd were produced until 2003. In 2004, 2005, 2006, 2007, 2008, 2009, 2010, 2011, 2012, 2013 and 2014, the 3rd generation Nissan Pathfinder labeled r51 was supplied to the markets. And from 2020 to the present, the 4th generation is in production. We suggest that you familiarize yourself with the description of the fuse and relay blocks of the Nissan Pathfinder R51 (3rd generation) and 4. Their photographs, diagrams, locations. We will also show which of the elements are responsible for the operation of the cigarette lighter. Depending on the region of delivery, year of manufacture and configuration, various versions of these blocks are possible.
Nissan Primera P12 fuses
In Nissan Primera cars of the first – third generations, the standard location of the fuse mounting block is identical.
Except for the pre-installed right-hand drive.
In this modification, the protective modules are located to the right of the steering column.
Where are the fuse boxes located:
- Main: inside the car, to the left of the steering wheel;
- In the engine compartment: to the left of the battery;
- Under the hood, to the left of the cooling system expansion tank.
Protective modules are placed in plastic cases to protect against moisture, dust, dirt, and condensation.
Considering the large number of fuses in each of the blocks, the location, markings, pinouts, and decoding are marked on the back of the cover.
The process of identifying and replacing a faulty module is not complicated, but requires care on the part of the repairman. Violation of installation technology can contribute to premature wear of equipment.
Description of fuses: location, diagrams, price
In all three generations of Nissan Primera P10, P11, P12, knife-type protection modules are preinstalled.
Layout of relays - switches
DesignationWhich is responsible for what/what provides
| K 1 | Headlight |
| K2 | Throttle valve |
| K 3 | Window lifters |
| K 4 | Rear fog lights |
| K5 | Ignition |
| K 6 | Fuel equipment |
| K 7 | Electrical equipment |
| K 8 | Reservation |
| K9 | Reservation |
| K 10 | Reservation |
| K11 | Reservation |
| K 12 | Stop signals |
| K 13 | Backlight |
| K 14 | Interior lighting |
| K 15 | Reservation |
| K 16 | Reservation |
| K 17 | Reservation |
| K 18 | Electronic powertrain control unit |
Fuse installation diagram
Marking / amperageWhat it is responsible for (with description)
| F (F-1) / 20 | Speedometer, tachometer, gauges |
| F (F-2) / 5 | Exchange rate stabilization system |
| F (F-3) / 10 | ABS |
| F (F-4) / 10 | Reservation |
| F (F-5) / 20 | Reservation |
| F (F-6) / 30 | Glove compartment lighting |
| F (F-7) / 30 | Heater fan (stove) |
| F (F-8) / 20 | Air conditioning system |
| F (F-9) / 10 | Fuel system, fuel pump |
| F (F-10) / 10 | Safety system |
| F (F-11) / 10 | Reservation |
| F (F-12) / 10 | Powertrain sensor |
| F (F-13) / 30 | Side mirrors |
| F (F-14) / 30 | Stop signals |
| F (F-15) / 10 | Car socket |
| F (F-16) / 15 | Additional electrical network |
| F (F-17) / 15 | Hazard warning lights, turn signals |
| F (F-18) / 20 | Reservation |
| F (F-19) / 20 | Heated rear window |
| F (F-20) / 20 | Oxygen sensor |
| F (F-21) / 20 | Reservation |
| F (F-22) / 20 | Window lifters |
| F (F-23) / 20 | Automatic transmission controller |
| F (F-24) / 20 | Oven heater, cigarette lighter, interior lighting |
| F (F-25) / 15 | Reservation |
| F (F-26) / 15 | Reservation |
| F (F-27) / 20 | Reservation |
| F (F-28) / 15 | Car horn |
| F (F-29) / 15 | central locking |
| F (F-30) / 20 | Reservation |
| F (F-31) / 15 | Electrical power system |
| F (F-32) / 20 | Windshield wipers |
| F (F-33) / 20 | Headlight washers |
| F (F-34) / 20 | Rear window washer |
| F (F-35) / 20 | Fuel equipment (optional) |
The price of the original mounting block for the Nissan Primera P12 assembly starts from 3,500 rubles, analogues from 3,000 rubles. Relays - switches priced from 550 rubles.
Signs of faulty fuses on a third generation Nissan Primera
- An indicator on the dashboard indicates a breakdown of mechanisms and equipment in the engine compartment;
- Power units do not operate when current is supplied or modes are activated;
- The fuse box is hot to the touch, with a clearly uncharacteristic temperature;
- The smell of melted plastic can be heard at the location of the protective modules.
Causes of fuse failure
- Violation of the terms of technical inspection of the vehicle, as a result of which the equipment ceases to function properly;
- Purchase and subsequent installation of non-original spare parts;
- Violation of the technology for installing spare parts and components;
- Damage to the mounting block with protective modules;
- Short circuit in electrical wiring;
- Damage to cable insulation;
- Oxidation of contacts, condensation, moisture ingress into the protective housing;
- Loose terminal contacts.
Replacing fuses on Nissan Primera P12
Preparatory stage:
- Flat head screwdriver;
- Additional lighting;
- A set of new relays - switches, fuses;
- Tweezers for removing melting elements.
Sequence of actions when replacing modules in the cabin:
- We place the car within the perimeter of the repair area, block the rear row of wheels with wheel chocks, and squeeze the parking brake;
- Left-hand drive: open the driver's door, a mounting block is installed to the left of the steering column, remove the cover;
- Using the serial number indicated on the back of the cover, we find the module. Using tweezers, remove it from its original place and replace it with a new one.
To replace the entire mounting block, you must additionally unscrew the two mounting screws that secure the board to the torpedo body.
Replacing fuses in the engine compartment of a third generation Nissan Primera (P12):
- Turn off the ignition, squeeze the parking brake on the Nissan Primera P12, open the hood;
- On the left behind the battery there is a black plastic case; we snap off the cover;
- By serial number we find the fuse, relay - switch. We remove it, replace it with a new one as necessary, and carry out preventive maintenance.
Fuse Maintenance Recommendations
Nissan Primera P12
- After driving through puddles or in the rain, check the mounting block for moisture. Dry, blow with a stream of compressed air as necessary;
- Buy spare parts and consumables mainly from certified points of sale, official representative offices, dealer centers;
- Check the functionality of the fuses with special equipment - a multimeter.
The average service life of fuses, relays - switches on the Nissan Primera P12 is 55 - 60 thousand km.
Source: https://zapchasti.expert/predoxraniteli/predoxraniteli-nissan-primera-p12.html
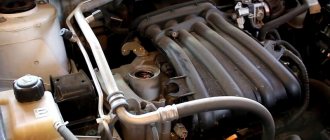
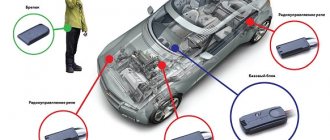
Fuse and relay blocks under the hood
For r51
Photo
For 4th generation
Video example of where the fuse boxes are located in a Nissan Pathfinder.
Relay block
Photo diagram
Fuse blocks
Current diagram from the back of the protective cover
Description in Russian
- 20A FR FOG LAMP - front fog lamp
- 10A ABC ECU - ABS electronic control unit
- 10A A/T ECU - automatic transmission electronic control unit
- 15A FUEL PUMP - fuel pump
- 15A RR DEF - heated rear window
- 15A RR DEF - heated rear window
- 10A DTRL - daytime running lights
- 15A HEATED MIRROR - heated mirror
- 10A A/C COMP - air conditioning compressor (activation of the electric clutch of the air conditioner)
- 15A H/LAMP LO RH - low beam, right headlight
- 15A H/LAMP LO LH - low beam, left headlight
- 30A FR WIPER - windshield wipers
- 10A H/LAMP WASH - headlight washer
- 10A TAIL LAMP - tail lights
- 10A ILLUMINATION - interior lighting
- 10A H/LAMP HI LH - high beam, left headlight
- 10A H/LAMP HI RH - high beam, right headlight
- 15A FR BLR MTR - front heater electric motor.
- 20A POWER SOCKET - additional 12 Volt socket
- 10A AT CONT UNIT - control unit
- 15A FR BLR MTR - front heater motor
- 30A. PTC HTR - electric heater in the stove (diesel warms up slowly, for comfort they use electric heating in the stove)
- 15A HORN - signal
- 20A RADIO AMP - power supply for radio/audio amplifier
Fuel system
Fuel tank, Water level sensor, Fuel level sensor, Tank vent valve, Fuel tank button, Fuel tank cap, Fuel neck, Fuel pump, Fuel pump, Fuel pump strainer, Fuel pump gasket, Fuel pump relay, Fuel injector, Injector ring, Throttle valve, Sensor throttle valve, Throttle pipe, Idle air regulator, Air receiver, Throttle valve heating tube, Turbine (turbocharger), Turbine gasket, Solenoid valve, Injection pump, Injection pump valve, Compressor, Compressor gasket, Carburetor, Fuel rail (rail), Fuel pressure regulator , Fuel line, Fuel valve, Fuel hose, Fuel pipe, Air flow meter, Engine control unit, Air pipe, Intake manifold, Intake manifold gasket, Additional air pump, Fuel pump, Gas pedal, Potentiometer, Throttle cable
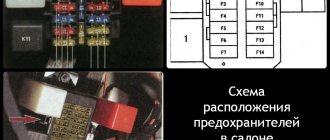
Block in the cabin
It is located in the instrument panel, behind the protective cover. If you have any difficulties, check out the video just above.
Option 1.
Purpose
Option 2.
Diagram from the back of the cover
The fuses located in this block are responsible for the operation of the cigarette lighter; see which ones in your diagram. In English they mean cigar lighter. If they are intact, pay attention to the fuse under the hood.
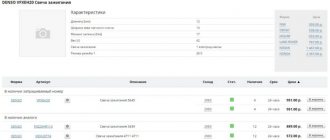
Cigarette lighter fuses under the hood
How to remove the cigarette lighter
In some situations, replacing the fuse does not solve the issue with the functionality of the cigarette lighter in the vehicle. The cause may be faulty wiring, burnout of the thermal spring in the device itself, or oxidation of the cables. To eliminate any of these faults, it is necessary to dismantle the device.
This can be done in several steps:
- Disconnect the negative terminal from the battery. This will help avoid short circuits and breaks in the electrical network. Additionally, you can pull out the cigarette lighter fuse.
- Remove the gear selector cover.
- Pull back the panel above the pocket in the center console.
- Remove the cup holder and the pocket itself.
- Remove the retaining bars using a screwdriver.
- Unclip the cigarette lighter bulb.
- Using a straight screwdriver, pry and pull out the socket socket.
This manual is suitable for Nissan X Trail T31, Teana, Tiida, as well as Nissan Sentra (Sunny, Almera).
DIY repair
You can repair and replace the device yourself, without involving a specialist. First of all, check the functionality of the fuse. To do this, you need to pull out the corresponding element from the mounting block, inspect it for damage and additionally check it with a multitester. The part is replaced using special tweezers.
The second step is to check the contacts connecting the device to the electrical network. It is necessary to inspect them and exclude the presence of breaks, creases and worn areas. After this, all sections of the circuit need to be tested with a multimeter. To repair damaged areas, use a soldering iron, electrical tape, tin and rosin.
Another common problem is the thermal spring burning out. This happens when the cigarette lighter is used as a socket for other car devices that have more power. Repairs in such a situation cannot be performed; the device must be replaced with a new one.