I drove like this for a long time, especially since it was warm and I was happy about the silence of the stove, but severe cold came and I began to lack warmth, or the car, or rather the interior, did not have time to warm up, after surfing the Internet I decided to go in two ways to increase the heating of the interior , the first is the installation of a pump from a gazelle, the second is the installation of a Chevy Nivovsky thermostat, it seemed to me that it would be easier to install the pump, especially since some procedures could be carried out at home in the warmth. So: a pump from a gazelle was purchased (disassembled on the same day and coated with sealant), because... I’m not a pioneer, I read from articles on the Internet that there are two samples of pumps, 16 mm pipes and 18 mm, I was going to leave the original pipe near the engine, and it’s just 16 mm, and returning to the original design in case of anything would not be difficult.
As a result, when the heating is turned on, another pump is turned on, consuming only 1.5 A in operating mode.
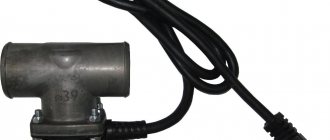
Installing an additional pump on a VAZ 21074 injector
Info
But you shouldn’t block the intense stream either, as in this case a lot of antifreeze will be lost. To allow air to escape from the channels when filling in fresh antifreeze, you should disconnect the thin manifold heating pipe (on the carburetor version of the engine). On an injection engine, such a tube is connected to the throttle body.
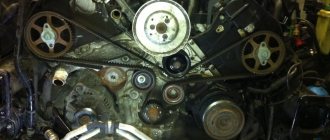
For further work, it is necessary to remove the generator drive belt. To do this, use a 17mm wrench to unscrew the tension fixing nut (located on top of the unit’s mounting bracket) and push the generator housing towards the crankshaft with a pry bar.
For easier access to the nut, you can disconnect and remove the battery.
For further work, it is necessary to remove the generator drive belt. To do this, use a 17mm wrench to unscrew the tension fixing nut (located on top of the unit’s mounting bracket) and move the generator housing towards the crankshaft with a pry bar.
Lada 2107 Movil-mobile › Logbook › Installing an electric pump in the heating system of a VAZ 2107
Briefly about why an additional pump is installed - before the large circle is opened, the coolant flows through the pipes by gravity without much pressure. Accordingly, less pressure means less wheel speed. The coolant reaches the stove more slowly. With an additional pump, you can increase the pressure already when the car begins to warm up. Accordingly, the heat in the cabin becomes a little earlier. I read from many people in the blog that it starts to heat up from the first minute, and as a result the temperature in the cabin is +20 degrees higher. It turned out like this for me - if you turn on the pump right away, it will still be cold. But if you wait until the needle rises to the beginning of the white zone (about 50 degrees), and then turn it on, it immediately starts blowing warm. In short, we start, warm up the car for a couple of minutes, as soon as the needle rises from minus, turn on the pump. Next, about the installation. What was needed: 1) Additional heater pump for 16mm TRUCKMAN; 2) 1 meter of 16mm hose; 3) Meter 3 wires; 4) Button 2 contacts; 5) LED indicator lamp; 6) Female terminals, round terminals (for negative); 7) 4-pin relay and socket for it; Mounted fuse.
To begin with, I took two pieces of 16mm hose, 50 cm each, and put them on the inlet and outlet of the pump. I tightened it with clamps, and put another clamp on the hose right away, so as not to forget later. Then I started looking for a place under the hood where to attach the pump. The easiest way was to attach it at the top, on the arch, on the side of the battery. But then I realized that the pump would be higher than the radiator, and there would be air pollution. Therefore, I lowered it down to the starter area. I had to suffer, screwing it to the body with a self-tapping screw, because... There's not much space there, and you can't really move around.
Next, I managed it without draining the antifreeze. I removed the hose from the OUTLET of the stove, clamped it with my finger so that the antifreeze did not leak out, and quickly put the hose on the INLET of the pump. Next, I removed the hose that goes to the block and put the hose from the pump outlet on it. I tightened the clamps and everything was ready.
Next up was the electrics. I did it according to this scheme:
On the console I found a plug for some button, drilled two holes, and between them with a knife I cut a place for the button. And next to it I drilled a hole for a light bulb and inserted it there. Diode light bulb from Aliexpress. Now that the pump is turned on, the light is on, and it will be very difficult to forget to turn it off. If I described the process at all incomprehensibly, I can make a video.
source
Installing an additional pump on a VAZ 21074 injector buy
New tax changes for simplified people
How to enter a delivery address in Leroy Merlin
Procedure for issuing SNILS
Return rule for registered mail
In what cases does the transport inspectorate check?
Check the drug by series
Before pouring, it is better to strain the old liquid through a fine brass mesh. Pour the antifreeze carefully so as not to stir up the sediment at the bottom of the container.
The system is first filled with fresh antifreeze through the radiator filler neck. Pour in antifreeze slowly, observing the tube removed from the manifold heating block (in an injection engine - the throttle valve).
As soon as liquid flows from the tube, immediately put the pipe on the fitting and secure it with a clamp. The remainder of the antifreeze is carefully poured into the expansion tank to the required level (between the Min and Max marks).
When finished, close the radiator and reservoir caps and start the engine. After warming up to a temperature of 80-90 ° C, inspect the front part of the engine for leaks and be sure to wait for the cooling fan to turn on.
How to install an additional pump
Installation of an additional pump on a VAZ stove can be done in the engine compartment or under the interior panel. The first option is preferable, since in this case the sound of the pump does not enter the interior, and there is also no risk of flooding the interior with antifreeze if it leaks. Depending on the installation location, the unit can be mounted at the mounting location of the standard engine compartment sound insulation or on additional brackets.
The installation of an additional water pump on the VAZ-2110 and other models of the domestic automobile industry is carried out on the heater supply pipe. In this way, it is possible to achieve a more active injection of coolant into the “furnace” radiator and increase heat transfer.
Note: increased pressure in the cooling system can lead to failure of poorly secured pipes or breakdown of the radiator. Therefore, before installing additional equipment, it is recommended to conduct a complete diagnostics of the CO.
Before installing an additional pump, the antifreeze is drained. After this, the pipe at the intended installation site is cut in half using a sharp blade, and the resulting ends are put on the pump outlets. It is important to ensure that the arrow drawn on one of the outlets, indicating the direction of fluid circulation, is directed towards the radiator. The pipes placed on the outlets are secured with clamps. It is better to use Norma brand screw clamps, since products from lesser-known brands often have sharp edges and cut the pipe.
The connection diagram to the on-board electrical network may vary depending on what goals the car owner sets for himself. If the pump is installed for more efficient cooling, it makes sense to connect it in such a way that it runs constantly when the ignition is on. The unit can be connected directly from the battery, but the circuit must be closed using a relay, which is activated after turning the start key.
If you plan to install an additional pump in the heating system to improve the operation of the stove at XX, it is better to connect it through a button. In this case, the power circuit will include a relay, a fuse, a pump button and a battery. Electricity is supplied via a single-wire circuit. The “minus” in this case is the car body. Using this scheme, the car owner gets the opportunity to turn on the pump only when there is a need for it. Note: it is better to install an additional pump using a second power supply connection scheme, since in extreme cold, its prolonged operation can lead to underheating of the motor and related malfunctions.
Installing an additional pump on a VAZ 21074 injector video
When driving from work (less than 10 km), the interior does not have time to warm up and most likely this is why it feels cold, although I repeat the air blows very hot. The car warms up very quickly, I mean the engine, apparently the installation of the pump has an effect (when warming up the heater+pump+light is always on, perhaps the load on the generator also gives this effect), and thirdly it seemed to me that the engine became warmer in the cold when the pump was on, I have only one explanation: with the rapid circulation of antifreeze through the stove, it does not have time to cool down much, thereby making the overall temperature of the engine higher; according to the BC, the temperature at any outside temperature does not fall below 85 degrees, although according to my observations it previously did not rise above 82-84 degrees .
Why is it necessary to use an additional pump in the engine cooling system?
Owners of the VAZ 2110 probably notice that hot air comes from the dampers only when the car’s engine speed reaches 2000 rpm. And when the car is only idling, the car interior only receives warm air from the fan. The whole point is that the rate of circulation of antifreeze through the cooling system will directly depend on the size of rotation of the standard pump. The faster the circulation, the higher the temperature of the tubes located in the heater radiator.
This problem can be solved by using an additional pump, which is a special mechanical device that accelerates the movement of coolant. Installing a pump for the heater provides an excellent opportunity to maintain the temperature in the cabin even when the engine is idling.
Perhaps, at first glance, it may seem that such a makeshift system could only be invented and implemented by ordinary garage craftsmen who simply wanted to make their lives easier with its help. But in reality, this technology has been used for a long time and quite successfully even by such global automotive giants as Mercedes Benz or BMW.
Installing an additional pump on a VAZ 2107
Since all work is carried out from the engine compartment, an inspection hole is not required for work.
The following tools will be required:
- set of spanners and sockets;
- flat screwdriver;
- mount;
- cloth gloves and rags.
In addition, you will need high-temperature sealant and 1 liter of coolant for topping up. To drain the coolant, you need to prepare a 10-liter container with a wide neck (a plastic basin or a canister cut off on the side) and a meter-long piece of ordinary hose.
To avoid getting burned, all work should be carried out with the engine cool.
Dismantling the pump
On classic VAZ models, to remove the pump, you do not need to rotate the crankshaft, align marks or disassemble the timing drive, as is done in front-wheel drive cars.
What is needed to install a new pump on a car?
Alas, many cars, regardless of the manufacturer, do not withstand any criticism in the harsh Russian conditions in matters of interior heat supply. Simply put, the performance of the stove does not live up to the expectations placed on it, and in the car, even with a big minus outside, it is simply cold. But it turns out that everything can be fixed, and with our own hands. The main thing is to have a head on your shoulders and instructions for use.
Modernizing a car's heating system involves installing an additional electric pump. Let's look at the example of the tenth VAZ model, since most often the owners of these cars complain about the lack of sufficient heat in their cars, especially when the engine is idling. To carry out the operation you need:
1. Electric pump from Gazelle. It is this model that is better suited to this role of an additional heat pump into the cabin. It is a simple centrifugal pump in which the fluid flow is rejected from the center to the periphery by means of blades.
2. Relay. It is best to take the starter or ignition relay, where the contacts are best open.
3. Small pieces of aluminum and reinforced hose.
4. Coolant in a volume of at least two liters.
5. Clamps, six pieces are enough.
Installing an additional pump on a VAZ 2107 injector
To replace the plastic impeller you will need:
- Having secured the shaft on the reverse side in a yew, use an M18 tap with a pitch of 1.5 mm to cut the threads inside the impeller, having previously lubricated the tool with engine oil.
- Screw a special puller into the hole and tighten the outer bolt.
- By rotating the head of the inner bolt clockwise, press out the impeller and remove it from the shaft.
- The metal impeller has threads cut from the factory, so the part is simply pressed out with a puller.
When reinstalling, the part is pressed onto the shaft using a hammer and a suitable attachment, avoiding damage to the blades. You need to make sure that the lower part of the impeller rests against the ring on the oil seal, after which it needs to be seated 2-3 mm inward.
Signs of a faulty water pump on a classic
The pump on a VAZ is a very important detail. It largely depends on it whether the car will heat up or not. Needless to say, element failure is an unpleasant thing, but it also has its advantage. Thus, a failing part always gives a sign to an experienced driver, who must be able to recognize the main signs of an impending breakdown.
First of all, let's look at the signs of deteriorating pump bearings. Albeit insignificant, but excessive play of the drive pulley is already a reason to think about it. Also, rustling, howling, roaring and other characteristic sounds of worn-out bearings should alert the driver.
Experienced motorists make an interesting comment on the sounds. The engine, they say, does not creak, but knocks or makes noise. On the contrary, everything that squeaks or creaks are characteristic signs of a generator, rollers or pump. A howl indicates that the timing belt or alternator belt is overtightened.
This is interesting: How to replace the crosspiece on a VAZ-2105 yourself
If you don’t pay attention to these signs, then after several tens of kilometers the car’s run, coolant may begin to leak, although this is not an axiom, because there are so many examples when there was no leakage when the pump completely collapsed. It is better to focus on noise: the grinding noise of bearings will only intensify over time, and it will be impossible not to notice it.
As for leakage, it depends more on the quality of the seal. It is located in the pump and is designed to ensure tightness. Liquid can come out of the drain hole if it is provided on the pump (depending on the pump model - there are ones with or without holes). Over time, the leak will only get worse if replacement measures are not taken.
You can check the bearing visually:
- stick your hand in and grab the pump pulley;
- move it back and forth;
- if even a slight play is observed, this means that some wear of the bearings is present.
However, if there is no whistle and the play is very insignificant, then the pump will continue to run for some time. You can remove the alternator belt and check the pulley like this. This will allow you to better feel the free play.
Thus, as long as there is no specific grinding noise, and there is no critical release of antifreeze to the outside, you can drive. From the first sign of rustling or faint whistling to complete failure, it is possible to travel another 1000–6000 kilometers. Here, depending on your luck, there are no magic tips.
On the other hand, and this must be taken into account, the pump can fail much earlier, before reaching the grinding stage. Everything can happen quickly and unnoticed by the car owner, and you should not wait until the noise level increases to replace the pump.
It is important to understand that there is such a breakdown of the water pump that there will be no loss of antifreeze or noise at all. And the engine will boil. For example, this happens when a plastic impeller moves away from the shaft. In fact, the shaft is spinning as before, but the impeller is inactive and just dangles. At the same time, the stove will stop heating.
There is another option for the motor to overheat. The pump is in good condition, new. However, in hot weather or in difficult off-road driving conditions, in traffic jams at traffic lights, the fan often turns on and the engine begins to heat up. This happens due to a mismatch in the design features of the pump: for example, if an impeller of a smaller size than necessary is installed inside (on older models of the pump, the impeller is equipped with small blades that may not be able to cope with the cooling of a more powerful engine).
If the owner has a choice when purchasing a new pump, then it is better to give preference to models with a larger impeller.
Pump impellers: small (left) and large
A large gap between the impeller and the pump body can also cause insufficient antifreeze flow through the cooling system. The gap should be no more than 1.5 mm. This deficiency is especially pronounced at idle speed, in traffic jams.
The gap between the impeller and the pump housing should not exceed 1.5 mm
Original methods for diagnosing the operation of a pump were found in one automobile magazine.
- You need to take several clean sheets of white paper and lay them out under the car in the evening. In the morning, check the paper; if it is wet, with traces of greenish liquid, it means the pump is leaking.
- Turn on the interior heater at full power. If the arrows of the water temperature indicator shoot up sharply, stop the machine. Check by touch the condition of the cooling radiator after stopping the engine and the condition of the pump drive belt. If the elements are too hot, there is something wrong with the pump.
- Open the hood of the car. If there is a clear smell of coolant, this indicates a pump malfunction.
- The engine switches to idle mode. Then you need to pinch the upper pipe of the pump with your finger. If the pump is working, a slight push of liquid is felt.
Oil seal leak
It is quite easy to detect coolant leakage through the oil seal: a puddle usually appears under the car. If the sealing element is damaged, for example, as a result of wear, antifreeze will get to the pump bearing, as a result of which the lubricant will be washed out of the device, and the part itself will soon collapse. To prevent this from happening, it is necessary to periodically inspect the car and eliminate possible problems.
If the oil seal fails, antifreeze leaks from the pump.
Appearance of noise
If extraneous noise is heard from the pump area while the engine is running, this indicates an imminent breakdown of the unit. The most likely cause of noise is failure of the bearings or weak fastening of the impeller. In any case, the part needs to be dismantled, subsequently damaged, repaired or replaced.
Decreased performance
Whatever antifreeze is used in the cooling system, it is a chemical substance. Over time, erosion occurs in the pump housing or impeller, which can lead to a decrease in the flow of pumped liquid. As a result, the motor may overheat with all the ensuing consequences. Therefore, if the coolant temperature sensor on the instrument panel begins to exceed +90˚С (operating temperature), it is worth thinking about a possible replacement of the pump or, at least, a revision of this unit.
Increased vibration
If increased vibration comes from the pump area, first of all you need to inspect the pump housing in the bearing area: sometimes cracks may appear on it. It would also be useful to check the correct installation of the generator belt, pump pulley and fan. If faulty parts are found, replace them.
Installing an additional pump on a VAZ 2107 carburetor
In fact, if the temperature outside is below minus 10, then the radiator is no longer doing its job well, and only two stoves in the VAZ-2107 can make heating faster.
Most often, for additional heating of the interior, a Chinese-made 12-volt device is used, with six channels on the right and six channels on the left (3 for each fan).
When ordering a second stove for a Chinese-made VAZ-2107, you must take into account the location of the outlet pipes that feed into the system. The position of your new heating system during installation will depend on them.
The system allows air to be drawn from the passenger compartment using two fans. Speed control is usually found in every device, and it is better to choose a three-stage control.
Furnace systems can have not only two, but also one fan with three outlets.
There is a hole in the pump cover through which the shaft comes out, where the pulley hub and then the pulley itself are attached to it. A belt is put on the latter, which on the “seven” rotates the generator and pump from the crankshaft. On modern cars, the pump rotates via a timing belt.
Where is
On classic Zhiguli models, the pump is located on the front of the power unit and is attached not to the block, but through a separate housing. By opening the hood, you can easily notice both the pump pulley and the assembly itself.
Which pump is better
Water pumps with catalog numbers 21073–1307010, 2107–1307011–75 and 2123–1307011–75 are suitable for the VAZ 2107. The last two options have an enlarged impeller and a slightly reinforced structure. Initially, these pumps were produced for Niva.
If play is felt, it means the bearing needs to be replaced.
Work on checking the pump with the engine running should be carried out carefully, not forgetting about the rotating fan and high coolant temperature.
Necessary materials
Before you begin installing an additional pump on a vase, you must purchase all the necessary materials. The list of required materials includes:
- electric pump from a Gazelle car. This part will act as a pump;
- a relay with slightly open contacts (an ideal option would be a relay from a VAZ 2108);
- reinforced hose, at least 1 meter long;
- hose clamps (at least 5 pieces);
In order to prepare a VAZ car for installation, it is necessary to drain the antifreeze from the radiator and cylinder block.
Pump installation
To install an additional pump on a VAZ 2110, you need to crimp the pipe coming out of the stove. This will help prevent antifreeze from leaking. However, experts believe that it is best to completely drain the antifreeze from the system. When the work space is cleared, you need to take the pipe and cut out a part from it that will correspond in length to the length of the pump. At the same time, the length of the fittings themselves should not be taken into account, since they will fit into the pipes.
If, for certain reasons, the outer diameter of the fittings does not coincide with the inner diameter of the nozzles, you will have to use adapters or select a pump of the appropriate diameter for installation. The second option is often more practical, since each adapter represents a potential leak point.
In order to increase the level of efficiency of the device, it is necessary to remove four screws from the part and remove the upper housing. The internal gasket of the pump must be carefully treated with sealant and the entire part must be reassembled. But re-fastening the housing is best done using long bolts and nuts. This way you can provide the future pump with greater tightness.
Installation location
The connection diagram consists of several stages:
- The white and white-yellow wires must be disconnected from the recirculation valve. The first wire is connected to the relay contact number 85, and the second is number 30. Contacts 30 and 86 are connected using a jumper;
- pin 87 is connected to the pump wire. To check the operation of the pump, you need to connect the ground. If the ground rotates, then all connections are made correctly.
Connecting the pump
When connecting the pump, be sure to set the switch. If the device operates in forced mode without the ability to turn off, in the summer it will be unbearably hot inside the car. An O-ring must be installed around the perimeter of the switch, which will hide the place of its contact with the body. The negative wire will be connected directly to the pump, past the switch, and the positive wire will go through it. Thanks to this device, an additional pump for the VAZ 2110 can be connected only as needed.
It is worth noting that installing an additional pump is not always advisable. This is due to the fact that often the reasons for inadequate heating of the interior are malfunctions in the stove or a poor-quality thermostat. It is for this reason that before deciding to install a pump, it is necessary to carefully check the entire antifreeze circulation system.
Pump repair
If it has been determined that the pump needs repair or replacement, you first need to prepare the necessary tools for work:
- a set of keys;
- container for draining coolant;
- flat or Phillips screwdriver.
Removal
After preparing everything you need, you can start disassembling:
- Open the hood and drain the coolant by unscrewing the corresponding bolt on the cylinder block and the plug on the radiator.
- Remove the generator belt by loosening the top fastening nut and reducing the tension.
- By unscrewing the nut further, move the generator all the way towards you.
Just to decouple all the speeds of the stove from each other, diodes were added, those that are connected in the forward direction towards the engine, I bought KD213, there were more than enough of them, but there were no others in the car store and I didn’t want to go to the radio store, those that go to control the stove We also bought them there; their characteristics also seemed more than sufficient to me because, anyway, the control was implemented through a relay. I assembled the circuit using a hinged method.
The diodes are conveniently placed in the heat shrink, it is advisable to fill the heat shrink with hot glue, this will give rigidity to the structure and the legs of the diodes will not break off, of course you can do it differently (for example, on a “fish”), but I didn’t want to. Yellow wires, three pieces, this is a signal to control the relay, we pull this wire into the engine compartment, place the relay there, take the fuse and take the power from the battery.
This indicates that there are no air pockets left in the hoses, that is, the cooling system is functioning normally.
Video: installing a water pump
Instructions on how to replace the pump
First you need to completely drain the coolant from the engine. Place the prepared container under the engine, unscrew the cap located on the engine block, if you want to replace the antifreeze completely, then also unscrew the cap on the cooling radiator. Next, unscrew the bolts that secure the electric fan casing, disconnect the contacts and pull out the electric fan along with the casing.
Loosen the nut, tension the generator belt and remove the belt.
Using a 17 wrench, unscrew the generator mounting bracket. After this, unscrew the three bolts securing the pulley, while holding it with a screwdriver, holding the pulley with a screwdriver and remove it from the shaft.
And finally, unscrew the four bolts securing the pump, which secure it to the engine cylinder block.
Remove the pump from the engine. Before installing a new one, you need to thoroughly clean the seat of grease and dirt. When installing, be sure to replace the gasket, otherwise you will have to repeat the whole job again. It is recommended to seal the gasket with sealant.
A lot depends on how the car pump works, because without this element of the car device, pumping coolant is almost impossible. Therefore, experts recommend replacing the pump on your car in a timely manner, that is, at the very first signs of a malfunction of this element.
In particular, the humming sound of the unit or the appearance of traces of coolant leakage can be considered prerequisites for replacing the pump. The humming sound of the pump indicates a high level of wear on the water pump bearings. Signs of a coolant leak can appear for a number of different reasons.
In addition, incorrect operation of the pump contributes to severe overheating of the car engine, and its repair is very expensive. Also, a faulty pump can simply jam at the most inopportune moment.
- But how is the VAZ 2107 injector pump replaced?
- Step-by-step instruction:
- Purchase a suitable pump from a specialized auto store or car market. It’s better to pay attention to the original pumps for the VAZ 2107 (they are available for free sale). Also, don't forget to purchase a small tube of sealant and new gaskets.
- Find the drain plug located on the unit block and unscrew it. Drain the coolant into a container prepared in advance for this purpose.
- If the coolant needs to be replaced, locate the radiator drain plug and remove the battery. To do this, you will have to unfasten the electric fan block, and also carefully unscrew the three bolts connecting the fan casing and the radiator.
- Take the key for seventeen and use it to loosen the bolt with which the tension of the generator belt is adjusted. In order to make it possible to remove the belt, it is not at all necessary to unscrew this bolt all the way.
- Next, use the same seventeen wrench to unscrew the nut that secures the bracket to the pump. It is moved to the side, after which three more bolts securing the pulley are unscrewed with a screwdriver. The pulley is removed, and then the remaining four nuts are unscrewed, with which the pump is attached to the unit. Now the old pump can be easily removed.
- Before reinstalling the pump, it is necessary to remove all accumulated dust and dirt, as well as remove the old gasket and replace it with a new one. Be sure to lubricate the pump with sealant.
- Reassemble in reverse order.
- When pouring new coolant, do not forget that the control lever for the heating radiator tap must be open and the hose from the intake manifold located nearby must be disconnected. This way you can avoid the formation of air locks in the system.
Read more: Tinting a VAZ 2107, how to tint the windshield, rear and side windows, instructions with photos and videos