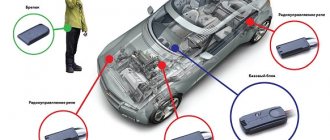
Why do you need a coordination unit for towbar electrics?
Modern cars are increasingly equipped with new electronic systems to improve driver comfort and safety (ABS, TSP, ESP, etc.).
However, a huge number of wires are required to connect all these devices. To solve this problem, manufacturers use the CAN-BUS system - all signals go through just 2 wires. And when it is necessary to select the necessary signals, manufacturers install a decoding unit, from which wires go directly to consumers: to the brake system lights, fog lights, side lights, turn signals. With such a power supply circuit, connecting the electrical equipment of the towbar to the corresponding light bulbs of the car will naturally cause a change in resistance in the electrical circuit, which is recorded by the Check Control and burnt-out lamp detection systems, and leads to blocking of the corresponding circuit. In addition, in this case, the connected towbar lights may not work correctly: when the turn signal is turned on, the brake light comes on, for example.
To prevent this from happening, it is necessary to install a matching unit (Smart Connect), which is connected via a separate wire to the car’s 12V and does not cause a change in the load in the car’s electrical circuit.
Coordination block - DIY Community on DRIVE2
Hi all! Nothing new, everything is banally simple: I installed a towbar and to properly connect the trailer’s electrical system to the vehicle’s on-board network, a coordination unit is required. There are, of course, many ready-made solutions, but their cost in some cases is commensurate with the cost of the towbar itself. In the store I bought the necessary radio components: - TRKM SZ 12VDC relay - the most common diodes - board-wire terminal blocks for input and output - one-sided PCB - a switch, an LED for status indication and a resistor were available. In the Sprint Layout 6.0 program I drew a board in accordance with the size of the available parts:
Coordination block board
Printed it out on a printer, transferred it to PCB using an iron, etched it in a solution of ammonium persulfate, tinning, drilling, mounting parts on the board. In the pictures it looked like this:
Ironed to foil
Etched
Board with parts
On the back side
Packed in a box for fishing baits
The design turned out to be very compact and, most importantly, efficient.
The power supply was taken from the cigarette lighter socket in the trunk; control signals come from the corresponding lamps in the rear lights. Using a switch, the towbar socket is de-energized when the trailer is not in use. The LED indication shows whether the outlet is connected to power or not. PS. It is not visible on the board or in the photo, but a jumper with a fuse is placed between the positive terminals of the input and output
, in case of a short circuit.
For those who want to repeat, the diagram can be downloaded from the link
.
www.drive2.ru
On which cars should a matching unit be installed?
The matching module must be installed on vehicles equipped with the following systems: 1. Electronic control system with variable voltage. 2.Car with multiplex wiring. 3. CAN BUS data system (with on-board computer) 4. CHECK CONTROL system 5. Burnt out lamp detection system (SFL) 6. Low voltage lighting power system. 7.LED lighting system.
In vehicles equipped with such systems, directly connecting a conventional socket to the trailer hitch will damage the vehicle. Installing a smart connect module eliminates additional load on the vehicle's electrical network and stabilizes the network voltage. The connector is resistant to voltage surges and short circuits, as it connects directly to the car battery through a 15 A fuse.
The matching block also provides:
- switching the fog lamp to the trailer;
- control of direction indicators on the trailer;
- o turning off the parking sensors when attaching a trailer;
- charging the battery on the trailer.
Coordination modules with advanced capabilities have a number of additional functions: – trailer connection test; – PARK SENSOR; – ALARM INFO; – control function of the left side lamp; – coordination function of the left fog lamp.
- Trailer connection test - checking the condition of the electrical equipment of the trailer: after connecting it, all the lights light up one by one and you can make sure that everything is in order.
- The Park Sensor function is designed to block the parking sensors of a car with the Parktronic system, since when reversing, the trailer is perceived as an obstacle.
- The Alarm Info function provides the ability to connect a trailer to a car alarm system to protect it from theft. In security mode, when the trailer is disconnected from the vehicle, an alarm is triggered.
- The left side lamp control function is designed for a single-filament lamp, which simultaneously performs the functions of side and fog lights, as well as side and brake lights.
- Left fog light control is a function that allows you to adjust the intensity of the fog lights and prevent the driver from being blinded by the light reflected from the front of the trailer.
The matching module is required to be used on:
- Audi: A4, A3, A6, A8, Q7, TT, Allroad.
- BMW: 1, 3, 5, 6, 7, x3, x5, x6.
- Chrysler: 300C, Sebring, PT Cruiser, Voyager.
- CITROEN: C3 Picasso, C4, C4 Picasso, C4 Grand Picasso, C5, Berlingo, C-Crosser, Jumper, Jumpy.
- Dodge: Caliber, Nitro.
- Fiat: Ducato, Linea, Grande Punto, Scudo.
- Ford: C-max, S-max, Galaxy, Mondeo.
- Jeep: Grand Cherokee, Commander, Liberty.
- KIA: Sorento, Soul, Carnival.
- Land Rover: Freelander, Range Rover since 2004 all models.
- Mazda 6.
- Mercedes: all models since 2005 (GLK, Sprinter, W164, W169, W212, W203, S203, W204, S204, W211, S211, W245, Viano, Vito).
- Mitsubishi Outlander since 2007.
- Opel: Agila, Astra H, Vectra C, Zafira, Corsa, Insignia.
- Peugeot: 3008, 407, 4007, 508, 5008, Bipper, Boxer, Expert, Partner.
- Porsche Cayenne since 2003
- Seat: Alhambra, Altea, Leon, Toledo.
- Skoda: Fabia, Octavia 2, Superb, Yeti.
- Subaru: Forester since 2008, Legacy Outback since 2009.
- Suzuki Splash since 2008.
- Toyota RAV-4 from 2013.
- Volkswagen: Amarok since 2010, Caddy new, Passat 6, Golf 5, Golf Plus since 2005, Jetta new, T5, Tiguan since 2007, Toureg, Touran.
- Volvo: C30, S40, S60, V70, V50, XC70, S80, XC60, XC90.
and some other models.
Operating principles of modules
The smart connector receives a control signal from the “central nervous system” and connects a dosed load to the desired wire.
The protection system built into the matching unit protects the electrical circuits and electronic “brains” of the car from overloads. The on-board computer “does not notice” the additional connection. And now we are moving on. Smart connector options come in standard or extended configurations. Basic capabilities of matching blocks:
- control of direction indicators on a trailer;
- fog lamp control;
- recharging the trailer battery;
- disabling parking sensors while connecting to a trailer.
Advanced options:
- “TPP” – checking the connection of the electrical circuits of the trailer;
- side light control on the left;
- adjustment of the fog lamp on the left;
- anti-theft option ALARM-info.
There are never too many reasons to buy
Do you have a modern car? Then the manufacturer simply left you no choice. You will not be able to use the trailer without the approval unit.
To prevent incorrect operation of the towbar lamps and prevent malfunctions in the car's electrical system, you need Smart Connect - a coordination unit that prevents an increase in the load on the on-board network. Thanks to the 15 A fuse, Smart Connect does not react to power surges.
If ABS, TSP, ESP, SFL, etc. programs are installed on the car, then without installing the matching unit, the operation of the car will be disrupted.
The matching module is multitasking. It is responsible for switching the fog lamp on the trailer, controls the direction indicators on the trailer, and turns off the parking sensors when connected to the trailer.
There are coordination blocks with a large number of functions (PARK SENSOR, ALARM INFO, etc.).
A couple more nuances
Universal matching block with a set of standard connectors and fasteners
Advantages: the universal unit is cheaper than the original analogue, is compatible with the electrical system of most cars, and is not difficult to install.
Universal electrics set UniKit
Unikit switching blocks are an intermediate link between the electrical kit of the towbar and the machine electronics. They relieve the electrical circuit, monitor the connection of the towbar and protect the system from overload and failures. If necessary, replace only the Unikit fuse. The short circuit does not damage the wiring or fuse.
The Unikit module ensures the correct operation of lighting devices and is indispensable for cars with single-filament lamps, in which different signals pass through one cable, and not through different ones.
Original block for Thule tow bar. The device is supplied with instructions and a mounting kit.
Advantages: “smart” device with an expanded range of capabilities.
The original matching block comes complete with the original tow bar. When connected, the unit automatically registers itself in the system, tests the trailer, checks the functionality of the lamps, and turns off the parking electronics and rear view cameras.
The operating diagram of the smart connect coordination block for a tow bar is quite simple. It receives data coming from the main computer systems of the vehicle, after which it redirects a strictly dosed load to the appropriate energy consumer. The peculiarity of the smart connect matching block for a towbar is that its operating scheme provides for the presence of protection systems that serve as reliable protection for all electrical circuits and computing devices of the car, protecting them from overvoltage. As a result, the host computer does not detect additional devices and continues to function as normal.
Read more: LG car radio connection diagram done correctly
Towbar module-coordination unit UniKit
According to the set of options, there are currently two types of modules for towbars: with basic and with extended configuration. Basic set options include:
- control of turn signals on a car trailer;
- control of rear fog lights;
- turning off the parking sensors while the vehicle is connected to a trailer;
- Extended dialing options include;
- control over the connection of all electrical systems of the trailer;
- control of the side lighting device located on the left;
- adjustment of the fog lamp, also located on the left;
- protection against theft.
Connection diagram for the Unikit2 matching unit for the Baltex tow bar
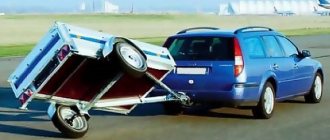
Many motorists know for certain that a towbar can make life much easier if there is a need to transport their own cargo. Hiring a cargo taxi is usually not worth it, which is why installing a tow bar can be a great solution.
This device has a common function regardless of the make and model of the car
How is a tow bar useful as a device?
A towbar is also called a towing device. It is used to connect a car to a trailer for towing. Some people buy it ready-made, while others prefer to make it themselves.
Tip: To choose a device suitable for your brand of car, you can contact a service center or a specialized service station.
Before moving on to the electrical part of attaching the tow bar, we will need to install it on the bumper. Usually it is attached to one of the towing eyes or a hole provided, which is intended for coupling, but is closed with a plug.
If you want to secure such a device with your own hands, you may need additional holes in the bottom of the machine and its side member. A welding machine and the services of an electric and gas welder may be required. Additionally, stock up on sandpaper and a grinder on which you can attach a grinding wheel.
Purchased products must correspond to a specific car model
Principle of operation
The electrics of the towbar and the BSF must be connected in parallel, using high-quality crimp clips. Please note that the connection is made directly to the matching unit, and not through the socket of your car towbar.
The BSF is connected to the battery or power supply. In this case, the principle of its operation will be as follows:
- smart connect receives relevant information from the on-board computer system;
- the matching block transfers a uniform and dosed load to the necessary consumers, that is, the trailer's lighting equipment.
Here we need to add one important point. You cannot take the universal BSF if the car has the so-called trailer towing mode.
Here, to connect the towbar to the towed vehicle (connection of the towbar and trailer, in other words), you will need an original block. Otherwise, the vehicle will not be able to control and monitor the electrical equipment of the trailer using its ECU.
Among the popular block models, users note the following:
- Flash-Fa Pro;
- Bosal (Bosal);
- Artway SC100.
Their price is reasonable, that is, there will be no significant costs for operating the trailer. Knowing the item number of the product, you can easily order for delivery online. Choose the purchase method yourself. The main thing is that the BSF matches your car model.
Equipment
BSF has a built-in protection system, with the help of which it is possible to protect the electrical network from overvoltages and short circuits.
When installing the unit, your on-board computer will function normally. That is, it will not start reporting new connected devices or giving any errors.
When choosing a Smart Connect device, pay attention to its configuration. She may be:
There is no special or urgent need for expanded equipment, and it costs more. Personally, I installed a more functional model. For this you will receive, in addition to the basic functions, protection against theft and control over the entire electrical circuit of the towed vehicle.
Vehicle installation
Basic procedure
First, remove the bumper and cut off the lugs. Drill holes if necessary and weld the fasteners.
Here's how to connect a trailer towbar to a car:
- We will need an inspection hole on the overpass or in the garage into which we drive our vehicle.
- Now we turn off the power from the mains by disconnecting the negative terminal from the battery.
- Installing towbars will require removing everything from the trunk and removing its upholstery.
- The device itself must be attached to the place where it is planned to be attached and the necessary markings must be made.
- At the attachment point, holes are drilled on both sides with a drill, which are best treated with an anti-corrosion agent to extend service life;
- As the photo for this article suggests, we can tighten the hitch using nuts, washers and bolts, as well as a suitable size wrench.
- Now you need to remove the load from the car frame and provide a more reliable fastening. To do this, we make a couple of holes at the bottom of the side member and from the inside of the luggage compartment with the installation of reinforcing linings.
- Tighten all the necessary bolts with wrenches.
Fastening to the car frame
Using the connection diagram
A ready-made towbar, as a rule, already has all the necessary holes for fastening, which is taken care of by the towbar manufacturers. Now we can start connecting the hitch.
We cannot do without an outlet that connects the electrical wiring of the car and the trailer. The towbar socket diagram is usually included in the kit. As for the electrical equipment of the coupling device, it consists of a plug socket with a set of wires.
The color of the wiring may not match the color of the wires in the photo.
Bolted to the bracket, the socket is connected to the main wiring. When connecting, you need to look at the colors of the wires according to the diagram. You need to connect it to a standard connector, which can be 7-wire or 13-wire (only on foreign cars).
Tip: If the socket wiring does not match the trailer wiring, use adapters.
Car installation
Below are instructions with which we can connect the towbar to the electronics of the car:
- We will need a hole located in the bottom of the trunk to connect the socket to the rest of the wiring. In the case where the coupling device is made independently, you will have to drill the holes yourself. Consider the location of your future location;
- After the socket is installed on the towbar, we will stretch the wire through the hole in the trunk and connect it to the socket.
The connection diagram for Largus can be of some help if you are the owner of this particular model
- During connection, the wiring must be connected in such a way as not to confuse the order. If the number of wires does not match, purchase an adapter for the socket. A special tube into which you need to pass the assembled wiring kit will help protect the electrical package from external damage and short circuits;
- Secure the wires to the trunk walls and carefully cover them with upholstery.
- You can connect the trailer, check how high it is from the ground, and whether its brake lights, turn lights, and running lights are working.
Coordination module for connecting a trailer - Community "Kulibin Club" on DRIVE2
Introduction to the essence of the problem 
I won’t tell anyone a secret if I say that many car enthusiasts use various kinds of trailers, trailers, campers, etc. And if there are no problems when connecting an electrical outlet to an ordinary Zhiguli car - throw it parallel to the taillight lamps, then for modern cars this method is not suitable - the wiring is designed only for a certain current strength and exceeding the power of the lamps can lead to a fire in the wiring (I saw a burnt one wiring many times). In addition, machines of recent years of production measure the load power consumption themselves and generate an error when the standard value is exceeded. For proper connection, special matching modules are used, which cost money. (for example: for the Volks Transporter VW T5, such a factory module costs $500). Meanwhile, there is nothing complicated in this module and you can make it yourself with minimal soldering skills. By the way, it is also advisable to use the module for ordinary Zhiguli cars so as not to “overload” the wiring.
Formulation of the problem
At the moment, three approaches to creating a matching module are “fashionable”: 1) Using optocouplers and field-effect transistors myzafira.ru/forum/viewtop....php?f=71&t=1159&start=20 The most beautiful solution, but not entirely suitable for beginners, is the field device you need to be able to solder correctly so as not to burn
2) Based on electronic keys BTS443P sxem.org/2-vse-stati/razn…ya-pritsepa-k-avtomobilyu Not exactly a budget solution, but undoubtedly has the right to life
3) Using a relay A simple and effective approach, which will be discussed below
There is also a “cheat” solution - to change the lamps in the trailer lights to LEDs, but it has the disadvantage that this is possible on your own personal trailer, but what if there are several of them? or do you borrow from friends? or even for rent? then this becomes a problem.
Pay
Well, there’s not much to tell here: I didn’t draw the circuit separately due to its simplicity, all the wiring is visible in the photo below. The
Sprint Layout file is available here - www.leman.cc.ua/farcop.lay6 Necessary explanations on the conclusions: Grownd and + I think there is no need to explain Reversing light - reversing lights, have 2 outputs - to the socket itself (used only on campers, so you don’t have to do it) and to the rear view camera. Parking light - parking lights, also known as dimensions.
Let me remind you that we are dealing with a German car whose left and right side dimensions are separate. The idea is really not bad - when parked on the side of the road, you don’t “burn out” all the lights, but only those that limit your view from the roadway. BUT in our realities, alas, it is necessary to limit it from the side of the roadside - what if someone decides to “slip through”, so we combine the left and right side signals through diodes into one relay and connect them in parallel on the socket - all of them on the trailer will light up dimensions, regardless of what lights on the tractor. Then everything is simple: Stop - stop Left Turn - left turn Right Turn - right turn I used ordinary radio relays 12 Volt 10 Ampere. Their coil resistance is 130 Ohms - this is quite enough so as not to affect the operation of lighting devices in the car. Their sizes are given below.
Diodes - any that can withstand voltage up to 20V and current up to 0.1A
It is worth noting that many, when making such boards, use connectors to connect wires of various types - whether this is correct or not can be debated, but the friend for whom I sculpted this asked to minimize the contact points, so the wires are soldered directly to the board
Unfortunately, the photo of the finished product has not been preserved, there is only a photo of the first version of the etched board (to be honest, it was unsuccessful - the tracks are too thin and although they conduct enough current, they are mechanically weak. This has already been corrected on the board above).
Full size
Connection to car
Since the car is German, we bought a “native” 13-pin connector for it at a disassembly site
Full size
Full size
I didn’t take a photo, but is it necessary to say that on the T5, a mount for it was already made from the factory, a channel was welded under the bottom to the left arch, where a rubber plug was located in the right place? I respect the Germans. The pinout of the towbar is shown, but the color of the wires may not match, so we look at the picture and “call” the tester looking for the required wire.
In the left arch we find the car wiring we need. So that
www.drive2.ru
What types of coupling devices are there?
There are the following types of towbars, based on mounting and purpose:
- For example, fixed ones, which are placed on the body using bolts or welding. They are much more difficult to remove, which is why they usually last the longest. Some car owners need to be able to remove and reinstall the hitch. In this case, removable towbars will come to the rescue.
- Sometimes there are flange-type devices, which are usually mounted on a special platform of the vehicle. There is a classification of towbars by tonnage, as well as the types of vehicles on which they are used.
Mountable quick release devices
Until the recent past, the hitch problem was solved much more simply - a hook was simply welded to the bracket, and there was no longer any possibility of removing such a device. Today, this approach looks, at a minimum, unreasonable, because it is better to purchase and install a towbar that can fold and hide.
Since then, the production of towbars has come a long way. In addition, the hook sticking out from the back of the car creates an additional threat to safe movement.
How to achieve a strong connection
To make the connection to the towbar even more reliable, it comes with reinforcing plates. For the device itself, we will need holes in the body with a diameter of 12.5 to 13 mm. The tow bar itself is attached through a reinforcing plate and a nut and bolt. It is advisable to place a washer under the metal.
When installing electrical wiring, try to achieve high-quality insulation to prevent moisture from entering with its destructive effect. The video in this article will help you complete all the steps of connecting the tow bar. Any work can be carried out efficiently if you carefully study the instructions before you start using the tool.
On some vehicles, the rear bumper will have to be removed during installation.
- It is not enough to confine yourself to screwing the hitch to the bumper of the car. An electrical outlet must also be connected to the device to be able to power the electrical consumers of the trailer itself.
- There is no need to run wiring through the entire machine. Near the location of the rear lights of the car there is usually a harness to which power is supplied.
- It is easy to carry out such work on your own or turn to third-party specialists with experience and skills.
Another option for a quick-release model
- If you cannot immediately connect the trailer to the network of the main vehicle, you may need to purchase a so-called adapter, or matching unit.
Renault Kaptur connecting a tow bar with a coordination unit. — DRIVE2
A fresh Renault Kaptur arrived to install and connect the tow bar.
The installation of the piece of iron was carried out by mechanics. The bumper was not removed. I didn't cut myself. They squeezed out some kind of plugs in the pockets on the right/left and tightened the bolts and nuts as I understood. Towbar manufacturer - didn’t pay attention to who))
I connected the electrics through a matching unit, there is no other way in this car. The matching unit relieves the vehicle's standard electrical wiring from excessive load when connecting a trailer, eliminates errors in lamp circuits, and prevents damage to the vehicle's electronics when the electrical wiring on the trailer is shorted. The matching block was used by Pandora TCM6, although any one in fact can be used. There are 6 channels (for 6 lamps, just a complete set for a trailer) There is a possibility via CAN, maybe it would work like Duster2... But I connected it analogue. It’s clearer and more reliable in this case. Those. input of high-impedance matching block to car lamps. And the outputs from the coordination block are already to the towbar socket.
I disassembled the following in the car for electrical purposes. I removed the shelf. The trunk sill (on clips, pull it up). The left pocket plug (large lid with a handle). The trim between the lower and upper plastic (Torx 20 and pull it out from the clips into the center of the trunk.) Neither the lights nor the bumper needed to be removed. Under the trim we removed, above the wheel arch on the left, there is a harness on a clip.
Cut the tourniquet from the clip with a blade. Unwind from the electrical tape. And let's go. The following wires go to the inputs of the matching block (we call, because there are identical colors in the harness!) THIN TWISTED PAIRS DO NOT TOUCH (!)
Green = brake light Blue = parking lights White = left turn signal Gray = right turn signal Pink = reverse Brown = rear fog light
The weight is on the pin inside the pocket, look, you will see the standard one there.
Plus the power is there in the trunk on a shelf in the Red Thick harness. However, in order for power to appear in it, you need to take a 20 ampere fuse (mini format) Open the fuse cover in the passenger compartment on the bottom left (pull it towards you, there are clips there, grab it with your fingers from below) And insert it on the right (I attached a photo, took it from the drive) where indicated on photo with an arrow (in the photo 10 amps are red, we will have yellow)
Of course I used the LED control to check the signals.
The wire was brought out through a plug in the left pocket. Without removing it, I pierced it with an awl, expanded it to the required diameter and threaded a wire through the resulting hole in the corrugation. After connecting and checking, I filled the wiring passage in the plug with sealant.
The unit was placed on a vertical stand under the shelf. It has a couple of holes. I attached the block to one by the eye with a tie, and to the other I attached a wiring harness.
We carefully insulate everything and prevent chafing on the edge of the metal by bending the side of the harness or using corrugation.
www.drive2.ru
In conclusion
When choosing a tow bar for a Volkswagen Polo sedan or another European car brand, give preference to quality manufacturers and their products. Now, if you have a trailer in the garage, it no longer has to gather dust. All that remains is to carry out state registration and you can use it. Good luck on the roads!
Publication date: August 16, 2020. Category: Automotive equipment.
Modern cars are equipped with a large number of electronic accessories that allow the car owner to feel more comfortable and confident on the road. All these devices operate from the network, and accordingly consume energy. In order to ensure the correct operation of all components in cars, modern “intelligent” on-board systems began to be installed that regulate the current supply and block any devices that provoke too sudden jumps. One such device is a towbar.
After connecting the electrics of the trailer hitch, many are faced with the fact that the car’s used vehicle generates an error or completely blocks the “suspicious” node. To get rid of this problem, it is enough to install a coordination unit (Smart Connect), which will act as an “intermediary” between the on-board system and the new device. However, not all machines require such an additional module.
Tips and nuances
What needs to be taken into account to ensure long and uninterrupted operation of the electrics on a machine trailer:
- Avoid overvoltage in the electrical network. Particularly if you use household appliances, too much voltage can cause a short circuit and fire.
- Carry out diagnostics of electrical devices regularly, especially before leaving. The presence of defects that can be identified visually will indicate problems.
- Before the start of the new season, perform diagnostics of electrical connections located outside the car body and trailer. To avoid problems with the wiring, sometimes lubricate the contact parts and connectors with grease or other protective materials.
- Make sure that the wires are not hanging. Electrical circuits must be securely fixed to the body using plastic clamps. If you plan to use your trailer regularly, we recommend installing waterproof optical lighting sources on it.
Why are matching blocks installed in old cars?
Installing a matching block is relevant in the following situations:
- If you accept the possibility of a fire. The fact is that when connecting additional electrical appliances, there is a risk of power surges.
- If you plan to operate the towbar without a trailer, this can also lead to damage to the wiring and blown fuses.
- If at the time of installation of the trailer hitch and trailer there were already problems in the electrical circuits of the vehicle. In this case, the fuse will blow out instantly, and this is fraught with burnt-out brake, parking and emergency lights.
- If you plan to tow a non-original or rented trailer. In this case, it may have a different pinout. If connected incorrectly, you risk losing all the car's fuses and lights.
If you are convinced that you still need a smart connector, you can purchase it at any car market (a universal model for a towbar will cost about 3,300 rubles) or make it yourself. If everything is clear with the purchase (preference should be given to BS from Bosal and Thule), then it’s worth talking about the homemade module in more detail.
Connection
To connect an additional module, perform the following algorithm:
- The start connector is connected to the battery.
- A starter, oil sensor, fuel valve and on-board computer are connected to the BSF.
Connecting the towbar matching unit is carried out in the following way:
- The loading panels are dismantled and a set of cables is prepared.
- Next, the running lights and brake lights are checked.
- The next step is installing the smart connector.
- Using a connector, connect all the necessary wires to the connectors.
Making a matching block with your own hands
A smart connector is a fairly simple device that can be made by any car enthusiast who understands electronics and knows how to solder.
For this you will need:
- Board (diodes and relays are subsequently installed on it).
- 5 diodes (or as many as you need).
- 5 relays (their number must match the number of relays).
- A box or any enclosure in which the device will be installed.
Next, you can begin directly assembling the connector:
- Mount the diodes on the board.
- Install a relay on it.
- Connect the cables using the diagram below.
- Place the finished connector into the housing.
- Ready.
After this, all that remains is to connect the matching block according to the usual standard circuit.
How to make a smart connection with your own hands
In order to assemble a matching block for a towbar with your own hands and connect it, you will need the following parts:
- design board;
- about five diodes;
- relays (the number coincides with the number of diodes);
- box in which the device will be placed.
Assembly diagram:
- install diodes on the board;
- install a control relay on the board; Monitoring relay board ready for installation
- connect according to this diagram: Connection diagram of the matching unit
- carefully pack in a box made of dielectric material. The matching module must be placed in a dielectric housing (box)