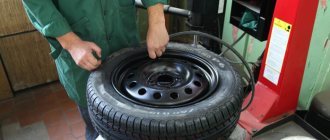
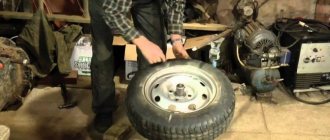
Unpleasant moments with a tire puncture can happen to every car owner. The worst thing is if this happens on the highway. I want to share my own experience and that of the tire service workers who work in our neighborhood on how to properly change tires on a car. We will outline the rules and main mistakes that can occur during replacement.
Procedure for replacement
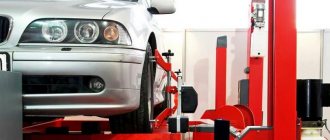
Place the car on a flat surface. This is suitable for the ideal conditions of a garage or repair area. If you have to change wheels in an open field, then try to find a flat surface, without holes or bumps.
Advertising:
Rule #1.
We put the car on the handbrake. With a manual transmission, engage first gear. If “automatic”, switch the selector to the “parking” position.
Rule #2.
We place a block or brick under the wheel, which is located diagonally from the one we are going to change. For example: if we change the rear left, then we fix the front right. This must be done so that the car on the jack does not roll forward or backward. This is especially true if the machine is standing on an inclined surface.
Use a screwdriver to remove the decorative cap. If this is not the case and you have alloy wheels, then skip this point.
Use a wheel wrench to loosen the bolts or nuts, depending on how the wheel is secured. If you can’t “break it”, you can press down on the key with your foot.
Advertising:
Rule #3.
Do not make any impact movements with the key. There is a chance of stripping the threads on a nut or bolt.
We take out the spare tire from the trunk. Rule #4.
We place it under the threshold of the car on the side where you are going to change the tire. This will protect the brake disc and hub from damage if the car falls off the jack. It will fall like a threshold onto the “spare wheel” without damaging the abovementioned elements of the chassis and braking system. The larger the surface area on which the car can “break”, the less the threshold will suffer.
We put the jack up. The surface underneath should be smooth and hard. Rule #5
. We install a board under it, the width of which is slightly larger than its sole. If the soil is loose, then under the weight of the car, it can “sag”, one part can bury itself in the ground, and the car will fall off it.
Advertising:
Rule #6
. To install jacks, there are special reinforced places in the thresholds and car body, we use them. These can be nickels, hinges, jacks, thrust bearings. Depending on the type of jack, they will have a certain appearance and shape on the car. These can usually be found closer to the wheels.
If you place it in another place not provided by the manufacturer, there is a chance of pushing through the threshold and letting the car fall to the floor. This is especially true for old cars, where the process of corrosion of the body and sills is highly developed.
We raise the car until the wheel needed to be replaced is hanging out. You can check if the lift is sufficient with a screwdriver. We hold it between the tire and the road. If it passes freely, then you no longer need to lift the car.
Modern SUVs are famous for their high ground clearance. Therefore, classic jacks are not suitable; their reach is not enough to raise them to a sufficient height. To do this, take a “bottle” jack and install it under the lever or beam, closer to the wheel being replaced.
In this case, we lift the car not by the body, but directly by the suspension, which will not allow the springs to stretch. The lifting will occur throughout the machine as a whole.
Important. The jack needs to be placed closer to the wheel. If you install it under the axle housing or in the center of the beam, the entire front or rear of the car will rise. At the same time, its stability will deteriorate, and there is a chance of “dropping” it.
We unscrew the nuts or bolts of the suspended wheel and replace it with a spare one. Having put it on the studs or guide hubs, we “attach” it with fasteners. They need to be tightened in a certain sequence . If there are four of them, we pull cross over cross, if there are five, then through one.
Important. There is no need to apply much force after tightening. It is better to tighten the nuts after the car body is lowered to the ground. Otherwise, if you lift them up on a jack, you can break the threshold, especially of an old car.
After tightening the bolts, we lower the car. Check the tightness by hand. The force on the wheel wrench should be from top to bottom so as not to strip the threads of the fasteners.
Important. Do not hammer the wheel key with a hammer or stand on it with your feet and jump on it. Yes, the nuts will tighten more, but breaking them or turning the threads on them will be sad.
Hand tightening torque will be sufficient. After 50 kilometers on the replaced wheels, it is recommended to manually check the tightening of the wheel nuts or bolts.
Checking the tire pressure. If necessary, we pump them up.
Why do the wheels turn at different angles?
The answer is actually obvious. It is enough to imagine only a situation where a vehicle moves clockwise in a circle. In such a situation, the circle of movement of the right wheel is much smaller than the left circle. Therefore, if a car drives at the same speed, the wheels of the vehicle on an identical axle rotate at different speeds.
Now let's get back to the fact that they rotate at the same angle. This will provoke the tendency of the inner wheel to move in the same way as the outer one, but it will slip. The external one will behave identically. Such movement of the vehicle during maneuvers will be unpredictable, provoking global tire wear. For a clear example, I advise you to pay attention to multi-axle bogies of trailers and trucks: the tire wears out unevenly and very quickly.
Scheme for changing wheels on a car
In old textbooks and operating manuals there are special diagrams in which order the wheels need to be swapped so that they wear evenly and their condition does not negatively affect the safety of movement. In the modern world, most tires have their own direction of movement, in which it needs to be mounted on the wheel rim. Therefore, these schemes are not relevant in modern realities.
Advertising:
How to find out the direction of installation of the tire and correctly read the markings on it, see this manual.
There are times when a complete set of wheels cannot be purchased or is not necessary. Buy in pairs. Therefore, such a scheme does not work, because according to traffic regulations, tires with the same tread pattern must be installed on one axle of the car.
In most cases, a simple scheme is used - the wheels from the front axle are swapped with the rear axle.
This allows for even tire wear.
It is recommended to install tires with the best tread on the drive axle - for front-wheel drive cars we install it on the front axle, for rear-wheel drive cars - on the rear axle.
If you have omnidirectional tires with the same tread pattern, then the procedure for replacing wheels is “cross to cross”:
- We transfer the left front one to the rear right hub;
- Rear right in place of left front;
- We install the right front on the left rear side;
- From the left side we transfer it to the front of the right side of the car.
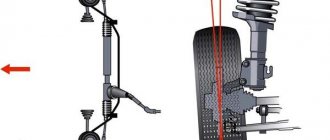
Fully depressed brakes impair cornering control.
Since each individual tire simultaneously contacts the road surface at one point, the average point of adhesion of all four wheels can shift to the right, to the left, or back and forth.
From the driver’s position, the shift of the average point “forward and back” is subordinated to the accelerator pedal, “right and left” – to the rotation of the steering wheel. It is worth understanding that grip is a constant value for which only the point of application changes, and not the absolute value.
There is no left or right, front or rear clutch. There is a general, single force for which only the point of application changes.
Common Mistakes
Twice a year, before replacing the wheels on your car for the summer or winter, it is worth considering certain points, failure to comply with which can lead to dire consequences. Let's look at common mistakes when changing tires yourself.
You can't rely only on a jack
If you get a puncture on the way and you stop on the side of the road, then the jack, in loose soil, may become warped and fail. In this case, the stability of the car on it is lost, and it can fall off it. As a result, the car will fall onto the brake disc or bottom. This will lead to expensive repairs and will be difficult to lift without outside help.
This situation has been discussed previously. Remember this rule - place a wide, strong board under the sole of the jack. Thus, we strengthen the surface and increase the stability of the entire structure.
Unlocked car
Even if the surface where the replacement takes place is smooth and durable. But if you do not put “shoes” under the wheels, then when lifting, the car may roll back or forward. This will cause it to fall off the jack. The consequences will be bad.
Therefore, it is recommended to place the car on the handbrake and place blocks or bricks under the wheels. This “dead” will fix it, preventing rollback.
We don’t skimp on fasteners
If, during replacement, defects in wheel bolts or nuts were identified, they need to be replaced. If one of them breaks and you “miss it,” then the entire load will go to the remaining fasteners. Which will lead to increased wear, breakdown and loss of the wheel on the road.
The same goes for “secrets”. If they are damaged, it may not be possible to unscrew them during a scheduled wheel change. If we see that they are deteriorating and losing their geometry, we change them.
Do not neglect the special places for attaching the jack
The thresholds of the car have special reinforced places for installing a jack. If you do not use them for their intended purpose, but place it wherever you want, then it will break through the threshold. The car will fall to the floor, and this is a repair, in the worst case, an injury.
This error applies to most supported machines. The metal elements of which are affected by rust.
To be on the safe side, if corrosion has “bloomed” along the entire perimeter of the sills, it is recommended to rest the jack under the lower suspension arms or rear axle.
Incorrect tightening torque
There was a case in my practice. The owner arrived with a complaint: “The steering wheel is shaking at speed.” They wanted to remove the wheel and check the balancing. It turned out that the mounting bolts were not tightened. Accordingly, it knocked on the hub while driving, and this was transmitted to the steering wheel. We pulled it up, drove it, the beating disappeared.
If you miss it, you might lose it along the way. An accident could have occurred.
If you overtighten the nuts, you can strip the threads on them or the studs. Accordingly, it will no longer be possible to unscrew or tighten the wheel to the correct torque when replacing it. Therefore, we follow the rules described above when tightening wheel bolts or nuts; I will not repeat them.
Perfect tire grip and weight transfer maneuver
When you press the brake pedal, all the force is spent on stopping the car and there is none left for turning. The car will not listen to the steering wheel even when you turn it. In general, the maneuver consists of the following stages:
- speed reduction
- turning the steering wheel in the direction of rotation
- speed dial
During braking, the traction force shifts to the forward-backward axis to reduce speed as quickly as possible. For this reason, when turning, it is important to complete the brake release before starting to operate the steering wheel. When exiting a turn, it is necessary to return the steering wheel to its original position to release more force on the forward-backward axis and to accelerate. When cornering perfectly, it is worth distributing the grip force between the longitudinal and transverse components. Visualizing the friction diagram while cornering will allow you to significantly improve your piloting technique.
The friction diagram provides a graphical illustration of the dynamics of changes in adhesion force with the track. Its circumference signifies extreme traction, and its four-way directions are similar to braking, accelerating and turning.
For ease of understanding, the schematic diagram is depicted as a circle. In reality, a tire (tyre) has different friction forces in the transverse and longitudinal directions, and the boundaries of the diagram do not describe a circle, but rather an ellipse (oval). The shape of the oval depends on the type of tire. Racing ones are designed to resist centrifugal force when cornering. Therefore, for them the diagram is stretched horizontally.
Cost of work
Many car owners, in order to save some money on seasonal “changes of shoes,” change their wheels for summer or winter on their own. To do this, buy an additional set of disks. Once you spend money on tire installation, you don’t spend money on tire installation for several years.
The cost of replacing a wheel on a car depends on the tire size. The higher it is, the higher the cost. For example, in our region, to “change” a tire with a diameter of 13 inches, you need to spend from 400 to 600 rubles per set. This includes tire mounting and balancing. Work to restore the geometry of the disc is paid separately. In Ukraine, the average cost for work will be:
- 13 inches – 95-100 UAH per unit. Of these, 30 hryvnia for removing and installing a wheel on a car;
- 15 inches – 115-120 UAH, 35 UAH – removal from the car;
- 16 and 17 inches – 140 and 160 UAH respectively, 45-55 UAH for removal work;
- 18-19 inches – 200 UAH;
- 20-22 – 220 hryvnia.
Wheel slip angle and slip coefficient
The numerical designation of slip is defined as the wheel slip coefficient . When a tire covers a distance of two meters from a two-meter circle in one revolution, the coefficient is zero.
In the case when the tire covers a similar revolution in 1 meter, the coefficient is equal to 50 percent.
Scientific research shows that the best rate is 15-10%. An unprepared driver will not feel this right away. It's easier to remember that tires will begin to make squeaking sounds when traction is particularly strong. When the slip coefficient exceeds 15%, grip will noticeably deteriorate.
The described indicators are relevant both in lateral directions and during movement “back and forth”. The sound helps determine the level of grip on the track: when cornering correctly, you will hear a faint squeal from the tires.
OCCUPATIONAL SAFETY REQUIREMENTS IN EMERGENCIES
4.1. In the event of an emergency, you should: — stop all work not related to the elimination of the accident; — report the incident to your immediate supervisor; — ensure the removal of people from the danger zone if there is a danger to their health and life; — take first aid measures if there are victims; — take measures to prevent the development of an emergency situation and the impact of traumatic factors on other people; — carry out other actions provided for by the plan for localization and elimination of incidents and accidents. 4.2. In the event of a fire, you should call the fire brigade by calling 101, report the incident to your immediate supervisor, and take measures to extinguish the fire using available fire extinguishing equipment. The use of water and foam fire extinguishers to extinguish live electrical equipment is prohibited. Carbon dioxide and powder fire extinguishers are used for these purposes. 4.3. In the event of an accident, it is necessary: - while maintaining personal safety, release the victim from the traumatic factor; - provide first aid to the victim, if necessary, call emergency medical assistance by calling 103; — take measures to prevent injury to others; — report the incident to the immediate supervisor or other official of the department or enterprise (dispatcher); — maintain the situation of the incident and the condition of the equipment as they were at the time of the incident, unless this threatens the life or health of others or leads to an accident. 4.4. In all cases of injury or sudden illness, it is necessary to call medical workers to the scene of the incident, and if this is not possible, take the victim to the nearest healthcare facility. 4.5. All work can be resumed only after the causes that led to the emergency have been eliminated with the permission of the immediate supervisor.