Replacing spark plugs on Lada Priora, Kalina and Granta cars (16 valves)
The described procedure for replacing spark plugs is relevant for Lada Priora, Lada Kalina and Lada Granta cars with 16-valve engines (also see the description of the procedure for replacing spark plugs for 8-valve modifications of these cars).
Spark plugs are changed every 30 thousand km when using gasoline as fuel or 10-15 thousand km when using gas fuel (propane-methane).
To replace you will need:
- Spark plug wrench "16"
- Key "10"
- New spark plugs (4 pieces)
- Flat head screwdriver
- Rags
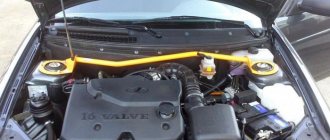
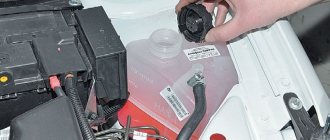
1. Remove the plastic decorative trim. It is installed on clips. Just gently pull it up:
2. Remove the terminals from the ignition coils:
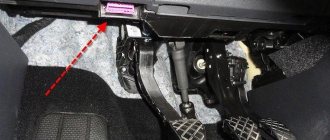
3. Use a 10mm wrench to unscrew the coils:
4. We pull them up by hand. If you can’t pull it out, then carefully use a flat screwdriver to pry the coil by the mounting ear and rest it against the intake manifold, lifting it up like a lever.
If oil is found in the spark plug well, the cylinder head gasket must be replaced. Before changing spark plugs, wipe the oil with a rag. It is advisable to blow it out with a compressor, but if used correctly and the rubber boot on the coils is intact, there should be no dirt in the wells.
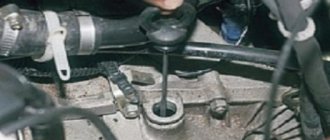
5. Using a spark plug wrench, unscrew the spark plugs. At the same time, they remain in the spark plug well.
6. To pull out the spark plugs, use the ignition coil. We take turns putting it on the candles and lifting them out of the wells.
You can do express diagnostics. Red or brown deposits indicate the presence of lead additives. It's better to change the gas station. Black is too rich a mixture. A white coating indicates that the mixture is too lean. Diagnostics required. A lean mixture with the check engine light not on usually indicates air leaks between the mass air flow sensor and the cylinder head. The light brown color of the coating indicates normal operation of the ignition system.
7. Before installing new spark plugs, we check their gap by eye. It should be within 1.0-1.1 mm. and is the same on all candles. Carefully, holding the shank with one finger, we lower them into the well. DO NOT throw candles as you may crush the electrode.
8. Screw in and tighten the spark plugs with a standard spark plug wrench by hand. Do not lengthen the key, as there is a possibility of stripping the threads on the cylinder head (it is aluminum).
9. Next, in reverse order: install the ignition coils, tighten them with a 10mm key, connect the terminals, put on the plastic cover.
10. Start the engine and check operation. In case of unstable operation (it worked fine on the old spark plugs), check the terminal connections to the coil. If this does not help, then you need to unscrew the spark plugs and check the gap.
Please rate the article
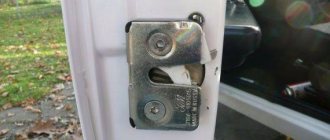
Everything is clear, but on my Kalina I don’t have bolts for the 10th key, but TORX sprockets, like the Europeans, I think they adopted this from the French. So I opened and closed the decorative cover because... no key yet. Will seek.
Thanks a lot! My father had a Zaporozhets all his life. All the time he dragged little me with him to the garage to fix it. There is no longer any father or Cossack. I passed my license and bought a viburnum. I changed a lot of things myself. I don’t have any acquaintances who fumble. I installed new spark plugs - the idle became unstable, vibration appeared (as if the engine was “troubling”). From this article I learned about the gap. I bought feeler gauges, set the gap on the spark plugs to 0.9, everything immediately became good. By the way, if the engine is running rough, don’t rush to buy a new ignition coil (a normal one costs 2000 rubles). remove the rubber insulator from the coil. remove the spring from it (simply pushing it out with a screwdriver). spray the spring from a can of carburetor cleaner. We wet a rag with the same cleaner and wipe the ignition coil electrode until it shines. We put everything back together and everything works!
The process of replacing spark plugs
Before the replacement procedure, it is advisable to blow out or wipe the casing and cylinder head. This is done to prevent dust, dirt and debris from entering the engine block, which can lead to catastrophic consequences.
It will be useful Choosing brake pads for Lada Granta - which ones are better?
For work we will need: a 10 mm socket, a spark plug wrench or a 16 socket with an extension (For eight-valve engines you will need a 21 socket with an extension).
Step-by-step instructions for replacing spark plugs on a Kalina with a 16-valve engine
- With a sharp jerk upward, remove the plastic engine casing.
- We disconnect the wires from the ignition coils, then use a 10 mm wrench to unscrew the mounting bolts and remove the coils from the spark plug well.
- We unscrew the spark plug with a 16mm wrench and insert a new one.
Step-by-step instructions for replacing spark plugs on a Kalina with an 8-valve engine
- Remove the wire end (don't be afraid to use a little force).
- We unscrew the spark plug with a 21 key and replace it with a new one.
When installing candles, you should not use excessive force, otherwise you can break the thread of the well, which can lead to costly repairs. In Kalina, replacement of spark plugs for 1.4 liter and 1.6 liter engines is similar.
How to replace spark plugs in Lada Kalina
Replacing spark plugs is an important procedure that is performed every 30 thousand km or in case of their malfunction. The reason why spark plugs are replaced unscheduled may be unstable engine operation, excessive fuel consumption or poor engine starting. In addition, poor throttle response or when the engine stalls can be evidence of faulty spark plugs. You can even determine the condition of the spark plugs by external signs; below I will give a table by which you can decide whether you need to replace the spark plugs or not.
Today I will talk about how to replace spark plugs on a VAZ 2170, 2171, 2172 (Lada Priora 16 valve)
Before you start replacing, take care of new spark plugs, choose one you like from the options in the auto store.
Replacing spark plugs on a Lada Priora is impossible without a special 16″ socket wrench with an extension. There must be a magnet in the spark plug wrench or head so that the spark plugs can be held suspended.
Possible breakdowns and their causes
There are many reasons why spark plugs can fail. This can happen due to contamination with oil or carbon deposits, destruction of the insulator, mechanical damage, rupture of the jumper, etc. Realistically, you can only deal with pollution. In all other cases, you will have to think about replacing the part.
It will be useful: Replacing the old-style VAZ 2110 heater radiator
There are three main cleaning methods: boiling method, sandblasting method and ultrasonic cleaning method. Due to the fact that ultrasonic cleaning requires specialized equipment, we will focus on the two remaining methods.
Digestion method
The essence of this method is that you need to boil the candles in water with washing powder for an hour. This method will allow you to clean the part from dirt without damaging the housing. It is worth noting that after cleaning they produce an unstable yellow spark, which can cause problems at high speeds.
Sandblasting method
The part is cleaned with compressed air supplied from a sandblasting machine. Unlike the first method, after such cleaning the candles completely restore their original parameters and give a good blue spark. However, this method only works with single-electrode ones, since the ceramic cone is more accessible in them than in multi-electrode ones.
HOW TO REPLACE CANDLES FOR VAZ 2170, 2171, 2172 LADA PRIORA WITH YOUR OWN HANDS.
If you have everything, then you can proceed:
1. First, remove the decorative plastic casing.
2. Next, disconnect the ignition coil terminal.
3. Unscrew the coil mounting bolt.
4. Using a flathead screwdriver, remove the ignition coil.
5. The spark plug is located in a recess, in the so-called spark plug well, so to unscrew it you will need an extension cord.
6. Be careful, if you notice traces of oil in the spark plug well, be sure to find out its origin; the engine may need immediate replacement of the cylinder head gasket.
7. If this is your first time replacing spark plugs, then it will take some effort to unscrew the spark plugs; in some cases it is simply impossible to do this with a simple spark plug wrench. To do this, you will have to buy a special spark plug socket with a knob.
8. So, unscrew the spark plug, be careful not to accidentally break the spark plug insulator, since it will be quite difficult to remove the fragments, and if, God forbid, they get into the cylinder, then you will need to completely disassemble the cylinder head.
9. Remove the spark plug from the well; if this does not work, use the removed ignition coil, put it on the spark plug shank and try again.
10. The candle has been removed, now you can look at its condition.
11. Draw a conclusion based on the table above. If the spark plug insulator is clean and does not fall into any of the categories, everything is fine with your engine.
Spark plugs for gas cars (GBO): which ones are better?
Today, many people install gas-cylinder equipment on their cars, since driving on gas is much cheaper and more profitable than driving on gasoline. The following spark plugs are suitable for such cars:
- French BERU Ultra 14R-7DU, they are not quite designed for gas, but still suitable;
- Ukrainian Plazmofor Super GAZ have good quality, but are inferior to imported ones;
- Czech Brisk LPG LR15YS Silver, the electrode of which is made of silver. They are cheap but non-toxic.
- German Bosch Platinum WR7DP - they have a thin electrode and an original design;
- Japanese NGK LPG LaserLine are quite expensive, but non-toxic and economical.
In general, there are a large number of them, the main thing is to choose models with thin electrodes for gas.
How often to change spark plugs on viburnum
The official resource of candles is 30 thousand kilometers. In my Kalina, until I was thirty, they did not betray themselves in any way, they worked like clockwork. Never even unscrewed it. I talked to the fret workers - they told me that 30 is not the limit for candles. They easily work 1.5-2 times more. So I decided at TO-30 thousand that I would not change them, let them work. I'll change it when the sparking stops.
The candles successfully survived their legal 30 thousand... but did not even reach the 31st. In mid-January, at 30,700 km on the way to Chelyabinsk, while accelerating, the “Check engine” light suddenly began to blink, the dynamics suddenly disappeared, the engine stalled. At the same time, the car could still reach its 110, I must say. I stopped, restarted the engine, the error disappeared, the engine was normal. But then 8 more times on this trip, until I returned home, this error popped up! You restart, drive - and then again. I didn’t immediately realize that the self-diagnosis system detects missed flashes and thereby notifies about the problem. In general, the end of the candles has come. And you can’t blame it on the fuel - the error occurred when the tank was almost empty and was running on a light bulb.
After driving for a few more days, restarting the engine many more times, I realized that the problem would not go away, although at some moments it seemed that everything was already gone. I bought a set of the same factory new spark plugs AU17DVRM from a dealer for 300 rubles and changed them in the evening in about 20 minutes. Initially I wanted to buy NGK proven spark plugs, but didn’t get to the store.
Knowing about the stupid star bolts that secure the coils, I bought a 1/4-inch E8 head in advance, at first I almost bought half an inch, but I checked and saw that it rests on the coil itself. I used a time-tested 16-inch Brigadier spark plug head with a half-inch rubber insert for the wrench. I bought it back in the summer of 2010 for a newly purchased second scooter (instead of the standard wretched scooter tool), she removed spark plugs on it, on the third scooter, and on the Ford, and now it’s Kalina’s turn)
The coils sat tightly on the spark plugs, so I had to carefully pull them out with pliers. The candles themselves easily moved from their places, and I was afraid that they had rusted there tightly. The candles did not arouse any suspicion, except for a yellow coating on the hexagon. The electrodes are in place, without visible damage, the gaps are normal. However, after replacement, the disease disappeared.
But 5 thousand km a week after the trip to Kostanay, everything started to repeat itself again! I thought it would stop, but no! I was shocked why factory spark plugs lasted 30 thousand, but exactly the same retail spark plugs lasted only 5! This time I didn’t buy them, but still I wasn’t lazy and drove to Canister, where I bought branded NGK 7121 for Lada, including 218 rubles apiece, versus 300 VAZ rubles for a set. Another week later I found the time and changed them. Until they rebel) These spark plugs have the same picture as the first ones - they look normal, but the engine thinks differently.
Replacing spark plugs on a Lada Kalina is a very simple and not too expensive procedure. However, it is not always necessary to replace consumables; it is quite possible that the old spark plugs will serve you a little longer.
Replacing the timing belt Lada Kalina 2, Granta 8 valves
Lada Kalina Sedan SPORTS casual Logbook Bumper Kalina Sport-1 Part.5 Installation
Yesterday one of our regular customers came to us with a recently purchased second-generation Kalina to replace the timing belt, roller and pump, plus all the fluids, but more on that in another article. This engine was also installed on the Grant, so this article will be relevant for it as well. The speedometer shows 60,000 and I believe that for this engine this is the optimal replacement interval, even though all reference books say about 75,000.
Let’s make a reservation right away that when the timing belt breaks on this car, the valves bend. It is recommended to check the condition of the belt every 15,000 kilometers.
To work, we will need a set of keys and sockets, as well as a 5-point hex and a key for the tension roller. The entire procedure takes approximately one and a half hours.
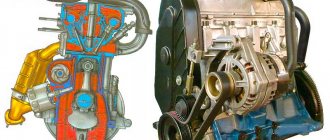
The engine is similar to the eighth.
First, remove the protection, drain the antifreeze, and for convenience you can remove the right front wheel. Next, loosen the locknut of the generator belt tensioning mechanism. Using a 10mm socket, unscrew the tensioner pin and remove the belt.
We unscrew the four bolts with a 5mm hexagon and remove the upper protective cover of the timing belt.
Set top dead center (TDC). We turn the crankshaft by the pulley mounting bolt clockwise until the mark on the camshaft sprocket and the timing belt protective casing coincide.
Unscrew the crankshaft pulley bolt. We block the wheels with stops, tighten the handbrake, engage fifth gear and, with a slight movement of the wrench and a one and a half meter pipe extension, unscrew this bolt.
Next, use the same 5mm hexagon to unscrew the bolts securing the lower timing case cover and remove it.
Remove the protective washer.
The marks on the crankshaft sprockets should be aligned with the oil pump casting.
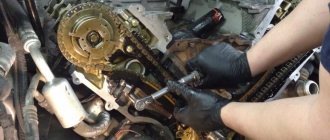
Praise be to the designers of AvtoVAZ, finally rollers with a tension indicator appeared on the engines, now you don’t need to tighten them by eye and check the tension by twisting the belt, not even thirty years have passed since the invention of such a design. We unscrew the tension roller bolt and dismantle the latter; we also remove the old timing belt. The photo shows that the belt has stretched out because the tension marks have diverged; when checking the condition of the timing belt, if you see this, you will just need to tighten it.
To replace the pump, we need to remove the camshaft sprocket, and also unscrew several bolts of the inner casing and remove it.
Three bolts out and the pump replaced. The green arrow indicates the hole for the tension roller bolt.
Having replaced the water pump, we proceed to install a new timing belt.
We put the casing and camshaft sprocket in place. We check that all the marks match, as discussed above. We install the tension roller, but do not tighten the bolt. We put on a new belt, observing the direction of rotation, first on the crankshaft sprocket, camshaft, tension roller and pump, the latter can be swapped. We tighten the timing belt. Use a special key to turn the roller counterclockwise, as indicated on its body...
...until the marks on it coincide and tighten the bolt.
We turn the crankshaft two turns and again check the alignment of the marks and the belt tension.
We install all the parts in the reverse order of removal, fill in antifreeze and start it. It couldn't be simpler.
Good luck on the roads. No nail, no rod!
How often should you change spark plugs?
The standard frequency of replacing spark plugs on a VAZ can vary quite widely - from 30 thousand kilometers for regular (standard) ones and up to 80 thousand for modern iridium and platinum ones. As with any other consumables, fluctuations are possible, the main factors influencing which are the condition of the engine and ignition system, the quality of the fuel and the nature of the vehicle's operation. For example, if you often drive short distances around the city, then even if all car systems are working normally, the spark plugs usually become covered with black soot quite quickly, since they do not reach the required temperature for self-cleaning.
It is not difficult to diagnose the condition of spark plugs. It's better to do this visually. If you find only slight darkening and a small grayish-yellow or pale brown coating on dry electrodes that have not lost their shape, you can safely return the spark plugs to their place and drive on.
If a significant coating of black or white or a shade of rust is detected, oiling is already a reason to think about replacing them or at least cleaning them. Cleaning can be done by soaking the spark plugs in gasoline or a special liquid and carefully removing the deposits with a brush or fine sandpaper. In this case, be sure to check the spark plug gap between the electrodes using feeler gauges. It will almost certainly be different from the recommended 1-1.1 mm. To continue operation, it must be restored by carefully bending the side electrode. But keep in mind that this is more of a temporary measure, after which the period for replacing spark plugs will pass much faster than with new ones.
It is better to throw away electrodes if they:
- Heavily contaminated
- Lost form
- Melted
- Broken off
- Has damage to the insulator
By the way, this condition is usually a direct indication of the presence of more serious problems, or the car owner’s reluctance to carry out maintenance on time. Like all other consumables, it is better to change candles regularly and in a timely manner. But what are the best spark plugs for Kalina?
Ceramic deposits have appeared - change the spark plugs immediately!
In terms of their operational parameters, including durability, all components of the listed items are almost the same from each other. This is confirmed by reviews from car owners expressed on various forums, etc. Perhaps there are more expensive components, the use of which will allow a simple replacement to increase power, engine torque or some other characteristics. But having installed such spark plugs in the 21126 engine, you will most likely have to forget about the warranty on the AY-K3 gearbox. It’s always like this with technology: we need to imagine what exactly we are doing and what we want to achieve as a result.
Indications for replacing spark plugs:
- If there is black soot (“suede”) on the insulator cone and electrodes, then cleaning or replacement can be done. Cleaning is carried out, among other things, by heating. When replacing, it is better to use spark plugs with a slightly lower heat value than before;
- If the surface of the insulator looks like yellowish glossy ceramic, then the spark plug needs to be replaced. In this case, a glassy glaze is formed. It is electrically conductive.
In the first of the cases considered, carbon deposits are formed because not all elements of the candle are heated sufficiently, and self-cleaning does not occur. This can happen when the car is used for short trips with low speeds and frequent starts and stops. The same effect is typical for operating the motor at low temperatures. Logically, in such situations, the recommended replacement would be a spark plug with a lower heat rating than what was intended by the manufacturer. You can try installing A14DVRM spark plugs instead of A17DVRM in an 8-valve engine, and so on. Only now, such a replacement must be discussed with the dealer.
What candles to put in Kalina
The manufacturer for Kalina recommends domestic spark plugs of type A17DVRM (for 8-valve engines) and AU15DVRM, AU17DVRM (for 16-valve engines), as well as their foreign analogues. For example, for 8-valve cars, spark plugs BRISK LR15YC (Czech Republic), BOSCH WR7DC (Germany), NGK BPR6ES (Japan) are suitable, for 16-valve cars, respectively, BRISK DR15YC, BOSCH FR7DCU and NGK BCPR6ES.
All of the above spark plugs are single-electrode – this is the type again recommended by the manufacturer. It is not prohibited to install multi-electrode analogues (it is believed that they give a better arc), just keep in mind that they will cost a little more, and you may not notice the effect. As for iridium and platinum spark plugs, their main advantage is their long service life.
1200 rub. for the photo report
We pay for photo reports on car repairs. Earnings from 10,000 rubles/month.
Write:
The line of cars from VAZ - Priora, Kalina and Granta are similar in many ways. Each of these cars has different modifications with different engines. But, in fact, the main difference in the engines of these models is only in the number of valves.
Spark plugs for Priora, Kalina and Grant differ only depending on whether an 8- or 16-valve engine is installed, regardless of the generation or year of manufacture of the car. Original spare parts for all three models are supplied by the Russian company ZAZS OJSC.
Choosing spark plugs for the engine 21116 and 21126
According to technical regulations, spark plugs in engines 21116 and 21126 should be changed during maintenance-2, that is, after 30 thousand km. In fact, this period can be extended by one and a half times if we are talking about gentle operation. But you shouldn’t do this if the car is under warranty (then the replacement is carried out according to the regulations). Here we will list which spark plugs are suitable for each of these engines. We will assume that the owner of Kalina-2 uses the catalogs of the following companies: BERU, CHAMPION, NGK, DENSO, BRISK, BOSCH.
It will be useful: Removing and replacing the timing belt VAZ 2112
AvtoVAZ’s recommendations for choosing spark plugs look like this:
- JSC ZAZS (Russia) – AU17DVRM, A17DVRM;
- BERU (Germany) – 14FR-7DU, 14R-7DU;
- CHAMPION (England) – RC9YC, RN9YC;
- NGK (Japan) – BCPR6ES, BPR6ES;
- DENSO (Japan) – Q20PR-U11, W20EPR;
- BRISK (Czech Republic) – DR15YC, LR15YC;
- BOSCH (Germany) – FR7DCU, WR7DC.
On the left is the brand of the product suitable for a 16-valve engine, on the right is for an 8-valve engine. You may notice that spark plugs with thin electrodes, iridium, etc. were not listed here. A thin electrode is then used to ensure reliable ignition at high speeds (7,000, 8,000 rpm or more), but for VAZ engines above 6,000 rpm the cutoff is triggered. Iridium spark plugs have a thin central electrode in their design, but as we have already found out, switching to using such parts is a waste of money, and nothing more. The durability of iridium spark plugs approximately corresponds to the “lifespan” of a spark plug with a standard copper electrode. We leave the choice to the owner.
Spark plugs for Kalina, Priora and Grant - which ones to choose?
Lada Kalina (1st and 2nd generations), Granta and Priora were equipped with both 8 and 16 valve engines. And although they differed for each car, they were still structurally very similar. Therefore, the same spark plugs were installed on all three cars; the differences are only in the article numbers. Spark plugs, as mentioned above, differ on all cars only depending on the number of valves in the engine.
In the original, all three cars are equipped with ordinary nickel spark plugs, with one ground electrode. The main differences between the spark plug for 8- and 16-valve engines are the size of the key for screwing it in.
More details about sizes and original articles in the table below.
| vendor code | Number of engine valves | Thread / thread length, mm | Key size | Gap, mm | Heat number* | Center electrode material |
| 21120-3707010-00 (for Priora), 21110-3707010-00 (for Kalina and Granta) | 8 valves | M14×1.25 / 19 | 20.8 | 1 | 17 | Nickel |
| 21120-3707010-01 (Priora), 21110-3707010-01 (Kalina 1), 21110-3707010-03 (Kalina 2, Granta) | 16 valves | M14×1.25 / 19 | 16 | 1 | 17 | Nickel |
*According to Champion nomenclature (Russian standard)
Despite the fact that each car has a different article number of original spark plugs, they are interchangeable. Original spark plugs can be found on sale directly from the manufacturer “ZAZS”. For 8-valve engines they have article number A17DVRM, and for 16-valve engines - AU17DVRM.
The most well-known replacement models from other manufacturers are presented below.
| Manufacturer | vendor code | Price, rub (for 1 piece) |
| Analogs for 8-valve engines | ||
| NGK | BPR6ES | 140 |
| Bosch | 0242235663 | 100 |
| Denso | W20EPR-U | 100 |
| Analogues for 16-valve engines | ||
| NGK | BCPR6E-11 | 150 |
| Francecar | FCR211044 | 70 |
| Denso | Q20PR-U11 | 120 |
As surveys on some popular automobile communities on the RuNet show, the most popular brands among owners of VAZs of the tenth family are NGK and Denso. In addition to ordinary nickel spark plugs, owners of the cars described in the article often resort to installing more advanced iridium spark plugs. Their service life is consistently three times longer than usual, or even more. In addition, they also slightly improve the responsiveness of the engine. The most popular spark plugs for these cars are from Denso. For 16th grade. this is IK20 at a price of 520 rubles/piece, and for 8 cells. — IW20, price — 590 rub./piece.
When to change spark plugs on Priora, Kalina and Grant?
According to the maintenance regulations for Lada Kalina, Granta and Priora, spark plugs must be changed every 30 thousand km. mileage, regardless of the configuration of the car, or how many valves the engine has. But, this indicator is strongly influenced by some factors, such as fuel quality, operating conditions, etc. Therefore, in fact, their service life on average is somewhere around 20-25 thousand km.
In accordance with the maintenance regulations for the Lada Kalina car, we replace spark plugs every 30 thousand kilometers. How this is done on a 16-valve and 8-valve engine is shown in the photo.
LADA > Kalina
We carry out the work on a cold engine.
On a 16 valve engine
Which spark plugs for Lada cars are best to choose?
A malfunction of the spark plugs immediately affects the operation of the engine; it begins to stall, jerk, does not pull, or starts poorly. To solve the problem, simply replace them with new ones, but which spark plugs are better to choose?
All modern 8 and 16 valve power units have the same manufacturer's recommendation. In other words, advice on choosing spark plugs will be similar for all modern Lada cars.
In the user manual for Lada Priora, Kalina, Granta, Vesta Largus, Niva and XRAY cars, the engine technical specifications contain the following data:
It will be useful: Removing and replacing rear shock absorbers of a VAZ 2107
VAZ 11183, VAZ 11186/11189
VAZ 21126, VAZ 21127
Granta, Kalina, Largus, Vesta
Granta, Kalina, Priora
| Engine | ||||
| Automobile model | ||||
| JSC "Robert Bosch Saratov" or EZ, Russia | A17DVRM/ A15DVRM | AU17DVRM/AU15DVRM | AU17DVRM | AU17DVRM |
| BERU, Germany | 14R-7DU | 14FR-7DU | 14FR-7DUX | |
| CHAMPION, England | RN9YC | RC9YC | RN9YC4 | RYCLC87 |
| NGK, Japan | BPR6ES | BCPR6ES | BPR6E | LZKAR7D-9 |
| DENSO, Japan | W20EPR | Q20PR-U11 | ||
| BRISK, Czech Republic | LR15YC-1/ LR17YC-1 | DR15YC-1/DR17YC-1 | DR15YC-1 | |
| BOSCH, Germany | WR7DCX | FR7DCU | WR7DC | FR7DCU |
| SAGEM | RFN58LZ | |||
| FINWHALE | F510 |
The gap between the spark plug electrodes should be within 1.1.15 mm. Let us remind you that Lada Vesta and Lada XRAY can be equipped with a Nissan-Renault HR16/H4M engine. The spark plug gap in this case should be 0.85...0.95 mm. For K4M/K7M engines (more about spark plugs), the gap between the spark plug electrodes is 0.95+-0.05.
According to the requirements, the manufacturer must guarantee uninterrupted operation of the spark plugs for 18 months, provided that the vehicle mileage does not exceed 20,000 km. However, with good technical condition of the engine and proper operation, the service life of the spark plugs can be significantly longer. Thus, spark plugs are often replaced every 3 years or after 40 thousand km.
Marketers suggest improving engine performance by installing, for example, iridium, platinum or multi-electrode spark plugs on the Priora, the price of which is higher than usual. AvtoVAZ recommends using conventional, single-electrode spark plugs for its engines. In a review by ZaRulem magazine, a survey was conducted that shows that the majority of drivers follow the factory’s recommendations and choose simple, inexpensive spark plugs.
As part of the same review, nine different spark plugs were tested. As a result, they all passed the tests, and the winner was determined by summing up the points:
So what spark plugs should I put on the Priora/Granta/Kalina/Vesta? Based on the recommendations of AvtoVAZ, the test results of a popular car magazine and a survey of the social network VKontakte, we can conclude that the best choice would be spark plugs from manufacturers: NGK, Bosch, Denso, Brisk and EZ Standard.
What kind of spark plugs do you use? What is the main factor when choosing them? Let us remind you that a high-quality battery also affects engine starting.
2302-3-2-09-06 (Copy)
When installing the spark plug, you must screw it in by hand to avoid damaging the threads of the spark plug hole in the cylinder head.
If the spark plug does not follow the thread, strong resistance to rotation will be felt. In this case, it is necessary to completely unscrew the spark plug and, after cleaning the threads, re-tighten it.
Finally tighten the spark plug to a torque of 25–30 N. m.
Attention! Over-tightening the spark plugs can damage the threads in the spark plug holes in the cylinder head.
We replace the remaining spark plugs in the same way.
On an 8-valve engine
2279-4-12-02 (Copy)
When installing the spark plug, you must screw it in by hand to avoid damaging the threads of the spark plug hole in the cylinder head.
If the spark plug does not follow the thread, strong resistance to rotation will be felt. In this case, it is necessary to completely unscrew the spark plug and, after cleaning the threads, re-tighten it.
Finally tighten the spark plug to a torque of 31–39 N. m.
Attention! Over-tightening the spark plugs can damage the threads in the spark plug holes in the cylinder head.
The official resource of candles is 30 thousand kilometers. In my Kalina, until I was thirty, they did not betray themselves in any way, they worked like clockwork. Never even unscrewed it. I talked to the fret workers - they told me that 30 is not the limit for candles. They easily work 1.5-2 times more. So I decided at TO-30 thousand that I would not change them, let them work. I'll change it when the sparking stops.
The candles successfully survived their legal 30 thousand... but did not even reach the 31st. In mid-January, at 30,700 km on the way to Chelyabinsk, while accelerating, the “Check engine” light suddenly began to blink, the dynamics suddenly disappeared, the engine stalled. At the same time, the car could still reach its 110, I must say. I stopped, restarted the engine, the error disappeared, the engine was normal. But then 8 more times on this trip, until I returned home, this error popped up! You restart, drive - and then again. I didn’t immediately realize that the self-diagnosis system detects missed flashes and thereby notifies about the problem. In general, the end of the candles has come. And you can’t blame it on the fuel - the error occurred when the tank was almost empty and was running on a light bulb.
Replacing spark plugs on Lada Priora, Kalina and Granta cars (16 valves)
The described procedure for replacing spark plugs is relevant for Lada Priora, Lada Kalina and Lada Granta cars with 16-valve engines (also see the description of the procedure for replacing spark plugs for 8-valve modifications of these cars).
Spark plugs are changed every 30 thousand km when using gasoline as fuel or 10-15 thousand km when using gas fuel (propane-methane).
To replace you will need:
- Spark plug wrench "16"
- Key "10"
- New spark plugs (4 pieces)
- Flat head screwdriver
- Rags
1. Remove the plastic decorative trim. It is installed on clips. Just gently pull it up:
2. Remove the terminals from the ignition coils:
3. Use a 10mm wrench to unscrew the coils:
4. We pull them up by hand. If you can’t pull it out, then carefully use a flat screwdriver to pry the coil by the mounting ear and rest it against the intake manifold, lifting it up like a lever.
If oil is found in the spark plug well, the cylinder head gasket must be replaced. Before changing spark plugs, wipe the oil with a rag. It is advisable to blow it out with a compressor, but if used correctly and the rubber boot on the coils is intact, there should be no dirt in the wells.
5. Using a spark plug wrench, unscrew the spark plugs. At the same time, they remain in the spark plug well.
6. To pull out the spark plugs, use the ignition coil. We take turns putting it on the candles and lifting them out of the wells.
You can do express diagnostics. Red or brown deposits indicate the presence of lead additives. It's better to change the gas station. Black is too rich a mixture. A white coating indicates that the mixture is too lean. Diagnostics required. A lean mixture with the check engine light not on usually indicates air leaks between the mass air flow sensor and the cylinder head. The light brown color of the coating indicates normal operation of the ignition system.
7. Before installing new spark plugs, we check their gap by eye. It should be within 1.0-1.1 mm. and is the same on all candles. Carefully, holding the shank with one finger, we lower them into the well. DO NOT throw candles as you may crush the electrode.
8. Screw in and tighten the spark plugs with a standard spark plug wrench by hand. Do not lengthen the key, as there is a possibility of stripping the threads on the cylinder head (it is aluminum).
9. Next, in reverse order: install the ignition coils, tighten them with a 10mm key, connect the terminals, put on the plastic cover.
10. Start the engine and check operation. In case of unstable operation (it worked fine on the old spark plugs), check the terminal connections to the coil. If this does not help, then you need to unscrew the spark plugs and check the gap.
Please rate the article
Everything is clear, but on my Kalina I don’t have bolts for the 10th key, but TORX sprockets, like the Europeans, I think they adopted this from the French. So I opened and closed the decorative cover because... no key yet. Will seek.
Thanks a lot! My father had a Zaporozhets all his life. All the time he dragged little me with him to the garage to fix it. There is no longer any father or Cossack. I passed my license and bought a viburnum. I changed a lot of things myself. I don’t have any acquaintances who fumble. I installed new spark plugs - the idle became unstable, vibration appeared (as if the engine was “troubling”). From this article I learned about the gap. I bought feeler gauges, set the gap on the spark plugs to 0.9, everything immediately became good. By the way, if the engine is running rough, don’t rush to buy a new ignition coil (a normal one costs 2000 rubles). remove the rubber insulator from the coil. remove the spring from it (simply pushing it out with a screwdriver). spray the spring from a can of carburetor cleaner. We wet a rag with the same cleaner and wipe the ignition coil electrode until it shines. We put everything back together and everything works!
Lada Kalina timing belt replacement 8 valves
It is recommended to check the timing belt every 15 - 20 thousand kilometers.
A broken belt on an 8-valve Kalina is not fatal; the valves will remain intact, but on a 16-valve Kalina it will bend them. Therefore, you need to monitor the timing belt and promptly change it to a new one (its service life is from 50 to 80,000 kilometers). The process of replacing the timing belt is almost the same for both 8 and 16 valve engines. First you need to remove the plastic timing belt protection, which is secured with 3 bolts.
Now you need to remove the right front wheel. You will have access to the right engine protection panel. Unscrew the 2 screws that secure it and pull it down. Now we can reach the pulley on the crankshaft.
Before this, you need to rotate the crankshaft and install both sprockets (crankshaft and camshaft) according to the marks:
To unscrew the flywheel you need to lock the crankshaft. On the clutch side, the engine has a special viewing window through which the flywheel is visible. We remove the rubber band and lock it with a powerful screwdriver. For this you will need an assistant.
The pulley can be very tight, so don't be surprised if it won't come off.
Then you need to remove the alternator belt.
We remove the pulley, remove the old belt. To do this, unscrew the tension roller and release the belt as much as possible.
Now ATTENTION! Make sure that the gears do not go astray
We begin to put the new belt on the crankshaft gear. Then we pull it onto the camshaft gear on the right side. We keep an eye on the signs all the time. Next, we pass the belt through the roller and pull it onto the pump.
We tighten the timing belt using a roller. For this I used a homemade key made of steel wire (2-3 mm):
The belt must be tensioned so that it can be rotated 90 degrees, but no more, no less. After tensioning, turn the crankshaft 2-3 turns and again look to see if the marks are off. If it goes wrong, then we remove it and set everything again.
We reassemble in reverse order.