Headlights on gazelles are not adjustable
the prologue
.
Of course, we are not talking about a girl named Sveta, but about the head light (lighting) of a car. To be honest, the simple flight Domodedovo-Yaroslavl-Ivanovo-Vladimir-Ryazan turned out to be quite difficult. More on this later in the blog. On the way to loading and back, when it got dark, drivers of oncoming cars asked to remove the distant one and switch. But there was nowhere to switch and lower the corrector! The weather was awesome! And especially nervous with your ego! And to hell with the distant ones turned on! For...li! There’s no way to cope with this on the road...On your way home! So I decided to take care of the oncoming traffic... Although in fairness it should be noted that the gazelle had not been looking at the road for a long time, but was looking in the bushes, along the side of the road: “Who’s pooping there... But everyone today and tomorrow, they made it through!”
============================================================
You can read the essence So let's see what the primer dictates to us...Operation manual: Draw a line along the centers of the headlights at a distance of 5 meters on the screen...Go to...oops! Why? Let me explain...
You need to make high-quality consumables, and light bulbs are such... And don’t let morons pass moronic laws! And if, as in the euro...oops! Likewise, control is essential over the execution of products, with the help of which we adjust their law! This is lyrics! Light bulbs, I don’t remember the name... And it’s not that important! I had no complaints about them, but time, constant work in strict temperature limits, wears out the filament or glow... Fuck it, you get the idea. Correctors that are from our European roads! They're just babbling! That’s why the lights on the cars are constantly on, either like the deceased Kramorov’s or in a runaway direction! They also took a running start on my gazelle. I remember from the nine, how the mechanism was made, on Zhiguli cars in general! I thought with a slight adjustment it would give me a ride on a gazelle, no, it didn’t! The kid was wrong. We went to a former airfield. Overgrown, cluttered. And once used for receiving and basing strategic bombers - An 2! Among the enemies is a corn farmer! Many agricultural pests, devouring the crops of local collective farms, listen with caution...What am I talking about? A! Yes! About light... More or less horizontal area. On the nine, 15 steps were enough for me with the corrector lowered and 24 with the corrector raised. I thought the gazelle was taller - I miscalculated! This is me getting ahead of myself. In general, as always, I don’t impose, but I’ll just share what I use myself. You can recalculate, modify, or not pay attention at all - it doesn’t matter! The main thing would be said and provided! I tried to mess around with lining the wall, but I’ll say it’s not an option for me. Either I blinded and didn’t see the asphalt, or I was shining the light for myself. Therefore, I idly came up with this method. That is, lower a spot of light onto the intended section of the road on which, if a problem arises, obstacle, I will be able to process the information in a timely manner and make a decision! Strongly said! Yes?! Hell no! That's right... Otherwise, why shine? Looking aside, I will say that many gazellists, in particular, being carried away by illumination, simply do not think about it! They stick round shapes in front of the radiator grille and shine into the sky (especially visible in fog) Why? Well, for various reasons, perhaps the dead ones on legs fall onto the spotlights when they look at the oil, and return them back... To your sheep: I took a wooden box as a beacon, it was placed on the dad in the center of the headlight. Set it to 30 steps. Strictly following the direct direction of the car and the right headlight accordingly. This is the right shoulder. Turned off the left headlight. Let's look... The box is in a slight glare of chiaroscuro, and is not illuminated. On the gazelle headlight - business - there are two adjustment screws. Under the 6mm hexagon - this is in the vertical plane (higher and lower). And the plastic one is horizontal (right-left). First, I adjusted the horizon - a box appeared in the light, then the vertical... A box appeared in the center of the spot. Corrector for lifting, it is necessary that the shadow from the box cuts through the spot of light that is behind it, exactly to its height. You can simply add one and a half steps equal to the divisions on the corrector regulator scale. Or the step depends on the light bulbs. Next, it’s difficult to get to the right headlight, I just closed it, there may be a mistake! The box does not need to be placed in the same way to the left headlight, we move it one step, but that will come later! Now the left headlight needs to be adjusted at this angle from the spot of light to the box.
This is all with the corrector raised high! Next, the box is a step to the left, it should not be illuminated, it should just be visible! All! What is this for? You can go give your money and they’ll fix it for you! To each his own...I prefer not to have standards and not see a damn thing, and it’s all for money! I prefer people not to s...t (not to blind those they meet), and to be on topic - to see the road.
With this method I achieve what I described and nothing more. I will say that it on the wall corresponds to the standards described in the book, with only a small adjustment to the daw from the left headlight. See for yourself.
And I underestimated. The weather is rain and black darkness with the absorption of light - it doesn’t matter, you can adjust each headlight by two turns without a box. And in a matter of seconds. In the snow with blue lamps (which are banned) you can set them up perfectly! In general, I repeat... The point is the norm, to know the norm... To see and not blind!
Adjusting the direction of beams of light from GAZelle Business headlights.
We adjust the direction of the headlight beams in accordance with the maintenance regulations every 30 thousand km of the vehicle.
The adjustment is carried out on a fully fueled and equipped vehicle, with normal air pressure in the tires. We install the car on a flat horizontal area at a distance of 10 m from the screen (you can use a garage wall, a sheet of plywood or hardboard measuring 1 × 2 m). We draw a horizontal line HH on the screen at a height equal to the distance from the center of the headlights to the floor. Below it, 88 mm ( 100 mm for 4x4 vehicles), draw a parallel line XX. We draw on the screen the center line VV (the distances from it to the centers of the left and right headlights should be equal) and the lines DD and GG corresponding to the centers of the headlights.
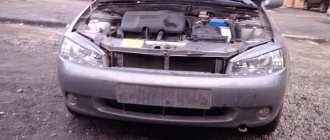
GAZ Gazelle 406i › Logbook › How I digested the face (from the old model to the new one)
The idea to make a new face has been around for a long time. But the volume of upcoming work and the amount of hemorrhoids did not allow me to do this. But just recently I got into another traffic accident and still decided to redo it, since the left side would have to be digested. And the main argument was normal headlights.
Well, it began... At first there was a long study on the Internet, how to do what, in the end I realized that I needed to do everything myself, by trial and error. I compiled a list of spare parts: Fenders, no Hood, no Bumper Business with brackets Front cover Radiator bracket Wing frames Glasses for headlights Headlights Hood hinges and various small things like hood lock, bolts, nuts, etc. Since the wing frame is sold only assembled and separately from the glasses, it was decided to buy these parts in disassembly, so that there would be less hemorrhoids during construction. But even here I miscalculated, the left side was sold broken (I bought it when it was already dark, I didn’t see it, and there was no time left to go change it). Everything else was bought new.
For those who decide to do such a modification, a little instruction (as I did):
First of all, we disassemble and cut off everything unnecessary
Then we screw the wings to the cabin, setting the gaps along the doors. Along the wings, we place the hood on hinges and put something under it so that it doesn’t sink lower. We put a hood lock and attach the front cross member (which is screwed to the headlight glasses). We screw the glasses with the wing frame and make supports to hold it all in. We throw off the wings and We trim the wing frame in place. We grab the whole thing with a couple of points and put the wings on again to see the gaps.
Then we hang the bumper and headlights, see that everything is fine, again we disassemble everything and boil everything. I left my spars, straightened the left one a little (after the accident it ran a couple of cm to the right), put a channel inside the size and 40 cm in length, scalded it and welded it to the glasses with gussets. Another assembly (fitting, adjustment) before painting.
That's all! Again we take everything apart and take it to prime and paint.
We clean all seams and cover them with mastic.
A little about paint... Since a month before the accident I covered the cabin with raptor, there was no turning back. As a result, I primed all the new parts, then covered them with a thin layer of raptor from a spray gun (thinned the raptor), and put 2 layers on top using an anti-gravel gun.
source
Rules for adjusting car headlights
Changing the direction of the axis of the light beam when adjusting the headlights is ensured by rotating the parabolic reflector, the focus of which is the light bulb, by moving it relative to the vertical and horizontal planes.
The correct position of the reflector is established by two vertical and horizontal adjustment screws, which are located on the rear surface of the headlight unit.
To correctly adjust the headlights, it is necessary to combine the light spot formed by the optics with the reference adjustment diagram, which is usually provided by the car manufacturer (in our case, the headlight adjustment diagram for Tavria and Slavuta cars).
Scheme for adjusting the headlights of a car
Headlights are adjusted in the following order:
- An unloaded car is placed on a flat horizontal platform at a distance of 5 meters from the screen. Any wall or low fence (up to one meter) is quite suitable as a screen.
- A vertical line “0” is applied to the screen, lying in the plane of symmetry of the machine (look at the adjustment diagram). To the left and right of it, two more symmetrical lines “L” and “R” are drawn, which should coincide with the centers of the left and right headlights.
- At a height corresponding to the distance of the centers of the headlights from the ground, a horizontal line “1” is applied, and a line “2” is applied 50 mm below it.
- When the preparation is complete, turn on the low beam headlights and begin adjusting.
- Closing each headlight in turn, check the location of the light border relative to the adjustment diagram printed on the screen. It should run along line “2”, with the inclined segments starting at points “E”.
- If this does not happen, then you should adjust the headlights using the horizontal and vertical adjustment screws.
The process of adjusting the headlights is shown more clearly in the video below. However, even if after adjustment you still do not have enough illumination of the road, perhaps polishing the headlights will help correct the situation.
Adjusting the direction of beams of light from GAZelle Business headlights.
Adjusting the direction of beams of light from GAZelle Business headlights.
Other posts on headlight adjustment:
We adjust the direction of the headlight beams in accordance with the maintenance regulations every 30 thousand km of the vehicle.
The adjustment is carried out on a fully fueled and equipped vehicle, with normal air pressure in the tires. We install the car on a flat horizontal area at a distance of 10 m from the screen (you can use a garage wall, a sheet of plywood or hardboard measuring 1 × 2 m). We draw a horizontal line HH on the screen at a height equal to the distance from the center of the headlights to the floor. Below it, 88 mm ( 100 mm for 4x4 vehicles), draw a parallel line XX. We draw on the screen the center line VV (the distances from it to the centers of the left and right headlights should be equal) and the lines DD and GG corresponding to the centers of the headlights.
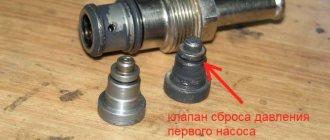
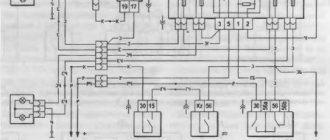
The location of the light beam direction regulators on the headlight housing.
1 – regulator of the light beam in the vertical plane; 2 – screw for adjusting the light beam in the horizontal plane.
Set the headlight range control switch to the “” position and turn on the low beam headlights. Cover one of the headlights with opaque material.
By turning the screw, we change the position of the headlight beam in the horizontal plane.
Left-right adjustment.
By turning the regulator with a Phillips screwdriver, we change the position of the light beam in the vertical plane.
Up and down adjustment.
When adjusting, the upper boundary of the light beam should coincide with the lower horizontal line (see figure), and the point where the beam breaks (the point of intersection of the horizontal and inclined sections of the light beam) should coincide with the vertical line corresponding to the center of the headlight.
Screen markings for adjusting the direction of headlight beams.
a – headlights marked “^L” on the lens; b – headlights with the “OSVAR” marking on the lens.
Similarly, we adjust the direction of the light beam of the other headlight.
Replacing lamps, removing headlights
To replace the lamps in the headlight with the ignition off, turn the headlight cover counterclockwise and remove it.
To replace the headlight bulb, remove the connecting block from the low beam - high beam lamp terminals.
We remove the antennae of the spring clamp from the grooves
We remove the faulty lamp.
We install the new lamp in the reverse order.
Do not hold the halogen lamp by the glass bulb with your hands to avoid leaving fingerprints.
If this happens, wipe the lamp with alcohol. Otherwise, the lamp bulb may darken when turned on.
To replace the side light bulb, remove the socket
By lightly pressing on the lamp bulb and turning it counterclockwise, remove the lamp
To remove the headlight assembly, disconnect the connecting block of the lamp power wires
Disconnect the electric drive block for the headlight range control.
Using a 10mm socket, unscrew the headlight mounting bolt in the engine compartment.
Use a 10mm wrench to unscrew the two bolts.
If the bumper prevents you from removing the headlight, first use a 10mm socket to loosen the two bolts securing the headlight bracket to the body
Install the headlight in reverse order.
Before tightening the fastening bolts, we adjust the position of the headlight housing relative to the car parts mating to it.
After assembly, check the adjustment.
When adjustment is required
The setup is not carried out every day, although it is worth checking its correctness regularly. It is executed:
- when changing lamps;
- after changing the head optics unit;
- every 30 thousand kilometers according to the maintenance regulations for Gazelles;
- after an accident or mechanical damage to the vehicle.
Adjustments are also made if the Gazelle driver notices a change in the light flux. As the vehicle is used, the headlights may shift, and the configuration of the light spot changes along with them. In such cases, they begin to shine higher or lower, and the spot moves to the sides.
Correct settings are important for the safety of other drivers: unadjusted headlights will blind oncoming traffic, which can lead to an accident.
Price examples
The cost of adjusting headlights may differ in large and small car services, organizations from different regions. Examples of service prices are as follows:
- Checking the light fluxes will cost 200 rubles .
- Adjusting low and high beam headlights on a typical car (VAZ, Renault, Kia) costs on average 500–700 rubles .
- Debugging of light rays on a premium class machine is done for 800–1400 rubles .
- Adjusting the beams of fog lights is estimated at 600–1000 rubles .
- Monitoring the operation of the adaptive lighting system starts from 1,500 rubles .
In service stations located in the center of large cities that provide official warranty service, prices for professional headlight adjustment are usually higher than in small services.
How to make adjustments
To adjust the headlights on a gazelle, you will need:
- a fueled and equipped car with inflated tires;
- horizontal and level area.
“Curb” means the weight of the vehicle with a jack, spare tire and tools. It is recommended to carry out the procedure in cloudy weather or at night, so the result of adjusting the headlights will be better visible.
Required tools and materials
To adjust you need:
- crosshead screwdriver;
- depending on the model of the car, a hex wrench for 4 and 6 may be useful;
- a screen with markings, it can be a 1 by 2 meter plywood sheet, a garage wall or another flat horizontal surface;
- something dense to block light - plywood, rag, etc.
To adjust the Gazelle's headlights, you should put a load of 75 kg in the car or place an assistant with approximately the same weight in the car; this is required for correct weight distribution.
Step-by-step instructions and work diagram
Adjusting the Gazelle headlights with your own hands proceeds in several stages:
- The car is refueled, the tires are inflated to the nominal pressure, and a check is made to ensure that the jack, spare tire, and other tools included in the kit are in place.
- The car is placed on a flat horizontal surface, 5 meters in front of the screen.
- For precise adjustment, the screen is marked. Sample:
There are two marking options: A – for marking on the AL diffuser; B – for OSVAR diffusers. Legend: size h – height of the light, this size should be equal to the distance from the center of the headlights to the surface of the site; VV – Gazelle axis.
- If there is an electric corrector, its knob is set to 0.
- An assistant is seated in the driver's seat or the cargo is placed. After this, the gazelle is pumped several times so that the body is correctly aligned with the wheels. Then the load is removed.
- Next, turn on the low beam. The adjustment is carried out on the headlights one at a time, the second one needs to be covered during the adjustment. To do this, you can use your hand, a sheet of plywood, a thick rag, or other available equipment that blocks the light.
- Adjustments are made in the vertical and horizontal planes. Light module design:
In the figure: 1 – diffuser; 2 – turn signal cartridge; 3 – horizontal adjustment knob; 4 – low beam lamp cover; 5 – vertical position regulator; 6 – connector for wires; 7 – cover of the high beam light bulb; 8 – body; H1, H7 – low and high beam bulbs; PY21W – turn signal lamp; W5W – side light.
- Using handle 3 and a screwdriver in slot 5, adjust the light until the upper boundary of the flow aligns with the line on the screen XX, and lines GG and DD with the centers of the beams of the left and right headlights, respectively.
- After setting up one, you need to set up the second one in the same way.
Sometimes the adjustments do not help; even if the controls and screws C and D are working properly, the headlights do not fall into place or quickly go astray. This is a typical disease of old Gazelles. Auto mechanics believe that the reason for this is the misalignment of the optical sockets and other power body elements. New cars are less susceptible to this.
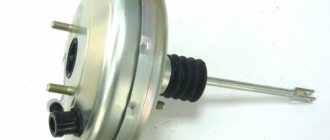
Automatic correction
The new model gazelles are equipped with an automatic corrector. They can change the horizontal direction of the light depending on the load on the machine. The element is located to the left of the steering column.
The headlight corrector on the Gazelle makes the driver's work easier and allows you to change the angle of incidence of the light without manually manipulating the screws when changing the load of the car. Modern versions of the GAZ 2705 are equipped with an electromechanical corrector.
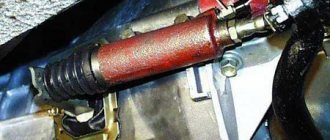
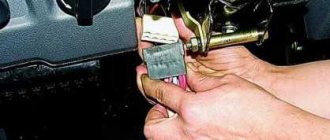
Replacement of electric headlight corrector and control unit
Disconnect the connecting block from the corrector terminals.
Press the latch located on the drive body with your finger (shown on the removed device)
Turn clockwise and remove the electric corrector.
After installing the electric corrector, we adjust the headlights (see Adjusting the headlights).
To replace the control unit, remove the instrument cluster (see Removing the instrument cluster).
Disconnect the connecting block from the block.
By pulling towards yourself, remove the control handle of the unit.
Using round nose pliers, unscrew the nut, remove the washer and block.
General view of the control unit with mounting parts
Install the removed parts in reverse order
Features of correction for Gazelle Business
Gazelle Business is a modern version of the car, also equipped with a headlight corrector, but there is also the possibility of manual adjustment in case the corrector fails or a full adjustment is required.
The business has two adjustment screws: a 6mm hexagon for vertical adjustment, and a plastic knob for horizontal adjustment. This Gazelle is equipped with new combined optics, so the experts recommend doubling the distance from the screen to 10 meters. Usually the correction procedure is carried out at a service station with the appropriate equipment, but it can also be done manually. Even with minimal equipment, this manipulation is within the power of every driver.
Gazelle Sable. Adjusting the headlights
Check and adjust the headlights when the vehicle is equipped (with a fully filled fuel tank, a set of tools and a spare wheel).
You will need a Phillips blade screwdriver.
1. Pre-check and, if necessary, adjust the tire pressure to normal.
2. Place the car perpendicular to a smooth wall (for example, a garage) at a distance of 10 m. Place an additional weight weighing 75 kg on the driver’s seat. Mark the screen on the wall as shown in Fig. 4.10. The longitudinal plane of symmetry of the car should pass along the line on the screen. Rock the car sideways so that the suspension springs self-align.
3. Measure the height of the headlight centers to the floor on the vehicle. This will be the distance h on the screen.
4. Set the headlight electric adjustment control on the instrument panel to position “0”, corresponding to the load of a car with one driver or with a driver and a passenger in the front seat.
5. Turn on low beam.
6. It is recommended to adjust the direction of the light spot for each headlight separately. Cover the second headlight with opaque material during adjustment.
7. If the location of the light spots does not correspond to the picture, move the brightest sections of the light beams to the points of intersection of the lines on the screen using adjusting screws 1 and 2 vertically or horizontally, respectively.
Rice. 4.10. Adjusting the headlights.
The photo shows the left headlight. The adjustment screws on the right headlight are located symmetrically.
8. Open the hood and, using a screwdriver, rotate the gears of the adjusting screws to adjust the position of the light spot on the screen for each headlight vertically.
9. . and horizontally, if the location of light spots on the screen does not correspond to the picture.
The rotation of the adjusting screws is shown on the removed headlight for clarity.
In addition to a screwdriver, the vertical adjustment screw can also be rotated with a 10mm wrench.
10. Headlights are considered adjusted when the upper boundaries of the left parts of the light spots coincide with line 4 (see Fig. 4.10), and vertical lines 1 and 2 pass through points E1
and
E2
intersections of horizontal and inclined sections of light spots.
If fog lights are installed on the car, then the direction of the beam of their light is adjusted only in height. The adjusting screw with a slot for a Phillips-blade screwdriver is located deep in the hole in the front surface of the fog lamp trim, made next to the lens.
Place the car at a distance of 3 m from the screen and, by rotating the adjusting screws, ensure that the upper boundaries of the light spots are 6 cm below line 4.
Steering column
The steering column is tilt adjustable.
To adjust the column, lower lever 1 of the steering column locking mechanism down (position II), set the steering wheel to a comfortable position and lock the column by lifting the lever to its original position I.
Adjust the position of the steering wheel and rear view mirrors after adjusting the driver's seat.
Position the steering wheel so that you can easily reach its upper part with a slightly bent hand.
DANGEROUS!
To avoid creating an emergency situation, do not adjust the steering column while the vehicle is moving.
How to Adjust the Low Beam Headlights on a Gazelle
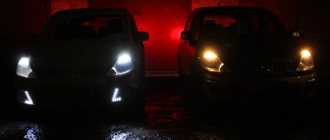
How to adjust low beam headlights. features, tips and tricks
In dark times you cannot do without additional lighting. For this purpose, every car has a low beam. The factory goes through a setup process, but eventually the settings will be lost. Many cars on the roads are blinded by oncoming drivers. And so that you don't blink far, you must adjust
headlights.
It is not often that an electronic proofreader can cope with this. In addition, the car does not remain with our client. How to properly adjust
headlights? This, of course, can be done at home, and in this article we will describe this feature in detail.
GAZ Gazelle is now a dump truck › Logbook › Converting simple headlights to “Khrustal”
And so, since after purchasing the car the headlights were not shining, I had to completely redo them.
For this we need: - Headlight - Sealant - Foil - Super glue - LED strip (25 cm for one headlight)
To begin with, we painted the body matte black.
At first we wanted to simply cover the reflector with foil, but these were not successful attempts, since after gluing, folds appeared and the foil simply became cloudy.
We thought about what we could do, and when we saw the crumpled foil, we came up with the idea of covering the reflector with crumpled foil, laid the foil in, figured it didn’t look bad. We came to the conclusion that we would cover it with crumpled foil. Here are a couple of options you can do:
Next, just take the foil.
Then coat the reflector with super glue.
And carefully place the foil inside the reflector (the main thing is not to tear it)
After it was glued. Add in pieces to those places where there was not enough or torn.
Well, we’ve all covered the reflector with foil, put the glass on it and admire it.
But this is not the final result. Now we will need to glue the LED strip (25 cm per headlight)
We glued it and connected it to the gauge. All that remains is to glue the glass. To do this, we purchased black sealant because the headlight housing is black. (You can also use clear sealant)