The cabin filter of the Lada Kalina is a small piece made of corrugated paper, the condition of which determines the cleanliness of the air in the cabin. More precisely, the air should flow in clean in any case, but the amount of air supplied depends on the level of contamination of the filter. Let’s say that in winter the heat of the stove becomes worse. Then, first of all, look at the filter, and only then at the condition of the heater. It is easy to understand that the cabin filter can always be replaced. And any owner can perform this operation.
Materials and equipment
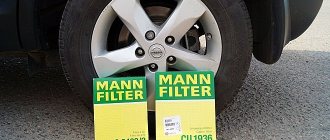
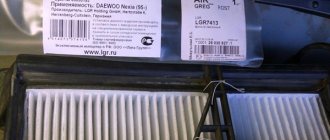
The part, which we call the Lada Kalina cabin filter, is designated by the following catalog number: 11180-8122010. Look at the photos and check what is available from your suppliers. To replace the cabin filter of Kalina-2, you will need only two screwdrivers: a Phillips (regular) screwdriver and a torx-t20 screwdriver. We will remove the plastic frill by unscrewing 5 screws, and then remove the filter cover and change the filter.
A set of materials and tools for replacing the cabin filter of VAZ-2192/94
We will consider the sequence of replacement actions in the next chapter. In the meantime, we note that along with the filter, its protection is sometimes installed - a plastic or aluminum mesh with a mesh size of 3-5 mm. Whether such “tuning” is advisable must be decided by the owner. It is better to choose heat-resistant plastic, but in general, you must remember: making changes to the standard design entails loss of warranty.
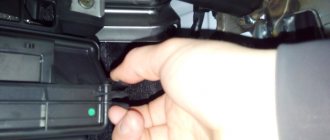
When performing any manipulations when the hood is open, it is recommended to remove the negative terminal from the battery. And although we will not work with electrical equipment, it is still better not to neglect the recommendation - take and unscrew the terminal marked with a minus sign. It does not take a lot of time.
Let's sum it up
Taking into account the above information, it becomes clear that poor ventilation and foggy windows are often directly related to the condition of the cabin air filter. An unpleasant odor may also appear, which can be clearly heard in humid and damp weather, even without turning on the air conditioner.
The reason is simple - the filter is clogged and not enough fresh air passes through it. This leads to the stove blowing weakly and the windows sweating. In turn, the organic elements on the filter create an unpleasant odor in the cabin.
Moreover, if the machine is actively used in areas where there is dust pollution (dirt and country roads), the filter replacement intervals must be reduced by 30-50% in terms of mileage and/or time.
Finally, we note that there are a large number of cabin filters for Lada Kalina on sale. At the same time, you should not settle for the cheapest solutions from unknown manufacturers.
Taking into account the fact that replacing the filter on such a machine is somewhat difficult, it is better not to save money and immediately buy a product that will perform well throughout its entire service life. This approach will avoid the need for frequent replacements every 2-3 thousand km, especially if the vehicle is actively used.
Step-by-step instruction
It is known that the cabin filter of the Lada Kalina-2 is replaced every 15,000 km. The indicated numbers are the maximum value, that is, in practice, replacement can be made more often.
How to get to the cabin filter
To gain access to the part we need, follow these steps:
- Approach the car and, without opening the hood, unscrew the 3 screws securing the right frill (see figure);
- Open the hood, remove the negative terminal from the battery (you need a 10mm ). Unscrew 2 more screws that hold the plastic frill and remove this part. A “t20” screwdriver fits under the head of the screws;
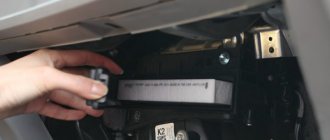
- Using a regular Phillips screwdriver, all you have to do is unscrew the two bolts holding the filter compartment cover;
- We remove the compartment cover, remove the filter along with the frame, and replace it.
If you decide to install a mesh, place it above the filter, not below it. In the standard version, however, only replacement is provided.
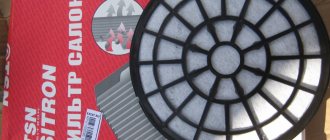
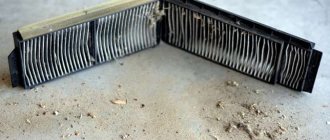
Plastic frame and filter element
Each owner can change the fuse or install a cabin filter without resorting to the services of a car service. But replacing a light bulb in a headlight is a more difficult task. But since we are talking about self-repair, we emphasize once again: as soon as the hood is open, disconnect the “negative” contact of the battery. At the final step, of course, it is necessary to return everything to the way it was.
Replacing the cabin filter on a viburnum
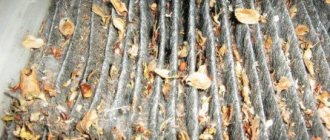
Welcome! Cabin filter - the name itself speaks for itself, namely the cabin filter, thanks to it all the air entering the car that flies into the car when driving is cleaned of dust, leaves and unnecessary dirt, but over time the filter becomes dirty and becomes very dirty, due to with this, it is no longer purified air that flies into the cabin, but all the dust that has accumulated on this filter over the entire time, because of this it becomes very unpleasant to drive and you are constantly thinking about replacing this filter with a new one.
Note! The filter is easy to change and all you need to take from the tools is: A set of several screwdrivers and, if possible, also take a vacuum cleaner and be sure to have a rag, the vacuum cleaner is very convenient to collect all the dirt from the place where the filter was installed, therefore, when you turn on the stove , it will no longer get into the interior of your car!
Where is the cabin filter located? To get to it, remove the right facing (As the car is moving) you will need to lift the brush that cleans the glass, then use a flat screwdriver or a knife (we don’t recommend using a knife, because the plastic is soft and, besides, it’s black and therefore if you do not do the work carefully, then at best you will scratch it, and at worst you will pierce it) pry off the two plugs indicated by the blue arrows, after prying them off, take them out and unscrew the two screws that were located behind these plugs, besides this, open the hood and find two more screws (there are four in total) that secure the right facing and then slightly lifting it (see small photo), remove it completely from the car, behind this facing there will be a protective cover (you will see it immediately) by removing it, you will provide access for yourself to the cabin filter in the car, you will learn more about how to remove it as you read this article.
When should you change the cabin filter? It all depends on you, if the air in your cars has ceased to be fresh (It has become dusty, it has become difficult to breathe, etc.), then you can already think about replacing this filter with a new one, but in general people recommend replacing it once every 15,000 thousand km. but at the same time, you also need to take into account the fact on which roads the car is driven, if on dusty roads or just in a metropolis where the surrounding air is polluted, then this filter must be replaced much more often (For example, once every 10,000 thousand km), in addition you need to take into account There is also the fact that the stove is connected to the cabin filter when working (It is only connected to it, there is nothing else the filter is needed for) and if you want to turn on the stove, then all the air will pass through this filter and if it is dirty, it will get into the cabin, and besides all this, the stove will also work worse (it will be harder for it, because air will be much more reluctant to pass through a clogged filter).
Note! Any filter elements have one goal, to prevent debris and dust from passing through the place where they are installed, but at the same time they also take in all this dirt and dust, and over time (When the filter is full of dirt) it ejects of all dirt, this process is called desorption (It only occurs in carbon filters; cabin filters, by the way, are mostly carbon) in connection with this process, it throws most of the dust and dirt into the car interior, so do not spare money on this thing and change it as often as possible, because in addition to dust, it also absorbs toxic emissions from the exhaust systems of passing cars, which are subsequently also sent into the car interior if you do not replace the filter with a new one!
A little more about digital notation
If you intend to buy a new cabin filter for Kalina-2, know that this part may be designated as follows:
- 11180-8122010-00, or 08 (there is a plastic frame);
- 11180-8122010-01, or 03;
- 11180-8122010-82 (produced by Lada Image CJSC), or 83 (coal, Lada Image CJSC).
The part itself may have an arrow designation. In this case, you need to remember: the arrow shows the direction of the air flow. She should look "down".
Kit 11180-8122010-08
The main thing that I would like to note here is that the filter inside the compartment must be installed tightly. That is, there should be no gaps at the edges. The frame, made of plastic, does its job well.
Signs that replacement is needed
If for some reason the filter was not changed during maintenance, its failure will make itself felt with the following signs:
- Poor windshield airflow. Typically, glass sweats only if the damper that opens the air intake from the street is in the closed circulation position.
When air comes from outside, there should be no fogging. If this occurs, it means that an obstruction to the air flow is created in the form of a clogged filter.
- Characteristic smell of burning. It is especially noticeable when driving behind diesel vehicles. You can also clearly smell the smell of cars running on a propane-butane mixture. In winter, the stench becomes more noticeable.
- Increased noise when the interior heater is operating. This occurs due to reduced air flow. This is especially noticeable in the summer when the air conditioner is running. It works, and the temperature in the cabin drops reluctantly.
Goals and tasks that we solved
We looked at how to replace a part called the cabin filter. In principle, you can not change anything, but simply clean it and return everything to its place. How best to accomplish this, the owner will decide for himself. Also, the instructions will be useful if the owner decides that it is necessary to change the stove radiator. First, the filter is removed, then the dashboard is removed, and then access to the radiator appears.
When dismantling the filter element, be careful. All kinds of debris or dust should not get into the compartment under the filter. It will no longer be possible to remove them from there, and the debris will end up on the fan of the heater unit.
The filter element, if not changed for a long time, can crumble from any touch. In such cases, there is no need to take unnecessary risks. For those who are not confident in their abilities, it is easier to entrust all actions to professional repairmen.
It is better to solve an existing problem rather than create additional ones. And in some cases, it is more advisable to contact a service station rather than try to fix everything yourself. We open the compartment, we see the destroyed filter - then we return everything to its place and go to the service center.
About differences in device location
Regardless of the class of the Lada Kalina, the cabin filter is located in the same place. Moreover, starting with Kalina-2, many parts (including filters) were transferred to all subsequent VAZ models, so the principle of replacing this device does not depend on the body type, engine size or the presence of a car radio.
The quality of the air that passengers breathe depends on the cleanliness of the cabin filter on Kalina. It is recommended to change it twice a year; the operation is not very complicated and takes no more than half an hour.