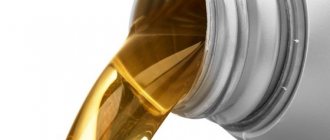
Seal replacement interval
In the enclosed space under the valve covers there is no oil pressure because there is air there. But during engine operation, the rapidly rotating camshaft, whose bearings are abundantly lubricated, scatters many small drops in all directions. Once on the inner walls, the oil flows back into the crankcase. If the slightest gap occurs between the sealing material and the adjacent surfaces, the lubricant will inevitably flow out.
When to replace the valve cover gasket:
- if traces or drips of engine oil are noticed on the side walls of the cylinder head;
- during the assembly of the power unit after a major overhaul;
- if gasket defects are detected during various repairs that involve dismantling the cover.
Sometimes inexperienced car enthusiasts accidentally damage the seal with a screwdriver or other tool. In such a situation, it is better to change the element, since attempts to seal the gap with sealant usually do not yield results - after some time, the lubricant penetrates outward at the point of damage.
Natural wear and tear of any cushioning material is loss of elasticity . The rubber or cork seal becomes dull and cracks, causing gaps to appear between the flanges of the cover and the cylinder head. The malfunction is not critical, but quite unpleasant - the engine walls are covered with a coating of oil mixed with dirt.
If you do not change a worn gasket, then it later becomes difficult to identify defects in other parts associated with leaks. It is difficult to notice leaks from under the timing cover or pump when the entire engine is already splashed with oil. Therefore, it is not recommended to operate a car for a long time with a defective valve cover seal.
Preparing for work
The valve cover gasket can be replaced in any convenient place - in an open area or in a garage. There is no need to drain engine lubricant or antifreeze. What tools will be needed for disassembly:
- a head with an extension and a knob, suitable in size to the cover mounting bolts;
- flathead and Phillips head screwdrivers;
- pliers;
- rags.
Work is carried out with the power unit cooled down to a comfortable temperature. If you don’t have time to wait for the engine to cool down, perform disassembly wearing cloth gloves that protect your hands from burns.
Before replacing, prepare the following consumables:
- a new gasket element selected according to the car model;
- O-rings for bolts (installed on certain brands of cars);
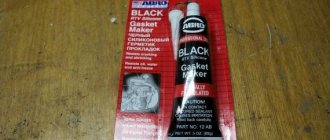
- high temperature sealant and degreaser such as white spirit.
The use of sealants to treat the seal before installation is not necessary. For example, on engines of classic VAZ 2101–07 models, the gasket does not require additional sealing. On 16-valve engines with a wider flange, the use of sealant is desirable, but not required.
Replacement instructions
Before you begin, open the hood and look for any elements that may interfere with the removal of the valve covers from the cylinder head mounting flange. Usually before disassembly you have to remove the following parts:
- an air duct laid from the throttle body to the air filter;
- the filter element housing itself;
- a cable connecting the throttle drive to the accelerator pedal;
- crankcase ventilation pipe;
- electrical wiring harnesses.
Having understood the scope of dismantling work, select the missing keys and other tools. Before replacing the valve cover gasket, take a rag and thoroughly wipe all surfaces where engine oil has come into contact. Then proceed to disassembly, proceeding in the following order:
- Disconnect the gas pedal cable, disconnect the pipes and electrical wiring connectors crossing the engine from above. If necessary, remove the pleated air filter.
- Using a socket wrench, loosen and unscrew all the bolts (or nuts) holding the cover to the cylinder head flange. The order of unwinding is arbitrary.
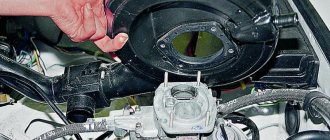
- Grasping the oil neck and the end of the part with your hands, carefully remove it and set it aside, turning it upside down so that lubricant does not leak out.
- Remove the gasket and remove any remaining gasket from the landing pad. Remove oil stains with a rag.
Before installing a new gasket, the cover flange must also be thoroughly wiped of oil. If you plan to install the seal on the sealant, treat both landing areas with a degreasing compound. Take this opportunity to inspect the parts under the valve cover for wear and grease color. Check the timing chain tension.
Recommendation. On some foreign car brands, for example Daewoo, a special valve is built into the cover. At a certain moment, it releases crankcase gases that are sent for afterburning. Wash this valve thoroughly with gasoline and blow with compressed air.
Install the gasket in the reverse order. If necessary, both areas are lubricated with sealant, then the element is placed on the cylinder head and pressed with a lid. The bolts are tightened with little force so as not to squeeze out the new gasket. Tighten in 2 steps, trying to follow a simple pattern: first tighten the pair of middle bolts, then move to the edges of the cylinder head. The tightening diagram for the fastenings of a 16-valve engine is shown in the figure.
If after assembly and test run oil leaks are noted, try additionally tightening the bolts. The last resort is to apply a high-temperature sealant to the gasket.
Do-it-yourself replacement of VAZ-2106 valve stem seals: repair instructions
Replacing valve stem seals on a VAZ-2106 must be done when repairing the cylinder head. These devices are necessary to remove excess lubricant from the valves when the engine is running. With a high mileage of the car, the valve stem seals wear out, they lose their positive qualities, and the elasticity of the springs decreases. As a result, the seal does not make good contact with the valve surface.
Features of repairs
In general, the caps should fit the valve stem as tightly as possible. If the integrity of the seals is compromised, carbon deposits can be seen on the electrodes of the spark plugs, and lubricant consumption will certainly increase. Smoke will appear from the exhaust pipe. Please note that similar symptoms appear when the engine breaks down. Therefore, it is necessary to determine exactly where the fault is.
Replacing valve stem seals on a VAZ-2106 with your own hands is quite simple, you just need to have all the necessary tools on hand. A prerequisite is that all work must be carried out in a clean garage. Dirt and dust must not get inside the cylinder head. In this case, the dust will act as an abrasive, causing all the engine components that come into contact to suffer extreme wear.
Repair tool
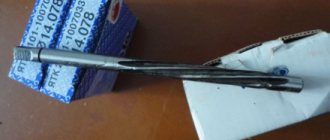
You will need the following list of tools:
- The desiccant can be used of any type. If you have a homemade one, then that will do. It should allow the removal of crackers.
- Set of flat and figured screwdrivers.
- Soft wire.
- A piece of tin.
- Socket heads, open-end and ring wrenches.
- Torque wrench.
Be sure to have tools such as pliers, side cutters, and tongs on hand. They can be useful for any work, in particular, when replacing oil seals on a VAZ-2106 engine.
Preparatory work
Before you begin any repairs, you need to wash the entire car as thoroughly as possible. Moreover, most of the attention should be paid to the engine compartment. Be sure to follow safety precautions - do not flood the ignition system, electronic sensors, or wires. Before you start washing, you must completely disconnect the power supply system. To do this, you need to disconnect the battery, preferably completely, and then remove it.
It is necessary to install wheel chocks under the rear wheels, then engage a lower gear and squeeze the handbrake. Since the car has rear-wheel drive, engaging the gear will prevent the car from rolling away. You definitely need to buy a set of valve stem seals. It is advisable to choose only those manufacturers recommended by AvtoVAZ.
Removing the block head
The valve stem seals can be replaced without removing the head. But if the cylinder head is being repaired, then in any case it will need to be removed. Therefore, you disassemble the gas distribution mechanism as follows:
- Unscrew all the spark plugs using a wrench. If the condition of the electrodes is poor, new ones must be installed during assembly.
- Then you need to unscrew all the bolts that secure the cylinder head cover. There are 8 of them in total, arranged in a circle.
- Install the camshaft exactly according to the marks.
- It is necessary to bend the petals on the camshaft lock washer and unscrew the bolt. To unscrew it without problems, you need to turn on the speed.
- Unscrew the nut securing the timing chain tensioner.
- After this, you can dismantle the tensioner and sprocket. Be sure to secure the drive chain to the sprockets with wire.
- Unscrew the nuts securing the camshaft bearing housing.
- Remove the housing and camshaft.
Then you need to completely remove the rocker arms and old caps.
How to remove the caps
It is necessary to completely remove the old elements before replacing the valve stem seals on the VAZ-2106. The repair instructions are as follows:
- If the replacement occurs without dismantling the cylinder head, then you need to install a tin rod in the spark plug holes. This will keep the valve in the up position. If you are making a replacement on a removed cylinder head, then you can hold the valves with your hands.
- Install the valve depressurizer.
- Compress the spring.
- Remove the crackers that are located on the groove in the upper part of the valve stem.
- Remove the spring, plate and support washer.
Using a flat-head screwdriver, pry up the oil seal and pull it out. You don’t have to spare the old elements; if it doesn’t work out, then use a sharp awl.
How to install new caps
On VAZ-2106 cars, the valve stem seals are replaced independently using a simple plastic device. It must be placed on the top of the valve stem to cover the recesses on it. In this case, you will not have to remove the springs from the valve seals. The work is carried out according to the following algorithm:
- Install the plastic bushing on the valve.
- Lubricate the auxiliary bushing and valve stem with engine oil.
- Push the oil seal on until it stops.
- Remove the plastic sleeve.
- Using a “10” tubular wrench or a large mandrel, you need to hammer in the cap.
- Install the support washer, spring and plate.
- Install the valve depressurizer and compress the spring.
- Put the crackers in place, and then release the desiccant.
This completes the replacement of the VAZ-2106 valve stem seals. If necessary, you need to double-check all gaps and correct them. Assembly of the entire assembly is carried out in the reverse order of removal.
The main reason
Oil enters the spark plug wells through a leak in the joint of the elements separating the well from the internal space of the cylinder head. There are several design options for the block head.
- The spark plug well insert is screwed into the cylinder head. An oil seal is installed between the top of the insert and the valve cover. Most often, oil gets into the wells due to the natural aging of seals, which experience numerous temperature changes, exposure to gases and engine oil. Less commonly, leakage occurs through the threaded connection at the bottom of the insert. This design is used on 3S-FE, 4S-FE engines, using the example of which we will consider how to fix the problem ourselves.
- The spark plug well insert is inserted into the cylinder head, and the connection is sealed with oil seals in the upper and lower parts. This is exactly the design of the cylinder head on VAZ 2112 1.5 liter engines with 16 valves. O-rings shrink over time and lose their elasticity, which causes oil penetration.
- The spark plug well tube is missing as such. The walls of the cavity for screwing in the spark plug are components of the cylinder head. The VAZ 21126 engine, installed on the Lada Priora, Kalina, and Granta, is designed exactly according to this type. There are no gaskets between the bottom of the cylinder head, the camshaft bed and the valve cover. Tightness is achieved by applying sealant to the mating surfaces. Due to numerous temperature changes, as well as deformation when tightening the cylinder head bolts, camshaft beds and covers, it is impossible to achieve a perfect fit of the parts. This causes oil to penetrate into the spark plug wells.
Crankcase ventilation system
Increased crankcase gas pressure is one of the main reasons for accelerated oil breakthrough through the spark plug hole seals. The operating principle of closed-type crankcase ventilation involves supplying a mixture of oil vapor, gasoline and exhaust gases back to the intake manifold.
The PCV valve is responsible for dosing a portion of gases. If for some reason the valve does not cope with its task, excess pressure will form inside the cylinder head. The cause of the malfunction can be either in the valve itself or in a worn-out cylinder-piston group. With worn compression rings and increased clearance between the pistons and cylinders, it is more difficult for the crankcase ventilation system to cope with its task.
In case of excessive fogging around the valve cover gasket, oil pan, oil in the air filter, spark plug wells, we strongly recommend checking the crankcase ventilation. With increased exhaust gas pressure, replacing gaskets with the application of anaerobic sealant will only give a short-term effect.
Symptoms and consequences
To determine the malfunction, it is enough to remove the ignition tips/ignition modules from the wells and unscrew the spark plugs. An oil film on the elements will be the main sign of leakage. If the cause of oil ingress is not eliminated in time, the engine will begin to sputter and lose power in all or certain operating modes, which can also result in high fuel consumption. Most likely, due to misfire in the cylinders, the Check Engine light on the dashboard will light up.
The negative impact of engine oil on the tip seal of high-voltage wires and ignition coil modules leads to such consequences. The oil environment creates favorable conditions for spark breakdown, as a result of which the combustion of the fuel oil in the cylinder is disrupted.
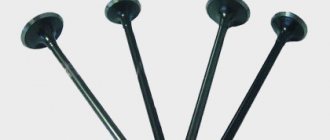
VAZ 2106: replacing valve stem seals with your own hands
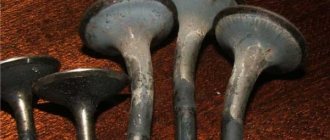
Intake and exhaust valve seals
Oil seals are designed to prevent oil from entering the combustion chamber through the valve openings of the engine head. The need to fit the valve stem into holes with a technological gap contributes to the entry of an oil film into the combustion chamber. Therefore, sealing of the gap is required, for which the installation of stuffing box caps is provided.
Signs of oil leaking through valve stems
Oil, when exposed to high temperatures, burns, releasing blue smoke. If the oil leak occurs through the valve stems, smoke will appear during startup and disappear after the engine warms up. In this case, excessive oil consumption will appear and an oily deposit will form on the spark plugs.
Dry and oil-wet candles
Necessary tools and accessories
Replacing the valve stem seals of a VAZ 2106 is done directly on the car, which significantly speeds up the work, since there is no need to remove and then reinstall the cylinder head. It is enough to place the car in a place protected from dust and precipitation. Apply the handbrake and put the gear shift knob in the neutral position. Replacing oil seals on a VAZ 2106 requires a set of caps and a new head cover gasket, standard tools, accessories:
- Carrying;
- Candle key;
- Spanners 17 mm., 13 mm.;
- Hexagonal internal heads 8 mm, 10 mm, 13 mm. with a collar;
- Pliers;
- Tweezers;
- Flat screwdriver;
- 8 mm thick soft metal rod;
- Torque wrench;
- Spring compression device
- Mandrel for installing caps
- Soft wire.
Different designs of special pullers for compressing springs
How to make your own devices
It is convenient to use a special device, since there is no need to hold it with your hands; it holds the springs compressed with a bolt. If you don’t have such a device, you can make it yourself. To do this, it’s enough to have two steel square rods 10x10 mm, 300 mm long. They need to be fastened at three points, at the ends and in the middle, so that there is a gap of 12 mm between them, like rails, then the price will be much cheaper. So:
- You can attach it in any way; bolts, clamps, welding, in the fastening points between the rods you need to place metal plates 12 mm thick, which will provide the necessary gap between the rods.
- The valve stem will fit into the gap when the springs are released. To install valves, instead of a mandrel, you can use a steel tube 120 mm long, with an internal diameter of 14 mm, and a copper washer with a hole matched to the rim of the cap.
Preliminary preparation
Before starting work, it is advisable to watch the video, replacing oil seals on a VAZ 2106; you definitely need to thoroughly wipe the surface of the upper part of the block and the head cover. For convenience, you need to remove the air filter housing. Cover the carburetor with film or cloth to prevent dirt from entering during operation. Unscrew the spark plugs, remove the cover with the gasket.
- Set the fourth cylinder to top dead center on the compression stroke. To do this, the crankshaft rotates to a position at which the intake and exhaust valves of the fourth cylinder remain closed before and after the piston passes TDC. This is determined by the valve clearance with the rocker arm.
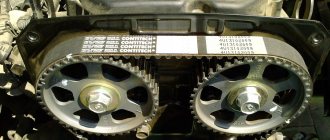
- The position of the piston is determined by measuring with any rod through the spark plug hole. Check the alignment of the marks on the sprocket and the housing.
Checking whether labels match
- Use a screwdriver to bend the lock washer using a 17 mm spanner. Loosen, but do not unscrew, the nut securing the sprocket to the camshaft.
- Using a 13 mm spanner, unscrew the cap nut securing the tensioner two turns.
- Free up the chain as much as possible.
- Unscrew the nut completely and carefully remove the sprocket from the camshaft axis.
- To prevent the chain from falling off the sprocket, you need to tie it with wire and hang it together with the sprocket on the edge of the cylinder block.
Disassembly sequence
- Unscrew the nine nuts holding the camshaft housing and remove it along with the shaft.
- Using a screwdriver, lift the pressure spring, pull out the pressure lever with a little force, push the spring out from under the stopper and pull it out.
- A soft wire is tightly inserted through the spark plug hole between the piston bottom and the valve so that the valve does not fall when the springs are pressed. The higher the part of the rod into which the fixing nuts are inserted, the less the springs will need to be pressed to install them.
Attention! It is not allowed to hold the valves with hard objects; there is a risk of scratching the piston or cylinder.
- A nut is screwed onto the camshaft housing mounting stud closest to the valve, as in the photo, to which a special puller or the end of a homemade device clings with a grip. It covers the stud on both sides, rests against the lower plane of the nut and rests on the upper plate of the springs.
- The valve stem with crackers is passed between the rods of the device.
Squeezing springs and removing crackers with tweezers
- We press the lever, the springs are compressed, the plate with crackers goes down, the crackers fall into the area of the narrower part of the rod, and are able to come out of the hole of the plate. You need to select them with tweezers or pliers.
Attention! It is forbidden to pull out the crackers with your hands, as you can get your fingers pinched.
- If the crackers are stuck and do not come out when the springs are significantly compressed, you need to knock them out with a weak hammer on the plate.
The device is released and removed sequentially:
- plate;
- outer spring;
- internal spring;
- inner spring lower washer;
- outer spring washer.
To remove the lower washers, you need to pry them off with a screwdriver.
- The cap is grabbed with pliers, rocked, and rises along the valve stem.
- Then a new valve stem seal is installed and the valve is assembled in reverse order.
- They are sequentially disassembled and reassembled with new valve caps for the fourth and first cylinders.
- After this, holding the sprocket, the crankshaft rotates until the pistons of the second and third cylinders reach TDC. Consistently, similar work is carried out on their valves. We can assume that the oil caps on the VAZ 2106 have been replaced.
Assembly order
Pressing in valve stem seals using a bushing
- The valve stem, oil seal and cap are lubricated with engine oil; the valve cap corresponding to the valve is placed on the stem with the oil seal facing up. It descends down the stem, where it is pressed tightly against the hole with the valve guide.
- The end of the mandrel is pressed against the rim of the cap, by lightly tapping the top of the mandrel with a hammer, the cap is pushed into the hole until it stops. The cost of an error in case of strong impacts, damage to the oil seal or cap, will have to be replaced. The springs are installed in the reverse order of disassembly.
Attention! After installing the springs and removing the device for compressing the springs, you need to remove the plate from the spark plug hole and tap the end of the rod with a hammer so that the crackers sit in their place. This must be done carefully; if the crackers are positioned incorrectly, the springs may pop out.
Procedure for tightening the camshaft cover nuts
The camshaft cover, as required by the instructions, is pressed with a torque wrench with a force of 8 kg/m. tightening the nuts in the required sequence.
Replacing oil seals on a VAZ 2112 1.5 l, 16 valves
To determine the type of spark plug cavities, unscrew the spark plugs and look inside the well. The insert version has smooth walls from the beginning to the end of the hole. On VAZ 21126 engines, the junction of the mating planes of the valve cover and the camshaft bed will be visible.
To replace oil seals on a VAZ 2112, it is necessary to dismantle the plastic cover, intake receiver, ignition module, and crankcase ventilation hose. The wells are removed using a slotted screwdriver (the screwdriver must be pressed against the upper edge). Make sure that the bottom seal remains on the tube after exiting. Clean the inserts before installing the seals. The lower oil seal must be lubricated with engine oil. Using an adapter of a suitable diameter, press in the insert until it clicks.
The spark plugs will be unscrewed during the work, so make sure that no debris or foreign objects get into the cylinders.
In the video you can see how, using a homemade puller, you can remove inserts for replacing spark plug well seals without removing the valve cover or receiver.
Engines 21126
On Lada Priora, Kalina, Granta cars with internal combustion engine model 21126, it is necessary to remove not only the attachments and valve cover, but also the camshaft gears and bed. Eliminating the cause of oil getting into the spark plug wells is to apply a high-quality anaerobic sealant. Using silicone gasket sealant will not be as effective.
Replacing the valve cover gasket yourself
Often, car enthusiasts are faced with one banal problem - loss of car engine oil during operation. Having opened the hood, they immediately notice smudges near a significant part of the very top part of the piston unit. However, replacing the cylinder head cover gasket, and this is what we are talking about, completely solves the problem, and this operation itself does not cause any particular difficulties.
Below we provide a detailed description of the process of this repair. We will also indicate in what cases the valve cover gasket is replaced. But first we list the reasons for the failure of the part:
- an excess of oil poured in after updating the engine’s lubricating medium, the resulting excessive pressure spoils the seal;
- During the previous engine repair, mistakes were made, in particular, the fastenings of the cylinder head casing were overtightened;
- the backing layer inserted during the previous repair was made poorly;
- It's just reached the end of its lifespan.
Next, we will first look at how to replace the valve cover gasket on VAZ models, and then we will discuss the implementation of the technology on foreign cars. But first, we note that before installing a new spare part, it is necessary, if possible, to coat it on both sides with automotive sealant.
Replacing the head cover gasket on a 16 valve Lada Largus engine
You will need: the tools necessary to remove the air filter and ignition coils, as well as a 10-mm socket, a flat-blade screwdriver, a knife, a mounting spudger, and a torque wrench.
To restore the cylinder head cover seal of the K4M engine, do the following.
1. Disconnect the wire from the negative terminal of the battery. 2. Remove the air filter. 3. Remove the intake pipe receiver (see “Replacing the intake pipe seals”). 4. Remove the oil separator (see “Cleaning the crankcase ventilation system”). 5. Remove the right support for the suspension of the power unit (see “Replacing the right support for the suspension of the power unit of the Lada Largus”).6. Remove the upper timing belt cover (see “Installing the piston of the first cylinder to the TDC position of the compression stroke”). 7. Remove the twenty-four bolts securing the cylinder head cover (Fig. 1)… 8. …pry the cylinder head cover with a mounting blade…
10. Clean the mating surfaces of the cover and cylinder head from old sealant. 11. Apply oil-resistant gasket sealant to the mating surface of the cylinder head.
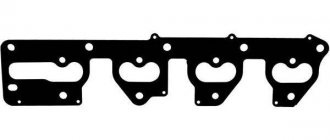
This is what the gasket sealant looks like applied to the mating surface of the cylinder head (for clarity, shown on the cylinder head with the camshafts removed). 12. Install the cover on the cylinder head. 13. Tighten the cylinder head cover bolts in three stages: Stage I - tighten the bolts in the sequence shown in Fig. 1. Tighten bolts 1-12, 14-19, 21 and 24 to a torque of 12Nm, bolts 13, 20, 22, 23 to a torque of 8Nm; Stage II - loosen bolts 22, 23, 20, 13; Stage III - tighten bolts 22,23,20,13 to a torque of 12 N*m. 14. Install the remaining parts in the reverse order of removal.
Rice. 1. The procedure for tightening the bolts securing the head cover of the Lada Largus cylinder block.
In 2011, in Russia, Renault and VAZ began assembling the Dacia Logan MCV, adapted for the local market. The Russian version was called Lada Largus. Magnitogorsk did not stand aside. Largus Park is growing rapidly.
VAZ offers a five-seat passenger station wagon, a seven-seat high-capacity station wagon with three rows of seats, and a cargo van. Each version of the Lada Largus is equipped with either an eight-valve 1.6i engine (K4M) with a power of 84 l/s or a sixteen-valve engine 1.6i 16V (K7M) with a power of 105 l/s. Most of the engine parts, steering, and suspension are the same as on the Logan.
Lada Largus configurations: FS015 - Van 1.6i (K4M), FS0Y5 - Van 1.6i 16V (K7M), KS015 - station wagon 5 seats 1.6i (K4M), KS0Y5 - station wagon 5 seats 1.6i 16V (K7M), RS015 - 7 seats 1.6i (K4M), RS0Y5 - 7 seats 1.6i 16V (K7M)
The catalog number is indicated in the original column. In the column with a non-original replacement and the name of the manufacturer, the original part is indicated if the price for it is not too high.