Replacing the cylinder head gasket on a VAZ 2114
Each VAZ engine model is equipped with a cylinder head gasket.
Its main task is to seal the combustion chambers and channels between the cylinder block and the cylinder head (cylinder head), through which coolant flows. It is made of thin sheet metal or reinforced paronite with metal edging for the holes for the combustion chambers. The holes in the gasket have fairly thin walls, so the slightest mistake during installation or replacement will lead to their rapid burnout. If the cylinder head gasket malfunctions, various problems appear in the engine.
labavto.com
One of the most important elements of the engine is the cylinder head and block. To seal the connection, a gasket is installed between them. It seals the combustion chambers and channels through which the refrigerant circulates. If it burns or becomes deformed, it must be replaced, otherwise it may cause serious damage and major repairs. The procedure, although labor-intensive, can be performed in a garage. It is important to follow the step-by-step instructions that will help you replace the cylinder head seal on a VAZ 2114.
Why change the gasket
The cylinder head gasket serves to seal the fuel, cooling and gas distribution systems. This is a one-time use item. When repairing the cylinder head, it must be replaced with a new one.
The need to replace the sealing gasket arises when signs of its burnout appear:
- Air bubbles appear in the fluid in the coolant conservator and radiator. This is a sign that there is no tightness and a small amount of exhaust gases have entered the refrigerant. If the amount of gases is significant, then more active seething will be observed. Therefore, you need to check the seal first.
- Breakdown between cylinders. The symptoms are the same as when the engine triples. The fuel assemblies in one of the cylinders are mixed with the exhaust gases of the other. The engine is difficult to start, but after warming up it runs stably. The malfunction can be determined by the pressure in the cylinders. If mixing occurs, the compression in the cylinders will be different.
- White smoke like steam comes out of the muffler. This means that coolant has penetrated into the engine cylinders and entered the lubrication system due to depressurization between the chamber where the fuel mixture burns and the cooling jacket channel.
Signs and causes of cylinder head gasket failure on a VAZ 2114
- A foam-like emulsion is visible on the oil level dipstick . This indicates a failure of the cylinder head gasket or a crack in the block itself. Liquid from the cooling system enters the oil channels and, during engine operation, is whipped into an emulsion, which is observed on the dipstick.
- Drives antifreeze into the expansion tank. The cause most often may be a burnt-out cylinder head gasket. A similar problem may arise due to an air lock in the cooling system; therefore, the heater in the cabin may also not work or the thermostat may not work correctly, provided that the fluid level is normal.
- emits a lot of . This indicates that, most likely, the cylinder head gasket has ruptured; through the resulting gap, coolant enters the cylinder head.
- Oil stains and stains on the surface of the coolant in the expansion tank. This was probably due to a cylinder block gasket rupture and oil leaking into the cooling system channel.
- Increased engine temperature. This occurs due to a breakdown of the combustion chamber edging. Burning gases enter the cooling system and quickly heat up the antifreeze.
To replace the cylinder head gasket we will need:
- torque wrench;
- keys “13”, “17”, “19”;
- socket heads “10”, “13”, “17”, “Torx”;
- screwdriver;
- head for unscrewing spark plugs;
- new cylinder head gasket VAZ 21083100302010 or its equivalent ELRING 463915.
The price of a cylinder head gasket for a VAZ 2114 is about 200 rubles. Relevant for the spring of 2017 for Moscow and the region.
Symptoms of a problem
So, when all the points have been considered, it remains to list the signs of cylinder head gasket failure:
- A large amount of white smoke comes out of the muffler.
White smoke from the muffler is a sign of a faulty cylinder head gasket
- Sufficient amount of emulsion on the filler cap.
Emulsion on the filler cap
- Antifreeze has an oil effect.
- The oil level in the pan has increased.
- The smell of antifreeze or exhaust gases can be traced in gasoline.
This is interesting: Error P0135: causes and troubleshooting of the oxygen sensor heating circuit
The procedure for tightening bolts and assembling the VAZ 2114 engine
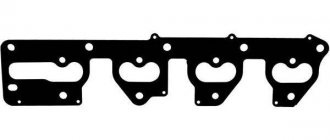
- We install a new head gasket on the block, along the installation sleeves so that the hole with a copper edging for the passage of oil in the gasket is located between the third and fourth cylinders, the gasket should be dry and clean.
- Then we install the head on the block, having first made sure that the crankshaft and camshaft are in the TDC position, and both valves of the 1st cylinder must be closed.
- We proceed to tighten the head bolts in the specified sequence, see photo 18 in four stages. Tighten the bolts from the center, gradually moving equidistant to the edges of the cylinder block, as shown in the diagram.
Remove the crankcase ventilation hoses and the supply hose from the valve cover fittings. Drain the coolant.
Using a 10mm wrench, unscrew the bolts of the front timing cover: two on the side and one in the center. Remove the timing cover. Using a 10mm wrench, unscrew the two nuts securing the throttle drive cable bracket to the receiver and remove it.
Set the piston of cylinder 1 to the TDC position on the compression stroke. Using a 17mm wrench, unscrew the camshaft pulley.
If the key does not sit tightly in the groove of the camshaft nose, remove it so as not to lose it.
We disconnect the hoses of the vacuum booster, electro-pneumatic valve and fuel pressure regulator in the fuel rail from the receiver.
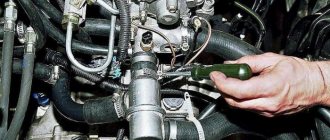
Using a 17mm wrench, loosen the nut “B” securing the tension roller. Using a 10mm wrench, unscrew the nut “A” securing the protective casing and bend the casing. We also unscrew the spark plugs.
Using a 10mm wrench, unscrew the two nuts securing the valve cover and remove it.
Using a 10mm wrench, unscrew two nuts and one bolt securing the plug. We remove the plug.
Using a “13” wrench, evenly, in several approaches (until the pressure of the valve springs is relieved), unscrew the 6 nuts securing the camshaft bearing housing.
Remove the rear camshaft bearing housings from the studs.
Work process
- Disconnect the negative terminals from the battery.
- The piston of the first cylinder is set to the top dead center position.
- All coolant is drained.
- Fuel pressure decreases.
- The intake pipe of the exhaust system is disconnected from the manifold.
- The cylinder head cover is being dismantled.
- All pipes, electrical wires and hoses are removed. But before you do this, you need to remember or note what was originally connected and where. This is done in order to avoid possible confusion during re-installation.
- There are three bolts on the camshaft belt cover that need to be unscrewed and the cover itself removed.
- The timing belt is removed and completely removed.
- The shafts must be secured against possible rotation.
- The pulley is attached to the camshaft using bolts that must be unscrewed and then the pulley removed.
- The nut securing the rear camshaft cover is unscrewed.
- Unscrew the remaining bolts and remove the cover completely.
- Slightly loosen the tension of the dozen bolts holding the head.
- Then each individual bolt is unscrewed one by one and removed along with the washers.
- The head is released and removed.
- If the head is attached directly to the gasket, a screwdriver or any other long tool should be inserted under the manifold. Next, you need to use this tool as a lever in order to slightly lift the head, and then remove it completely.
- Very carefully, so as not to scratch the surface of the head, it is necessary to remove the remnants of the old gasket. It is best to use a special liquid for this matter.
- We put the new gasket in place.
- We make sure that the shafts are in the top dead center position and all valves on the first cylinder are completely closed.
- We put the bolts back.
- Using a torque wrench, we begin to tighten the bolts one by one.
- We reinstall all removed equipment.
- We adjust the clearances in the valve drive and tension the camshaft belt.
As you can see, repairing the cylinder head on a VAZ-2114, which has 8 valves, is a fairly simple, albeit slightly labor-intensive task, which means that every person who has at least a slight understanding of this unit can handle it.
What kind of gasket to buy to replace a burnt one?
The new part should be:
- sufficiently elastic so as not to deform during installation and use;
- impermeable to gases;
- resistant to prolonged exposure to chemicals and aggressive substances.
The manufacturer recommends installing only the original cylinder head gasket, its article number is 21083-1003020. The dimensions of this part are calculated for the VAZ-2114 cylinder head. The original spare part is produced at AvtoVAZ, but you can buy a part with the same parameters from Trialli, Patron, and Reinz. But please note that some analogues often cost 2-3 times more than stock components.
When is cylinder head repair required?
The seal for the VAZ cylinder block cover has a complex structure: sheets of steel, cardboard, and fiber pressed together. They are coated with a layer of sealant, which improves the connection of the parts to each other. Replacement must be carried out if this gasket burns out during engine repairs. The following symptoms indicate a problem with this component:
- Air bubbles in the antifreeze appeared in the expansion tank of the cooling system. This is the first sign that the seal has been broken.
- Exhaust gases begin to escape through the seal. In this case, the gasket may be damaged after repair if you overtightened the mounting bolts.
- White smoke appeared from the muffler, a bit like steam. This happens when coolant enters the cylinders through a breakdown in the gasket.
- White foam has appeared on the oil level dipstick. This is another sign that coolant is present in the engine - it is mixed with the engine oil.
- Increased fuel consumption with insufficient engine power, the car takes more time to gain speed. If the gasket wears out significantly, the vehicle may stall when driving uphill, and when pressing the gas pedal, the driver will feel a dip in the power of the power unit. In the most difficult cases, the car will stall when moving the gear lever to neutral or when stopping at a traffic light.
- Oil stains on the surface of the antifreeze in the expansion tank. This is another sign that the cylinder head is leaking.
- The spark plugs are filled with antifreeze. This malfunction can be detected if you remove the high-voltage wires from the spark plugs and then unscrew them.
Signs of a broken/burnt head gasket
When the first signs of a cylinder head gasket malfunction appear, the vehicle must be stopped. Next, as part of the diagnostics, the gasket is checked for functionality. List of main symptoms of malfunction:
- the appearance of bubbles in the expansion tank of the cooling system and radiator;
- the engine is shaking, running unevenly, power is lost;
- the engine overheats for no other apparent reason;
- the appearance of white smoke from the muffler was noted (coolant may enter the cylinders through a breakdown in the head gasket);
- high oil level in the engine, the presence of a white foamy emulsion on the engine oil level dipstick (leakage in the lubrication system and mixing of oil with antifreeze);
It is not difficult to guess that if the head gasket is damaged, the tightness is broken, exhaust gases break through the cylinder head gasket, and antifreeze enters the combustion chamber. Separately, we note that the reason may be either that the gasket has failed, or a previous replacement of the VAZ 2114 cylinder head or a gasket that was not installed correctly, the fixing bolts were too tightened, etc.
One way or another, the coolant burns out in the cylinders and mixes with oil, and the engine wears out a lot. There is also an increase in fuel consumption, and a decrease in the power of the internal combustion engine of the car (VAZ 2114 or any other). The active entry of antifreeze into the combustion chamber destroys the oil, and the lubrication system does not work properly. Of course, in such a situation it is impossible to travel further and urgent measures must be taken.
How to change the gasket correctly
To work, you need to place the car in a garage with a pit or drive it onto an overpass. Then make the replacement according to the instructions:
- Remove the negative terminal from the battery so that the voltage in the network disappears.
- Place the transmission lever in neutral until the first cylinder is locked at top dead center. Secure the wheels with bricks or shoes to prevent the machine from rolling during the repair process. Remove the right front wheel after placing a jack under the car.
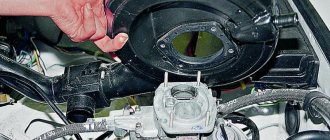
- Remove the fasteners from the engine compartment splash guard to remove it. Find the cover covering the front camshaft drive; it also needs to be removed.
- Using the generator set fixing screw, turn the crankshaft so that the marks on its pulley coincide with those on the rear cover. The matching marks must also be checked in the clutch housing. To do this, remove the cover from the technological hole.
- Drain the refrigerant from the system, first placing a container under the plug to collect it.
- Relieve pressure in the fuel system.
- Disconnect the intake line of the gas exhaust system from the exhaust manifold.
- Disconnect the intake and exhaust manifolds, throttle body and receiver to remove the cylinder head cover. Loosen the clamp of the pipes supplying air to the throttle. After this, you can remove the throttle assembly with the air intake pipe and the cleaner housing.
- There are several wires to the right of the cylinder head. Disconnect them and remove the fuel rail assembly with other system components.
- Remove the fasteners from the front of the unit cover. Secure the crankshaft from turning, then remove the timing belt.
- Loosen the tension roller and remove it, then remove the spacer washer and remove the camshaft gear.
- Remove the screws from the back of the cover. Disconnect all conductors from the cylinder head exhaust hose by loosening the clamps with a screwdriver.
- Using a hex key, you need to unscrew 10 cylinder head fixing bolts. Do this one by one, unscrewing the outer fasteners halfway first and then the middle fasteners. After this, you can unscrew them all the way.
- Remove the cylinder head along with the gasket, and then carefully clean it and the seat from dirt and engine oil residues. After this, this component is replaced.
Now all you have to do is install a new gasket in place of the old one, placing the hole with a copper edging between the 3rd and 4th cylinders. Before reinstalling the head, check that all valves in the first cylinder are closed. It is important to tighten the head screws correctly using a torque wrench with a final torque of 69.4-85.7 Nm. Carry out the rest of the assembly in reverse order.
Replacement
Now, knowing all the intricacies of the replacement procedure, you can talk directly about how you can remove the old rubber from the cylinder head on your own and install a new one in its place.
To work you will need a certain set of tools and materials:
- Torque wrench;
- Wrench;
- Socket head;
- Screwdriver;
- Pad;
- Container for draining coolant;
- Clean dry rags.
We begin the replacement procedure.
- Remove the negative terminal from the battery. The procedure is standard, but it is prohibited to continue working without it.
- Fix the piston of the first cylinder at top dead center - TDC.
- Drain the coolant into a container prepared in advance.
- Relieve pressure in the fuel system if you have just recently driven into the garage after a trip.
- Next, disconnect the exhaust pipe from the exhaust manifold.
- The cylinder head cover is removed, and along with it it will not be superfluous to disconnect the receiver, throttle assembly, exhaust and intake manifold.
- Loosen the clamps that hold the air supply pipe to the throttle body. Remove it from the assembly, grasping it together with the air intake hose. Remove the air filter together with the housing in parallel.
- On the left end of the cylinder head there are mass wires that are disconnected and thereby the fuel frame is removed.
- Unscrew the fasteners that hold the front cover in place. Remove the cover and timing belt. Secure the crankshaft to prevent possible spinning.
Important cleaning step
- Remove the tension roller and spacer washer along with it.
- Remove the mounting bolts to remove the timing pulley from the camshaft.
- Now you need to remove the back cover. To do this, unscrew the mounting nuts and bolts.
- Using a Phillips screwdriver, remove the screws, loosen the grip of the clamp and gradually begin to disconnect all the hoses from the head outlet.
- By unscrewing the fastening nuts, the fuel supply and drain hoses are removed from the fuel pipes.
- The hexagon removes 10 mounting bolts. Unscrew each bolt half a turn one after another to relieve tension and avoid deformation of the cover.
- Remove the screws and washers.
- Remove the head and gasket.
- Clean all contacting surfaces, remove all traces of metal shavings, and clean threaded connections and holes.
- Install a new gasket, taking into account the two centering sleeves. The holes with copper trim should be between the 3rd and 4th cylinders. These holes allow oil to pass through.
- Make sure that both valves on the first cylinder are closed, after which you can return the head to its place.
Installation process
- Insert the mounting screws into the holes and tighten them. This is done in four stages according to the diagram below:
- At the first stage, tightening is performed with a torque of 20 Nm;
- At the second stage, a tightening torque is used in the range of 69.4-85.7 Nm;
- At the third stage, the fasteners are rotated 90 degrees;
- At the final cycle, a final tightening of another 90 degrees occurs.
After replacing, carry out the reassembly procedure, moving in the opposite sequence. If you disassemble the unit correctly, there should be no problems with assembly.
How to properly replace the cylinder head gasket on a VAZ 2114 with your own hands
A malfunction of the cylinder head will lead to incorrect operation of the car engine as a whole. This unit consists of many elements, but most often car owners are faced with the need to change the seal. In the article we will look at in what cases the cylinder head gasket of a VAZ 2114 is replaced and how to change this product yourself.
Where is the cylinder head gasket located on a VAZ 2114?
When should you change?
We change it with our own hands
Consequences of untimely replacement
Video “How the gasket replacement process occurs”
Comments and Reviews
Sequence of repair work
Installing the cylinder head
Also need a new head gasket and valve cover gasket. Having all this, you can begin the renovation. The sequence of actions for repairs is as follows:
Replacement of cylinder head gasket for VAZ 2115 8 valves.
- The car is placed in the garage, the gearbox is set to neutral, and chocks are placed under the rear wheels. The first thing that is done after setting up the car is to de-energize the on-board network by disconnecting the “-” terminal from the battery.
- The pressure in the fuel system is relieved. For this purpose, there is a control valve on the fuel rail in the form of a regular tire valve. You need to place a container under this valve and clamp the spool. When the pressure is released, gasoline will leak out. You will also need to drain the coolant using drain plugs.
- On the engine, you need to set the piston of the 1st cylinder to the TDC position. To do this, remove the protective cover of the timing belt and rotate the crankshaft until the marks on the pulley, camshaft and flywheel match.
- The next step is to remove the valve covers. To do this, all pipes, the throttle drive rod, the accelerator drive bracket and the valve cover mounting nuts are disconnected from the cover fittings.
- The exhaust pipe of the exhaust gas removal system is disconnected from the exhaust manifold. These works are carried out under the car.
- The wiring is disconnected from the mass flow sensor, the air supply pipe to the throttle assembly is removed, after which it is completely dismantled along with the air filter housing.
- Then you need to disconnect from the head all the elements suitable for the head - pipes of the cooling system of the throttle assembly, vacuum booster, throttle drive linkage, ground wires, bracket for the exhaust manifold supply pipe.
- The intake manifold strut mounts are also loosened, and the struts themselves are removed. Next, the wiring is disconnected from - oil pressure sensors, coolant temperature and throttle position sensors, XX regulator, injectors, high-voltage wires from spark plugs.
- Then the timing belt is removed. Before this, you need to once again check the alignment of the marks on the crankshaft pulley and the timing gear. After this, the belt tension is loosened and it is removed from the timing gear.
- To remove the camshaft gear, you will need to fix it through the technological holes and unscrew the fastening bolt. You need to remove it from the shaft carefully so as not to lose the key. After this, you will need to remove the rear cover, located behind the removed gear, from the head and block.
- The cooling system pipes are removed from the head along with the thermostat from the head, as well as the rest of the wiring. The fuel supply and drain pipes are also disconnected.
- All that remains is to unscrew the head bolts. But to do this, they must first be weakened, and in a strictly defined order. And only after relaxation do they completely unscrew. If disassembly is done correctly, after removing the bolts, you can remove the head and remove the damaged gasket. At this point, the first part of the repair is considered complete.
Replacement of cylinder head gasket for VAZ 2114 8 valves.
Where is the cylinder head gasket located on a VAZ 2114?
In a VAZ 2114 car, an injector with an engine of 8 or 16 valves, the seal is installed at the junction of the cylinder head with the block itself. Structurally, this element consists of several layers. High-quality sealing is ensured thanks to sheet steel, fiber, cardboard and other materials that are pressed together and covered with one layer of sealant.
Damaged cylinder head gasket VAZ 2114
When should you change?
It is necessary to check the performance of the seal if the first signs of malfunction appear.
Symptoms that the cylinder head gasket has burned out:
- Bubbles appear in the antifreeze in the radiator unit, as well as in the expansion tank of the cooling system. This indicates a lack of tightness. The seal is checked first.
- Exhaust gases exit through the sealing product of the cylinder head 2114. This usually happens after repairing the cylinder head, if the car owner has tightly tightened the bolts securing the device.
- The appearance of white smoke from the muffler, resembling steam. Its presence indicates that coolant has entered the cylinders of the power unit, penetrating the lubrication system through a breakdown in the head gasket.
- The appearance of a white foamy emulsion on the dipstick for monitoring the engine fluid level. This is due to a lack of tightness in the lubrication system and refrigerant getting into the oil. This problem may indicate the presence of cracks in the cylinder block of the power unit.
- Decrease in car engine power, increase in fuel consumption. When pressing the gas pedal, the driver may feel dips; the engine takes more time to gain speed. When driving uphill, the engine will randomly stall, and the speed of the power unit may fluctuate. If the gasket is severely damaged, the power unit stops spontaneously at traffic lights or when neutral gear is activated.
- Presence of traces of motor fluid in antifreeze. If you open the expansion tank cap, you will see oil stains in the refrigerant.
- Spark plugs filled with coolant. If you disconnect the high-voltage wires from the devices one by one and unscrew them from their seats, you will see that they are filled with coolant. It is difficult to determine visually. Touch the liquid remaining on the candles with your finger, then taste one drop of the substance, but do not swallow it. If a sweetish taste remains on the tongue, then the candles are filled with antifreeze.
You can learn how to correctly determine the need to repair the power unit in the “four” from the video filmed by the “Engine Repair” channel! And interesting!”
Cylinder head VAZ 2114, 2113, 2115
The content of the article:
Repair of cylinder head VAZ 2114, 2113, 2115
At first I noticed twitching, and then completely white smoke from the muffler “well, I think everyone has arrived,” I open the hood, look in, 100-200 grams of antifreeze have disappeared, it’s good that there are a couple of kilometers left to the house, I got there slowly. The result is a blown cylinder head gasket. I drained the remaining antifreeze, it was 2.5 liters, everything else went into the oil.
- valve cover gasket
- change valve seals on occasion
- also camshaft oil seal
so that nothing gets in the way
when we get it, we take the spider away
We put everything together so it doesn’t get in the way
removed the head, it burned out on the 4th cylinder, you can see how the antifreeze washed the piston, white and shiny
now we wash everything
effects of antifreeze mixed with oil
wash galoshes with diesel fuel and gasoline
The head had to be sharpened; there was some damage in the place where the gasket burned through, but it didn’t work.
We continue the work, took the head back after grinding, now wash everything and blow off any shavings, dried out the valves, removed the valve seals, washed them, we will assemble and install them after work.
before desiccation of valves
Assembly of cylinder head VAZ 2114, 2113, 2115
So we assembled the cylinder head, oh, and this is not an easy task for a beginner. I changed everything that was possible in the cylinder head, installed it, tightened it, and then the assembly process went in full swing, but there was no need to rush. After the assembly, the first launch and failure overtook me for a good amount: the purchase of an oil pump housing, and the reason for this was lack of care during assembly, the damper was not put on correctly, or rather not put in its place, it turned out that during startup it broke off the crankshaft sensor mount for me , as a result, a damper, an oil pump housing, and a gasket were purchased. Assembled, changed - everything is in its place. And then the start, everything is fine, the engine whispers, after some time 5-10 minutes, the engine suddenly stalls and does not start. I was furious. I found the reason the next day. The reason for this was that the crankshaft sensor wire was not secured to the clamp and it ended up being singed on the manifold. I redid the wires. Everything works and I finally left the garage. There weren't many photos, I was busy assembling.
Assembled cylinder head already with adjusted valves
The thermostat was put in place
Here's the new belt
Cylinder head boring VAZ 2114, 2113, 2115
I've had an assembled eight-point head lying around for a long time. The plans are to bore the intake channels to 33mm and the exhaust to 30mm. The valves will be of standard size, only lightweight (T-shaped), 17 grams removed from each valve. By the way, they are already ready. Milling cutters 28-30-31-33mm were made from ball joints. They cut very well. In the near future I will buy bronze guides, I have everything else. We'll see what happens. The cylinder head has already begun to bore. In general, this is what happens.
I wrote that I would install homemade T-valve valves, but I had to install new ones from the store. As a result, I went to buy spare parts for the cylinder head and bought myself new valves. They are practically no different from the previous ones that we made ourselves. In general, we bought bronze guides, upset springs, though they were prosport, but I haven’t heard anything bad about them, and T-shaped valves. Found at a friend's place, crackers, plates and valve stem seals.
Gasket selection
The product must meet the following properties:
- elastic deformation, which will not allow the gasket to wear out quickly;
- impermeability of liquids - water and engine oil;
- resistance to gases;
- maintaining its characteristics over time;
- resistance to various chemical influences.
In case of burnout, in accordance with the technical manual, to ensure the working condition of the mechanism, only original gaskets must be used.
The article number for this product is 21083-1003020. The dimensions of this gasket are optimally designed for installation in the seats on the VAZ 2114 head. The product is manufactured at the AvtoVAZ plant. You can use analogues from manufacturers Patron, Rains, Master-Sport, Trialli, etc. The cost of some similar products can be 2-3 times higher than the original.
An overview of the faulty gasket and the procedure for solving the problem is shown in the video published by the KV Avtoservis channel.
We change it with our own hands
Replacing a gasket correctly with your own hands without experience is not so easy. But if checking the injection engine showed that the reason is a broken seal, then you can try to do everything yourself. To do this, follow the instructions below.
Required Tools
What you will need to complete the task:
- set of wrenches;
- socket wrenches;
- set of hex keys;
- two screwdrivers - with a Phillips and a flat tip;
- new seal for the cylinder head of the VAZ 2114;
- a bucket or cut-off bottle into which the used refrigerant will be drained;
- clean rags;
- torque wrench for tightening the cylinder head bolts.
Consequences of untimely replacement
If the replacement is not done on time, it will lead to serious problems. Due to a broken gasket, engine oil will begin to enter the cooling system, which will disrupt its overall operation. Antifreeze will not be able to properly cool the power unit. The stove will work poorly, the engine power will decrease, and problems will arise in its operation. The engine will stall, in some cases it will be impossible to start it, and dips may be felt when you press the gas pedal.
Due to antifreeze entering the lubrication system, the oil will lose its properties. Lubrication of rubbing components and parts will be less effective, which will lead to their accelerated wear and damage. The engine will run rough and may overheat due to the loss of antifreeze properties. In the winter season, difficulties will arise with starting the engine. If you do not change the gasket and continue to use the car this way, this may lead to breakdown of the power unit and the need for major repairs.
Changing the cylinder head gasket on a VAZ-2114 8-valve engine (video inside)
Probably, many motorists were faced with the fact that the time had come to change the cylinder head gasket on a VAZ-2114. This procedure is labor-intensive and not everyone can do it, but if you wish, you can handle this process yourself. Of course, you will need to remove the cylinder head itself and perform a number of operations that require some knowledge of the engine structure.
Let's sum it up
As you can see, it is quite possible to replace the cylinder head gasket yourself, but only if you have the necessary tools and skills. If you are not confident in your abilities, it is better to immediately contact experienced specialists. It is also important to follow the rules and recommendations and adhere to a strict sequence of repair work.
Sources:
https://ladaprofi.ru/vaz-2114/kak-sdelat-zamenu-prokladki-gbts-na-vaz-2114.html https://carfrance.ru/zamena-prokladki-gbc-8-klapannogo-dvigatelya-vaz -2114/ https://etlib.ru/report/1341-zamena-prokladki-gbts-na-vaz-2114 https://labavto.com/vaz/2114/kak-zamenit-prokladku-gbts-na-vaz- 2114/ https://etlib.ru/report/1341-zamena-prokladki-gbts-na-vaz-2114 https://krutimotor.ru/zamena-prokladki-golovki-bloka-vaz-2114-svoimi-rukami/
VAZ-2114 engine structure diagram
Cylinder head gasket close up (engine removed)
In order to understand the process and principle of replacing engine gaskets, you need to know the structure and sequence of parts in the main power unit.
So, let's look at the design of the VAZ-2114 engine:
Engine diagram and structure
Replacement process
So, when the basic structure of the engine is clear, you can proceed directly to the process of replacing the gasket. But first you need to decide on the tools. So, what do you need to complete the procedure: a torque wrench, a set of open-end and socket wrenches, a set of sockets and a ratchet, bits from a Torx set, screwdrivers, coolant for topping up, a new gasket, rags, containers for draining liquids.
Instructions
Replacing the cylinder head gasket is a procedure consisting of several stages. By following the step-by-step guide, you will be able to complete this job quickly and without any problems.
To perform this work, prepare sets of open-end and socket wrenches, a set of heads of different sizes, screwdrivers, rags, and a container for draining coolant and fuel.
First, turn off the power to the car. Remove the negative terminal from the battery. Then set the 1st cylinder (its piston) to the TDC position. Drain the coolant.
After this, you need to make sure that the pressure level in the power system is low enough. To do this, unscrew the cap, which is located at the rear end of the fuel rail, press the spool and drain the fuel, then screw the cap back on. It is very important to consider that these actions can only be carried out a couple of hours after using the car. If you do this immediately after stopping the car, it is possible that you will get burned both from contact with the spool and from the fuel that will be sprayed under pressure. In this case, it will not be possible to safely drain it.
After you have drained the fuel, disconnect the muffler pipe from the manifold. To do this, unscrew the nuts securing the bracket under the bottom of the machine. Then remove the clamp and free the exhaust pipe.
The next step is to remove the cylinder head cover. Disconnect the manifolds and receiver. Remove the pipe from the throttle body with an air filter and an air intake hose. Take a hexagon ("10") and a screwdriver. Use them to disconnect the hoses from the air outlet pipe. Remove all mounting screws.
The wiring harness connectors from the sensors must be disconnected. This applies to both the idle speed control and the injector wiring harness (injector). The ends of the explosive wires must be removed from the spark plugs. Remove the wiring harness from under the receiver. Unscrew the fastening nuts, remove the timing cover and belt.
Remove the pulley from the camshaft. For this:
- secure it to prevent twisting;
- Unscrew the fastening bolt and remove the washer.
Remove the pulley carefully so as not to touch the oil seal. After this, remove the rear camshaft drive cover. Next, take the hexagon and do not completely unscrew the bolts that secure the cylinder head. Loosen the bolts ½ turn. Remove the cylinder head using a screwdriver as a lever. Disconnect the block head from the gasket. Clean all removed elements and remove oil. Install a new gasket over the mounting bushings.