Untimely replacement of antifreeze can cause the same harm as poor quality fuel. Antifreeze is an engine coolant. A boiling engine in a traffic jam and in the heat is precisely what happens due to the lack of replacement of the coolant. You can easily change the coolant at home; the whole process will take 30 minutes. Many drivers are afraid of a trip to the service center and a long wait in line - so replacement is postponed until the very last moment. This very last moment happens, as a rule, on the roads, at the most inopportune time. How to avoid the development of such situations? Read further in the article.
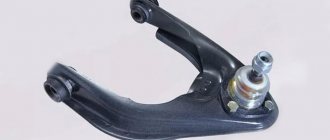
Front strut support bearing Opel Astra N: diagnosis and location
Before starting to check the serviceability, we first determine the signs of failure of the Opel Astra H support bearing:
- Creaking and knocking when turning the steering wheel on an uneven road from the side of the front pillars (spar);
- Difficulty rotating the wheels, deteriorating vehicle controllability.
The above signs are also important factors in diagnostics; knocking during shock absorption and operation of the struts, as well as creaking when turning the steering wheel, indicate a malfunction of the “supports”.
The causes of failure are usually the following factors:
- Unfriendly driving style;
- Depressurization of the upper supports (moisture, dirt);
- Poor quality components;
- Natural wear and tear (expiration of service life).
Location of the support bearing on the front strut of the Opel Astra H:
Creak when turning the steering wheel of Opel Astra H:
How to determine if the top support is faulty:
Video of a faulty rack support in operation:
Knock in the front suspension of Opel Astra H:
Replacing lamps in Opel Astra G
- Repair manuals
- Repair manual for Opel Astra 2004-2006.
- Replacing lamps
| ATTENTION Before replacing the lamp, turn off the ignition and the corresponding switch. Handle the new lamp by the base only. Do not hold the lamp by the glass with your bare hands, as this will leave fingerprints on the glass. Dirt settles on the reflector and impairs its reflectivity. Remove any traces of contact with a clean, lint-free cloth soaked in alcohol. |
Select a replacement lamp in accordance with the markings on the base of the defective lamp. Do not exceed the specified wattage.
| . Openings in the front wheel arch |
Replacement of the outer lamps of the front headlight unit is carried out through the openings in the front wheel arch. To do this, turn the wheels in the desired direction, release the lock and remove the cover ( ).
Headlight adjustment
| . Headlights |
When adjusting the headlights, set the corresponding headlight range control to 0.
Replacing low beam lamps
| . Headlight cover |
Remove the headlight cover ( ).
. Releasing the lamp holder |
Turn to the left and release the lamp holder ( ).
| . Removing the lamp from the reflector |
Remove the lamp socket together with the lamp from the reflector ( ).
| . Removing the lamp from the holder |
Remove the lamp from the holder ( ).
Insert the new lamp into the holder without touching its bulb.
Insert the lamp holder so that its locking tabs align with the cutouts of the reflector.
Turn the lamp holder to the right until it stops.
Install and close the headlight protective cap.
Place the cover over the opening in the wheel well and secure it.
Replacing high beam lamps
Open the hood.
The high beam lamps are replaced from the engine compartment.
When replacing the bulb on the right side, remove the hose from the air filter.
When replacing a lamp on the left side, disconnect the connector on the fuse box.
| . Headlight cover |
Remove the headlight cover ( ).
Disconnect the plug from the lamp.
Release the spring wire by sliding it forward from the retaining tabs and swing it down.
Remove the lamp from the socket.
When installing a new lamp, insert the retaining tabs into the cutouts of the reflector, but do not touch its bulb.
Fix the spring wire clip, insert the plug into the lamp.
Install and close the headlight protective cap.
After replacing the lamp on the right side, install and fix the hose on the air filter.
| . Lamp plug |
When replacing a lamp on the left side, connect and secure the connector to the fuse box.
Replacing parking light bulbs
Open the hood.
The high beam lamps are replaced from the engine compartment.
When replacing the bulb on the right side, remove the hose from the air filter.
When replacing a lamp on the left side, disconnect the connector on the fuse box.
| . Protective cap for parking light |
Remove the parking light protective cap ( ).
| . Removing the lamp socket |
Remove the parking light bulb socket ( ) from the reflector.
| . Removing the lamp |
Remove the lamp from the socket ( ).
Insert the new lamp without touching its bulb.
Insert the cartridge into the reflector, install and close the headlight protective cap.
After replacing the lamp on the right side, install and fix the hose on the air filter.
When replacing a lamp on the left side, connect and secure the connector to the fuse box.
Xenon headlight system, Adaptive headlight system (AFL)
| . Xenon headlight |
Xenon headlights consist of a group of lamps with separate systems for low beam 1 (inner lamps) and high beam 2 (outer lamps) ( ).
Low beam
| WARNING Low beam operates at very high electrical voltage. Do not touch the connectors - this is dangerous. Have the xenon light bulbs replaced by a service technician. |
Replacing high beam lamps
The lamps are replaced through the opening in the wheel arch. To do this, turn the wheels in the desired direction, release the lock and remove the cover (see).
| . Removing the hood |
Remove the headlight cover ( ).
| . Lamp holder clamp |
Turn to the left and release the lamp holder ( ).
. Removing the lamp with socket |
Remove the socket together with the lamp from the reflector ( ).
| . Removing the lamp from the holder |
Remove the lamp from the holder ( ).
Insert the new lamp into the holder without touching its bulb.
Insert the lamp holder so that its locking tabs align with the cutouts of the reflector.
Turn the lamp holder to the right until it stops.
Install and close the headlight protection cover.
Place the cover over the opening in the wheel well and secure it.
Replacing parking light bulbs
Open the hood.
The high beam lamps are replaced from the engine compartment.
When replacing the bulb on the right side, remove the hose from the air filter.
When replacing a lamp on the left side, disconnect the connector on the fuse box.
| . Protective cap for parking light |
Remove the parking light protective cap ( ).
| . Removing the lamp socket |
Remove the parking light bulb socket ( ) from the reflector.
| . Removing the lamp |
Remove the lamp from the socket ( ).
Insert the new lamp without touching its bulb.
Insert the cartridge into the reflector, install and close the headlight protective cap.
After replacing the lamp on the right side, install and fix the hose on the air filter.
When replacing the lamp on the left side, attach and secure it.
Replacing front turn signal lamps
Open the hood.
The high beam lamps are replaced from the engine compartment.
| . Releasing the lamp socket |
Turn to the left and release the lamp socket ( ) from the retainer.
| . Removing the lamp |
Lightly press the lamp into the socket, turn it to the left and remove it).
Insert the new lamp without touching its bulb.
Insert the lamp socket into the reflector, turn it to the right and lock it.
Place the cover over the opening in the wheel well and secure it.
Replacement of rear combination light bulbs (Limousine)
. Paws of the rear combination lamp: 1 – reverse; 2 – direction indicator; 3 – side/brake light; 4 – side light; 5 – rear fog lamp |
| . Rotating the cover lock |
To replace the lamps on the right side, turn the lock with a coin, as shown in the figure, and fold the cover down.
To replace the lamps on the left side, turn both latches with a coin and fold the cover down.
| . Removing the cable plug from the lamp holder |
Remove the cable plug from the lamp holder ( ).
Holding the lamp body from the outside, loosen the mounting nuts with a wheel bolt socket wrench and unscrew them by hand.
| . Removing the lamp housing |
Remove the lamp housing by pushing it backwards ( ).
| . Lamp holder mounting screws |
Unscrew the three screws with a screwdriver ( ).
Push out the tabs on the outside of the lamp holder and remove it.
Remove the required lamp from the socket.
Insert the new lamp without touching the glass bulb. Secure the holder into the lamp housing. Insert the lamp housing into the body and tighten the mounting nuts by hand. Reinsert the cable plug. Close and lock the lid.
To make sure the tail lights are functioning properly:
– turn on the ignition;
– press the brake pedal;
– turn on the parking light.
Replacement of rear combination light bulbs (Caravan)
| . Paws of the rear combination lamp: 1 – side/brake lamps; 2 – direction indicator lamp; 3 – reverse lamp; 4 – rear fog lamp |
| . Removing the combination light cover |
Unlock the cover by pressing the locking tabs and remove it ( ).
Remove the cable plug from the lamp holder.
| . Removing the lamp housing |
Holding the lamp housing from the outside, unscrew the fastening nuts and remove it by pushing it backwards ( ).
Unscrew the three screws with a screwdriver and remove the lamp holder.
| . Lamp holder mounting screws |
Remove the required lamp from the socket.
Insert the new lamp without touching the glass bulb. Insert the holder into the lamp housing and secure it with bolts. Insert the lamp housing into the body and tighten the mounting nuts by hand. Block the plug connector of the wires. Close and lock the lid.
To make sure the tail lights are functioning properly:
– turn on the ignition;
– press the brake pedal;
– turn on the parking light.
Replacing the license plate light bulb
| . Unlocking the lamp housing holder spring |
Insert the screwdriver as shown in the picture.
Press and release the holder spring.
| . Removing the Lamp Housing |
Remove the lamp housing ( ).
| NOTE Do not pull the housing by the cable. |
Lift the cover and remove the plug from the lamp holder.
Turn the lamp socket to the left and disconnect it.
| . Removing the lamp |
Remove the lamp from the socket ( ).
Insert the new lamp without touching its bulb.
Insert the socket into the lamp body and lock it by turning it to the right.
Insert the plug into the lamp socket.
Insert and secure the housing.
Replacing the front interior light bulb
To de-energize the lamp, close the doors before dismantling it.
| . Removing the diffuser |
Release the diffuser by grasping it with your hands in the places indicated in the figure, slightly tilt it down and pull it obliquely back.
Remove the lamp from the socket.
Insert the new lamp without touching its bulb.
Install and secure the diffuser glass.
Replacing the glove box light bulb
To de-energize the luminaire, close the doors or hold down the limit switch before removing it.
| . Removing the lamp |
Release and remove the lamp using a screwdriver ( ).
Lightly push the lamp towards the spring terminal and remove it.
Insert the new lamp without touching its bulb.
Insert the lamp into the hole and fix the lamp.
↓ Comments ↓
1. Vehicle operation and maintenance
1.0 Operation and maintenance of the vehicle 1.1. General information 1.2. Controls and instrument cluster 1.3. Air conditioning and heater 1.4. Interior equipment 1.5. Passive safety system 1.6. Driving and car maintenance 1.7. Tables
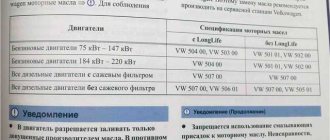
2. Engine
2.0 Engine 2.1. New petrol engine Z 18 XER DOHC-I 2.2. Gasoline engines - general inspection procedures 2.3. Removal and installation of the power unit 2.4. Mechanical part of the 2.5 engine. Checking and repair operations of engine mechanical components 2.6. Cooling system 2.7. Fuel injection system for gasoline engines 2.8. Lubrication system 2.9. Tables
3. Transmission
3.0 Transmission 3.1. Clutch 3.2. Manual gearbox 3.3. Automatic gearbox 3.4. Drive mechanism 3.5. Tables
4. Chassis
4.0 Chassis 4.1. General information 4.2. Wheels and tires 4.3. Front suspension 4.4. Rear suspension 4.5. Tables
5. Steering mechanism
5.0 Steering gear 5.1. General information 5.2. Preliminary checks 5.3. Steering mechanism 5.4. Tables
6. Brake system
6.0 Brake system 6.1. General information 6.2. General verification procedures 6.3. Operations for adjusting and replacing brake system elements 6.4. Tables
7. On-board electrical equipment
7.0 On-board electrical equipment 7.1. General information 7.2. Power supply system 7.3. Onboard electrical equipment 7.4. Tables
8. Body
8.0 Body 8.1. Design features 8.2. Hanging elements
9. Electrical circuit diagrams
9.0 Electrical diagrams 9.1 Symbols used in electrical diagrams 9.2 Engine cooling system (Z14XEP, Z16XEP, Z18XE and Z17DTL engines) 9.3 Front and rear windshield wipers/Rain sensor/Headlight washers 9.4 Window lifters 9.5 Brake light switch/Reversing light switch/Panel switches exterior lighting/Instrument panel lights 9.6 Rear combination lights/License plate lights/High level brake light 9.7 Headlights (except xeon)/Fog lights 9.8 Interior lighting/Power take-off socket/Cigarette lighter/Low compartment lighting
Replacing support bearings Opel Astra N - step-by-step instructions
The process of replacing the “support” is conventionally divided into four operations:
- Removing the front pillar;
- Disassembling the unit and dismantling the support;
- Assembly and installation of a new part or repair kit;
- Installing the unit in reverse order.
It is more convenient to carry out the replacement on a lift, but in its absence we use a jack. Tool set - standard spanners and sockets. Additionally, you will need ties for the shock absorber springs. The instructions use a specialized machine for tightening the springs, but in garage conditions two spring ties are used for compression.
Place the car on a level surface, put chocks under the rear wheels, engage first gear, and release the parking brake. Now we move on to removing the front strut.
Note:
This manual will also help if you need to replace the front struts of the Opel Astra N.
Sequence of work when replacing ATF in an Opel Astra H automatic transmission
- A car with a well-warmed engine is installed on an overpass or lift. It is important to ensure full access to the underside of the machine
- The motor protection is dismantled, under which there is a drain plug. After removing the protection, we next remove the plug, then unscrew the control plug. At this point, old used oil will begin to flow out - possibly along with dirt and metal shavings. The liquid will be drained into a previously prepared technical container
- It will take about 10 minutes to drain the used ATF.
- After making sure that the liquid has completely drained, tighten the drain screw and move on to the next step.
- Filling with fresh oil - to do this, unscrew the corresponding hole. This cannot be done by hand; for these purposes, the best variator would be a Torx socket wrench
- Using a filling syringe, inject new oil until liquid begins to come out of the hole.
- Tighten all plugs tightly - drain and filler, including the control hole
- We start the engine and leave it on for 10 minutes. At this moment, it is necessary to engage each gear one by one so that the oil is driven throughout the entire box. Hold each gear for 2-3 seconds
- Turn off the engine and let it cool a little
- Check the fluid level and add if necessary. This completes the oil change process.
How to choose support bearings for Opel Astra N: price, articles, manufacturers
It is advisable to choose a support bearing for the Opel Astra H, the price of which ranges from 800 to 4000 rubles depending on the configuration, based on customer reviews of the manufacturer. If we talk about the configuration, then on sale there are repair kits with an upper support and fasteners.
To simplify the choice of spare parts among the variety of manufacturers, as well as articles, a summary table has been compiled, which contains the current price, equipment, and number. Before purchasing a support bearing, it is recommended that you familiarize yourself with this table.
Article (number) of the support bearing Opel Astra H – 13186959
Table of recommended support and support bearing repair kits for Opel Astra H
| No. | Manufacturer | Catalog number | Price 2020, rub. | Equipment | |||
| Anther | Fasteners | P/sh | Upper support | ||||
| Repair kit | |||||||
| 1 | GENERAL MOTORS USA Analog | 13186959 | 3400 | — | — | + | + |
| 2 | FEBI Germany Analog | 28116 | 2000 | — | + | + | + |
| 3 | SWAG Germany Analog | 40 92 8116 | 2200 | — | + | + | + |
| Support bearing | |||||||
| 4 | GENERAL MOTORS USA Analog | 13270705 | 1400 | — | — | + | — |
| 5 | SWAG Germany Analog | 40 92 7996 | 740 | — | — | + | — |
| 6 | LEMFORDER Germany Analog | 31504 01 | 800 | — | — | + | — |