Ababukarov › Blog › Replacing the timing belt Mitsubishi Lancer 9 1.6
The timing belt must be changed every 90,000 km.
It is also recommended to replace the timing belt if upon inspection the following is found: Traces of oil on any surface of the belt. Be sure to replace such a belt, as oil quickly destroys rubber. The reason for oil ingress is usually a leak in the crankshaft and camshaft seals. Signs of wear on the toothed surface. Cracks, folds, indentations or bulges on the outer surface of the belt. Fraying or delamination on the end surfaces of the belt.
To replace the timing belt you will need: 10, 12, 19 sockets. A 12 wrench and pliers.
Timing belt catalog numbers:
Mitsubishi MD342154 – timing belt, original Mitsubishi 1145A051 – timing belt, original Gates 5535XS – timing belt, analog Contitech CT1008 – timing belt, analog (used by rally drivers on Evo, not inferior to the original and in many ways superior in strength) SUN A343YU100 – timing belt, analogue (SUN is the official packager of the original from the Japanese plant UNITTA owned by Gates) Catalog numbers of the tensioner pulley:
Mitsubishi MD356509 – timing belt tensioner pulley, original NTN JPU57-008A-4 – timing belt tensioner pulley, analogue (NTN is original from the factory). If you order this video, NEP57008A6 still arrives. Both articles appear on the label, both old and new. NTN NEP57008A6 – timing belt tensioner pulley, analogue (NTN is the original from the factory) Mitsubishi does not produce either a belt or a pulley. Therefore, there is no point in buying an original belt with a roller under the Mitsubishi label; the box will still contain original replacements: SUN A343YU100 and NTN JPU57-008A-4.
If this is your second timing belt replacement, you can replace:
Replacing the camshaft oil seal Replacing the crankshaft oil seal Replacing the pump (water pump) Catalog numbers for alternator and power steering belts:
Mitsubishi MD375935 – power steering belt, original Gates 5PK1063 – power steering belt, analogue MITSUBOSHI 5PK1065 – power steering belt, analogue Mitsubishi MN183019 – Alternator belt, original Gates 5PK903 – serpentine alternator belt, analogue MITSUBOSHI 5PK905 – serpentine alternator belt , analog Let's start replacing the timing belt with Mitsubishi Lancer IX 1.6 (4G18).
1. You can do without a hole; to do this, just jack up the car and remove the right front wheel, not forgetting to place boards under the side member:
2. Loosen the bolts on the generator and power steering compressor, then remove the belts. If you are not going to change the belts of the attachment, then it is advisable to remember in which direction the belts rotated, so that later you can prevent the belt from rotating in the opposite direction. Of course, this may be overcautious, but it's better to do it this way.
3. It is necessary to unscrew the fastenings of the protective casing and remove the pistons:
4. After that, we got a view of the crankshaft pulley. Unscrewing it can sometimes be a big problem:
5. Unscrew the bolt that secures the pulley to the crankshaft. In the book from the third Rome they advise taking the old alternator belt, clamping it with pliers and unscrewing it! But that most likely won’t work...
Source: www.drive2.ru
LANCER 9 1.6L crankshaft gear backlash or timing mechanism diagnostics
This customer was already well known in the car shop; he came often and constantly bought something for his Lancer. The sellers were interested in the buyer. We started talking. It turned out: “I decided to do everything myself.” I've already visited so many car repair shops - no one can help. And I don’t know how my address ended up in this auto shop, but they gave it to me and advised me to come. This is the beginning of the story... 4G18 engine. The look is “sporty”.
I looked at the “date” -
some crazy data. The opening time of the injectors is about 4 ms. In theory, it should be around two... During communication, it turned out that at some car service they once changed his firmware - “they installed sports firmware.” The catalyst has been removed and is replaced by a fake one. Air filter with zero resistance. The driver is a young man... - The car doesn’t drive at all. I press it to no avail.
...a certain understanding has already formed in my head:
- very large vacuum. About 60 kPa. This is already “one foot in the minds of motorists.” But trying to check something further when there is no one knows what “tuning firmware” is installed -... - there is simply no point. Therefore: - let's upload the stock software, and after that - let's diagnose it. The drain is flooded, let's go for a TEST DRIVE. I arrived: - She stopped driving altogether! It’s not suitable for a small hill! What did the scanner show? And the fact that the fuel correction is minus 12 and a half percent. For some reason the computer is trying to lean the mixture. For some reason the mixture is “rich”... I connected a pressure sensor to check: very high compression pressure. "The peaks have been cut." Ignition after TDC. And it will be “late” seriously!
For those interested: you can read the cheat sheet from Postalovsky. I look at the client: - Apparently the car needs to be given to mechanics - What's the problem? Something serious? — It could have broken the seating groove on the gear. If the driving is “aggressive”. The car was taken to the mechanics. After some time they came up to me: - Misha, you screwed up... everything is fine there...
You understand what state I was in at that moment. Screwed up? - No, guys, let's watch everything again. Attentively. I'm specifically interested in the gear.
We started looking more closely and this is what we saw:
Did everyone see the “steps”? Well, has the problem been identified? - we do. And here are the results obtained after the repair:
Bottom line.
As a doctor I know says: “A correct diagnosis is 95 percent of the success of the operation!”
Diagnostics is an accurate and responsible science!
Kudryavtsev M.E. © Legion-Avtodata Original article on the website “autodata.ru”
When to change and which timing belt is best for Lancer 9
The frequency of replacing the Mitsubishi Lancer 9 timing belt is 90,000 km . In addition, the belt must be changed if cracks and delaminations, abrasions and other signs of tooth wear, protruding threads, and also traces of oil on the surface of the belt . Oil destroys rubber and can get onto the belt due to leaky seals (crankshaft or camshaft).
Often, when choosing which timing belt is better, the original is called the original. However, if you are not satisfied with their price, you can make a certain compromise with quality and take an analogue.
Catalog numbers of the timing belt Mitsubishi Lancer 9 (engine 1.6 4G18):
- original Mitsubishi MD342154. Analogs: MITSUBISHI 1145A051, CONTITECH CT1008, GATES 5535XS, DAYCO 94904, INA 530051810 and others.
Catalog numbers of tensioner roller Mitsubishi Lancer 9:
- original Mitsubishi MD356509. Analogues: SKF VKM75625, INA 531067220, SNR NEP57008A6, TSN 6147 and others.
The price of a Lancer 9 timing belt (for the original) averages 3,000 rubles. Analogues will be much cheaper, around 500-700 rubles. The cost is relevant for Moscow and the region as of spring 2019.
Replacing a timing belt at a service station will cost about 2,500 rubles for the work itself - the procedure takes about 2 and a half standard hours, and the cost of a standard hour is determined around 1,000 rubles.
When and why is it necessary to replace a Mitsubishi Lancer 10 timing belt or chain?
The chain has always been considered a more reliable part than the belt. And its service life is on average 2-3 times higher than that of its belt analogue. But there are several factors that can prematurely damage the timing chain or belt.
Systematic high loads on the engine. Moreover, the greatest impact is not the fact of high load itself, but its difference. Sharp accelerations, throttling before the cutoff, driving tight at low speeds with the pedal pressed to the floor negatively affect not only the gas distribution mechanism, but also many other engine components. Motors are designed with these loads in mind, and it is unlikely to cause significant damage in a short period of time just due to driving style. But constant operation of the car with overloads will significantly reduce the life of the timing chain or belt.
- Untimely oil change. The timing chain drive is washed and lubricated with engine oil. The tensioner is “powered” from the engine lubrication system. And if the oil has not been changed for a long time, this will initially lead to insufficient lubrication. That is, the oil will still lubricate the chain, but a sufficient level of protection will not be provided. When the lubricant becomes heavily clogged with engine wear products, and clots and a large amount of solid inclusions appear in its structure, the tensioner will also fail. And this is already fraught with more serious problems.
- Unqualified timing belt repair. Often, after a makeshift replacement of the tensioner or dampers, the entire necessary range of accompanying work is not carried out. These elements do not work correctly, and ultimately lead to failures in the functioning of the timing belt.
- Installation of low-quality spare parts. Timing parts of the car in question belong to a category on which you absolutely cannot save. Savings of several thousand rubles can later lead to costs measured in six figures.
There are several characteristic signs by which problems with the gas distribution mechanism can be preliminarily determined:
- a slight drop in engine power and throttle response, an increase in fuel consumption and slightly changed warm-up and idle speeds (typical of chain stretching);
- floating speed, a significant drop in engine power and response, and even engine failure.
Delay can result in a major overhaul and even replacement of the engine, so you should not put off replacing the Lancer timing belt.
How to change the timing belt Lancer 9
Step-by-step instructions for replacing the timing belt are presented in the photo above. The main points of the procedure are described in more detail here.
- You can change the timing belt not only on a pit or a lift. There is an option to get by by jacking up the front part (with the installation of stops, of course) and removing the right wheel.
- Removing the crankshaft pulley can be difficult - unscrewing the fastening bolt is sometimes not easy. The most effective way is to unscrew it with the starter. To do this, you need to turn off the ignition coils (you can also power the injectors, just in case), install the head on the bolt and adjust the knob to it so that it rests on the lever or the ground. Then, in short attempts (no more than 1 second), crank the starter - the bolt should come off the first time. You can try to unscrew the bolt in another way, if you have a partner who will press the brake pedal with fifth gear engaged.
Tightening torque of threaded fasteners when replacing the timing belt (for 4G18/13 engines):
- crankshaft pulley mounting bolt - 128 Nm;
- pump pulley mounting bolt - 9 Nm;
- pump mounting bolt - 13 Nm;
- belt tensioner mounting bolt - 23 Nm.
Source: etlib.ru
Replacing the timing belt
The timing belt must be changed every 90,000 km. It is also recommended to replace the timing belt if during inspection the following are found:
- Traces of oil on any surface of the belt. Be sure to replace such a belt, as oil quickly destroys rubber. The reason for oil ingress is usually a leak in the crankshaft and camshaft seals.
- Signs of wear on the toothed surface.
- Cracks, folds, indentations or bulges on the outer surface of the belt.
- Fraying or delamination on the end surfaces of the belt.
The report on replacing the timing belt on the Mitsubishi Lancer 9 2.0 is here.
To replace the timing belt you will need: 10, 12, 19 sockets. A 12 wrench and pliers.
Timing belt catalog numbers:
- Mitsubishi MD342154 — timing belt, original
- Mitsubishi 1145A051 — timing belt, original
- Gates 5535XS - timing belt, analogue
- Contitech CT1008 - timing belt, analogue (used by rally drivers on Evo, not inferior to the original and in many ways superior in strength)
- SUN A343YU100 — timing belt, analogue (SUN is the official packager of the original from the Japanese UNITTA plant owned by Gates)
Catalog numbers of the tensioner pulley:
- Mitsubishi MD356509 — timing belt tensioner pulley, original
- NTN JPU57-008A-4 — timing belt tensioner pulley, analogue (NTN is original from the factory). If you order this video, NEP57008A6 still arrives. Both articles appear on the label, both old and new.
- NTN NEP57008A6 — timing belt tensioner pulley, analogue (NTN is original from the factory)
Mitsubishi Lancer: replacing the Mitsubishi timing belt or chain in our car services
Servicing gas distribution mechanisms is one of the most developed areas of activity of our car services. For several years now, we have been professionally engaged in replacing timing drives of almost all cars operated in the Russian Federation. And we replace the timing chain on the tenth generation Mitsubishi Lancer quite often. Firstly, it is not so easy today to find specialists who know this work well. Secondly, we provide our clients with a high level of service, which includes the following features:
- preliminary agreement on the price of repair work without its subsequent unilateral change;
- precise indication of repair deadlines and compliance with them;
- highly qualified workers with many years of experience in the field of repair of gas distribution mechanisms;
- availability of specialized tools, including high-precision digital equipment;
- strict adherence to the manufacturer’s instructions, which guarantees stable operation of the timing belt after work performed by us;
- a well-functioning warranty service system, which in case of any questions will allow you to quickly correct the shortcomings.
A more frequent operation that has to be performed is replacing the timing chain tensioner and dampers.
These elements, as practice has shown, are changed until the life of the circuit is exhausted. In parallel with replacing the Mitsubishi Lancer timing belt or chain, it is recommended to change the following engine elements:
- gasket under the cylinder head valve cover;
- camshaft and crankshaft oil seal;
- gasket under the manifold.
If it turns out that the work on replacing the timing chain coincides with the timing of the next maintenance, we can simultaneously replace the oil, filters and other working fluids with this work. Again, all work is carried out at the request of the client and only after agreement with him.
Replacing the timing belt Lancer 9
Lancer 9 for many is the standard of a universal car. The model combines high technical capabilities and low price. No wonder it quickly became popular all over the world, including in the post-Soviet space. However, any car requires repairs from time to time. The basic list of necessary measures includes replacing the timing belt of the Mitsubishi Lancer 9.
The service life of the engine, as well as the operating period as a whole, largely depends on the condition of this component of the car. Observing a certain periodicity, it is extremely important to check the timing belt for serviceability and replace if necessary.
Mitsubishi Lancer 10 / Mitsubishi Lancer: replacing the Mitsubishi timing belt in reliable car services
The new generation of Lancers surprised fans of this car with some rather serious design changes. In particular, the gas distribution mechanism on all Mitsubishi Lancer 10 engines began to be driven not by the usual belt, but by a chain. Moreover, the declared resource is impressive: the manufacturer assures that the new drive is capable of operating up to 250 thousand kilometers. However, as practice has shown, this figure is somewhat overestimated. Let's take a closer look at the procedure for replacing the timing chain drive on a Mitsubishi Lancer 10.
Step-by-step replacement with marking
Has the Mitsubishi Lancer 9 timing belt expired or did the breakdown occur earlier? The part must be replaced immediately. Fortunately, we can carry out the repairs entirely with our own hands and only require the owner to have certain tools and basic car mechanic skills.
Replacement is carried out using the following devices, that is, their presence is mandatory:
- socket heads in sizes 10, 12, and 19;
- wrench “10-12”;
- pliers;
- screwdriver;
- rags for wiping off dust and dirt;
- gloves.
Mitsubishi Lancer 9 timing belt
The part replacement algorithm includes the following steps.
- Place the car on a flat surface and remove the front wheel on the right side (do not forget to securely secure the car). Remove the right sector of the engine mudguard; to do this, unscrew 2 bolts and pry it off with a screwdriver.
- After access to the crankshaft pulley is gained, you need to unscrew it too. To do this, you need to unscrew the pulley fastening, represented by a bolt. The easiest way to do this is in 5th gear and with the brake applied.
- After unscrewing the pulley element, open the hood and remove the timing belt protection by unscrewing the fasteners with a size 10 wrench
- The next step is to remove the water pump pulley. To do this, wedge it with a screwdriver and remove the fastenings using a 10mm socket.
- Remove the belt protection from below and place marks on the two shafts. This is done in 5th gear by spinning the wheel placed over the seat. It is necessary to rotate clockwise until the camshaft mark matches the mark located on the engine. If everything is correct, the crankshaft mark will also be in the correct position.
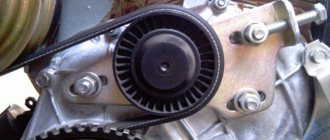
- Now you can bend the tension roller using pliers and remove it by unscrewing the mounting bolts.
- Support the engine and remove the support that is preventing further action.
- The last step before replacing the belt itself is to remove the bolt connecting the support mount and the power steering compressor.
- Remove the timing gear. After this, it is strictly forbidden to turn the crankshaft and camshaft, otherwise the marks will be lost.
- Install a new belt roller (without spring). Place the new element on the pulleys with maximum tension relative to the roller. Now you can put on the tension spring itself, which will automatically tension the belt. Afterwards, do not forget to tighten the roller mounting bolt.
Mitsubishi Lancer FAQ
So the car's mileage is close to 90,000 km. And this, in turn, indicates the desirability of replacing the timing belt.
Required parts:
- The timing belt is definitely original (MD 326059)
- The balancing shaft belt is definitely original (MR 984778 or MD 182295)
- Timing belt tensioner - original (MR 984375)
- Timing belt tensioner roller - can be original (MD 182537), or can be made by NTN (JPU60-011B-1)
- Balance shaft tensioner roller - can be original (MD 352473), or can be made by NTN (JPU55-002B-1)
- The timing belt deflector roller can be original (MD 156604), or it can be from Koyo (PU276033RR1D).
The rollers in points 4 and 5 (see above) are installed from the NTN factory, and the roller indicated in point 6 is Koyo. So, when buying the above “original” rollers, you pay half the price for a package with the inscription “Mitsubishi” and find NTN and Koyo rollers in this package.
The report on replacing the timing belt on the Mitsubishi Lancer IX 1.6 is here.
Let's start removing the timing belt
1. Remove the engine protection (3 nuts/bolts at the front of the car and 2 nuts/bolts closer to the middle. Naturally, all this is under the car)
2. Loosen the nuts securing the right front wheel, jack up the right front part of the car and remove the right front wheel.
3. Take out the plastic clips securing the plastic casings and unscrew the bolt securing the fender liner (indicated by red arrows):
4. Bend the inner part of the fender liner and unscrew another bolt securing the casing:
5. Then remove the front casing:
and the crankshaft pulley protection casing (let’s call it that):
6. Get to your feet and unscrew the 4 bolts securing the camshaft cover:
pull the cover towards the car interior:
and finally pull it out:
7. We hang the engine so that the left engine mount (the one next to the camshafts) is not deformed, otherwise we will not remove it in the future:
8. Under the hood again - unscrew the fastening of the power steering hose from the engine mount:
9. Unscrew the cushion itself (3 nuts on the cushion closer to the engine and 3 bolts closer to the wing):
from another angle it looks like this:
When removing the pillow, I unscrewed it from the bracket, this did not have to be done:
10. Slightly loosen (but do not unscrew!!!) the 4 bolts securing the pump pulley (as long as the hanging belt is tensioned, this is not difficult to do):
11. On your knees again:
12. Using an adjustable wrench and a wrench, turn the suspension belt tensioner counterclockwise (it will take quite a bit of force), align the 2 holes at the bottom of the tensioner and use a Phillips screwdriver to fix the tensioner in the bent state:
13. Let's get up. The hanging belt is loose, unscrew the 4 bolts securing the pump pulley completely and remove the pulley itself:
14. Unscrew the 4 bolts securing the decorative engine cover (red arrows) and remove it. We also take out 2 chips that go to the ignition coils (modules) (indicated by green arrows):
15. Take the head at “22” (or at “21” - I don’t remember) and place it on the crankshaft bolt, to the head there is a powerful crank, which we press against the bottom of the wheel drive:
16. Get behind the wheel, turn on the ignition and crank the starter for half a second. The crankshaft bolt is loose.
17. Unscrew the crankshaft bolt, as well as 4 bolts of the crankshaft pulley:
18. Remove the crankshaft pulley:
19. And again under the hood. We set (either by turning the crankshaft or camshafts clockwise) the marks on the engine cover and the marks on the camshaft gears (indicated by green arrows). We firmly connect the camshaft gears to each other (blue and red curve), preventing the camshafts from turning relative to each other in the future. We fix one of the shafts using a bolt securing the camshaft pulley (indicated by black arrows) with a wrench (for example, by wrapping the wrench with wire to the strut spacer), preventing the camshafts from turning.
20. On your knees. Unscrew the drive belt idler roller, unscrew the bolts securing the lower timing belt guard:
21. Remove the drive shaft deflection roller and the lower timing belt protection. Here's what we'll see if we stand up:
22. Now it’s convenient to crawl up to the timing belt tensioner pulley from below. Here we unscrew it:
Remove the timing belt.
23. Next, unscrew and remove the timing belt tensioner itself:
24. Remove the timing belt gear from the crankshaft:
25. Next we see the following picture:
We unscrew the 2 bolts securing the crankshaft position sensor, move it to the side and remove the iron plate, marking the inner and outer sides on it so as not to confuse it when installing it back.
26. Unscrew the balancing shaft tensioner roller:
27. Remove the balancing shaft tensioner roller and balancing belt:
28. It remains to unscrew the timing belt idler pulley. But you can’t just get close to him. In order to unscrew it you need to: - unscrew 6 bolts, indicated by green arrows and numbers (1-6).
Bolts numbered 1-5 are not difficult to tighten, but bolt number 6 covers the power steering pump pulley. Tear off the designers' hands!!! We take the next step - go to the power steering pump, unscrew the upper bolt No. 1 and the lower bolt No. 2 through the holes in the power steering pump pulley. We simply loosen bolt No. 3.
We pull the power steering pump itself towards the front bumper and gain access to the 6th bolt:
— unscrew it and remove the interesting structure to which the timing belt deflector pulley is screwed:
29. Unscrew this video.
The timing belt removal procedure is completed.
We begin installing a new timing belt.
1. Change the idler roller (Koyo) of the timing belt:
and screw the iron crap (to which the above-mentioned roller is screwed) into place:
2. Return the power steering pump to its place and tighten the 3 bolts securing it:
3. We fasten the tensioner roller of the balancing shaft (but do not tighten it), align the marks of the balancing shaft, the marks of the crankshaft gear with the marks on the engine (green arrows). We put on the balance shaft belt. We turn the balancing belt tensioner roller clockwise with our hands, thereby forcing the balancing belt to tighten. Tighten the tensioner pulley bolt. The ideal position of the tensioner roller will be when, when you press the belt with your hand from above (in the direction of the thick red arrow), the belt bends no more than 5-7 mm.
4. With the marks of the balance shaft gear and crankshaft gear set, put on the iron plate. Here it is important not to confuse its outer and inner sides, and also take into account that there is also a mark on the plate itself, which should be combined with the protruding mark on the engine. We screw back the crankshaft position sensor.
5. We put the timing belt gear on top of the iron plate.
6. Fasten the timing belt tensioner. DO NOT PULL the pin out of the tensioner!!!!!!
7. Turning the camshaft gear bolts with a wrench (1 and 2 in the figure), we combine the marks on the camshaft gears with the marks on the engine (green arrows). We put the timing belt on the camshaft gears and fix it on the gears with paper clips.
8. We set the oil pump gear. The mark on it should be combined with the mark on the engine, but there is a very important nuance here!!!! To correctly align this gear you need: under the exhaust manifold on the engine there is a rectangular platform, on which a bolt (plug) is screwed into the engine. We unscrew this bolt and insert a screwdriver/wire/bolt or the like into the hole formed. with a diameter of at least 0.5 cm and a length of at least 5 cm. If it is inserted without problems at 4-5 cm and the mark on the oil pump gear is aligned with the mark on the engine, then everything is fine. But if it is inserted less than 4-5 cm and rests against something, then you need to turn the oil pump gear 1 turn and so on until the screwdriver/wire/bolt or the like. will not fit freely by 4-5 cm, while the mark on the oil pump gears should coincide with the mark on the engine. If this is not done, then an imbalance occurs between the balancing shaft and the oil pump shaft - the engine will wobble and roar. Do not remove the screwdriver/wire/bolt until you have completed installing the timing belt!!!
9. Screw on, but do not tighten, the timing belt tensioner pulley. We check that all marks on all gears are set correctly. We put the timing belt on the crankshaft gear and the oil pump gear. We turn the timing belt tensioner roller counterclockwise by hand, achieving the initial tension of the timing belt. Tighten the bolt securing the timing belt tensioner pulley. We try to carefully pull the pin out of the timing belt tensioner. If you don’t have to make any special efforts and the pin comes out more or less freely, then the timing belt tensioner roller is set correctly, otherwise we leave the pin in the tensioner and again adjust the belt tension with the roller. I managed to position the video correctly the 3rd time.
10. After we have pulled the pin out of the tensioner, we once again check that all the marks are set correctly. We take out the screwdriver/wire/bolt from the engine under the exhaust manifold, screw the bolt/plug back in. We screw the crankshaft bolt into place and use a wrench to turn the crankshaft clockwise until the marks on the camshaft gears match the marks on the engine.
11. We put on the lower timing belt guard and screw it on. We fasten the drive shaft idler roller:
12. We put on the crankshaft pulley, fasten 4 small bolts and 1 large:
13. We put 2 chips on the ignition coils, return them to their place and screw on the decorative engine cover:
14. Throw on the drive (hinged) belt:
15. We put on the pump pulley, tighten the 4 bolts securing it. We throw the drive (hinged) belt through it:
16. Take the engine mount and bracket:
17. Screw on the engine mount:
18. Screw the bracket to the engine and to the pillow:
19. Screw the power steering hose mount to the cushion:
20. Check that the drive (hinged) belt passes through all the rollers and pulleys and return the drive belt tensioner to its place:
We check once again that the drive belt passes through all the rollers and pulleys smoothly:
21. Put the upper timing belt protection in place:
and screw it on:
22. We put on and screw on the crankshaft pulley cover:
23. Screw on the front casing:
We return all the clips to their place, fasten the wheel, pull out the stops from under the engine, and put on the engine crankcase protection. We lower the car to the ground with a jack and try to start it.
The report used materials from the author “Grundic”, for which many thanks to him!
Which product is better to supply?
In conclusion of the article, we note the most popular and reliable parts of the timing system that may need to be replaced. Only by choosing and purchasing high-quality spare parts for Lancer 9 can you guarantee long and reliable service for the car.
| Product, name | Name, catalog numbers |
| Original timing belts | Mitsubishi MD342154 and Mitsubishi 1145A051 |
| Analogs of belts | Gates 5535XS, Contitech CT1008 and SUN A343YU100 |
| Timing belt tensioner roller, original | Mitsubishi MD356509 |
| Analogs of rollers | NTN JPU 57-008 A-4, NTN NEP57008A6 and SUN A343YU100 |
| Original power steering belt (analogue) | Mitsubishi MD375935 (Gates 5PK 1063) |
| Original alternator belt (analogue) | Mitsubishi MN183019 (Gates 5PK903) |
Timing kit Mitsubishi Lancer 9
All the above parts are of very high quality and are used in almost all official Mitsubishi services in Russia and the CIS countries. They are guaranteed to ensure long and reliable service of the car engine. In general, replacing the timing belt of a Mitsubishi Lancer 9 is a simple task, but it does require some preparation and knowledge.
Source: info-mitsubishi.ru
About the car
The Mitsubishi Lancer 9 first rolled off the assembly line in 1973. At first there were 12 modifications with engine capacities from 1.2 to 1.6 liters. In the 70s, Lancer 9 was produced with a coupe body. Then the car began to be produced with four doors and engines of 1.6 and 1.8 liters.
Lancer 9 is the ninth generation and, under an agreement with Mitsubishi, it was produced in our country from 2007 to 2020. Over 8 years, 145 thousand copies of the model were sold in our country at a price starting at 760 thousand rubles.
The car is equipped with two versions of 16 valve engines:
- SOHC - one camshaft with valves is used (engines 4G13,4G18);
- DOHC - two camshafts are used (4G63 engine).
Replacement procedure
Replacing the timing belt of a Mitsubishi Lancer 9 is not an easy procedure, requiring partial disassembly of the engine and certain conditions. In this case, it is necessary to have a garage, specialized tools and a classified selection of replacement parts.
Therefore, it is safer to turn to specialists, to a service station, where everything is adapted for this. However, you can change the timing drive on Lancer 9 yourself; you just need to have basic skills in servicing and repairing the car.
Algorithm of actions
- Jack up the car on the right side, then remove the front wheel and fender liner.
- Strengthen the machine for stability by placing additional support under it.
- First, you need to remove the power steering drive from the engine.
- Remove the generator and pump drive.
- Remove the crankshaft pulley, first unscrew the bolt.
Attention! In order to tear off the pulley fasteners, it is recommended to install a socket wrench with a long lever on the head of the bolt and, by briefly turning on the starter, move it from its place.
- Remove the upper and lower timing covers, marking them beforehand so as not to confuse them later.
- Place marks on the camshaft and crankshafts. Carefully remove the tension roller spring using pliers and then remove it.
- Unscrew the fasteners from the power steering pump and the engine mount. Remove the suspension base.
- Replace the timing drive. Put on the new belt so that the surface opposite the roller is taut.
Reassemble the engine for Lancer 9 in the reverse order.
Alignment marks
When disassembling and assembling the engine for Lancer 9, special attention should be paid to the crank mechanism (CVM) and timing components, since they are interconnected. Before disconnecting these mechanisms, you must first set marks on the corresponding shafts of these devices.
To set the marks, turn the crankshaft.
For SOHC engine
The camshaft mark must be aligned with the mark on the cylinder head.
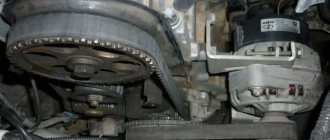
The crankshaft mark must be aligned with the mark on the cylinder block on both engine types. To see this mark, you need to remove the generator drive pulley and power steering pump.
For DOHC engine
It is necessary that the two camshaft marks align with the slots on the rear timing cover. The crankshaft mark must be installed in the same way as the SOHC engine mark.
Additional verification method
There is another way to make sure that the piston of the first cylinder is at TDC.
To do this you need:
- Remove the spark plug in the first cylinder.
- Set the piston to TDC. To do this, install the plug in the cylinder hole with a slight tension, then engage 5th gear and put the wheel in place. Smoothly turn it clockwise. As soon as the plug flies out, the compression process has begun and the piston is in the upper position.
- Place a mark on the crankshaft pulley.
- After this, set the camshaft to the mark.
Attention! Disconnected camshafts and crankshafts must not be rotated to avoid disrupting the coordinated operation of the crankshaft and timing gear devices.
Before removing the tension roller, it is recommended to secure the above-mentioned shafts together. To do this, you can tie the gears together with wire or tighten them with clamps and attach them to the pulley mounting bolt.
When assembling the engine for Lancer 9, special attention should be paid to the marks; therefore, it would be more correct to first install the tension roller and belt and only then turn the tensioner. If you pay close attention to this procedure, the Lancer 9 timing marks should coincide with the protruding marks on the motor housing.
To make sure of this, you need to reinstall the piston of the first cylinder to TDC, and then check the alignment of the marks. To do this, you need to put the wheel on the hub and, turning it, make two revolutions of the crankshaft. The marks must match.
Timing belt tension
When assembling the Mitsubishi Lancer 9 engine, before installing the upper timing cover, you need to tension the drive.
To do this you need:
- Rotate the crankshaft one or two turns clockwise and set the piston of the first cylinder to TDC.
- Remove the cover from the service hole.
- Make sure that the tension roller is loosened so that it tensions the belt under the action of a spring.
- Check the gap between the timing drive and the cover. The nominal value should be 31–34 mm.
- Tighten the roller mounting bolt.
- Install the service hole cover.
- Install the upper timing cover.
After replacing the drive and tensioning the belt, start the car and check engine operation.
Timing for replacing the timing belt on Lancer 9
According to the instructions, the timing belt on a Mitsubishi Lancer 9 needs to be replaced after 90 thousand km. mileage However, sometimes you should not wait for the required resource to be exhausted, but carry out such a procedure ahead of schedule.
Reasons for this may include:
- Excessive wear of the profile track on the inner surface of the belt.
- Oil leaks on any surface.
- Deformation as a result of mechanical damage, as well as visible cracks and chips.
- Cord delamination.
- The detection of any of the listed defects should serve as a reason to replace this important element in the engine structure.
What spare parts are worth purchasing?
Before you begin scheduled repairs, you need to prepare original consumables:
- Timing drive. The original belt for Mitsubishi Lancer 9 should have the article number MD342154. There is also a replacement for this timing drive under serial number 1145A051, Gates 5535XS, Contitech CT1008. They are not supplied from the manufacturer's factory, but according to their characteristics they are well suited as an analogue.
- Power steering drive MD375935 (Gates 5PK1063 – analogue).
- Alternator belt MN183019 (Gates 5PK903 - analogue).
- Belt tension roller MD356509 (NTN JPU57-008A-4 analogue).
- Camshaft seals – 2 pcs.
- Crankshaft oil seals – 2 pcs.
- Water pump.
It should be noted here that experts recommend replacing the tension roller and pump on Lancer 9 after 150–170 thousand kilometers, it all depends on their wear. If after removing the belt there is no play in the bearings of these parts, then they can not be removed during scheduled repairs after 90 thousand km. Also, seals can only be changed during the second scheduled repair.
Source: grmexpert.ru
We change the timing belt on a Mitsubishi Lancer 9 ourselves
One of the conditions for proper operation of the car is regular technical inspection and timely replacement of consumables. These works are performed at car services. If you want to save money, many procedures can be performed at home. The article describes how to replace the Lancer 9 timing belt, and also includes a video as a visual aid.
In what cases is replacement necessary?
All consumables are changed according to the recommendations specified in the Mitsubishi Lancer service instructions. It is recommended to change the timing belt after 90 thousand kilometers. The frequency of replacement depends on the condition of the strap. It should be replaced if the following defects are present:
- cracks, assemblies, bulges on the outer surface;
The surface of an old belt with cracks
- teeth are worn out;
- frayed edges;
- material delamination;
- traces of oil on the surface.
If you do not replace it in time, the belt may break. Its breakage can have serious consequences for the car engine. The timing belt is a rubber product with a toothed inner side. It is designed to synchronize the operation of the crankshaft and camshaft. If there is a break, the synchronization is lost, as a result the valves may bend and the pistons may deteriorate. This may lead to engine overhaul or replacement.
Replacement frequency
The manufacturer recommends changing the chain on a Mitsubishi Lancer x after a mileage of 250 thousand kilometers. According to reviews from car owners, replacement is usually required at 190-230 thousand km on the odometer. With careful driving, the chain runs up to 300 thousand km.
The need for earlier replacement is indicated by specific extraneous noise when the engine is running. If the chain rattles, this indicates that it is excessively worn.
Teeth jumping over a chain link also indicates the need to replace timing elements. In this case, there is an extraneous sound and a decrease in the dynamic characteristics of the car. A displacement of one tooth may not be accompanied by a compression deviation from the norm. If the chain has jumped several teeth, there is a risk of bending the valves.
Step-by-step replacement instructions
It is more convenient to carry out work on an inspection hole or overpass, but you can use a jack.
Tools
To carry out the work you will need:
When replacing the Mitsubishi Lancer timing belt, it is recommended to change the tension roller. Original consumables must have catalog numbers: Mitsubishi MD342154, Mitsubishi 1145A051. Can be replaced with analogues: Gates 5535XS, Contitech CT1008, SUN A343YU100, etc. For the tension roller, the original is Mitsubishi MD356509, the analogue is NTN JPU57-008A-4.
Stages
- If the car is not on a lift, you need to jack up its right side, remove the wheel and place a support under the side member. Next, remove the right front wheel arch liner.
- Remove the wheel and place the support
- First, the air conditioning compressor drive belt is removed, as well as the power steering drive. To do this, you need to loosen the mounting bolts and bolts for adjusting the belt tension.
- To remove the generator belt and pump, you need to loosen the nut securing the generator to the auxiliary units and the mounting bolt that secures the generator to the mounting plate. By rotating the adjusting bolt, loosen the tension and remove the strap.
- If the belts will not be changed, then it is worth putting marks on them so that during installation it is clear in which direction they rotate.
- Having loosened the 4 fastening bolts on the pump pulley, holding the pulley motionless, you need to unscrew the fastening bolts and dismantle the device.
- Next you need to remove the crankshaft pulley. To do this, you need to unscrew the bolt holding it. There are several ways to do this:
- Secure the crankshaft pulley from turning with an old belt by throwing it over the pulley and holding the pulley together with the belt with pliers, and then unscrew the fastening bolt.
- If there is an assistant and free access to the crankshaft, then you need to engage fifth gear and press the brake pedal, and the assistant at this time must unscrew the pulley mounting bolt.
- You can use a starter. Disconnect the ignition coils and injectors from the power supply, put the head on the bolt and rest the knob against the lever or the ground. We make several short starts until the bolt turns.
- At the next stage, it is necessary to dismantle the upper and lower protective timing covers by unscrewing the mounting bolts.
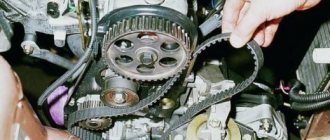
- Next, you need to set marks on the camshaft and crankshaft, aligning them with the marks on the engine. The marks are set by rotating the wheel clockwise. When the mark on the camshaft matches the mark on the engine, the mark on the crankshaft should also match the corresponding mark on the engine.
- We combine the marks of the crankshaft and engine
- Next, bend the tension roller spring and remove it. Then unscrew the fastening bolt and remove the tensioner.
- All that remains is to unscrew the bolt securing the connecting strip of the power steering pump and the engine mount. Next, remove the right suspension support, not forgetting to support the power unit in this place.
- Now you can remove the Mitsubishi Lancer timing belt by pulling it through the top.
- Installation of all devices is carried out in reverse order.
- With the new tension roller in place, the spring does not need to be installed yet.
- The new timing belt should first be placed on the crankshaft timing pulley and then on the camshaft pulley.
- First we put the belt on the crankshaft pulley
- The branch located opposite the tension roller must be tensioned.
- Next, the spring is inserted into the tension roller. Thanks to the spring force, the belt is automatically tensioned. Now you need to tighten the tensioner mounting bolt.
- Next, all the removed parts are installed sequentially. After installing the belts, you need to adjust their tension.
After completing the work, start the Mitsubishi Lancer engine and check its operation.
When the belt is removed, the crankshaft and camshaft must not be allowed to rotate, as the valves and pistons may be damaged.
Regulations for replacing belts and rollers
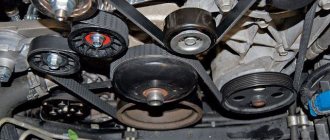
Diagram of a belt drive for attachments on a Mitsubishi Lancer 10 with a 1.5 engine.
To replace the belt, you should prepare the necessary tools:
- set of spanners and sockets;
- new belt and tension rollers;
- special rod for fixing the roller;
- knife or spatula for dismantling;
- protective gloves;
- sheet of paper and pen.
Before replacing, you need to remember the location of the belt or make a drawing on a piece of paper. Then you need to do the following:
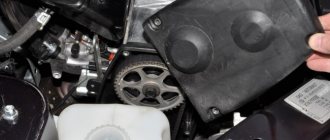
- Remove the right wheel and expansion tank.
Remove the expansion tank and power steering reservoir.
Remove the boot in the right wheel arch.
- Use a wrench or a 16mm to move the main tensioner to the side and use a special rod to secure it.
- Use a spatula to remove the belt or cut it with a knife, since the narrow space between the motor and the spar creates inconvenience during removal.
We remove the old damaged belt.
- Place the new belt into the grooves on each pulley.
We install the new belt first through the engine compartment, then put it on the crankshaft pulley from the side of the wheel arch.
- Check the installation using a wrench by turning the crankshaft pulley.
Rollers
When replacing the belt, it is recommended to also replace the rollers. To do this, you need to: remove the wheel and expansion tank, move the main tensioner aside and remove the roller.
Unscrew the deflection roller.
Remove the tension roller.
First of all, you need to remove the upper bypass roller , then the middle one, and lastly the main tension roller . The second bypass roller is equipped with a left-hand thread.
Assembly is carried out in reverse order.
Belt and roller selection
Belt item number 1340A113.
Idler roller 1341A005.
Tensioner roller 1345A079.
In order for a part to serve for a long time, it is necessary to choose a quality product from reliable suppliers.
Article number of original spare parts for Mitsubishi Lancer X with a 1.5 l :
- drive belt – 1340A113;
- two deflection rollers – 1341A005;
- tension roller – 1345A079.
These parts must be replaced within the specified period or when the following symptoms appear.
If the belt breaks, the engine continues to run, but all other attachments stop working. If the water pump fails, the coolant circulation stops and the engine stops removing heat (overheats). In a short time, the engine overheats, which can lead to a major overhaul of the power unit.