Color design
Choosing the right color scheme is one of the main factors. Despite the fact that everything here mostly comes down to taste preferences, there are certain points that are worth adhering to:
- Vehicle color – its color is not required for the interior; a simple combination is enough.
- Color combination.
- The number of colors used - basically, two main colors are used in the interior of a car with a proportion of six to four. Rarely do they use three colors with a proportion of five three and two out of ten, “mainly when the ceiling is not retightened and some of the interior elements are made to match the color scheme.” You can neglect color saturation, since it is problematic to select the ideal combination of different types of materials.
- Color design of the stitching – it’s important not to go to extremes here. As an example, a simple black or dark gray interior harmonizes perfectly with orange or blue stitching. It is important to know here that if it was decided to use white stitching for black material, it will stand out greatly, which means that any minor defect in the floating stitching will immediately catch your eye. If you are unsure about the quality of your work, it is better not to use threads with a contrasting color.
Let's say you have a black and gray color scheme in mind, but will it harmonize well?
Will it be generally noticeable that the car interior was reupholstered with your own hands, since this is the color scheme that most vehicles are produced with? Here you can resort to more exotic options, such as brown. If you are not sure about the quality of the stitches, it is best to use threads that match the color of the material.
DIY car seat reupholstery technology
Reupholstering car seats with your own hands is within the capabilities of diligent and persistent people. Since the average car owner does not have the skills to do this kind of work, everything needs to be done slowly, following proven technology.
Preparing to reupholster the seats
Before you start updating your car seats, you first need to do some simple preparatory work:
- Removing seats. Usually fastening is carried out with 4 bolts, but you must first disconnect the negative terminal of the battery in order to de-energize the security system (airbags). Under the seat, you also need to disconnect the electrical wiring terminals, if any, for example, from the electric seat heating.
- Each part of the standard case is signed with a regular marker. You can also indicate the name of the material that will be used in this area of the cover.
- Removing the standard cover from the chair. To carefully remove the old seat trim, you need to press the metal clips on the back of the chair.
- The old cover is cut at the seams into separate parts that will be used as patterns.
- Material calculation. Now each piece of the old cover can be measured and its area can be calculated. The total area of the material must be increased by 20-40%, which depends on the accuracy of measurements and cutting options.
Making new cases from leather or Alcantara
To make new seat covers you will need some tools and materials:
- gel pen,
- scissors,
- sewing machine,
- foam rubber 5 mm thick,
- glue in a can,
- hammer.
The sequence of actions is as follows.
- Each piece of the old cover is placed on new material and pressed with weights. Use a gel pen to mark with short dashed lines. The marked elements of the new cover are cut out with scissors. When cutting, it is important to take into account such a feature of Alcantara as the direction of the pile. When all elements are combined, the result should be a surface with the same direction of the pile.
- Alcantara and leather are reinforced using fabric-based foam rubber. The connection of the cut parts with the foam rubber is done using glue. You cannot apply the adhesive composition with a brush or roller to the surface of the foam rubber. Therefore, the glue is sprayed evenly from the can.
- The next important step is stitching the patches. It is important to ensure that the edges of adjacent elements are accurately aligned. This will require some skill in using a sewing machine.
- The seam flaps, spread to the sides, must be glued on the wrong side. First, excess strips of foam rubber and material are cut off, and the lapels are cleaned and degreased. All that remains is to apply glue and press the lapels together.
- An important point in reupholstering the seats will be beating off the seams with a regular hammer.
- The lapels are sewn with a double finishing stitch, and the free edges behind the stitching are not trimmed.
Installing a car seat cover
Installation of a new car seat cover is carried out in the following sequence:
- Before installing the new seat cover, you need to thread the straps. The product is turned inside out and straightened out. The cover is first pulled over the back of the seat.
- Now it’s the “seat’s” turn. Usually this stage does not cause any problems. You need to use plastic clamps threaded through special holes to pull the cover to the base of the chair and secure it by the spoke. The edges of the new cover are stretched evenly along the contour of the seat.
- The leather covering should be completed by heating the material with a stream of hot air. An electric hair dryer is used for this; the main thing is not to overdo it and not burn the case. Gradually drying, the material will stretch like a drum. After this, each chair is steamed using an iron and a damp cloth. Thanks to these thermal operations, the chair cover becomes taut and absolutely smooth.
- The final operation of reupholstering the seats will be to clean the light leather or Alcantara from glue residues, abrasions and fingerprints.
Carefully reupholstered car seats will please the car owner for a long time. During the update process, you can change the design of the car seats, as well as update the upholstery of the doors, ceiling and panels. The comprehensive tuning will change the shabby interior beyond recognition, add elegance to the car and increase its value.
How to choose material
The market for the materials used has become oversaturated to such an extent that it is now very difficult to select or at least find a suitable solution. This applies not only to the types of materials, but also to the number of varieties of a particular material, which may differ from company to company. What kind of material will be used to reupholster the interior depends on personal preferences and available funds. So, for example, reupholstering a car interior with leather may not involve natural varieties, but substitutes.
Of course, it is best to resort to natural, high-quality and therefore expensive materials.
Genuine leather is used due to its resistance to wear, strength, durability and other well-known advantages. The skin is bifurcated at the dressing stage, and the outer layer is characterized by a natural leather pattern with a smooth surface. There are also varieties of genuine leather with artificially applied patterns. Like many products, they are divided into varieties
- Leather substitute is a budget option for reupholstery, but it is relevant even in the case of rather expensive vehicles.
- Alcantara is a material that is rapidly gaining popularity, characterized by good elasticity and wear resistance.
- Suede
- Velvet and others.
Where to buy material and in what quantity
Here it is worth noting this: purchasing material via the Internet is not recommended.
It is problematic to draw conclusions from a picture of a material, and it is possible that a completely different material is depicted. Selecting colors using this method is practically impossible. Even if you find a material in a real store, you can touch it, find out about the brand and color code, whereas when placing an order online, this is simply not possible. The surest way is to visit a specialized store and pick it up there and consult with the sellers.
You can take a closer look at purchasing material from furniture stores. Of course, not every salon will strive to sell several meters of material, but it’s worth a try. But here it is important to understand one nuance - you will be purchasing furniture material, not automotive material.
These two types of material differ in their level of strength and wear resistance. The furniture version, due to its scope of application, is inferior in this regard to the automotive version.
However, it is worth noting that furniture variations are characterized by a good quality-price ratio, which is difficult to say about leather substitutes.
As tests of materials from a furniture showroom have shown, temperature changes are not capable of negatively affecting the material in any way.
There is no clear answer to the question of how much material will be needed.
It is best to measure each element and add a little margin to the results obtained, at least one fifth. Well, the main thing is that you can buy additional material
What type of thread will you need?
It is better to use an elastic thread that is pre-designed for leather and ecological leather.
It is also suitable for a number of other materials. Numbers suitable for stitching are in the range from thirty to forty; numbers from fifteen to twentieth are suitable for decorative seams. You should not use ordinary threads, as they easily become moistened and become dirty, thereby quickly becoming unusable.
Material selection
Of course, a leather interior in a car is simply an ideal option. But this pleasure is very expensive and not every car owner can afford it. Let's consider what other materials (the price of which is affordable) can be used to update the interior design of a vehicle.
The most popular and frequently used materials for car interior trim are:
- Carpet . This is a fairly accessible and cheapest material, which is a non-woven base, on top of which a “decorative” layer of pile is applied. The advantage of this material is the presence of a large number of shades and the simplest installation possible.
- Alcantara . Unlike the first option, Alcantara consists of a woven base made from fine fiber threads. Manufacturing involves both textile and chemical processes. It is worth noting that this is a more durable and durable material, with silkiness, softness and dirt-repellent properties.
- Leatherette . This is an inexpensive option for interior trim, which, in addition to cost and attractive appearance, has only disadvantages. The main disadvantages of this material are a strong odor (for quite a long time), increased elasticity, excessive susceptibility to mechanical damage and absorption of odors (sometimes quite unpleasant).
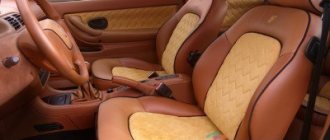
Leather car interior
When purchasing material for new interior trim, it is very important to pay attention to the quality of the product. Check that the structure of the fabric or leather is uniform. If Alcantara is chosen, then when cutting out it is necessary to take into account the direction of the pile. Otherwise, it may turn out that the details of one chair will have different shades.
Manual process of reupholstering complex elements
- Repeat the first two points of the seventh section.
- They cover the material with a food-grade film “it is needed to make it easier to remove the tape”, glue on masking tape “if you want to save money, you can glue the tape with a “mesh” in the area of the planned seams and glue a few additional strips of tape.”
- Using a marker, mark the zones using a stationery knife and make a cut along the drawn lines.
- Remove the formed parts for transfer and move them to the material and cutout of the pattern. You can start by transferring the elements onto special paper, but since this method does not involve machine stitching, and there is no need for stock, you can do without it. It is worth taking into account small irregularities in the case of applying and cutting out the planned elements with a knife, and in the case of transferring, take into account the factors and remove the irregularities.
- Glue the patterns as described above. There is no need to apply glue to the future seam; you need to make an indent of no more than 20 millimeters from the edge. The indentation is important for the contraction of the material during the stitching process.
- In the joint area, mark with a marker and pierce holes with an awl at a distance of five millimeters between them. The same distance to the joint.
- Hand stitches are made.
- Bend the material as already described above.
Working with complex elements and machine seams
- Based on the first three points of the previous section, prepare the surface and perform the elements using a template.
- They remove the completed elements, transfer them to special paper one by one, cut out the paper template, apply it to the material for tracing and mark dotted segments at a distance of about a centimeter from the template, cutting along the drawn dotted line.
- Sew the material along the completed line.
- Fold the remaining material and stitch with a distance of no more than seven millimeters from the seam. In order for the seam to be even, you need to use a special foot when stitching.
- At the end of the above step, you need to trim off the remains, and as close as possible to the seam.
- According to the points of the seventh section, glue is carefully applied so that the pattern sticks to the product. It is also important to note that it is of paramount importance to align the seams on the surface and glue the materials in the area of the seams so that they do not move out. Swelling and folds, floating lines are very noticeable, so it is important to deal with them.
Experienced craftsmen sew semi-synthetic strips on the back areas so that the glue does not pass through the holes to the outside. Strips of this type are also trimmed, as described in the current section.
To prevent the seam from bulging, the overstretched surface of the material can be glued around the perimeter and beaten with a hammer using a board so that the surface is not damaged, only then the stitching is done. As an alternative, on the surface to be covered with glue, it is necessary to mark the area in which the seam will be placed, and a small depression is made there. It must be extremely even and neat; this can be done using special equipment. The seam will be placed in the recess.
In the case of skin, a needle with a so-called spatula is used so that the skin can be cut without problems, facilitating the penetration process. The needles used can be left-handed or right-handed.
After the main part has been glued, the unnecessary parts of the material are cut off, leaving two centimeters for bending. Two or three cuts are made in the corners in the form of a triangle with sharp corners, so that the material does not wrinkle, but obediently fits into the intended place.
The process of re-upholstering the visors
- Cover the material with food-grade film and stick with masking tape. Using a marker, mark the zones using a stationery knife and make a cut along the drawn lines.
- They remove the completed elements, transfer them to special paper, and make an indent of about three millimeters. This is necessary in order to avoid sagging, and the visor fits tightly; the distance is chosen taking into account the elasticity of the material. Cut out a paper template, apply it to the material, trace and mark a line at a distance of six millimeters, cut it out.
- Sew the material along the line on three sides. There is no need to sew anything on the reverse side “where the visor is attached.” Make separate lines at a distance of four millimeters from the edge.
- In the corners, in order to obtain a smooth bend, you need to make about ten compact cuts in the form of triangles with sharp corners in order to avoid unevenness and other defects.
- The “cover” is turned inside out, and the visor is inserted into the completed “bag”. So that each end is smooth, and it does not turn out that one of the parts is bent in one direction, and the other in the other direction, you can apply unstitched elements to the material itself, or not suffer and resort to a ruler that can somewhat improve the current situation.
- Pull the fourth side together.
Direct work
Of course, everyone has different cars, seats, ceilings and doors of different heights and widths, and therefore there are no uniform operating parameters, but the general technology and procedure are the same everywhere. Remember that, as in home repairs, all work is done from top to bottom, that is, reupholstering the interior with your own hands always starts from the ceiling.
- The old ceiling covering is dismantled. In this case, you need to remove all decorative and functional parts - handles, plugs, interior lighting lamps. Then the sheathing itself is removed and the ceiling underneath is thoroughly cleaned, after which the new upholstery is dried and glued, and the installation of the removed parts is performed in the reverse order.
- The door trim is removed in the same way. The space under it is thoroughly cleaned and a new part of the sheathing is cut out along the contour of the old one, as if according to a template. Naturally, holes are cut for door handles and window regulators. The edges of the updated material are coated with glue and the new upholstery is installed in place of the old one in its rightful place.
- The lower we go, the more dirt there is under the casing - sorry, but the law of gravity works and various dirt and debris do not fall upward. We do the same with the armrest as with the doors and ceiling. The material for the new upholstery is first cut out on paper, and then, using the patterns, like real tailors, we make pieces of fabric that will become the upholstery of the armrest.
- Once you get into the work, you can remove old seat covers and make new ones using patterns. Although, you can simply buy other covers at your discretion.
That's all the technology is. In reality, this is painstaking and tedious work, but it is always pleasant to evaluate the results of your efforts when looking at the updated interior.
Covering the ceiling with velvet “as an example of a thin material”
- Remove the stock coating and clean the surface from unevenness and other defects.
- Apply the adhesive in strips of twenty centimeters to the ceiling, without waiting for the glue to dry, immediately apply the skin and heat it with a hairdryer and smooth it out.
The problem here is that if you overuse the glue, the product can come out. In case of deficiency, on the contrary, it will not be effective. It is recommended to test different volumes of applied glue on compact parts in advance in order to get the hang of it.
It happens that the material has a very small thickness and the danger of glue “escaping” increases. In such a situation, it is worth trying to apply spray adhesive with one or two layers and let it dry. Due to the formed film, the glue will remain in place.
The material is folded in the same way as the seventh stage, which described the seamless waisting of complex elements
Additionally you can order:
Single diamond stitching 2,000 rubles (for all seats) | Double diamond stitching 4,000 rubles (for all seats) | Reupholstering door inserts 1,500 - 3,000 rubles (for 1 insert) |
| Black ceiling reupholstery 25,000 - 55,000 rubles (The price depends on the size of the ceiling and the materials used) | Steering wheel reupholstery 4,000 - 6,000 rubles (Price depends on the complexity of the steering wheel) | Front armrest reupholstery 1,000 - 2,000 rubles (Price depends on the complexity of the armrest) |
Torpedo hauling
- Everything is done similarly to the seventh section of the article.
- The glue begins to be applied from the smoothest surface, usually in the upper part of 200-300 millimeters.
- Due to the complexity of the geometry, solid folds are formed. The problem is that in order to properly distribute the material over the surface and, as a result, each fold accumulates in the central area.
In the case of excess folds formed, the material must be cut and a joint made.
The first of the joints is located in the lower area of the torpedo in the center near the ashtray. Don't be upset, because there's nothing that catches your eye anyway. But with the second joint it is not very pleasant, because it is in an area accessible to the eye. It is located in the air duct area on the driver's side.
The blown areas and excess are trimmed.
The material is folded in the same way as the seventh stage, which described the seamless waisting of complex elements.
Useful tips
It is difficult to put the upholstery on the back. In order not to waste a lot of effort and time, it is turned to the left side. Place it on the top of the seat and gradually unfold it. In order for leather upholstery to sit well on the base, it is treated with hot air.
Under the influence of heat, the leather softens, easily stretches, cools, contracts, and tightly fits the seat. A hairdryer is used for heating; the temperature is adjusted by distance. They don’t stay in one place for long.
It is better to do seat restoration on a flat surface. The work table must be large to lay out the material. Sewing on a sewing machine is the most difficult part when reupholstering a car seat.
- How to install 4th generation HBO yourself: step-by-step instructions
- What does a modern dictator drive: the fleet of North Korean leader Kim Jong-un
- Digital service booklet - goodbye to tangible service history
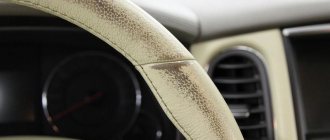
Steering wheel reupholstery
They cover the material with a food-grade film “it is needed to make it easier to remove the tape”, glue on masking tape “if you want to save money, you can glue the tape with a “mesh” in the area of the planned seams and glue a few additional strips of tape.”
Using a marker, mark the zones using a stationery knife and make a cut along the drawn lines.
Remove the resulting elements and transfer them to special paper 1:1. Cut out a paper template, apply it to the material, circle and mark a dotted line at a distance of six millimeters from the template.
They stitch the materials, and also, if desired, bend the edges and make stitching or, as mentioned earlier, make a recess.
Place the blank on the steering wheel.
Apply glue to the material and the steering wheel.
In the joint area, mark with a marker and pierce holes with an awl at a distance of five millimeters between them. The same distance to the joint. Hand stitches are made
Pillow reupholstery
In this case, all procedures are performed similarly to the seventh section of the article, which describes seamless waisting. That is, all the operations performed are excellent for the pillow.
Quite a lot of people are concerned about whether the airbag will work properly and whether the materials can rip? When the element in question is triggered, a strong pyrotechnic charge is triggered. The thickness of the pillow's plastic is about three millimeters, everything depends on this or that manufacturer. The force of the explosion will be significant, because the material will simply be torn apart. This is not an obstacle for the pillow.
Methods for re-upholstering car seats yourself
Reupholstering seats with your own hands can be done by persistent and diligent people. All actions to reupholster car seats must be carried out slowly and carefully, in accordance with the proven methodology.
Preparing seats for upholstery
Before starting work on upholstering car seats, you need to carry out the following preparatory steps:
- Remove the seats. Basically, they are secured with four bolts, but you must first remove the negative terminal of the battery to de-energize the security system and airbag. You also need to disconnect the electrical wiring terminals under the seat (if there is, for example, an electrically heated seat).
- All parts on the standard case are marked with a simple marker or felt-tip pen. If desired, indicate the name of the fabric that will be used in one place or another of the cover.
- The seat cover is removed. In order to remove the upholstery of the chair more easily and accurately, you need to press out the metal fasteners on the back.
- The old sheathing is steamed at the seams, and several pieces are obtained, which are used as patterns for cutting out the new sheathing.
- Subtract the required fabric footage. By measuring each part separately, you can calculate the area. We increase the resulting area to 30%; accuracy in measurement and compliance with the cut option depend on this.
car seat reupholstery
Making new upholstery from Alcantara and leather
To make new upholstery for seats, you will need the following material and tools:
- scissors,
- hammer,
- gel pen,
- sewing machine,
- foam rubber with a thickness of at least 5 mm,
- glue.
The order of work looks like this:
- Each piece of old sheathing is placed on new fabric and pressed with weights. Use a gel pen to mark with short strokes of marking lines. Cut out the marked parts of the new sheathing with scissors. When cutting, you need to take into account the direction of the pile of Alcantara. When combining all parts, the surface should have the same direction of the pile.
- Leather or Alcantara is strengthened using fabric-based foam. The connection of all cut parts with foam rubber is carried out using glue. It is not recommended to apply glue to the foam with a brush or roller. It is best to buy glue in a can and spray it evenly over the material.
- The next important step is stitching the cuts. It is imperative to observe and ensure that the edges of adjacent parts are evenly aligned. This will require some knowledge about using a sewing machine.
- The seam flaps that are apart on the sides will need to be glued on the wrong side. Before this, excess foam rubber and fabric are first cut off, and then the lapels are well cleaned and degreased. Next, apply glue and press the sides together.
- The main point when reupholstering chairs is to beat off all the seams with a simple hammer.
- It is necessary to sew the lapels with a double stitch and do not trim the free edges after the stitching.