Frosty morning. You are carefully reversing to get out of the house onto the road. One more movement of the wheel and your car will spin out onto the road. But the steering wheel turns with difficulty. Instead of turning the car around, you drive straight ahead and crash into a trash can on the other side of the street. Luckily, the damage is minor: a dented trash can and sticky debris that you're forced to pick up in your weekend suit.
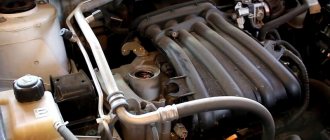
"What's happened? - you are surprised, lifting the hood. – The belt is in place and the oil level is fine – although it looks black. Maybe the belt is slipping until it warms up.” Once everything is in order, you try to drive in reverse again, holding the steering wheel with both hands. The steering is now simply excellent - no squeaking and excellent steering power.
If the belt is 4 years old or older, replace it because it's the fault anyway. But don't be surprised if the problem returns on another frosty morning. Power steering that is slow to wake up in cool weather has what is known as "morning sickness." It won't go away.
It is caused by wear and tear inside the steering assembly (also known as the “rack”). The fact that the oil has a black color with a metallic tint is the result of wear of the metal from inside the housing. Oil is destructive and wear gets worse over time. The rack is worn out - replace it and find a way to flush all the dirt out of the pump and hydraulic system.
Analysis of vehicle control problems
What symptoms indicate that something is wrong with this node?
The options are:
- play appeared on the steering wheel;
- the steering wheel became unusually heavy;
- Suspicious knocking noises are heard when turning the steering wheel;
- oil began to leak in systems with hydraulic booster;
- The steering wheel occasionally sticks in one position.
If you notice something similar on your car, then it’s time to think about visiting a car service center or try repairing the steering rack yourself.
The second option will help you save not only money, but also time, because there are often queues at service stations, and no one wants to be left without a car even for a short period of time.
So, let's look at the sequence of simple self-repair of the rack using the example of popular domestic cars VAZ 2109 and VAZ 2110.
DIY steering rack repair
It should be noted that the above symptoms do not at all mean expensive repairs with the replacement of steering components; often everything can be managed with preventive replacement of consumable parts.
But, unfortunately, in order to accurately determine the problem, you will have to dig around and dismantle the rack. Do-it-yourself repair of the VAZ 2109 steering rack will look like this:
- raise the front of the car using jacks, install rollback wheels and provide other safety measures;
- free access to the rail;
- put the wheels straight and unscrew the spline bolt located near the pedals;
- unscrew the tie rod nuts;
- the assembly is ready to be disconnected, although you can still try to immediately remove the rods.
To fix the problem, first of all you need to get a special repair kit, which is sold in car dealerships.
It can be complete, including gear and rack, or incomplete, containing a needle bearing, support bushing, rubber seals, retaining rings, boot cover, couplers and other small items.
- remove the boot, end caps and stops;
- use an octagon to unscrew the screw plugs and remove the springs, thrust bushings and rings - we carefully inspect all this and replace it if necessary;
- It would be a good idea to check the bearing and, at the slightest suspicion of play, replace it;
- inspect the drive gear;
- finally, we take out the rack itself, and here it is important not to forget to change the support shaft bushings and rubber bands - all this is in the repair kit;
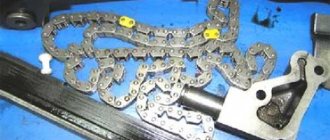
- The most difficult patient is the needle bearing. It requires a special wrench or, as a last resort, a drill with a 1.5 mm drill, with which we loosen the end of the bearing and then knock it out;
- After we have changed everything that is possible, we lubricate the rack parts and put everything back together as it was.
Repairing the steering rack of a VAZ 2110 with your own hands is similar, but there are nuances. Some versions of the “ten” are equipped with new units, which do not need to be completely disassembled to replace the bushing.
It is enough to remove the corrugation, unscrew the nut under it and the rail will split into two parts - one of them will have convenient access to the bushing.
It’s not all that difficult to repair the steering rack yourself. I was glad to help with the repair of your four-wheeled friend!
If you are an experienced motorist, then you probably know what a steering rack is and why it must be constantly in working order. But if you are a beginner, you will probably need knowledge about the structure of the steering rack. In the article we will look at what types of this mechanism there are, how to determine a breakdown and what you will have to face in this matter.
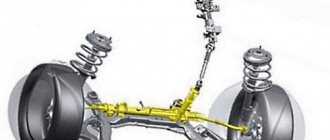
Rack and pinion steering is the correct name for the part of the car we are looking at. Although the popular expression “steering rack” has taken root a long time ago and everyone understands what we are talking about. This mechanism converts the rotation of the steering shaft into left-right movement of the rods. And they, in turn, transmit force to the steering knuckles of the front wheels. In other words, the steering rack is a transition link between the driver, who turns the steering wheel, and the wheels, which turn. Now you understand how important the performance of this device is.
On the other hand, the rack is a rod with a piston, the body of which is the power steering cylinder. The housing contains a spool that distributes fluid flows into the first or second cavity of the cylinder. Depending on which direction the driver turns the steering wheel, the side with the liquid, which is under pressure there, will also change.
The design of the steering rack also depends on the type of mechanism. The mechanical type is the simplest and most common. It can be installed on both front-wheel drive and rear-wheel drive vehicles.
In this case, the wheels turn directly due to the efforts made by the driver. And in order to reduce them as much as possible, a rail containing a variable subordinate number can be used.
The size of the steering clearance is very important for the good and correct operation of the car, and this indicator directly depends on the condition of the steering rack.
Therefore, let’s consider the structure of the mechanical section. In such a mechanical mechanism, the teeth of the rack change their pitch from the center to the edges. Therefore, when driving at high speed, the steering wheel becomes slightly heavier and its maneuverability decreases. And on the road at low speed, for example when parking, the steering wheel turns a little easier (since there is a smaller subordinate number).
The first domestic car with such a device is the VAZ-2110. Drivers considered the fact that when turning due to a mechanical rack, the steering wheel automatically returned to its initially level position to be a big plus. There was no need to make an effort to return the steering wheel to its original position after turning; it was enough to simply let go of it.
Basic faults
Like any other mechanical structure, the steering rack, due to certain circumstances, may show signs of malfunction. These include:
- crunch (knock) when turning the steering wheel;
- “tight” steering wheel;
- increased play in the steering wheel or steering shaft drive gear;
- vibration of the steering shaft when driving;
- uneven tire wear caused by improper alignment of the front wheels.
The listed symptoms indicate that it is time to repair or replace the steering rack. However, do not rush into replacement. The rail itself is made of durable steel, and it is not so easy to damage it. Most often, auxiliary structural elements become unusable:
- support sleeve;
- drive gear bearings (ball and needle);
- seals;
- anthers, etc.
There can be any number of reasons for the failure of these parts, from spent resources to mechanical damage due to off-road driving. If you are sure that the rack itself will not have to be changed, you can get by with minor repairs to the steering structure, which consists of replacing the listed “consumables”.
If you decide to repair the steering rack at a service station, expect that you will have to pay about 300 rubles for the simplest repair kit. A complete set, including bearings, will cost about 500-700 rubles. The entire filling, including the rail, will cost 1,500 rubles.
It is advisable to know the markings of the rack before purchasing a repair kit, since they may differ depending on the configuration and year of manufacture of the “tens”.
The cost of repair work, depending on the service station, will be 1000-1500 rubles. If you don’t want to overpay for the work, you can repair the rack yourself.
Work order
- Remove the steering rack assembly.
- Cut the clamps securing the boot (cover) of the steering mechanism.
- Unscrew the thrust nut of the rack (octagonal special wrench 17), remove it from the body.
- Remove the rubber plug from it. Use a screwdriver to remove the retaining ring and spring.
- Lightly tap the steering housing on a wooden block to knock out the rack stop (piston) and remove it along with the seal.
- Remove the boot and drive gear seal (slotted screwdriver).
- Remove the lock washer (slotted screwdriver).
- Unscrew the nut securing the drive gear bearing (octagonal special wrench 24 with a central hole with a diameter of at least 18.5 mm).
- Remove the rack drive gear with bearing from the housing.
- Remove the rack from the housing.
- Pull the support sleeve out of the body by prying it with a slotted screwdriver.
- Remove the retaining ring from the drive gear shaft. Check the bearing for play. If there is one, use a bearing puller to remove the ball bearing from the shaft. Install a new one in its place in the same way.
- Remove the needle bearing from the housing by drilling two holes with a thin drill (2 mm) on the back of the housing and knocking it out using a thin rod. Seal the resulting holes with “cold welding” or “fast steel”. As a last resort, the bearing can be broken using a narrow chisel (not recommended!).
- Liberally lubricate the seat, install a new needle bearing into it, and press it into place by lightly tapping its housing.
- Install a new support sleeve from the repair kit, cut its rubber O-rings, and remove unnecessary fragments.
- Fill the inner surface of the rack body with special lubricant (Fiol-1 or equivalent).
- Insert the rail into the housing.
- Reinstall the drive gear and bearing. Secure it with a nut and install a retaining ring. Place a new boot on the gear shaft.
- Replace the new stop with the new seal. Secure it with a locking ring. Place a spring in its hole. Tighten the thrust nut.
- Adjust the rack by first tightening the stop nut all the way and then loosening it 30 degrees. Plug the nut hole with a rubber plug.
- Place the boot on the rack body and secure it with clamps.
- Install the rebuilt structure on the car.
Hydraulic rack device
How does a hydraulic steering rack work? This question may be asked by drivers of new cars that have power steering installed. The most basic difference from the mechanical type is that there is power steering here and it makes control easier and sharper.
If we consider the structure of a hydraulic mechanism with a rack, it consists of:
- Login.
- Spool bushings.
- Dust cap.
- Retaining ring.
- Spool seal.
- Zolotnik.
- Bearing.
- Rod seal.
- Tylnik.
- Rack rod.
- Retaining ring.
- Back seal.
- Piston rod.
- Rod bushings.
- Clamp nuts.
- Spool nuts.
- Spool plugs.
- Spool worm.
- Bypass tubes.
- Exit.
Whatever version of the steering rack is installed on the car, it is important to listen to its operation and identify errors that are present. This could be a knocking, creaking, or whistling sound in the steering mechanism. And these sounds should alert every driver. Even if it is a one-time procedure, something is wrong with the work - contact a specialist or look at the problem yourself.
Very often, to eliminate unpleasant car sounds, it is enough to lubricate all parts with oil or add liquid to a mechanical device. This will keep the machine operational for many years without major repairs. It is better to fix minor problems right away rather than have them turn into big problems. Take care of your car and it will serve you well for a long time!
How to find the right part in the service
The worker selects spare parts and components according to the parts catalog. So, for example, you need to find the steering rack. For the Kia Sorento there are several part numbers with RR recorded, and there cannot be any other options. Only such designations and only such modification. If they tell you that other markings are also identical, do not believe it, this is a hoax. This is not recommended in certified workshops.
The Kia steering rack consists of the following parts:
- anthers;
- alloy end seal;
- cylinder;
- main gear;
- spool;
- secondary shaft gear;
- thrust socket;
- rack;
- adjusting screw;
- hydraulic tubes;
- frame.
Video “How to replace the steering rack”
The recording shows step-by-step instructions for replacing the steering rack. Watch this video and you can easily repeat all the steps on your car.
Failure of the steering rack is a nightmare for any car owner. After all, eliminating this defect requires serious effort and resources, as well as the need to remain for some time without your “iron horse”. Therefore, in order to minimize the consequences, you need to be able to recognize the signs of impending repairs and have at least a general understanding of possible rack failures. In addition, it is necessary to find out how feasible it is to repair the steering rack with your own hands, and also to reveal the aspect of preventive measures.
Signs of a faulty steering rack
The steering rack is a power unit in the design of the steering mechanism, designed to transfer force from the steering wheel to the wheels (steered). It is through the steering rack that the process of driving the car is carried out by turning the guide wheels.
Reiki are divided into 3 categories:
- Mechanical;
- Hydraulic;
- Electrical.
Sectional view of the steering rack
Malfunctions may vary. However, to detect them you do not need to have special knowledge - it is enough to simply inspect this unit periodically. In addition, you should know the reasons why such defects may occur.
Play in the steering wheel
Play in the steering wheel and the appearance of sounds - if this occurs when the power unit is turned off during active turning of the steering wheel. In such a situation, the problem may be a weakened spool stop, as well as insufficient elasticity of the torsion bar.
Backlash - the causes of such a defect are varied. It can manifest itself as a result of excessive wear of the silent blocks that secure the rack, a change in the contact angle of the screw and teeth due to curvature of the crankcase or shaft, damage (mechanical) or the stroke (vertical) of the screw bearing. To determine the causes, it is necessary to diagnose the condition of the steering rack bushing, rod joints, and also the central tooth.
Heaviness and knocking when turning the steering wheel
Steering-rack diagram
Heaviness when turning the steering wheel usually manifests itself in the case of souring of the driveshaft.
Knocking is the most common symptom. Moreover, the sources of such knocking in the rack are different. Typically, sound occurs in the following cases:
- vertical stroke of the shaft in the bearing;
- development of the service life of the hinges and crankcase;
- maximum service life of screw, bushing or central tooth bearings;
- curvature of the crankcase or shaft, which leads to an incorrect angle of contact between the screw and teeth;
- development of the resource of silent blocks;
- loosening of the rail fixation;
- backlash violations.
Heavy running and leaking
Heavy movement of the steering wheel in extreme positions - this, along with insufficient return and creaking, is observed in the case of an overtightened bushing, as well as a bent crankcase or shaft.
Leakage - it occurs in case of corrosion on the shaft or wear of the oil seal. In addition, leakage occurs when the tubes (discharge or discharge) of the cylinder are depressurized.
Steering rack VAZ 2112 how to disassemble and replace faulty parts
If you decide to repair the steering rack at a service station, expect that you will have to pay about 300 rubles for the simplest repair kit. A complete set, including bearings, will cost about 500-700 rubles. The entire filling, including the rail, will cost 1,500 rubles.
It is advisable to know the markings of the rack before purchasing a repair kit, since they may differ depending on the configuration and year of manufacture of the “tens”.
The cost of repair work, depending on the service station, will be 1000-1500 rubles. If you don’t want to overpay for the work, you can repair the rack yourself
- Remove the steering rack assembly.
- Cut the clamps securing the boot (cover) of the steering mechanism.
- Unscrew the thrust nut of the rack (octagonal special wrench 17), remove it from the body.
- Remove the rubber plug from it. Use a screwdriver to remove the retaining ring and spring.
- Lightly tap the steering housing on a wooden block to knock out the rack stop (piston) and remove it along with the seal.
- Remove the boot and drive gear seal (slotted screwdriver).
- Remove the lock washer (slotted screwdriver).
- Unscrew the nut securing the drive gear bearing (octagonal special wrench 24 with a central hole with a diameter of at least 18.5 mm).
- Remove the rack drive gear with bearing from the housing.
- Remove the rack from the housing.
- Pull the support sleeve out of the body by prying it with a slotted screwdriver.
- Remove the retaining ring from the drive gear shaft. Check the bearing for play. If there is one, use a bearing puller to remove the ball bearing from the shaft. Install a new one in its place in the same way.
- Remove the needle bearing from the housing by drilling two holes with a thin drill (2 mm) on the back of the housing and knocking it out using a thin rod. Seal the resulting holes with “cold welding” or “fast steel”. As a last resort, the bearing can be broken using a narrow chisel (not recommended!).
- Liberally lubricate the seat, install a new needle bearing into it, and press it into place by lightly tapping its housing.
- Install a new support sleeve from the repair kit, cut its rubber O-rings, and remove unnecessary fragments.
- Fill the inner surface of the rack body with special lubricant (Fiol-1 or equivalent).
- Insert the rail into the housing.
- Reinstall the drive gear and bearing. Secure it with a nut and install a retaining ring. Place a new boot on the gear shaft.
- Replace the new stop with the new seal. Secure it with a locking ring. Place a spring in its hole. Tighten the thrust nut.
- Adjust the rack by first tightening the stop nut all the way and then loosening it 30 degrees. Plug the nut hole with a rubber plug.
- Place the boot on the rack body and secure it with clamps.
- Install the rebuilt structure on the car.
Main defects of the steering rack
- Development of the life of the bushing and its crankcase;
- Oil seal leaking on the shaft;
- Excessive wear on the distributor housing;
- Development of the resource of the central tooth.
Resource development of the bushing and its crankcase
Video: What to do if the steering rack knocks?
The bushing itself is necessary for reliable clamping of the teeth and shaft, as well as fastening the shaft itself. The bushing is mounted on a special spring, which provides the necessary clamping force, as well as control over the position of the teeth. Such a defect is considered quite common, especially in those racks where the bushing is made of plastic.
As a result, there is wear of the bushing and cylinder walls, which leads to vertical movement of the rack and, as a result, knocking and play. To determine such a malfunction, it is enough to drive onto an uneven road and rock the steering wheel to the sides while driving, and then repeat this with the car stationary. In addition, bushing wear will manifest itself in the transfer of shocks to the steering wheel while driving on a bad road.
In this case, it is necessary to repair the rack - simply tightening the bushing will not do anything.
Oil seal leak on the shaft
The specified oil seal is located on the rack shaft. A feature of such a defect is the late detection of the leak, because there is no pressure on the oil seal. Signs of oil seal leakage are a hum when the steering wheel is rotated, as well as a decrease in the level of fluid poured into the hydraulic booster reservoir. In this case, it is necessary to urgently inspect the rack, since it is not only the oil seal that may leak. Leaks can also occur due to defective clamps, pump, pipes, hoses, etc. The likelihood of an oil seal leak is largely determined by the material from which it is made - during severe frosts, some of them crack.
Excessive wear on distributor housing
This defect begins to manifest itself gradually - in slight biting of the steering wheel in a cold car. In addition, the steering becomes more and more tight, and its return to the zero zone will be incomplete.
The reason is the design of the rings, which rotate with the crankcase shaft. Over time, they form small grooves on the surface of the crankcase distributor and begin to leak oil. This leads to a loss of pressure and heaviness in the steering wheel.
The appearance of grooves is due to the addition of metal particles to the fluoroplastic from which the rings are made, which rub against the shaft. It is noteworthy that for most Japanese models such problems are not typical, since rubber gaskets are installed under the rings.
Video: Repair of VAZ steering rack. Do it yourself!
Resource development of the central tooth of the shaft
One of the main problems is the wear of the gear mechanism, the main task of which is the process of converting rotational motion into translational motion. Moreover, almost all cars are characterized by wear and tear on the middle link, since city traffic (for the most part) is characterized by driving in a straight line with slight steering.
To determine the problem, you need to independently inspect the mechanism by shaking the steering wheel to the sides from the middle position. If there are knocking noises, you should go to a service station and carry out a comprehensive diagnosis. If the central teeth are worn, the entire shaft will have to be replaced, and it is recommended to use only original components.
Is it possible to repair the steering rack yourself?
If the steering rack breaks down, it is recommended not to take risks and immediately go to a specialized service station. You can only carry out diagnostics on your own, while repairing the rack by an ordinary driver, in the absence of the proper knowledge, experience and tools, is unrealistic.
Preventive measures
With their help, you can significantly extend the life of the slats:
- careful passage of bumps and speed bumps;
- monitoring the condition of the steering rack components, especially its boots and seals;
- warming up the oil in the rack in winter before driving smooth and short turns;
- Do not hold the steering wheel for more than 5 seconds. in the extreme position, as this significantly increases the load on the gearbox and seals.
Such measures will significantly extend the life of the steering rack, as well as avoid costly repairs or replacement.
I have already talked about Fiat electric power steering systems. Fiat uses electric power steering, located directly on the steering column. There is an advantage here: the system is under the “protection” of the cabin, that is, all the electrics, electronics, gearbox, and drive are located in the cabin. Among the disadvantages: it requires a lot of free space in the area of the steering column; increased load on the steering gear. Recently, electric power steering has become widespread, in which the drive and gearbox are located directly on the steering rack.
Disadvantages and advantages of electric racks
Main disadvantages:
- actuators are located in the engine compartment, where there is a high probability of foreign liquids and dirt getting in;
- complication of the already capricious design of the slats;
- The electrical wiring of the electric amplifier is in extremely unpleasant climatic conditions.
Advantages of this design:
- freeing up free space in the steering column area, which increases driver safety in case of an accident;
- the entire kinematics of the power steering is concentrated in one place - on the rack;
- reduction of total steering mass;
- Possibility of prompt repair by unit replacement.
Principle of operation
In the middle position of the steering wheel, the steering wheel position sensors generate a zero signal to the electronic power steering control unit. No voltage is supplied to the drives, the rack remains in the neutral (zero) position. When the steering wheel is turned in one of the directions, the angular displacement sensors generate a control signal to the control unit, which generates control currents to the electric drive, which helps move the wheels in the required direction. At the end of the maneuver, the control unit returns the mechanism to its original position.
Structurally, electric rails are currently made in the following versions:
- racks with parallel drive;
- direct drive racks;
- electric racks with additional gear.
In accordance with the design, the drive motor can be installed directly on the rack:
or installed on a rail as an additional mechanism.
The power steering electronics are quite complex. When processing information about the required steering force, it uses signals from numerous sensors, which are not necessarily electric power steering sensors, for example:
- vehicle speed sensor;
- crankshaft speed sensor;
- wheel rotation sensors.
This is necessary to make the steering wheel more informative. It’s one thing when the wheels turn at a speed of 5 km/h, and another at a speed of 100 km/h. At high speeds, in the absence of steering feedback, even minor angular displacements of the wheels can lead to an emergency situation. Therefore, a malfunction of the electric power steering system, especially its electronic part, is fraught with serious consequences.
Communication with sensors of other vehicle systems and control units is organized via a CAN bus. A faulty CAN bus is a common cause of failure of the electric power steering system.
Manufacturers geographically install control units in different places. For example, Asians prefer to install control units (electronics) away from the electric rack drive. In this case, they are guided by the fact that the electronics in this case are more protected from contamination, dust, water, and oils. But there are also disadvantages:
- fairly powerful electrical wiring goes directly to the electric drive;
- The signal wires of the sensors may be damaged, which leads to a clear loss of functionality.
Quite the opposite is done by European manufacturers who install control units directly on the drive, that is, on the electric rack structure. I think they rely on the quality of their roads. From this point of view, I would choose the Asian option. But from the point of view of repairs, it’s better to have a European rack, on which everything is concentrated in one place: remove the rack and tinker with it.
Main symptoms and causes of malfunction
The main signs of faulty electrical racks are:
1. Jamming or jamming of the rack
.
Such a malfunction is usually associated with damage to the boot. In this case, dust gets into the area of the teeth, which, when mixed with moisture, turns into an excellent abrasive, which slowly “eats” the teeth with every minute of movement (especially in the urban cycle). After several thousand kilometers, the teeth wear down so much that the result is visible without a microscope. There is only one way out of the situation: replacement. 2. Increasing the required steering effort
.
In parallel drive systems, a common cause of this failure is belt wear. This may be a consequence of moisture getting into the mechanism or the installation of a low-quality belt after routine maintenance. Again the verdict: belt replacement. 3. Mechanical noise, hum when turning the steering wheel
.
The noise in the steering wheel area may most likely be the electric drive. In any case, it must be dismantled. The main reason for the mechanical hum of the engine is wear of the bearings. If a decision is made to dismantle the electric drive, then it is better to immediately carry out a set of routine maintenance work on it. 4. Incorrect “feedback” to the steering wheel
. That is, the movements of the rack do not correspond to the rotation of the steering wheel. There are two possible options here: failure of the sensors (or wiring to them) and a malfunction of the electronic control unit. First of all, it is necessary to perform computer diagnostics. If it doesn’t show anything, then you can try “tossing” a known-good control unit.
Repairing the electric power steering control unit is a troublesome task. If the firmware has failed, it is almost impossible to find it, except perhaps from professionals in their field.
Electric rack adaptation
After repair or maintenance of the electric rack, it must be adapted again, otherwise the steering wheel and rack will work with angular displacement, and the error signal on the dashboard will not be cleared. This can only be done with the help of diagnostic equipment, by manipulating the steering wheel to its extreme positions in accordance with the instructions given by the diagnostic scanner.
- Regularly check the condition of the rack boots.
- If a power steering error message appears, immediately begin troubleshooting.
- If possible, turn the steering wheel to extreme positions less often.
- Do not park your car for long periods of time with its wheels turned out.
A steering rack or, more correctly, a rack and pinion steering mechanism is a structure that converts rotation of the steering shaft into horizontal movement of rods. The link between the driver who turns the steering wheel and the wheels. Most modern passenger cars have this type of steering mechanism, which replaced the worm gear.
However, this is not a logical continuation of the worm mechanism. The steering rack was first installed on cars of the nineteenth century, in a primitive variation of a gear on the steering shaft and rack teeth interlocking with it.
Later it was supplanted by complex mechanisms, including worm gear; only at the end of the twentieth century did designers return to the rack and pinion design. The design has become so successful that modernization continues to this day.
Removing the rack
A little inconvenient, but doable: use a 17mm wrench to unscrew the bolt under the brake pedal. To do this, you will need to remove the nut; you may not be able to do without universal WD-40; soured fasteners are not a rare occurrence in a car. When the steering rack cardan is removed from this fastener, the part is moved to the side, and further work will take place in the engine compartment.
Method for removing the rack without dismantling the spool
This is done through the right wheel arch and the method is considered quite simple. If you didn’t manage to do it the first time, don’t give up - it’s better to take a break, calmly examine the field of activity and calmly get to work again. This is much easier than immediately moving on to the second method, which we will describe below.
You need an extension cord, wrenches 7 and 14, using these tools you can unscrew three bolts. They are unscrewed from the side of the engine compartment, then you should loosen the steering cardan, more precisely, its splined mount, which is held on by one bolt, and you need to unscrew it.
Without haste or sudden movements, we separate the rack and the cardan, and at this point the dismantling can be said to be completed. All that remains is to slowly, methodically unscrew and move the rack to the left, in the manner of removing large-sized furniture from the room that does not fit into the doorway, and pull out the complete part through the right wheel clearance.
It’s not that difficult if you give yourself time and complete the task without fuss. Otherwise, more complex disassembly work cannot be avoided.
Method of removing the rack with dismantling the spool
Not the most desirable and simple, but in the absence of proper disassembly skills, this is the only way to pull out the rail.
At least for the first time, if it was not possible to remove the entire mechanism through the wheel arch, you will have to tinker with the bypass valve (spool). Actually, in this case, you will also have to install the rack in parts, so it is worth remembering or recording the process of disassembling the spool.
- using wrenches 13 and 15, remove the hose and the tube closest to it
- use a 12mm wrench to unscrew 2 more iron tubes, it is not necessary to remove them, just loosen them so that they come out later when you turn the spool at the removal stage
- Using a 13mm head, unscrew the lower hinge from the rack shaft
- Using the E8 head, unscrew the 2 accessible bolts
- Use a marker to mark the position of the spool relative to the cardan (required!)
We warn you right away: the mark must be made without hesitation, run the marker along the spool itself, along the casing, along the splines, including the cardan. Otherwise, many difficulties will arise with the subsequent installation of the position of the steering wheel relative to the wheels.
Since the spool is no longer held in place by anything, you can carefully try to turn it clockwise; the part should come out of the seat along with two tubes, the fastenings of which were loosened a little earlier.
Now the rail can be removed using the method indicated in the previous paragraph.
Steering rack device
The connection of the rack to the wheels occurs due to steering rods, which, using tips, set the angles of rotation of the wheels.
There are three types of rack and pinion mechanisms:
- Mechanical.
- Hydraulic.
- Electric.
The steering rack layout will vary depending on the type of mechanism, but the general principle will remain the same.
Mechanical steering rack
It is the simplest type of slats, but at the same time the most universal, because The mechanism is installed on both front-wheel drive and rear-wheel drive cars. The wheels are turned only with the help of physical force. A special feature of this design is the variable gear ratio. This means that the pitch of the teeth changes from the middle to the edges. When driving at high speeds, when turning angles are minimal, the effect of a heavy steering wheel is created due to the large gear ratio. And in parking mode, when the steering wheel is turned to its extreme positions, on the contrary, the gear ratio becomes low and the steering wheel is easy to turn.
The steering rack diagram includes:
- an aluminum crankcase with a cavity with special protection in the form of a rubber corrugation;
- drive gear or regular gear attached inside the housing using a special bearing;
- a spring that tightly presses the rack to the gear, thus ensuring tight engagement of the teeth;
- The rod joint bushing operates at a given interval and provides the required steering rack travel.
Electric steering rack
The principle is the operation of an electric motor, which transmits the force from the steering wheel as accurately as possible. The electric power steering can be integrated into the rack or located on the steering shaft. This method allows installation to significantly reduce the cost of construction, while at the same time reducing safety.
The fact is that when the electric motor fails, the control becomes very rigid, virtually uncontrollable. The steering wheel simply does not budge, despite the efforts made. However, the design of a steering rack with an electric motor has a number of advantages that outweigh the disadvantages:
- high efficiency;
- simplicity and compactness;
- immunity to weather conditions;
- lack of working fluids;
- high reliability due to the absence of gaskets, seals, and tubes;
- efficiency (the electric motor only works when the steering wheel is turned, and turns off at high speed);
- low cost;
- quick return of the steering wheel to the neutral position.
Hydraulic steering rack
The principle is to transmit force using hydraulic fluid. This ensures precision and ease of driving. Thanks to the hydraulic system, the transmission of road unevenness to the steering wheel is reduced, and if you drive into a hole at speed, your steering wheel will not be torn out, since the shock will be absorbed by the hydraulic booster. But high fluid pressure at the moment of impact will affect the condition of the entire system.
The disadvantages include:
- poor information content of the steering wheel, lack of good feedback;
- poor reliability due to high pressure during operation;
- leakage and regular replacement of seals, gaskets, tubes;
- constant operation of the system, even if you stand motionless with the engine running, the pump will circulate liquid in the system;
- problems during repairs, you have to change the fluid.
Despite a decent number of disadvantages, heavy-duty vehicles use hydraulic steering, since the electric motor is not capable of transmitting the force provided by the liquid.
Electrohydraulic steering rack
The logical continuation of the hydraulic rack was the electrohydraulic one. This is a hybrid system with technology based on hydraulics, similar to power steering, but the pump is driven not by the engine, but by an electric motor. This option eliminated the disadvantage of uninformative feedback. The higher the speed, the less pressure the electric motor creates, giving a stiffer steering feel.