06.09.2014
The service life of the steering rack (hereinafter referred to as RR) should be about 15 years, as manufacturers assure. However, it will only be so under the following conditions: regular maintenance, use of recommended high-quality oils, driving the car on good roads and/or on the roads for which your car is intended, otherwise you cannot avoid repairing this part.
Of course, if you constantly drive only on high-quality roads without potholes and holes and with good coverage, then you may very rarely have to climb into the car to repair it. But, unfortunately, good, smooth roads still remain an unfulfilled dream for Russian motorists, so RR has to be repaired somewhat more often than we would like. One of the types of steering rack repair is its adjustment.
2Tighten the steering rack
Most often, hydraulic type racks are installed in modern cars, because this type of part accurately and quickly transmits steering rotation, even if the speed is quite high.
The steering rack does not deteriorate quickly, but constant driving on uneven roads with holes and potholes is a direct path to failure of the part in question. In addition to everything else, speed bumps, which often get stuck on uneven roads, also cause the breakdown of such a part. Don’t forget about dust, which negatively affects the operation of the steering rack.
You don’t need to immediately think that a knock in the steering rack will cause the need to replace it; tightening it can also help with this problem. Despite the fact that this method of repair is not always the most effective, but often tightening the steering rack becomes the solution to such a problem.
Regulatory processes are not something complicated in this case, so anyone who has ever sat behind the wheel and at least has a rough idea of where and what the car is can handle this task without any problems.
In order to tighten the steering rack, you will need:
- partner
- key
- car pit
- gap measuring device
The sequence of actions is as follows:
- The car must be on the handbrake so that under no circumstances does it roll anywhere
- The wheels of the vehicle must be in a straight line
- You will need to use a backlash meter to determine the gap.
- We take an adjusting screw (you can find it by studying the car passport, because this screw can be located in different places in each vehicle).
- The tightening process should be carried out in a moderate mode; there is no need to rush anywhere. After each revolution, it is imperative to check the movement of the steering wheel and its travel.
- If you think you have tightened the steering rack properly, you need to check this by road testing.
- It so happened that the drive wheels “go” with tension - then the rack will definitely need to be loosened a little.
- You need to understand that tightening a part such as a steering rack does not always completely eliminate a knock in the steering wheel, but often the situation can still be saved. No one is saying that the problem will disappear forever, but temporarily you can get rid of knocking and such unnecessary play.
The driver of the vehicle should keep in mind that some time after tightening the steering rack, it will still become “loose” and may even fail completely, so contacting a service station is mandatory, and the sooner the better.
Let's look at another detailed instruction for tightening the steering rack in a car:
- We lift the car onto the overpass (you can just put it on the pit). You need to understand that this process is carried out from under the car.
- We find the adjusting nut, the main purpose of which is to tighten the steering rack. If you don’t know where exactly it is located, read the instructions (the passport for your car).
- If your car does not have such a nut (and in some models this may be the case), then you will not be able to deal with the problem yourself. The only way out in such a situation is to seek help from professionals at the service station.
- When you find such a nut on the bottom of the car, it's time to pick up a wrench to tighten it.
- Do not forget that in some cases the nuts are equipped with protective caps, which will need to be removed before tightening the nut.
Now that the key has been selected, we proceed to directly tightening the nut. In this case, you can’t overdo it either, because the steering wheel will simply stop turning.
The nuances of working on a car with EUR and power steering
According to experienced auto mechanics, the process of tightening the steering rack on cars with electric steering and power steering is practically no different, so this guide can be called universal.
This is interesting: How not to buy a credit car
It is worth noting that the complete replacement process is also identical in the case of electric steering and power steering, with the exception of one point - in cars with power steering, before replacing the rack, it is necessary to drain the fluid from the power steering tank, and in cars with electric steering, remove the terminals from the battery.
Tightening the rack with removal
How to Rebuild the Steering Rack on Kalina
Immediately equip yourself with a steering rack specialized for the “ten”, and also get ready to remove the rods. From the tools, grab:
- Pliers;
- Mounting blade;
- Socket wrench 19;
- Hammer;
- Flat screwdriver;
- Set of heads - from 10 to 27.
Get started:
- Unscrew the nuts inside the passenger compartment and remove the fastening bolts of the lower universal joint to the steering rack gear shaft. To do this, you will need a 13mm socket. The bolt can turn, so hold it with an open-end wrench.
- In the engine compartment itself, remove the nut of the upper fastening of the rack boot.
- At the bottom of the car, remove two more nuts that secure the rack boot.
- Remove the boot.
- Raise the front of the car and remove the front wheels.
If you are going to remove the steering, but not dismantle the rods, follow these instructions:
- Remove the locking plate from the rod mount by prying it off with a screwdriver. Then unscrew the two bolts that secure the rods and rack;
- Using a 13mm socket, remove the nuts from the steering gear brackets connecting to the front panel;
- Move the rack forward a little to remove the gear shaft from the shield hole;
- Remove the rack together with the rods.
If you want to remove the steering rods, unscrew the rod end from the swing arm of the shock absorber struts. To do this you will have to do the following:
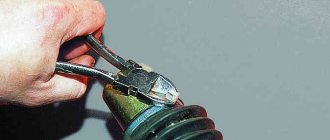
- Remove the cotter pin using pliers;
- Using a 19mm spanner, unscrew the ball pin fastening nut, but not all the way;
- Use a 17 socket to loosen the tension bolt of the rod end;
- Now press out the ball pin. To do this, insert a mounting blade between the swing arm and the tip. Press the tip away from the lever, and apply several blows with a hammer to the end of the rotary lever;
- Unscrew the ball stud nut completely;
- Remove the ball pin from the lever hole;
- Use a screwdriver to open the groove of the tie rod end;
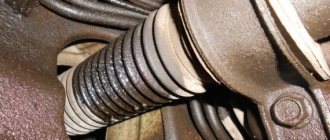
- Remove the tip, holding the threaded adjusting sleeve with a 27mm wrench. Count the number of turns so that during reassembly you can tighten it by the same number of turns;
- On the tie rod, try to maintain the position of the threaded bushing. This way the toe angle of the wheels will remain as correct as possible.
Features of the design of the steering tip
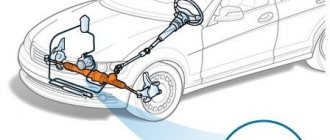
The rod is attached to the steering rack rod using an internal tip, and to the middle link of the trapezoid - using a swivel joint. The rods are connected to the steering knuckle lever through the outer steering tip. Internal tips and ball joints ensure the mobility of the rods in the vertical plane - otherwise the rods would break off when the car drives on uneven surfaces. The external tip ensures the mobility of the rod and the wheel in any plane - so the drive can operate normally on turns and potholes without damage.
Steering rods and ends
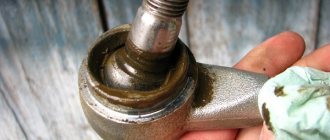
The design of the tip resembles the structure of a human joint: the sphere of the finger rotates inside a hemispherical body with a Teflon, caprolon sleeve or lubricant, which eliminates the friction of metal elements and allows the finger to deviate at a certain angle. The entire hinge is protected by a rubber boot. This design allows you to accurately connect the fixed and moving elements of the steering drive.
In general, the steering tip is a reliable, wear-resistant element: the fingers are made by casting or stamping from special steels, the ball parts are carefully ground, wear-resistant anti-friction materials are used as liners, the body is injection molded and anodized to further protect against corrosion. There is nothing to say about traction.
So why do these reliable elements force drivers to go to the service station from time to time?
Scheme of operation of the tie rod end
How and why steering rods break
The tie rods themselves never wear out, unless the car sits on the street for an eternity and simply rots. Usually the driver “helps” the rods: he suddenly flew onto the curb at speed, hit a stone - the rod was bent. Actually, corrosion and deformation are all possible malfunctions of steering rods.
However, bent rods cause other troubles - wheel alignment, wheel steering angle are disrupted, tip boots are torn, or the entire tip is torn out. Therefore, if you come across something impressive, just in case, go to a service station and check the geometry of the rods. If one rod is bent, both will have to be replaced.
Why do tie rod ends break?
The condition of the steering tips depends on one factor - the driver: how he drives, at what speed, and how carefully he monitors the steering system. Well, and also from the condition of the roads, because no one is safe from “suddenly flying into a hole in the dark.”
Therefore, the first enemy of steering tips is “beautiful” roads and the driver who drives on them. Due to strong impacts, not only do the rods bend, but the fixing nut simply loosens - the consequences of this are clear. In addition, a strong blow breaks the anthers, displaces the sphere, and it, in turn, breaks the bushing.
A torn boot is enemy number two. Yes, yes, the boot again (sometimes you get the impression that this is generally the most important element in the system). Through a torn boot, water and dirt will enter the ball, the metal elements rust, the dirt acts as an abrasive, and the water gradually washes away the lubricant.
How do handpiece malfunctions manifest?
We have already mentioned more than once that malfunctions of different elements and components of the steering can manifest themselves in the same way: backlash, knocking, vibrations, tight or loose steering wheel, beating in the steering wheel.
You can assume that something is wrong with the tie rod ends if:
- when driving, it “gives” the gas pedal;
- a quiet and frequent knock in the wheel area when turning the steering wheel and when the car is driving on an uneven road;
- the steering wheel turns too easily;
- There is no way to adjust the wheel alignment.
To be 100% sure that the tips are worn out, you need to lift the car or put it on a pit and swing the rods up and down - the gap should not be more than 1.5 mm. You can ask a friend to turn the steering wheel and watch the movement of the tip - it should not dangle in the seat.
IMPORTANT! Some drivers still take the risk of restoring them rather than changing their steering ends. Undoubtedly, now this is a very technological process. However, we do not recommend restoring such an important part. The fact is that workshops change the bushing - i.e. “fill” with new anti-friction material (the bushing is designed for the new sphere). Meanwhile, the working surface of the finger sphere has already worn out. To fit the hemisphere and sphere, the new bushing is pressed. It turns out that on a cold car the steering wheel is a little tight, but on a warm car the tip still knocks. In a word, the game is not worth the candle.
Replacement of tie rods and ends
So, we made sure that the tips were loose. Or the rods are bent. Or both. In general, you will have to change.
How to do it:
- First, jack up the car, remove the front wheels, and lock the steering wheel.
- We loosen the fixing nut with which the tip is screwed to the rod.
- If there is a cotter pin, remove it from the tip pin nut (a cotter pin is a fixing element, similar to a woman's invisible hairpin).
- Unscrew the nut that secures the tip to the steering knuckle (on the pin).
Adjusting the steering wheel play on a VAZ 2101-VAZ 2107
How to Remove Steering Rack Ford Focus 2
Welcome! Steering wheel play is a fairly common problem in almost all cars, especially cars of the “Classic” family. Backlash can occur for various reasons, ranging from a banal collision with a bump and ending with a malfunction in the steering system itself, so in order to remove the backlash you will have to make an effort that you will appreciate in the future.
Note! To adjust the backlash you will need to stock up on: A screwdriver and also a wrench set to “17”!
- Adjusting the free play of the steering wheel
- Additional video clip
What can cause backlash? In fact, it occurs for various reasons, some of which were described above. But if play occurs, this may be to blame: A loose or heavily worn fastening of the steering mechanism, as well as the pendulum arm and the steering rods themselves.
Note! Before sinning on all these items of the steering mechanism, it is first recommended to check and, if possible, correct the increased gap that can be found in the engagement of the roller with the worm of the steering mechanism - we will do this adjustment!
How to adjust play, also known as free play at the steering wheel on a VAZ 2101-VAZ 2107?
Note! It is better to do the work with an assistant, as it is much easier and more convenient!
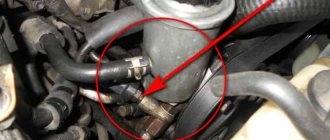
1) First, remove the protective cap that covers the column adjustment screw.
2) Then loosen the adjusting screw nut (Indicated by the red arrow) using a 17mm wrench. The nut must be loosened until the washer located under this nut can be lifted (Indicated by a blue arrow).
Next, when the nut is loosened, ask your assistant to sit behind the wheel of your car and sharply turn the steering wheel in different directions several times, while using a screwdriver, screw in the adjusting screw, which is indicated by the green arrow.
Note! Do this until the play at the steering wheel is within normal limits. Also, do not over-tighten the adjusting screw, otherwise the steering wheel may become very difficult to turn!
3) Next, completely tighten the adjusting screw nut, which is indicated by the red arrow, and while screwing, use a screwdriver to hold the screw itself from turning it.
Note! After the completed operations, check the free play of the steering wheel; if the steering wheel is difficult to turn, then slightly loosen the adjusting screw by loosening the nut. If, after completing the work, the steering play remains the same or has moved but not significantly, and if turning the steering wheel is accompanied by squeaking and clicking, then have it repaired at a car repair shop or replace the steering mechanism with a new one!
The steering mechanism is a very delicate thing and therefore it is not recommended to repair it yourself, because if assembled incorrectly, the mechanism can jam on the road and therefore the car will stop responding to steering movements!
If you don’t know how to check the steering wheel play, then read the article entitled: “Checking the free play of the steering wheel on a VAZ”!
Additional video clip: You can watch more detailed adjustment of the steering wheel free play in the video clip located just below:
Vaz-Russia.ru
Adjusting the steering rack without removing it
Lada Priora hatchback Logbook Steering rack repair
If you cannot decide how to tighten the steering rack on a VAZ 2110, we recommend that you familiarize yourself with the second option - without removing it.
For this method, arm yourself with a special wrench, which is made in the form of an octagon, 17 mm in size.
The steering wheel should be tightened to “tens” only in cases where knocking noises are observed during operation of the steering mechanism. It’s not worth it to just do work without a real need.
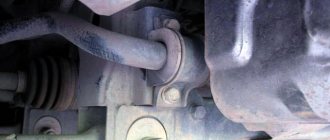
- Drive into the inspection hole or lift the car on a lift.
- Remove the engine guard, take a flathead screwdriver and hold a good light under the car.
- Locate the rear subframe at the rear of the steering rack. There the rack and shaft should intersect. The adjusting nut is located in that place. Do not confuse it with the adjusting nut plug. This is a common mistake made by beginners.
- If the steering gear was previously untouched, there will be a green plug on the nut. It functions as a stopper and is installed directly at the factory.
- Use a flathead screwdriver to remove the plug. It will probably break, but there's nothing wrong with that.
- After removing the stopper, pick up a specialized adjusting key and tighten it, moving clockwise. Do not press too hard. The degree of clamping directly depends on the strength of the knocks when moving.
- Turn the key 10 degrees, check the rack for play. If it is present, press more. It is not recommended to rotate more than 15 degrees at a time.
- Checking the degree of clamping is quite easy. Take the rack and turn it sharply in one direction or the other. If no extraneous noise is observed, the rail is tightened well.
- There is no point in trying to replace the stopper, even if you managed to keep it intact. It does not carry any benefit.
Video
We figured out how to adjust the steering rack on a VAZ 2110 with and without removal. Which option is more attractive to you - decide for yourself. By removing the rail, you can additionally perform some other work, check the condition of the units, components, replace something, tighten it.
Obviously, it is more than possible to carry out the adjustment yourself. The only caveat is the search for a specialized adjustment key specifically for the VAZ 2110 car. Without it, you cannot do anything; there are no analogues among the available tools. It is not expensive, so there is no need to worry. But also to squeeze.
How to diagnose the steering rack of a Mitsubishi Lancer 10
The first thing that may indicate a rack breakdown is a knocking sound when driving over uneven surfaces at low speeds. This knock is quite strong and sends vibration to the steering wheel. There may be some play or the steering wheel may become less smooth. Another symptom is a decrease in the level of hydraulic fluid in the EUR. Although Lancers have electric rather than hydraulic boosters, you still need to carefully monitor the fluid level.
How to determine what exactly is the cause of a crunching or knocking sound in the steering rack? There are two ways.
- First, diagnostics are carried out on a stand or visually, on a removed rail. Of course, this method is more accurate and informative, but also more expensive and labor-intensive.
- The second option is to visually inspect the rack with electric amplifier in the pit and, by clicking on the parts one by one, try to determine the source of the sound.
The following items must be checked: tie rod end, tie rod, left and right bushings and bearings. Of course, if you have the means and you are not a fan of doing everything yourself, then it would be good to contact a reliable service center so that the specialists can carry out a full diagnosis and give clear recommendations.
Signs of a faulty steering rack
If there are problems with the steering rack, the driver will immediately feel it by the “behavior” of the car. The following main symptoms of a faulty steering rack can be identified:
- When turning the steering wheel, a knock is heard from the rack;
- You feel play in the steering wheel;
- The wheels turn a smaller or larger angle when you turn the steering wheel than before. In general, the car becomes more difficult to control;
- There is no effort when the steering wheel is in the center position;
- There is no force at all even when turning the steering wheel, but the situation is corrected after the power steering fluid warms up above 50 degrees Celsius.
Symptoms can appear all at once or separately. In most cases, the cause of malfunction of the steering mechanism is a loose rack, not a failed one. Accordingly, tightening the steering rack will solve the problems that have arisen.
When does the steering rack need to be tightened on a Priora?
The steering rack is a vulnerable point for the Lada Priora.
The first sign indicating the need to adjust the rack is the appearance of a knocking sound when driving over small uneven surfaces. The knocking will be felt especially clearly when driving on country roads. In this case, the driver will feel shocks and vibrations on the steering wheel, which will also be transmitted to the entire car body.
In addition, if the steering wheel adjustment nut is loosened when driving on the highway, the car will “float” a little, and additional steering will be required from the driver, which will also immediately become noticeable.
Experts also say that a tightening is necessary if the driver begins to notice the appearance of a clearly audible crunching sound in the area of the steering column, as well as an increase in the amplitude of the steering wheel rotation.