To lighten the overall weight of the product, some components of the bicycle shifter are made of plastic. Of course, this design feature solves the problem of excess weight, but, as we know, plastic is a rather fragile material. Therefore, under excessive loads, it may burst, which will lead to shifter malfunctions. Plus, there are a lot of moving parts, rubbing surfaces, etc. contribute to the possible formation of backlashes or, on the contrary, jamming of the mechanism. Therefore, in this article we will consider the following questions: how to disassemble and lubricate shifters or repair bicycle shifters yourself at home; how to replace shifters if necessary, and also consider their types, operating principles and which ones are better.
Features of replacing the gear shift cable on a bicycle
A bicycle lover should always be able not only to handle it, but also to carry out competent repairs.
And most importantly, you can do all the actions yourself. In this article we will talk about the gear shift cable. The cable is a very strong connecting thread between the gears and the derailleur. The cable's job is very simple, to take human effort and transfer it to a mechanism to change gears. The cable tension can change in both directions, respectively, this happens when the gear is already selected. The cable itself consists of many thin metal threads. Which are intertwined with each other and thus form a strong connection. The cable is wear-resistant and can withstand the loads placed on it well. But due to poor quality care and bad weather conditions, breaks appear and the cable must be replaced. When purchasing a cable, carefully examine its condition; special attention is required at this stage. The best material is steel that is immune to corrosion. It is better to take it with a Teflon coating, it is more durable and reliable. The price of cable can vary, but depending on the manufacturer, they are relatively cheap. Significantly cheaper than other bicycle parts. Please note that you will need additional tools that you may not have. Most likely you have wire cutters or pliers, but most likely you don’t have a 5mm hex socket. For most operations on a bicycle, you will need one of these. Therefore, the hexagon will become an indispensable thing when independently adjusting or repairing a bicycle.
Purpose of cables and braids
The shift cable on a bicycle is the connecting thread between the shifter and the derailleur. It is a very strong metal straight thread. The job of this cable is to take all the forces and transfer them to the mechanism, thereby operating the gear shift. Depending on which gear is selected, by pressing the lever the cable tension becomes stronger or weaker. When the cable tension is optimal, the switch is in working condition.
With the help of a braid of cables (shirts), the force is transmitted to the mechanism into the rear stay. The braid also protects the cable from mechanical damage. It is a twisted metal wire, usually coated with polymer on top. At the ends there are lugs, from which a section of cable appears for adjustments.
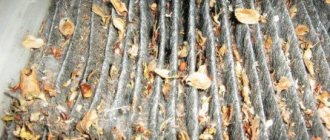
A cable is a set of thin strands of steel that are intertwined and together formed into a reliable, damage-resistant metal fiber. Over time, the threads can wear out and the strength of some of them decreases, thus, damaged areas appear with breaks, kinks and individual wires coming out. Therefore, the fiber is coated with a layer of polymer or stainless steel, this improves wear resistance and significantly extends the service life of the cable.
In addition to mechanical influences, cable wear is also influenced by external factors - moisture, dirt, dust. In order to protect the metal from external influences, lubricants such as Teflon are used - one of the most durable and hardy.
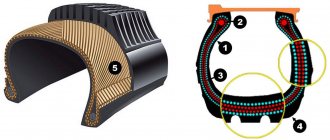
Braids on the market are presented in three types: twisted type, SIS type and improved SIS-SP type.
The twisted type of shirt is a spring made of metal wire, covered with plastic on the upper side. Inside, the metal springs are treated with lubricant so that the cable rubs less against the jacket. Cables with such a shirt are the most budget-friendly and are practically not produced today.
The SIS type jacket is similar in type to the twisted one, but the material from which the spring is twisted is more durable - metal sheets. A more durable and clean material, Teflon, is also used inside. This is the most common type of braid today.
SIS-SP braid is parallel woven. The threads are held back by a polymer layer. The length of this braid, unlike the previous ones, does not change, but the tension of the cable is adjusted. This ensures more accurate operation of the shifters. The inside is treated with silicone.
When might a cable need to be replaced?
If knocking and vibrations occur when shifting gears, the first thing you should do is inspect the shift cable. Often it is he who is the culprit of the breakdown.
The main cause of switch failure is dirt and water. Such problems appear when cycling in the rain, or lack of care for the bicycle after riding. Because of this, repair work will have to be carried out to restore the operation of the speed switch. If the bike was purchased quite recently, then of course such problems will not arise, but when the factory lubricant runs out, some parts will certainly need to be replaced.
But no need to worry. You can fix the gear shift problem yourself and replace the cable without much effort. Follow the sequential steps described below and you will cope with everything with ease.
Carrying out the replacement in stages
As with any other repair work involving the replacement of parts, you will need some tools, namely hexagons and wire cutters.
Nothing additional is needed, except for the replacement part. The process of replacing the cable is very similar to replacing the switch itself.
Attention! Due to different designs, it will not be possible to use the same method.
The replacement steps themselves will consist of 12 steps:
- The rear derailleur should be located at the smallest sprocket. Using wire cutters you will need to bite off the end of the cable and loosen the screw used for clamping. But before performing this action, you need to remember the initial position of the clamped cable. There are only two options: above the screw or below the screw, this is very important for correct gear shifting.
- Most likely you need a 5 mm hexagon, use it to loosen the shifter fasteners, and then remove it and put it aside. Now access to the protected element is completely open.
- To remove the cover, you will need to turn it counterclockwise, so the lock will unscrew and go to the shifter.
- Thanks to the removed cover, the end of the cable located under the spring becomes visible. Carefully study its location there so that you can easily pull it out and re-secure it in the future.
- Using the tension regulator, pull out the entire cable.
- Gently slide the spring to the side to gain access to the end of the cable so you can release it. Remember this sliding motion because this is also what the spring will need to move when installing the cable.
- We replace all the freed space with a new cable. It does not have to be identical to the one that stood before. For precise installation, use a handy tool, such as a screwdriver or perhaps an awl, to guide the end of the cable. After the last steps, carefully review the position, it should stand correctly and not stick out.
- Now install the shifter cover. This time the lock needs to be turned clockwise until it is fully tightened to prevent breakage.
- We install the shifter in the place it previously occupied.
- The cable is stretched until its beginning appears on the other side. This is where it becomes clear whether the cable is suitable. If it does not fit through the braid, then most likely you will have to replace it.
- If the cable has passed further and you notice its beginning, then we check the location of the switch again. It should be exactly opposite the small star. We apply the cable, remember where it was attached, from above or below, and we can tighten the retaining screw.
- As promised, this is the last step. To eliminate possible problems, cut off the remaining cable using wire cutters; leaving a couple of centimeters will be enough.
Replacing shifters with new ones
Replacing bicycle shifters with new ones is a fairly simple task. The main condition is that the new shifters fit the bike's speed switches. We will talk more about how to choose shifters in one of the following articles. To replace we need to perform the following operations:
- We unscrew the plug that closes the cable channel on the shifter itself.
- We unscrew and fold the cable away from the switch, and then bite off the end piece on it to the very root. Please note that if you are not going to replace the cable with a new one, then this should be done either with special wire cutters or very sharp side cutters. If you bite the cable with pliers, its tip will fluff up, which will lead to additional difficulties when threading it back into the shifter. If the tip is fluffy, you can try to twist it and solder it with a regular soldering iron (before this, treat the end of the cable with soldering acid to simplify the soldering process).
- We set the 1st speed on the shifter if the front derailleur shifter is being dismantled, or the last (for example, 8th speed on 3x8 systems) if the rear derailleur is being removed. This is required so that the position of the groove into which the cable is inserted inside the shifter coincides with the cable channel (into which the plug is screwed).
- We pull the cable out of the shirts and the bike shifter.
- Carefully remove the grip. This should be done slowly, since it is mainly made from very soft rubber, which can be torn if handled carelessly. Plus, you should make sure that you do not block the hole at its end, through which air will enter when removed. If you block it, a vacuum will be created inside the grip, which will complicate its removal.
- Loosen the bolt securing the bicycle brake handle clamp and remove it from the handlebars.
- Loosen the shifter clamp bolt and remove it from the bike.
The process of installing a new shifter on a bicycle is performed in reverse order, but with some caveats.
- Install the shifter on the steering wheel and slightly tighten the clamp bolt. We do not tighten it completely so that the shifter can be moved along the steering wheel.
- Reinstall the brake lever and also slightly tighten the bolt.
- We put on the grip. Before doing this, the edge of the steering tube can be slightly wetted with clean water (do not use oil, as the rubber may be destroyed under its influence). And do not block the hole in the end of the grip.
- After you have put the grip on all the way, position the brake lever on the steering wheel. We move it close to the grip, set the angle and tighten the locking bolt.
- Then we set the correct position of the shifter. We move it towards the brake handle all the way and set the angle at which it will be convenient for you to change the speed of the bicycle. Then tighten the bolt on the clamp.
- We set the 1st speed for the “front” shifter or the last one (for example, 9, if the system is 3x9) for the “rear” one.
- We thread the cable through the shifter, shirts, and bring it to the speed switch.
- Next, you need to adjust the shifter, the shifter of which we replaced. You can find out how to set the rear or front speed derailleur by clicking on the appropriate links.
Changing the gear shift cable on a bicycle
About replacing the gear shift cable on a bicycle. Step-by-step instructions and necessary materials
A cable is an inexpensive but important element of a bicycle's gear shift system. Like any parts, it becomes unusable over time. The transmission system stops working. Replacing the gear shift cable on a bicycle will restore the functionality of the mechanism.
Device
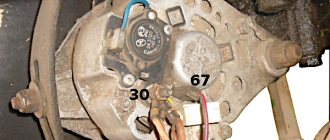
On modern cars, the clutch fork is hydraulically actuated. The clutch master and slave cylinders are engaged. On the VAZ-2110, this fork moves mechanically, using a cable (the same as the accelerator).
- Cable sheath.
- Mounting brackets.
- The lower end of the cable sheath.
- Adjusting nut.
- Cable protective cover.
- Upper tip of the shell.
- Thrust plate.
- Seal.
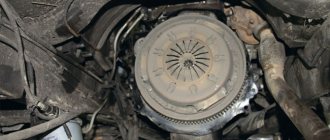
The entire mechanism is controlled by the clutch pedal. It is suspended on a separate bracket. By pressing it, the driver moves the clutch fork. That, in turn, disconnects the box from the engine flywheel using a basket and a friction disk. After the desired gear is engaged, the pedal moves up under the action of the return spring. The friction disc engages the flywheel. Torque is transmitted to the box and then to the drive wheels. The drive has a fairly simple structure, so owners often do not face the problem of replacing the cable. However, if it is cut off, you will notice it immediately. The gears will not engage normally.
Read also: How to find out the nut size
More about replacement
Cable - consists of a strong metal thread, which, after pressing the lever on the switch, transmits force to the mechanism for connecting the chain to the wheels. The simple system works quickly and reliably, but it requires optimal tension.
The braid (shirt) is connected to the rear stay of the mechanism. It also serves to protect the warp thread from damage. There are several types of shirts. The strength of the cable depends on their design.
Proper care will help extend the life of the element.
- as wear occurs, cut off frayed ends;
- lubricate the cables at least once a season;
- Monitor the tightness of the caps (after each trip).
But even regular maintenance will not prevent wear and tear.
Bicycles use two types of cables for brakes and gear shifting. They are distinguished by knobs at the ends.
Why does the cable need to be replaced regularly?
Absolutely any cable stretches, read, lengthens - this is a fact.
It is for this reason that we periodically tighten it up, restoring the clarity of the star selection. However, this does not continue indefinitely. During the stretching process, the cross-section of the cable in some places decreases and the risk of breakage increases. Unscheduled malfunctions cannot be ruled out. These are fractures, unraveling of fibers and corrosion. The creases prevent the cable from moving freely along the jacket, which increases the force on the gear shifter. An unwoven product is significantly inferior in strength to a solid one, increasing the risk of breakage. Corrosion disrupts the smooth running and reduces the strength of the product.
In what cases does it change?
The cable is changed when malfunctions in the operation of the rear derailleur begin: imbalance of voltage inside the braid, incorrect switching, refusal to move to the desired position. There are several reasons for failures:
- wear of wire and braid;
- clogging of the gap between them;
- tears and bends;
- erosion of metal elements.
You can try to clean the gap between the wire and the braid. In other cases, the gear shift cable needs to be replaced.
Which cable to choose and where to find it
There are three types of braids:
- twisted - consists of thin, twisted wire coated with polymer. Inexpensive option with a short service life;
- SIS - similar to twisted, but instead of wire for twisting the shirt, strips of metal with Teflon coating inside are used. The most popular type of cables;
- SIS-SP - consists of a shirt in which the threads are arranged in parallel. They are bonded with a polymer layer. During operation, the braid does not stretch. Tension is transmitted directly through the cable. The most reliable, accurate, expensive variety.
A cable for shifting gears and bicycle brakes can be purchased in regular and online stores specializing in cycling products.
How to change the cable
The cable can be replaced at home. You don't need to use complex equipment for this. All tools are usually found in every home. The operating procedure also does not cause difficulties for a person with skillful hands.
What you need
To change the transmission or brake cable you will need:
For beginners, it is advisable to sketch out a plan for the route of the element before replacement. There are instructions on the Internet for replacement, but searching for materials for a specific model will take time.
Step by step
Replacing the gear shift cable is carried out in several stages:
- We change the position of the rear derailleur so that it faces the small bicycle sprocket, cut off the rope cone and unscrew the screw.
- Unscrew the cap until the end of the cable becomes visible and pull it out. To release the tip, you will need to pull back the spring.
- We take the cable prepared for replacement and install it, repeating the path of the old element. To adjust the direction, use an awl or a thin screwdriver.
- We return the cover to its place. Set the switch to its original position if it has moved.
- Tighten the screw to secure the cable.
- We cut the cable, leaving three centimeters, squeezing its ends.
How to replace brake cables on a bicycle?
Over time, dirt collects in the cables, water begins to seep in, and they become worn out. If you want to make repairs, you don’t have to wait for some part to break. Replacing cables is a good thing; repairs are carried out once a year, or more often if you ride a lot. After replacing the cables, the difference becomes very noticeable. Braking will be smooth and effective. You can repair the cables before the general repair of the bicycle.
This instruction is specifically for replacing the brake cable on the handlebar. The process is very similar to other types of brake lever, only the access to the cable is actually modified. Variability will depend on the manufacturer, and information is often available on websites, so you can very easily replace the cable with a little intuition added to the instructions. Replacement will require a new brake cable. You need to check whether there is a nipple at the end of the brake cable. This will depend on the type of brake. You'll also need an outer casing (also known as a cable housing) if you need to replace it, as well as metal ferrules, a tip cap (often included), and wire cutters.
Only professional cutters should be used. If there are none, you should contact your nearest bicycle store to cut the cable to the required size according to the instructions.
Before removing the brake cable, you need to pay attention to what the current thread of the bike is. The variability will depend on the type and brand of bicycle. If the owner of the bicycle does not have a very good memory, then you need to take a photo of the thread and then replace it. Using a hex wrench, it is very easy to unscrew the clamp screw that holds the cable. Turn the shutter all the way so that you can easily pull out the cable. Then give the brake lever a good tug to gain access to where the cable nipple runs. Pull out the old cable, keeping all parts intact.
Check the outer casing to make sure there are no defects. If there are defects or the case is too old, then it must be replaced; if not, then it can be used. If a new outer casing is used, it must be given the same length as the old casing. If you don't already have a spare housing, you need to determine the required length. There may be difficulties with this, so in this case it is worth contacting specialists.
If the outer casing is too long, braking will not be effective. You need to use good quality wire cutters and make sure the outside is cut. When reducing the length of the new housing, you need to clean the hole. This is where a screwdriver comes in handy. After replacing the body, you need to attach metal tips to the end. Attach the tip to the brake device depending on the type of bicycle. To improve performance, you need to lubricate the tips a little.
If, when purchasing a new brake cable, two types of nipple are included in the kit, you should choose the one that matches the old one. Then lubricate the cable with a thin layer using your fingers or a piece of cloth. This is done in order to prevent rust, just a little lubricant is needed. All that remains is to thread the cable through the outer casing.
Next, connect the cable to the brake lever, starting at the nipple. To do this, pull the lever and insert the nipple into the socket. Pass the cable through the brake lever and through the adjuster hole. Then turn the adjuster so that the cable does not move. Slide the outer shell into the regulator hole. On the other side of the cable, reattach the metal end. In addition, the tires also need to be returned. This needs to start from the larger side.
Thread the bolt through the cable clamp and tighten until secure in position. Press the handbrake, which secures it. Then you can perform any other actions by loosening the bolt or, conversely, tightening it.
Now it's time to test your new cables by pulling the lever down sharply twice. When you press the brake lever, the brakes should be fully applied. If this does not happen, you need to adjust the clamp bolt on the cable, tightening it a little or, conversely, lowering the cable. It's better to start completely with setting up the body. Loosen the cable a little, as when driving the cable becomes tense and the brake pads wear out.
Double check that all bolts are tight and the cable ends are hidden. If there is an extra cable, then using wire cutters you can cut off 5-10 cm for the next repair. After this, cover the cable with a cover that prevents separation of the wires, which must be secured by pressing down on the open edge. To make sure everything is working properly, you need to check how the brakes work several times.
New cables stretch a little when used, so the first repair of bicycles after replacing the cables is almost always free. If after a few weeks the brakes start to work poorly, the bike owner can adjust them the way he likes: tightening them or loosening them, it all depends on his preferences.
On the subject: Types of bicycle brakes
How to change a brake cable on a bicycle - video
velosmak.ru
Possible problems and nuances
Repairing the brake mechanism does not end with installing a new cable. Adjustment required. Before tightening the brake cable of a bicycle, you need to determine the degree of its tension. To do this, just lift the rear wheel, spin it and press the brake. If the handle moves without effort more than half the distance from the original position to the steering wheel, it is necessary to tighten the brake cable. To do this, we tighten the cable on the handle itself with a figured bolt.
In cases where the brake reaches the steering wheel freely, you need to adjust the tension near the brakes. For this:
- Unscrew the fastening screw.
- We tighten the cable using pliers.
- We fix the cable with a screw.
The remaining piece of cable is cut off.
Tension
So, having understood the diagram, you can begin the procedure of tightening the handbrake cables.
Stretch
The tensioning procedure is as follows.
- Place the car on an overpass or pit. If you don’t have a garage and you have the opportunity or desire to carry out the procedure at a service station, use a jack. The rear of the car is raised on a jack. The most extreme option is a curb onto which the car is driven and all you have to do is crawl under it.
- Engage the gearbox in first gear and put the car on the handbrake by pulling the lever up.
- The ideal number of handbrake clicks is from 2 to 5. If there are fewer or more clicks, it is easier to take appropriate measures to tension the cable.
- If there are less than 2 clicks, then the cable will need to be lengthened. If there are more than five clicks, then the cables are shortened.
- Lengthening the cable means relaxing it. To do this, unscrew the locknut. When tightening the cable, the locknut must be tightened in reverse.
- Before you start looking for the required nut on the bottom of the car, release the handbrake lever all the way.
- Take a 13mm wrench under the car and head down.
- Find the handbrake cable equalizer. This is the same element from which the main handbrake cable is divided into two cables.
- In some cases, it is simply not possible to gain access to the equalizer, since the muffler holders made of rubber are in the way. In such a situation, it is better to remove them. This is not difficult to do, but working with the handbrake will be much easier.
- Now there are two nuts in front of you. One is a simple nut and the other is a lock nut. Having two keys in your hands, fix the nut with the first one, and with the second one begin to unscrew or tighten the locking nut. Be careful that the nut does not start to turn.
- Taking into account the condition of the handbrake and the need to loosen or tighten the lever, turn the locknut in the appropriate direction. Remember what is the optimal number of clicks.
- Tighten or unscrew the locknut to obtain the required degree of tension.
Examination
But if you twisted the nuts there, this is not a guarantee that the handbrake now works perfectly. This needs to be clearly verified.
To do this, it is enough to go through a successive stage of verification activities.
| Stage | Explanation |
| Spin the wheels after tensioning is completed | The wheels are lifted one by one on a jack. When the handbrake lever is turned off, they should rotate freely without obstacles. By squeezing the brake, the wheels should lock. |
| Drive up a slight slope, stop and engage the handbrake | The fact that the wheels do not spin when suspended is good. But you need to make sure that the handbrake holds the car even when exposed to gravity. |
If the check shows that the handbrake still does not hold, even if the cable was tensioned exactly according to the instructions, the handbrake is probably simply worn out and the cable needs to be replaced.
It is not uncommon for the VAZ 2114 handbrake cable to rust, as a result of which it breaks or weakens so much that no tightening can restore its previous functionality.
At the first sign of cable wear, you should consider replacing it. This problem may manifest itself as follows:
- The handbrake is not able to withstand the required traction;
- Drum brakes overheat;
- When you pull the parking brake lever, the cable does not respond to your actions;
- The cable sheath is seriously worn.
To check the operation of the handbrake, it is enough to perform one simple action. Place the car on a level surface, apply the handbrake, get out of the car and try to push it hard. If movement begins, the cable is dead and needs urgent replacement.
When may it be necessary to replace the gear shift cable?
As soon as the rear derailleur starts to malfunction, the first thing you need to do is check the condition of the high-speed shift cable. This is what most often causes:
- switching jams;
- or incorrect switching.
Why does the cable fail? Its main “enemies” are water and dirt. Have you driven in the rain and slush? Did you not wash or dry your bike? Be prepared for problems with gear shifting. The cable will start to fail. At first, after purchasing a vehicle, this part is still protected by factory lubricant, then you can hold out for some time on aerosol lubricants. But then the cable will still have to be changed.
But the replacement process, as already mentioned, is simple and takes only a few minutes. The main thing is to do everything correctly and consistently, following the step-by-step instructions.
Adjustment
Adjustment takes a few simple steps:
- We put the car on a jack so that the rear wheels can be easily rotated by hand;
- We bring the repaired handbrake to the locked position;
- We arm ourselves with two keys at “13” and find the adjusting bolt and nut of the parking brake;
- Tighten the tension adjustment nut. Pull until the wheels are completely blocked;
- Tighten the locknut;
- We check the quality of work of the repaired unit
- The travel of a properly adjusted handbrake lever should not exceed 8 clicks. The optimal lever stroke is 6-7 clicks (this number varies depending on the car model; details for a specific VAZ model can be found in the operating instructions supplied with the car).
- After installing the new cable, the rear wheels of the car should be jacked up and try to spin them by hand. Rotation must be free.
- Now the brakes should be checked while driving. You need to drive 30-40 meters, then slow down using the parking brake. After braking, you need to get out of the car and touch the rear brake drum. It should not be hot, its temperature should not exceed the ambient temperature. If the drum gets so hot that it burns your hand, this means that the brake cable is too tight and should be loosened.
- To loosen the cable, you should put the car back on the inspection hole, unscrew the lock nut on the outer tip with a 13mm wrench, and then loosen the main fastening nut. After this, the locknut is tightened again.
- If the brake cable is too slack, it needs to be tightened. All steps are listed above, with one exception: the main nut on the tip should be tightened, not unscrewed.
- To independently check the reliability of the parking brake, you should find a slope with a ratio of 1:5 (that is, 1 meter high and 5 meters long), drive the car onto it, turn off the engine, put the car on the parking brake and squeeze the clutch. After these actions, the machine should remain in place and not roll downhill. If the car does roll, you should tighten the brake cable a little more.
As you can see from our article, there is nothing complicated about replacing a brake cable, and even a novice car enthusiast can do this task. The main thing you should pay attention to in this case is compliance with safety regulations. When changing a cable, it is very easy to get injured or get a chemical burn, so it is better not to carry out this operation alone, but to work together with an experienced auto mechanic.
Replacing the cable in a bicycle derailleur
Since replacing a cable is a repair process, the person doing it will need a certain tool kit:
- a set of hex keys (and it must contain a 5 mm key);
- and wire cutters.
Moreover, the procedure for replacing the rear derailleur cable is almost identical to the process of changing the front derailleur. Only the latter will need to be set to easy gear before loosening the cable clamp screw. Well, the designs of these two switches are somewhat different - you also need to pay attention to this. It’s also worth remembering how the cables were routed before replacement.
Also, after the cable replacement procedure, you should definitely adjust the rear (or front) derailleur.
Actually, the replacement is carried out in stages, sequentially, step by step:
The rear derailleur is set to a position strictly opposite the smallest bicycle sprocket. The end of the cable must be cut and the clamping screw loosened. And first you need to remember in which part of the screw (top or bottom) the clamped end of the cable was located. Since this circumstance can have a significant impact on the correctness of gear shifting.
- Using a five-millimeter hexagon wrench, you need to loosen the shifter fasteners and then remove it. This will give access to the protection cover.
- The cover latch must be turned counterclockwise to remove.
- And the removed cover provides the repairman with the opportunity to see the tip of the cable under the large spring. And you need to take a good look at how it is installed there in order to understand how best to remove it.
- The cable must be pulled out completely, assisting the process through the tension regulator channel.
- To help the cable head release, you need to carefully move the spring away. And in exactly the same way it will need to be removed when installing a new cable.
- A new cable must be installed in the vacant space. And you need to stretch it tightly to the location of the old cable. For convenience, you can guide the cable with the end of a thin screwdriver or even an awl. And at the end it is better to make sure that the cable is installed exactly as it should be.
- Now you will need to put the shifter cover in its original position. And secure it with the previously removed lock, this time turning it clockwise.
- The shifter is installed in its place immediately before pulling the cable through the braid.
- The cable is pushed into the braid until its end appears in the area of the rear derailleur. And there is one significant nuance. If the cable “doesn’t want” to fit into the braiding, it always gets stuck and clings to something, it (the cable) will probably have to be changed.
- At the very end, you need to make sure that the rear derailleur is directly opposite the smallest of the bicycle chainrings. Attach the cable and secure it to the screw.
- Cut off the excess cable with wire cutters, leaving only 3 centimeters, and crimp its tip.
Types of construction
Replacing the parking brake cable does not require major intervention in the rear drum or disc brakes. You don't even need to remove the rear brake pads to replace them. The nature of the work primarily depends on whether your car has rear disc or drum brakes, so we will consider the replacement process on both design options.
On most cars, the new handbrake cable is attached to an adjustment mechanism in the passenger compartment, while in some designs the replacement is made entirely from under the bottom of the car.
Reasons for replacement
- Break. Most often, the cause of a break is poor fasteners, as a result of which the cable hangs from under the bottom and can be torn out. A less common reason is fixation in brackets without a protective sleeve. In the latter case, vibration and the movement of the cable when the handbrake is raised lead to rubbing of the insulation and the cable itself on the metal bracket. If the cause of the break is not eliminated, the new parking brake cable will soon suffer the same fate.
- Souring. Moisture and dirt can get inside the rubber ring. If in this case you rarely or not use the handbrake at all, corrosion will block the cable inside the insulation (sometimes this happens with only one circuit).
- The handbrake doesn't hold, but the adjustment range is no longer enough to restore the system's functionality. This happens if you frequently apply the handbrake while driving or leave the car for a long time with the handbrake activated, even if the car is not parked on a slope.
The cable rarely stretches, so if you decide to replace it due to poor operation of the handbrake, first of all we recommend that you familiarize yourself with the process of adjusting the parking brake.
How to deal with stuck-on elements
Unscrewing stuck nuts and removing soured drums is the main problem when replacing the parking brake cable yourself. How can you reduce the number of broken bolts and twisted threaded connections?
- Thoroughly clean bolts, nuts, studs with a wire brush to remove corrosion and dirt.
- Before unscrewing, apply several blows to the bolt head and nut. If access to the element allows, blows should be applied perpendicular to the axis of twist. Under no circumstances should you hit exposed threads!
- After tapping, fill the fasteners with penetrating lubricant. If you don't have liquid wrenches like WD-40 on hand, you can use brake fluid. By tapping the bolts and nuts and creating microcracks in the areas where they stick, you loosen the joint and open up access for the lubricant to penetrate inside. Penetrating lubricants need at least 20-30 minutes to work, but if you are not in a hurry to replace, then it is better to leave the wetted parts for 40-60 minutes before attempting to unscrew.
- Unscrew the bolts in several stages. Even if the bolt gives in, alternate unscrewing with tightening and using liquid wrenches.
Article on the topic: Crankshaft position sensor from “A” to “Z”
Causes of malfunctions
The first and main reason for poor gear shifting is usually a damaged cable and switch jacket. Replacing it is not difficult and identifying this malfunction is simple. However, in order not to have to change the cable with the jacket again, we recommend monitoring its condition.
Winter is ahead and this is an excellent time to inspect and replace the cable (if necessary). In order to check whether the cable runs well inside the shirt, you need to do the following:
- Drop the gear to the smallest star.
- Visually inspect the jacket and cable end for damage or fraying. If they are, then go to step 8.
- Unscrew the cable retaining bolt on your derailleur (front or rear) and pull the cable out of the groove in the derailleur.
- Pull the shifter shirt to expose the cable. Check the cable for dirt. If necessary, remove it.
- Using forward and backward movements, check the smooth movement of the cable. If the cable moves smoothly and without noticeable effort, we recommend lubricating the cable jacket for prevention.
- Instead of alcohol-based lubricants such as WD-40, we recommend using a little winter oil for your car's engines. Up to -25, it will be able to provide you with acceptable lubricating properties, preventing the cable from freezing in the jacket. And when you put the bike in a warm apartment, unlike aerosols, it will not evaporate from your shirt. To lubricate the shirt you will need a regular syringe with a needle. After first drawing a few milliliters into the syringe and moving the cable to the side, insert the needle into the hole for the cable and inject up to 5 milliliters of oil inside.
- Repeat the forward movements from step 4 several times so that the oil spreads over the shirt. If replacing the cable is not necessary, you can proceed to setting up the switch. We talked about how to set up a rear or front derailleur in this and this article.
- If you need to replace the cable, then you need to read the instructions for your shifter. Usually the cable can be pulled out of the shifter by dropping the gear to the smallest sprocket and “pushing” it inside the shifter. But first, check the “end” of the shifter for the presence of a plug bolt. Before replacing the cable, this bolt must be unscrewed.
- If there is no plug (as in my case), then most likely the cable can be pulled out by simply disassembling the shifter. In order for you to conveniently disassemble the shifter, it must be removed. Difficulties at this stage can only arise with the flu. By clicking on the inscription you will learn “how to remove the flu”.
- After removing the shifter, unscrew the top cover by turning the bolt counterclockwise.
- Important! Be extremely careful when removing the cover, making sure that the return spring does not fly out of the shifter. Press the cable as in step 8 so that it comes out of its groove. Along the way, you can check the shifter for dirt inside and lightly lubricate the insides with the same oil. A couple of drops will benefit your shifter mechanism.
- Insert the new cable and assemble the shifter. Also do not forget about replacing the cable jacket. After replacement, proceed to setting the switch from step 6.
Inspecting and replacing a shift cable is not a complicated matter. With the help of these instructions and with minimal tools, you can replace the cable yourself without contacting a service center. Happy renovations!
Video about replacing cables and jackets:
Possible errors when setting up the rear derailleur
Question: What if I unscrew the adjusting screw all the way, but the chain still does not shift down 1 speed? Answer: Most likely, you did not tighten the cable properly by hand from step 4, or you did it with the cable tension adjusting screws from step 3 not tightened enough, and it is also possible that you did not tighten the cable at the highest speed on the shifter described in step 1.
Question: I reached stage 7, but the chain was not on the smallest sprocket, why? Answer: You may have pulled the cable too tight with your hands in step 4, in which case try loosening the cable tension a little with the adjusting screw. If the chain still does not move to the outermost small star, repeat steps 1 to 4.