Tell me, who knows how to replace a heater core Lada Samara 2? Simply put how to remove the stove on a VAZ 2114 with minimal labor and time costs (the easiest way)?
- The engine does not heat up to operating temperature on a VAZ 2114 - 3 answers
- The VAZ 2114 stove does not work - 1 answer
- At idle, cold air from the heater, VAZ 2115 - 5 answers
- How to replace the pipe from the stove to the cylinder head on a VAZ 2115? – 4 answers
- The radiator pipe tore off on a VAZ 2109 - 3 answers
You can remove the heater radiator with your own hands, of course, in different ways (remove the panel completely or partially), but I would advise partially, no matter how much hassle is much less and faster..
So the first thing you need to do is drain the coolant. I did the process this way:
I screwed the hose instead of a plug into the engine, and then unscrewed the cap of the expansion tank, since my system was sealed, the antifreeze neatly flowed into the prepared container (the hose from the mixer is screwed into the engine instead of the drain plug, the loss of antifreeze is minimal, provided that the system is sealed and the expansion tank cap is tightly screwed on).
Then you need to remove the side panels and the glove compartment (it’s not difficult, just unscrew all the screws that are visible).
The only thing you need to remember is to unscrew the mount to the floor, near the ECU (2 screws).
Next are the fastening screws that hold the cables (both on the right and left sides, since, among other things, 3 screws hold the radiator cap).
Once again making sure that all the screws have been unscrewed, you need to carefully pull off the panel (just in case, remove the plastic tips from the heater and damper adjustments).
On the passenger side, we scaffold whatever we can get our hands on.
The next step will be to unscrew the 2 clamps from the radiator (try not to forget to substitute some kind of container so as not to flood the interior with antifreeze).
To make it easier to drain the residue, you can remove and put on the pipes to drain, and also apply a little pressure on the pipe with a screwdriver.
When all the pipes are unscrewed and removed, and the liquid is drained, you can pull out the radiator.
It will rest a little on the bottom of the panel, so you will need to strain a little and lift the panel more.
The radiator will be delivered safely. Next, having purchased a new one, do the entire procedure in reverse order. I don't think there should be any particular difficulties.
I decided to post information here on replacing the heater radiator to help those people who decide to change it themselves. It’s better to learn from other people’s mistakes =) The car is from 2005, the radiator lasted 8 years, there used to be small leaks, but it was tolerable, recently a puddle appeared on the carpet on the driver’s side, I think it flowed in some inexplicable way along the gas pedal, because... I found drops of antifreeze on it =) before this incident the faucet had leaked, it was replaced earlier, so suspicions fell on the heater radiator =)
I went to the service center out of curiosity, they said a replacement would cost 2000 rubles. I immediately decided to buy a DAAZ radiator, I read a lot about luzars, crafts, pramo, etc. The work is labor-intensive, so buy a high-quality radiator right away, as they say, the miser pays twice. And the difference in price is small, about 200-300 rubles.
So, what you need to stock up on:
1) Knowledge (at least read Murzilka for fun)
2) All kinds of screwdrivers, preferably short ones =)
3) And most importantly, SABR, i.e. patience =)
Everyone changes it differently, some remove the panel completely, some don’t (he decided to partially remove it himself), some drain the coolant or put plugs in the pipes without draining (my personal opinion, it’s better to drain so as not to take a shower or dirty the interior) and it’s not hard if you have a hose from the mixer at hand =)
And so on in order Before starting work, do not forget to generously anoint your hands with some kind of cream (there may be cuts, and it will be easier to wash) and say “Bismillah” so that the Almighty will help in this labor-intensive task =)
We drain the coolant (if your cooling system is sealed, then the cap of the expansion tank should be closed, after you wrap the hose instead of the plug into the engine, open the cap and the antifreeze will flow neatly into the prepared container) we use this hose
We remove the side panels and the glove compartment, the main rule is to unscrew all the fastening screws that we see =)
Don’t forget to unscrew the fastenings to the floor - two screws on the sides, on the right and left sides of the panel
If owners of classics quite often complain about malfunctions of the interior heater, then the VAZ-2114 stove in this regard works quite stably, coping “well” with its immediate responsibilities. If the interior is in good condition, even in severe frost, the stove will be able to provide a comfortable temperature, and ice on the windshield will be removed within a few minutes.
The most common causes of problems
Most often, the phenomenon in which cold air blows from the VAZ 2114 stove on the sides and onto the windshield is caused by one of the following reasons:
- The thermostat has failed;
- air got inside the cooling system;
- The heater regulator has broken or its cable has become loose.
In addition, in quite rare cases, the cause may be a failed (clogged or leaking) radiator - you should start troubleshooting the system by checking it.
To do this, you need to completely warm up the car engine and carefully touch the pipes leading to and from the heater - if they are all hot, then the heater is working and you should look for the cause elsewhere.
Check the functionality of the thermostat and replace it only if the heating system does not work completely. If warm air enters the cabin, but only locally, then the reason most likely lies in a faulty heater regulator.
This element can fail for several reasons:
- the sealing foam layer has collapsed;
- the foam has peeled off and moved;
- The damper is sagging due to the loosening of the control cable.
The first two malfunctions (as well as the methods for eliminating them) are quite elementary - just glue the foam rubber or replace it with a new one, but the third case should be examined in more detail.
The reason that the stove blows cold air from the sides on a VAZ 2114 when the damper is not tightly closed is its design.
The heater is designed in such a way that the side airflow channels begin right under the damper, and even if it is slightly displaced (literally a few millimeters), instead of warm air, cold air from the deflectors begins to blow, coming directly from the street.
To eliminate this malfunction, you will need to tighten the cable that regulates the position of the damper.
Radiator repair
It is quite possible to clean the radiator pipe system from deposits and scale. To do this, you can use the same cleaning products that are usually used in everyday life (“Silit”, “Mole”, Comet). However, any chemically active compositions will do, including Coca-Cola (you’ve probably repeatedly seen materials devoted to this drink regarding its chemical properties). As practice shows, better results can be achieved by working with the radiator removed, but this is not critical. Completely satisfactory cleaning can be performed without dismantling the radiator. The flushing scheme is very simple: the antifreeze is drained, all pipes are disconnected, after which a cleaning agent is poured into the filler neck. Then the engine starts, which, with the heater on, should idle for about 40 - 120 minutes.
After cleaning, the radiator is thoroughly washed, for which you can use running water from a tap connected through a suitable hose. The final stage is to dry the radiator with compressed air (if a compressor is available) or naturally, which will take at least a day. The presence of a leak is a much more serious problem. It can be eliminated by soldering. At the same time, finding a leak in itself can be a time-consuming task, which is unlikely to be accomplished without removing the radiator.
Soldering is also difficult, since the radiator tubes are made of aluminum. For such work you need a very powerful soldering iron, supplemented with special solders and flux. The quality of soldering also depends on the skills of the worker performing such repairs: if they are small, there is a high probability that over time the leak will be restored in the same place. Therefore, it makes sense to replace the radiator with a new one, the cost of which varies within a thousand rubles.
Regulator repair
To adjust the damper cable tension, you will need:
- Remove the cover located to the right of the steering column and find the regulator drive in the opened niche (2 cables fit to it).
- Loosen the fastening of the right cable by removing it from the lever and tighten it (for example, using pliers) so that the damper fits as tightly as possible into the “interior heating” position, without cracks or gaps.
- Fix the cable in this position by placing its loop on the lever.
- Bite off the extra piece of cable.
Cutting off the entire cable remaining after adjustment is not recommended due to possible inconveniences when repeatedly manipulating the damper. You should leave a small “tail” about 1.5 cm long.
In some cases (when the damper does not reach its extreme position by only a few millimeters), it is possible to tighten it without even removing the cable loop from the lever - just bend it slightly with pliers.
After completing such repairs, you need to start the car and make sure that warm air enters the cabin from all deflectors at once (if this does not happen, then you will simply need to repeat the tightening).
Sometimes the reason why cold air blows from the VAZ 2114 stove onto the windshield may not be the regulator damper, but the regulator itself, which controls the heater tap. The reason here also lies in the sagging of the cable, which often occurs due to its stretching during prolonged use.
To cope with this trouble, you need to:
- Remove the cover located on the left side of the steering column.
- Find the regulator cable located near the gas pedal.
- Loosen the cable clamp.
- Use pliers to tighten the cable until it stops.
- Keeping the cable in a taut position, secure its fastening clamp.
- Set the stove tap to the maximum position.
After such repairs, the heater should work properly, and the temperature should be adjusted smoothly from minimum to maximum.
If the above repair methods do not help, and cold air continues to flow into the cabin, then you will have to look for other possible causes of the malfunction and ways to eliminate them (for example, “bleed” the cooling system in order to remove the air trapped inside it).
But, as was said earlier, such problems are typical for the entire system. If there is only partial airflow or if cold air comes from only part of the deflectors, then the fault should be looked for in the damper regulator.
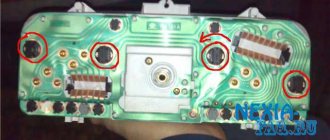
Switch replacement
If, after repairing or replacing the heater resistor, the fan continues to show signs of life in only one mode, regardless of the position of the switch, it is necessary to check the functionality of the latter. To do this, we again need a screwdriver, as well as scissors (or fairly powerful tweezers). Work order:
- remove the negative terminal from the battery;
- unscrew the 4 screws that secure the right panel cover;
- remove from the slots and pull out the switch by pulling it towards you;
- Using scissors, tweezers or another suitable tool, unscrew the nut that holds the switch;
- on the right side of the console, remove the switch, identifying and disconnecting all connectors from it;
- inspect the contacts for scale, rust or other defects, clean them with fine sandpaper;
- We install the switch in place, connect the terminal and check its operation. If there is no effect, the switch must be replaced with a new one.
If you perform any of these operations for the first time, it may take a lot of time, but you can save on buying extra spare parts and gain invaluable experience in replacing a VAZ-2114 stove. It is worth noting that for VAZ 2112 - 2115 models there are no fundamental differences in the repair or replacement of heating system parts.
>
What to do if there is cold air in the VAZ 2114 stove?
The cold air of the stove 2114 creates many problems. The VAZ is a car loved by many, but it also often has problems.
The task of the stove in the cabin of any car is to create a warm climate. A car heater is not a very complicated device, and the heat is supplied by the engine. The pump sends antifreeze through the heating and cooling systems, the hot antifreeze enters the stove radiator, and the fan at this time passes already heated air. That's why it gets warm in the cabin. The antifreeze then returns to the engine.
If the stove in a VAZ 2114 produces cold air when the mode is on, an urgent inspection of the entire car is necessary, otherwise a seemingly minor breakdown can lead to serious repairs.
Most often, the reason lies in the cylinder head gasket.
If it was pierced, then even by eye you can determine whether this is so. This will become clear if you make sure that in the expansion tank:
- air bubbles enter;
- An excessive amount of antifreeze enters, and it does not decrease (this is the reason for the instantaneous heating of the engine even at idle speed).
A hole in the gasket indicates that the thermostat needs to be checked, and there is a possibility that the operation of the large cooling circle is disrupted.
Most often, the gasket is damaged, burning out in the place between the cylinder and the cooling, then:
- antifreeze may get into the camera;
- gases into the cooling system.
If cooled air is blowing, there is a fear that the heating system hoses could not withstand the load while driving. When the engine got too hot, they burst, followed by the cylinder head gasket.
A pump malfunction can also cause the stove to supply air that is far from warm. But that's not what's dangerous. Such a breakdown entails a malfunction of the cylinder head.
Because of this, the engine may overheat so much that the engine cannot withstand it, and it will face major repairs.
Driving on dusty, polluted roads adds to the damage to cars. The radiator is the first to suffer. It may be partially or even completely blocked from road dust. The air, which according to all the rules should pass through the grille, will in this case look for more optimal paths and blow around the edges of the radiator, and the stove, accordingly, will not please the driver with warm air.
Possible causes of a malfunction of the heater fan on a VAZ-2114
Heater fan installed on a car
Before eliminating a malfunction that has occurred, it is necessary to establish the causes of its occurrence.
So, according to the experience of many motorists, the most common reasons are:
- Fuse blown.
- Failure of the contact group.
- Relay failure.
- Resistor.
- Switch.
- The fan motor burned out.
Now that the causes have been discussed, we can move directly to elimination methods.
Elimination methods
Many motorists think that a heater fan failure is associated only with a fuse or combustion of the motor that turns it, but this is far from the case. Let's consider all possible reasons in more detail.
Fuse blown
Mounting fuse block where the heater fan fuse is installed
The most common cause of all auto electrician troubles are fuses that fail.
So, in the case of a fan, the first thing you need to do is check the integrity of the fuse. If it is burnt out, it must be replaced with a new one. If this does not help, then you need to look for the reason elsewhere.
The heater fan fuse is marked with an arrow in the diagram.
You can find the fuse in the mounting block marked F7 .
Since the fan requires a lot of energy consumption, the rated current is 20A , so the fuse must be set no less than this figure.
Failure of the contact group
Another reason that is quite common in cars is oxidation of the contact group. To eliminate this malfunction, you need to clean the contact connections or simply move them.
Since the mounting block is located under the hood and water can get into it, it is necessary to protect it from moisture. You can do this in this simple way.
It often happened that the connections and connectors themselves had to be changed because they failed and were completely destroyed due to corrosion.
Relay failure
Relay block on a car
A relay failure will cause the stove fan to turn on briefly.
Sometimes, as practice shows, it may not turn on the first time, or only when the power unit is heated. The solution is quite simple - replacing the relay . You can find it under the dashboard of your car.
Resistor
The process of dismantling the heater resistor
A resistor malfunction occurs when the stove operates only in the extreme right position.
In this case, power will not be supplied, but only in the right position it is supplied directly, bypassing all other elements. Therefore, to eliminate the malfunction it is necessary to replace the part that has failed.
Switch
A fairly common malfunction is considered to be a failure of the switch or simply a breakdown of the contact connections.
Of course, it is not recommended to carry out repair operations, since incorrect restoration of an element, especially in the electrical part, can lead to the others breaking down. So, the manufacturer suggests that car enthusiasts with experience in DIY repairs recommend replacing the complete heater control unit.
Fan motor burnt out
Location of the heater fan under the hood
Motor combustion is the most unpleasant reason that can happen in this situation.
So, you will have to replace the stove fan completely, which will entail expensive parts. Some motorists, in this case, look for used motors at salvage yards, which are much cheaper.
On the left is a burnt out motor, on the right is a new one.
Of course, it is unknown how long such spare parts will last, so it is better not to skimp and buy a new one.
How to fix the stove if it blows cold air?
The resulting airiness in the stove is unlikely to disappear on its own - the radiator contains narrow tubes, and the antifreeze does not have such a strong pressure to eliminate the created plug.
You can do this in the following way:
- warm up the engine, but only to such a state where you can manually carry out repair work without burning your hands - you can get serious injuries;
- loosen the clamp located on the hose connected to the stove;
- carefully remove it from the tube, but only until a small gap appears, which will allow you to get rid of the resulting plug.
A faulty faucet can also disrupt heating. The reason is that it was high time to replace it because it was broken or clogged. To make sure that this is the reason - cold air enters the cabin instead of warm air - check the inlet hose: it comes from the heater radiator.
In the event of a malfunction, it heats up and the output remains cold. If it is not possible to open the faucet manually, then a new one must be installed.
If it turns out that the damper is in perfect order, there is a risk that the radiator is clogged with scale. This means that it will have to be replaced.
If the faucet does not open, then there is a possibility that there is a problem with the cable drive, since the operation of the faucet depends on this type of drive. A weakened cable, which lengthens over time as it wears out, will not allow the faucet to open even in the “open” position, or it will open only slightly.
You should check how the radiator works by warming up the engine, but you do not need to turn on the fan. At the same time, you need to check the temperature of the hoses.
Methods for solving the problem
Why does the VAZ 2114 stove fan not work?
If excess air is not removed from the system, this will lead to the following consequences:
- increased fuel consumption;
- low efficiency of the stove;
- engine wear;
- breakdowns.
Important! The laws of physics say that air tends to the highest point. When airing the stove on a VAZ-2114, this place will be the throttle assembly
So the traffic jam should be removed from there.
There are three methods of combating air pollution. Each of them has its own nuances.
First method
Some people perceive this method critically, but in fact it is very effective.
- Remove the filler cap through which the oil is poured. This will allow you to remove the plastic protection from the mounts (they are rubber).
- It is better to immediately screw the cap back on, otherwise you risk introducing excess dirt into the motor.
- Remove one of the tubes designed to heat the throttle. It doesn’t matter which one.
- There is a cap on the expansion tank. It should also be removed.
- Start actively blowing into this very tank. The fact that you managed to expel the air will be indicated by antifreeze or antifreeze leaking from the dismantled pipe.
- Return everything to its place as quickly as possible, tighten the tube and fix the clamp. If you hesitate, the suction will start again and you will have to repeat the procedure.
The method is not complicated, but not everyone will agree to it. So look at the alternatives.
Second method
You don't have to go anywhere here. The work is no less simple.
- Warm up the engine until it reaches a temperature of about 90 degrees. After this, turn off the engine.
- For now, the plug on the expansion tank remains there. There is no need to touch it.
- At the throttle assembly, remove the clamp and tube. That is, you should act similarly to the first method.
- Wait until all excess air is removed from the system. This is easy to determine - coolant will begin to flow out after a while.
- When a leak starts, immediately return the pipe to its place, fixing it on the fitting and tightening the clamp until it stops. Make sure that the clamp is properly tightened, otherwise the work will be in vain.
Important! In this situation, keep an eye on the antifreeze. It is hot, and therefore its release from the system can result in hot liquid getting on your skin
Third method
A number of VAZ-2114 owners note that it was in this method that they found the optimal way to cope with the problem of airing. But certain conditions will need to be created.
- Choose a place where you can drive the car's front wheels so that the radiator cap is positioned as the highest point of your cooling system. Although the front end can be simply raised in the garage using a jack. Use your own discretion.
- Remove the caps from the radiator and expansion tank.
- Turn on the engine. Let it heat up to 90 degrees.
- Press the gas pedal actively. Just make sure before doing this that you are not in gear.
- Help will be needed, since when gassing you need to gradually add coolant into the tank at the same time. Pour until bubbles stop forming when you press the gas.
Important! Although the third method is considered simple to implement, it does not always give the desired result. So, although the previous two are more difficult, their effect is greater
The problem of airing is familiar to many owners of VAZ-2114 cars. Tell us about your solution methods, share your impressions of the presented methods of dealing with air jams. It will be interesting to learn about alternative methods and features of their implementation.
VAZ-2114: what to do if cold air is blowing from the stove
Sometimes owners of VAZ-2114 cars have to deal with the problem of a non-working stove.
In particular, such malfunctions cause problems in winter, since the car interior is not only unbearably cold, but also the windshield tends to become covered with a thin crust of ice, which significantly blocks the view. Therefore, if suddenly the stove in a VAZ-2114 stops working, you should immediately find the cause of the malfunction. These problems can occur for a variety of reasons, ranging from worn-out cooling systems to electrical wiring problems. This article will discuss in detail all possible causes of stove malfunction, thanks to which it will be possible to find a solution to this problem.
It should be noted that symptoms of stove malfunction can be divided into two types:
- Cold air is blowing from the stove. Sometimes barely warm.
- The stove does not turn on at all or does not work in some individual modes.
Instructions for replacing the heater radiator VAZ 2114
From the manual for operation, repair and maintenance of VAZ 2113-2114-2115
- Disconnect the negative terminal of the battery.
- Open the tap and drain the coolant from the system.
- Remove the instrument panel.
- On the right side of the stove, loosen the clamp of the heated glass damper rod.
- Unscrew the three screws that secure the heater radiator.
- Remove the radiator from the heater body.
- Loosen the clamps and disconnect the hoses from the heater tap pipes in the cabin, under the panel.
- Loosen the hose clamps and disconnect them from the radiator.
- Installing a new radiator is done in the reverse order.
For more information on this procedure, we recommend this video.
1
Usually they start replacing the heater radiator when the problem is already obvious, coolant is pouring into the cabin and this is not good, as you yourself understand.
2
First you need to drain the coolant. Unscrew the screw under the plastic plug.
3
Unscrew the 2 upper and 2 lower self-tapping screws located at the instrument panel.
4
Remove the steering column cover by unscrewing 3 screws and three self-tapping screws from the bottom.
6
Disconnect the connector going to the cigarette lighter.
7
Disconnect and remove the radio
8
Now we can unscrew the screw fastening the plastic console from both sides. They are located symmetrically.
9
Then remove the adjustment flags and the heater fan mode switch.
10
Now we can detach the console from the panel.
11
We disconnect the terminals from the buttons on the console; it is advisable to mark them so as not to confuse them later.
12
Disconnect the plug for the ashtray light.
13
Unscrew the screws from the diagnostic connector.
14
Now the console is completely free and can be moved to the side.
15
We unscrew the 2 screws that attach the metal base to the floor, you can see the first one in the photo, the second one is located symmetrically to the first one on the left side.
16
Now we need to unscrew the 4 screws securing the torpedo, 2 of them are located on the right, and 2 symmetrically on the left.
17
We unscrew the two self-tapping screws embedded in the iron base.
18
We disconnect 2 self-tapping screws located in the iron structure.
19
We unscrew 2 more screws and remove this structure by pulling out the ECU.
20
We lift the dashboard and access to the heater radiator is free.
21
Just in case, place a rag on the floor, since coolant may leak from the radiator. Unscrew the clamps of the heating system.
22
We drain the antifreeze from the stove and hoses. We remove the old current heater. We reassemble everything in the reverse order.
Malfunctions of the VAZ-2114 cooling system
If the thermostat in the car does not work, the coolant that is in the system is constantly circulating in a large circle. As a result, it turns out that the liquid does not have time to heat up, so cold or slightly warm air blows from the stove. In order to solve this problem, it is enough to simply repair or replace the thermostat.
Another reason could be a simple air lock formed in the thermostat. In order to eliminate this problem, you need to remove the pipe going to the heater, and then add antifreeze to the very top. It should be noted that in this case, the liquid level in the system should not be below the maximum mark, or even a whole centimeter above it. And all because if there is not enough liquid in the system, then the stove blows cold air.
If the heater blows cold air at idle, the problem may be hidden in the pump, since it is not able to ensure normal circulation of the coolant in the system. In this case, the pump must be replaced.
How to make the interior of a VAZ 2114 warmer
Replacing the heater radiator Lada Kalina
Before replacing the radiator, it is recommended to completely flush the cooling system
If the radiator leaked and we had to remove the front panel, then to replace the radiator we would still have to drain the antifreeze. Therefore, it is highly advisable to flush the cooling system completely. There are special compounds for this and it won’t take much time, but it will eliminate heating problems on frosty days. We have already mentioned sealing the air ducts, but when replacing the radiator itself, it would be good to change all the pipes. Even if they don't leak today, there is no guarantee that they won't happen tomorrow. After assembling the cooling system, it is worth running it in operating mode, turning on the stove and making sure that there are no air pockets left in the system. They can really ruin your blood in winter. Now that the heating system is sealed, the stove is working and does not leak, you can spend the remaining half a day assembling the interior. But we will know that we have done everything in our power to keep the interior of the VAZ 2114 warm in winter.
We will answer your questions for FREE regarding deprivation of rights, road accidents, insurance compensation, driving into the oncoming lane, etc. Daily from 9.00 to 21.00
Moscow and Moscow region
St. Petersburg and Leningrad region
Free call within Russia 8-800-350-23-69 ext.418
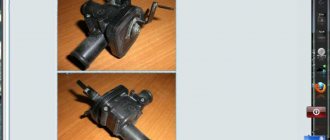
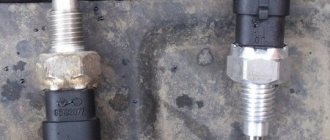
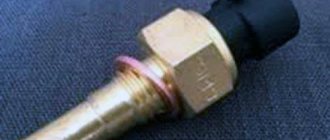
Stove tap failure
Quite often, the stove of a VAZ-2114 car blows cold air due to a malfunction of the faucet. In order to get rid of this problem, you should tighten the cable, which can be easily reached from the pedal assembly. You need to have pliers on hand, which, in fact, are used to tighten the cable.
If, after doing all of the above, the stove tap still does not open, there are only two reasons left:
- the faucet is sour;
- The faucet needs replacing.
By the way, this procedure should be carried out very carefully, since the tap can easily be torn off, causing the liquid to leak directly into the car interior.
A faulty faucet is indicated by cold air blowing from the car's heater when it is turned on for heating. Another reason to replace the faucet is leakage.
If you decide to replace the faucet yourself, we present to your attention the sequence of actions:
- unscrew the drain plugs located on the engine block;
- drain all the coolant that is in the system;
- clean the studs on the faucet using an iron brush;
- wet them with WD-40. Thanks to this action, unscrewing will be much easier;
- loosen the clamps on the pipes and drain the remaining liquid;
- inside the car, unscrew the side trim, loosen the clamps on the pipes that are directed to the heater radiator;
- unscrew the nuts under the machine holding the tap;
- pull the tap out through the cabin;
- disconnect the cable leading to it;
- connect it to the new tap;
- check that all parts are assembled correctly;
- Proceed with the assembly process in reverse order.
Reasons why the VAZ 2114, 2115, 2113 heater motor does not work.
The reasons why a fresh flow of cold air in summer or a hot stream in winter does not come from the air ducts of your VAZ 2113, 2114, 2115 can be of two types:
Let's look at them in more detail.
Mechanical reasons why the VAZ 2114, 2115, 2113 heater fan does not work.
First of all, mechanical reasons include clogging of the air duct.
As you can see in the photo, leaves, branches and other debris get under the casing and clog the air duct of the heater motor. Debris can get into the section with the blades itself and jam the stove fan. Usually before this, a whistle or grinding noise is heard from under the soot space.
Mechanical reasons for the inoperability of the stove motor include jamming of the blades due to improper installation of the stove fan housing. When removing the stove motor, the latches securing the two parts of the housing are often damaged. And if these parts are not firmly fixed to each other, then there will be a gap between them and the air flow that should go into the cabin will fall into this gap. Also, parts of the housing may generally jam the motor blades, then it will not spin at all.
Problems with the heater fan from the electrical part.
In this section, we will consider the circuit to the VAZ heater fan by components.
Fuse.
Let's follow the scheme given at the beginning of the post. If your heater fan does not work together with the heated rear window, then the problem is 100% in the fuse. Check fuse f7 in the mounting block , if it is ok, then use a multimeter to see if the plus is coming to it from the ignition switch unloading relay. To do this, with the ignition on, place one multimeter probe on the fuse and the other on the car body. If everything is in order, look at the circuit from the fuse to the speed switch and the heating switch.
Heater fan speed switch.
We figured out the fuse - let's move on. And then we have the stove motor speed switch . To check it, remove the connector from it. The connector has three inputs nearby and one is located, as if separately from them. We connect any of these three inputs with a wire to the one that stands separately. If the motor starts working, then the speed switch is to blame; if not, we move on.
Additional resistors.
If the fan works, but only at the third (fastest) speed, then additional resistors . In the third mode, power is supplied directly to the fan, bypassing additional resistors, so it does not work in other modes.
Heater motor VAZ 2114, 2115, 2113.
If checking all the components listed above shows that they are working, the reason is in the stove motor . Most likely it is burned out or has a bad mass. To check, we remove it (read how to do this here) and connect it directly to the battery (the black wire screwed to the body is a minus). If it works, it's a bad mass. If it doesn't work, we change the motor.
To optimize vehicle production and reduce their cost, AvtoVAZ uses the same components for models of different families. An example of such an assembly is the stove of the VAZ-2114 car, which belongs to the Samara-2 family. When designing this car, the interior heating system was borrowed from the models of the first Samara family - VAZ-2108-21099.
The VAZ-2114 stove is integrated, with heat intake from the engine cooling system and forced air circulation. Structurally, the interior heater of this car is simple, which has a positive effect on the reliability of the system.
Relays and fuses
A blown fuse is one of the most common stove malfunctions in a VAZ-2114. This reason is extremely simple, since it can be eliminated by every person who does not have the slightest idea about the structure of a car. However, this reason is also very unpleasant, since it is, firstly, necessary to establish the reason why the fuse blew, and secondly, not so easy. Typically, a blown fuse indicates a problem with the vehicle's electrical wiring.
Tap
A broken faucet is a common cause of a non-functioning stove. In most cases, it simply does not open all the way. There are two reasons for this:
- The faucet fails completely (needs to be replaced).
- The heater stopped working due to poor fixation or deformation of the heater cable. This problem can be solved by tightening the latter.
If a leak appears or the hot air supply is lost, the faucet must be replaced. A heater breakdown can be detected by spots with an unpleasant odor on the interior floor or the appearance of a greasy coating on the glass.
Stove motor failure
Of course, the stove motor, like, in fact, any other electrical part of the VAZ-2114, can burn out over time. However, before deciding to replace it, it is necessary to check the functionality of all fuses, the temperature mode switch, and the ignition relay. If all the above parts are in order, then the problem is still in the motor.
To replace it, you must first disassemble and then remove the entire dashboard, turn off the heater valve, and also drain the antifreeze or antifreeze. Next, we remove all the pipes, take out the old motor, and install a new one in its place. Once the functionality of the new heater has been verified, the system can be refilled with the fluid that was drained at the beginning of this process.
When the stove behaves badly
It would seem that nothing can spoil the simplest interior heater device, such as on all front-wheel drive VAZs. It turned out it was possible. If in classic Zhigulis the first bone in the throat of automobile stove makers was the heater tap, which was not made entirely of the material it should have been, then in Samara and Samara 2 the radiator itself was joined to the stove tap. The symptoms of his death pour out like crocodile tears of antifreeze directly onto the passenger’s feet, but this is not a fact that the radiator is leaking. Pipes and hoses can also crack due to temperature changes and become leaky over time. But winter is ahead, there is nothing to do. It needs to be repaired.
On the service, the price of work for this operation will be at least 1,500 rubles, and only if you’re lucky. Expensive? Of course it's expensive. Removing the heater radiator involves almost complete disassembly of the front panel. And that is why we appeal to the driver’s conscience in order to do the work with our own hands. For one simple reason. No, not because of savings, although fifteen hundred are not lying around on the road.
Video instructions for replacing the heater radiator of a VAZ 2114
https://youtube.com/watch?v=JYC8ijuYJdg
Due to the fact that when dismantling the front panel, which is already inevitable in the case of a stove, you can do a lot of useful work that also concerns the stove. Everyone knows chronic air incontinence in VAZ air ducts, leaks in the fit of deflectors and other annoying little things that the plant does not consider necessary to improve. And into each of these leaks precious warm air escapes, which warms not the interior, but the engine shield. In this way, you can achieve ideal operation of the heater, and a leaking radiator will simply become a reason to prepare the car for winter.
Cooling system malfunction
If the thermostat in the car does not work, then the engine cooling liquid constantly circulates in the system in a large circle. As a result, the system does not warm up, and the stove blows either cold air or slightly warm air. In order to solve this problem, you should replace the thermostat with a working one.
In addition, the reason may lie in an airlock. This happens if, while the coolant is cooling after stopping the engine, air first enters the upper part of the cooling radiator and then moves to the thermostat. The next time you start the engine, air will enter the heater radiator using a water pump. As a result, cold air will blow from the stove. This problem is not difficult to solve. You just need to remove the pipe that leads to the heater and add coolant to the top. Thus, the coolant level in the system should be no lower than the maximum mark, or even one centimeter above it. Separately, it should be noted that if there is not enough coolant in the system, then the stove will also blow far from warm air.
If the stove only produces cold air even at idle, the problem may be hidden in the pump. The pump is not able to provide the necessary circulation of antifreeze in the system.
Replacement
Replacing the heater tap on a VAZ 2114, which one is better to install?
All cars of the 9th family and the Samara family have engines of the same structure, so replacing the heater radiator on all these cars is done the same way.
To replace it yourself you need:
1. A set of screwdrivers with a Phillips, slotted base; 2. Set of open-end wrenches.
Before starting work, you need to prepare a container where the coolant will be drained. In the heating system, a lot of equipment is attached to self-tapping screws, so to speed up the operation it would not hurt to equip yourself with a screwdriver.
When removing the heater, it is necessary to disassemble the entire dashboard; when removing the heater radiator, it will be enough to disassemble only some elements of the front part of the cabin. This operation is not the simplest, so if you have no experience, then you should not start performing it. When replacing a radiator, the main thing is to take your time and do everything according to the instructions:
- 1. Drain the coolant. To do this, you need to open the reservoir cap, then drain the liquid from the radiator, then open the cylinder block cover and drain the antifreeze from the block;
- 2. Remove the head unit (radio) in the central panel;
- 3. Unscrew the bolts securing the central panel and remove it. There are 4 bolts in total. The instrument panel remains in place;
- 4. Remove all accessories from the stove control panel;
- 5. Remove the lining under the steering wheel by unscrewing all the bolts;
- 6. Under the cigarette lighter, remove the diagnostic connector, first removing its cover;
- 7. Remove the cigarette lighter along with the socket;
- 8. Disconnect all connectors of the central panel. For ease of further assembly, it is better to mark all the wires;
- 9. Take out the signaling unit. After this operation, the central part of the torpedo is completely freed. You need to remove it too;
- 10. Remove the glove compartment by unscrewing the 6 mounting bolts;
- 11. Unscrew the instrument panel fasteners on both sides;
- 12. Unscrew the fasteners of the engine control unit and the bolts securing the metal frame to the bottom of the car on both sides;
- 13. Unscrew the bolts securing the heater regulator;
- 14. Remove the plastic covers on the front pillars. They are attached using two self-tapping screws;
- 15. Unscrew the screw between the panel and the steering column. The entire torpedo has been dismantled. Now you need to slightly pull the dashboard up and towards the seats. For convenience, on the right side you can use a jack to fix the panel in this position;
- 16. Remove the clamps from the pipes and rip out the pipes themselves. It is best to lay some absorbent material under them, since the coolant flowing from the pipes will drip onto the floor of the car;
- 17. Unscrew the three bolts and remove the radiator;
- 18. Install a new heater radiator;
- 19. Reassemble in reverse order. There are no special features here.
Tips to help with assembly:
The clamps also need to be changed.
To avoid an air lock in the system when replacing, you need to: remove one of the pipes when filling in antifreeze and when air stops coming out of it, put it back on.
Removing the air lock
Changing a stove radiator is not difficult, but if you have no experience in carrying out this type of work, you should not begin this procedure. Poor heating of the VAZ 2114 interior may be caused by a clogged filter. Replacing it is easier than replacing the radiator.
The stove tap is faulty
The stove may also not work or work, but incorrectly, if its tap is faulty. To correct this problem, you need to tighten a special cable located near the pedal assembly. It is grabbed with pliers and pulled to the side, thereby increasing the tension. The stove tap should open. But if this does not happen, most likely it has oxidized and requires replacement.
Attention! Do not pull the cable too hard, as it may break and all the antifreeze will end up in the cabin.
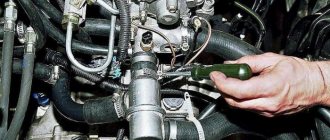
Repair process
- We turn off the car, open the hood, remove the wires from the battery and place a container under the antifreeze drain from the stove
- We switch the temperature controller to the strongest heating mode
Slowly unscrew the plug for draining the liquid from the heating circuit. If you remove it quickly, antifreeze may splash on the generator. Some also unscrew the cap on the antifreeze tank itself so that the liquid drains faster
We go into the salon and move the seats towards the rear seat + recline the backrests + cover the seats with a large piece of oilcloth, and lay an old blanket on top
Unscrew the central pillar. Unscrew the fasteners to the floor (on the right and left sides) + self-tapping screw on top + side fasteners
Please note that some screws are covered with a plug.
We remove the glove compartment (the photo below shows its mounting diagram)
We unscrew the dashboard mount so that the entire dashboard shakes. This point is important for removing the radiator. That is, in order not to remove the entire tidy, we will simply move it away without disassembling it down to the screws. Replacing the VAZ 2114 heater radiator continues
Now we have access to the adjustment cables for the heating tap of the stove. Remove the ends of the cables on the driver's and passenger's seats. They simply fall off the eyes of the adjusting levers
Removing the radiator protective casing
Remove the clamps securing the pipes (can be from the hood or from below)
Now, in order to replace the VAZ 2114 stove without removing the panel (that is, the radiator), you will need a partner. Together with the second pair of hands, we lift the dashboard a little and pull it towards ourselves to take out the old radiator and push the new one in there. You need to be extremely careful at this stage
The torpedo must be moved with the utmost care so as not to damage anything anywhere.
We assemble the new radiator in the reverse order (clamps, cover, cables, etc.)
To make it more clear how to replace the VAZ 2114 heater radiator without removing the dashboard, check out the video instructions:
Pay attention to one more point. Having put everything back together, you need to fill the circuit with new service fluid.
After refueling, you need to bleed the heater (heat the interior), then turn off the engine and, if necessary, add antifreeze to the tank.
That's it, the replacement of the VAZ 2114 heater radiator was carried out successfully.
Author remont-automobilya
- The royal SUV Karlmann King broke all price records - 03/31/2018
- Easter bunnies from Jeep. New seven show cars - 03/27/2018
- How to change the oil in a Kia Rio engine? — 02/08/2018
- How to replace brake light bulbs on a Nissan Tiida? — 02/02/2018
- How to replace a low beam lamp on a Renault Logan? — 01/27/2018
View other articles
Heater relay and fuse
A blown fuse is one of the most common faults. Anyone can replace a blown fuse. But determining the reason why it burned out is sometimes not so easy.
Typically, fuses blow because there is a short circuit in the electrical wiring. So, for example, on a VAZ-2115 car the stove is protected by a fuse marked F7 for 30 amperes. By replacing it, you can make the stove heat the car interior again.
Solving faucet problems
It is important to take into account that when the main heater breaks down, in the vast majority of cases the bypass valve fails. On VAZ 2114 cars it is being replaced along with the stove
If you do not change a stuck faucet, it will cause antifreeze to leak into the cabin due to loss of tightness. As a result, an unpleasant odor will appear inside and pockets of moisture will appear.
To replace, you will need a flashlight to see small fastening elements and carry out quick dismantling. A visual inspection for diagnosis will be sufficient to identify the installation location.
To work you will need the following set:
- technical aerosol WD-40;
- new faucet;
- cleaning brush for removing scale from metal;
- a set of wrenches and screwdrivers;
- sealant with silicone;
- jack and overpass or inspection hole;
- container for collecting antifreeze.
It is preferable to choose a faucet from ceramic models. This will minimize the possibility of oxidation of the passage channels.
Step-by-step instructions for replacing the faucet:
- We send the car to a viewing hole or a lift.
- We install an empty container with a wide neck, for example, a cut-off five-liter plastic container, under the dismantling site, into which the antifreeze from the system will be drained.
- We get to the faucet during disassembly in the cabin, similar to the operations of dismantling the radiator.
- After draining the liquid, clean the threads on the studs with a metal brush. In the process we use WD-40 liquid.
- The pipes are dismantled one by one, because the remaining coolant will flow out of them.
- At the next stage, the work is carried out from the interior, where the side trim of the dashboard is removed. To minimize contamination, place the rags on a rubber mat.
- Next, using a 10 mm socket wrench, remove the fastening nuts holding the faucet from the hole.
- We return to the salon, pull the tap towards ourselves, after which we will have access to the cable and spring fastener, which we also remove.
After all operations, the crane can be dismantled and a new one installed. Assembly is carried out in the reverse order of disassembly. We recommend replacing all seals with new ones at the same time. It is worth using a sealant to ensure maximum sealing.
https://youtube.com/watch?v=JYC8ijuYJdg
Breakdown in the radiator
If the honeycombs are damaged, the circulation of antifreeze will deteriorate significantly. In this case - only replacement. Moreover, it must be changed strictly to a new one. Never buy a used radiator.
In order to replace it, it is necessary to disassemble the console and the front panel of the car. Next, you should prepare a clean container with a volume of 5 or more liters and drain all the antifreeze from the system through the tap on the radiator. Then you need to remove all mounting pipes and radiator fixing bolts. The location of the latter is indicated in the photo by an arrow.
After installing a new element, do not forget to refill the system with antifreeze. To avoid air locks, do not pour liquid into the expansion tank with high pressure. Pour in 200 ml - wait 10-15 seconds, then add more. And so on until the system is completely filled with antifreeze.
Fan motor repair
If the electric motor malfunctions, it should first be removed and then the feasibility of repair should be determined. It is necessary to evaluate the condition of the brushes, armatures, windings, and check the integrity of the wire insulation. The contact area of the brushes on the armature can be cleaned with zero grade sandpaper. You should also pay attention to the bushings and bearings - clean the rubbing parts from dirt and apply lubricant (for example, Litol). All elements with signs of wear must be replaced.
When installing a new heater radiator, it is recommended to pre-treat the pipes with sealant
Read more: How to find a car radio malfunction and repair it yourself?
The cause of a non-functioning stove may be a relay that wears out during operation. It cannot be repaired and is immediately replaced with a new one. The relay is located under the instrument panel in the fuse box.
The heater relay is located under the instrument panel in the fuse box
The cause of uncharacteristic sounds (whistle, hum, murmur, etc.) from the heater is usually a faulty electric motor. Lack of lubrication, contamination, wear of bearings and bushings - all this leads to the fact that the motor begins to whistle. It is removed, disassembled and cleaned, and the rubbing elements are lubricated. If the bearings are heavily worn, the motor will not make a whistle, but a hum. In such a situation, lubricant may not help, and the electric motor will need to be replaced.
Steam is coming from the stove
Sometimes steam starts coming out of the stove. The reason for this is a leak in the heater core. The leaking coolant hits the hot radiator housing and begins to quickly evaporate, and the smell of antifreeze appears in the cabin. To fix the problem, you will need to disassemble the stove and replace the heat exchanger.
Sometimes white steam comes from under the hood and enters the cabin. This happens when antifreeze gets on the hot manifold or exhaust system pants. In this case, you will need to find the location of the leak and fix it. The most common cause is damaged pipes.
Finally, we note that the reasons for the poor operation of the stove were discussed above, but it still continues to function. But this unit also has breakdowns and then the stove fails and stops working completely. Such reasons include breakdown of the radiator, leaks at the joints of the pipes, fan malfunction (open circuit, exhausted motor life or burnout).
Fault prevention
In order not to ask the question “why the stove on the VAZ 2114 does not heat well,” it is necessary to carry out regular maintenance of the unit. It consists of periodically disassembling the system and cleaning each of its parts. Change antifreeze more often. Fresh antifreeze will freely flow through the thermostat valve onto a large circle, including the stove. Also make sure that the tap and pipes that go to the radiator are tight. If they are cracked, they should be replaced. On a well-warmed engine, the presence of drips is unacceptable. For better tightness, motorists are advised to use “fum tape”, winding it around technological connections. The pipes are put on top of it and secured with clamps. Once every 2 years, perform a complete flush of the cooling system.
Repair work
Knowing the structure of the stove, it is easy to repair. Before starting repairs, it is necessary to remove the wire from ground and drain the coolant.
Repair consists of the following steps:
- First you need to remove the instrument panel and carefully disconnect the air pipe through which air enters the cabin.
- Next, you should check the electrical system: resistor wires, electric motor, fan. In addition, you need to check the outlet and inlet hoses of the faucet.
- Next, you should unscrew the two nuts from the shield that secure the faucet.
- Then you need to remove the seal from the tap pipes.
- Next, the nuts are unscrewed, with which the stove is attached to the body.
- Now you can remove the stove.
- Having completed the necessary repairs and adjustments, the heater is reinstalled in the reverse order.
After repairs, you should check the operation of the heating system. It should turn on as soon as the engine starts.
Heater repair at VAZ
If the stove fails, it either does not work at all, or it works but does not heat the air. In the first case, first check the fan wiring, starting with fuse F7. If the fuse is blown, replace it. Then they check the relay, which may not turn on the first time or only when the engine is warm. In this case, the relay is replaced with a new one.
Then the serviceability of the electric motor is assessed. To do this, power is directly supplied to its contacts from the battery. If the electric motor starts to operate at maximum speed, then it is in good condition. Otherwise, it will need to be repaired or replaced.
The intensity of the air flow is adjusted using a resistor having two spirals with resistances of 0.82 Ohm and 0.23 Ohm. In the first mode, the current flows through both spirals, in the second - only through a spiral with a resistance of 0.23 Ohms, in the third - bypassing the spirals, that is, without resistance at all.
If the resistor is faulty, the heater fan will only be able to operate at maximum speed.
If cold air enters the cabin, this may be due to:
- Airlock. It could have formed when replacing the coolant, when the system was depressurized, or because there was insufficient amount of coolant in the system. To remove the plug, remove the heater radiator pipe, use a watering can to add antifreeze to the maximum and put the hose back in place. After starting the engine, coolant under pressure will displace the remaining air from the system.
- Stove tap jammed. This happens if the tap was not initially opened all the way, and during operation, oxide and scale formed on the inner surface, preventing the normal circulation of the liquid. You can try to open the tap using pliers or immediately replace it with a new one.
- The stove radiator is clogged. When using low-quality coolant, the radiator honeycombs may become clogged. The problem is solved by flushing or replacing the heat exchanger. The feasibility of washing is determined by the scale of contamination.
- Installation of a low-quality radiator. In a defective product, the honeycomb may be incorrectly soldered. The radiator should be replaced.
- Low pressure in the cooling system. If heat transfer increases at higher speeds, the pump needs to be replaced.
- Low coolant level. It is necessary to check the level and add antifreeze if necessary.
- Damage to the heater fan impeller. The impeller is carefully inspected and replaced if mechanical damage is detected.
- Cabin filter dirty. If it is heavily polluted, the power of the electric motor will not be enough to pump warm air into the cabin. The filter is replaced with a new one.
- Damage to the cylinder head gasket. If the cylinder head gasket is blown, white smoke will come out of the exhaust pipe. The problem is solved by replacing the gasket and dismantling the cylinder head.
If the stove is clogged, warm air will stop flowing into the cabin.
If such a malfunction occurs, the stove will have to be disassembled to find the breakdown. But before that, you need to start the car and turn on all three fan power levels in turn. If there is no additional noise, then it’s time to start disassembling.
Also, in a VAZ 2114 the stove does not heat if the thermostat is faulty. With such a breakdown, the coolant circulates in a circle without having time to cool.
An air lock in the cooling system can form if the engine has already stopped running. At this point, the coolant temperature begins to drop. It is then that air can leak into the upper part of the radiator, and then it moves to the thermostat. Later, when the engine is started again, the pump will drive the accumulated air from the thermostat into the radiator of the heating system.
Faulty faucet
Attention, the most common reason. In nine out of ten cases, this is a faucet that does not open completely. This problem can have two reasons: it is completely out of order and needs to be replaced, or it is poorly secured and due to the heater cable, which is located near the pedal assembly. The cable needs to be tightened a little by grabbing it with pliers.
If at the same time the stove does not supply hot air to the cabin, and the faucet is leaking, then the latter must be urgently replaced. At such a moment, a greasy coating forms on the glass, and the same stains may appear on the floor, and a pronounced smell of antifreeze and antifreeze hovers in the atmosphere of the cabin.
Heater valve VAZ 2114
If the heater radiator is clogged with dirt and debris, then the heater does not blow well and the flow of warm air enters the cabin barely noticeable. This is especially unpleasant if there is decent frost behind the glass.
This kind of news about the performance properties of their radiator is most often received by car owners who bought a used VAZ 2114 back in the summer. And before the onset of cold weather, they do not even suspect the upcoming problems. Also, a bad radiator can be installed at a car service center. A gullible customer who did not control the result of the master’s work may become a victim of deception and negligence. In any case, a bad radiator will have to be replaced with a high-quality one. There are no options here.
Heater radiator VAZ 2114
Read more: Table of tire pressure by car make: what should it be
Radiator replacement procedure:
- Disassemble the front panel and remove the console.
- Drain the antifreeze into a special clean container through the radiator or drain hole.
- Remove the center panel, glove compartment, side panels.
- Unscrew the bolts and screws that secure the panel to the body and metal.
- Remember about the cables in time.
- Move the released dashboard to the side.
- Remove the pipes.
- Remove the old radiator and replace it with a new one.
- Screw all other serviceable parts into their original places.
Faucet failure
This detail should also not be ignored. If the stove does not heat well (VAZ 2114 injector 8 valves), the reason may lie there. In most cases, it does not open completely. The reason is poor fixation of the heater cable. On Samara-2 cars it is located near the pedals. To resume operation of the unit, you need to tighten the element using pliers.
It happens that the VAZ 2114 stove does not heat well, the damper is open, and antifreeze drips into the cabin. The cause of the malfunction lies in the depressurization of the seals (most often on the faucet). If there are clamp connections, they should be tightened. We also carefully look at the condition of the pipes themselves. They should be soft, without cracks or other signs of wear. Otherwise, you need to purchase a repair kit and completely change the pipes (it is best to purchase new clamps, as the old ones turn sour).
Cylinder head gasket
Sometimes the cause of a faulty heater is a blown cylinder block gasket. This malfunction can be identified by several signs. Firstly, there is a smell of gasoline or exhaust gases in the antifreeze. Secondly, a certain mixture – “mayonnaise” – forms on the dipstick and oil filler cap.
It occurs due to mixing of car oil with coolant. Also, characteristic white smoke will be visible from the exhaust pipe while the engine is running. If at least one of the above symptoms is present, you should diagnose the condition of the gasket and urgently replace it.
Thermostat
In addition, the reason that the heater on a VAZ 2114 does not heat well (at idle as well) is a breakdown of the thermostat, namely, the failure of the valve to open. Thus, the coolant circulates only in a small circle. With such a malfunction, the car often boils, and in winter the stove does not work or heats very poorly. It's quite easy to check if the thermostat is working properly. When dismantling it, you should place the part in a container of water and heat it on a stove. Before the water boils (bubbles will form), the valve must open. If this does not happen, the element should be replaced with a new one.
Fortunately, it is inexpensive. By the way, experienced motorists recommend changing thermostats depending on the season of operation. For example, in summer it is better to set the element at 82 degrees, and in winter - at 72. It is not necessary to adhere to specific values, just remember the principle - the colder it is outside, the lower the valve opening temperature should be. If the VAZ 2114 stove does not heat well, you can check the part without disassembling it - to do this, on a warm engine, you need to touch the upper and lower pipes of the main radiator. Both elements must be hot. If one of them is cold, most likely the valve has not opened and the thermostat will need to be replaced.
Heater motor malfunctions
Troubleshooting in the heating system of front-wheel drive VAZs should begin with the heater motor:
- turn on the ignition, start the engine;
- On the heater control unit we check the operation of the motor in all positions. If you can hear the stove motor changing speed when switching, it is most likely working.
The heater motor may not work for several reasons:
- the fuse responsible for the operation of the electric motor has blown;
- the contact in the mounting block has oxidized;
- the switch itself is faulty;
- there are breaks in the electrical wiring;
- The furnace electric motor burned out.
If the motor only operates at maximum speed (third position), the resistor is most likely faulty.
When the heater motor burns out, it needs to be replaced. We carry out the work of replacing the part as follows (using the example of 2114):
Now all that remains is to install the new spare part and secure all the removed parts in their places.
Air lock formation
On cars of the VAZ 2110 and VAZ 2114 models, an air lock often forms in the cooling system; it mainly occurs:
- due to loose connections in the pipes (for example, the clamps are loosely tightened);
- after replacing the coolant;
- if the cylinder head is broken.
The plug can be removed in several ways (provided that the head gasket is not broken), let's consider one of the options. To expel air from the cooling system, proceed as follows:
- put the car on a hill so that the engine is higher in level;
- unscrew the expansion tank cap;
- fill the tank with antifreeze to the maximum;
- we start the engine and warm it up to operating temperature, increase the speed to about 3000;
- Gently squeeze the lower radiator hose with your hand, it is important not to get burned while doing this, do not close the expansion tank cap;
- As air leaves the cooling system, the antifreeze will “sink” in the tank; it must be added regularly. As soon as bubbles stop appearing when you press the nozzle, hot air will begin to flow into the cabin when the heater is on.
What to do if cold air from stove 2114 comes in? This question often arises among motorists. All parts in any car perform a special function, specifically designed for it, and when something becomes unusable, the car owner has to figure out what caused the breakdown.
The heater blows poorly into the legs and side windows
Despite the simplicity of the design, problems with the VAZ-2114 stove often arise. They are mainly associated with a drop in the performance of the heating system - the stove heats the air poorly, blows cold or slightly warm air. In this case, the reasons for poor operation of the stove can be both general (warming up is weak at any control unit settings) and when operating in a certain mode, for example, at idle. Or, for example, cold air or slightly warm air blows only on the side windows, and in other modes the heating works normally.
• the heater radiator is clogged or an air lock has formed in it; when switched to heating mode, the heater damper does not fit tightly to the body, which is why part of the air flow moves bypassing the radiator and enters the cabin cold;
• the tap does not open completely - this is one of the main reasons for a poorly heating stove;
• the formation of cracks at the joints of the housing and air ducts, due to which there is a strong dispersion of the air flow.
It is not difficult to determine the cause of a general decrease in the efficiency of the heating system. To find out why the VAZ-2114 stove does not heat well, you need to remove the side decorative panels from the center console, and then warm up the engine and turn on the stove at maximum power. After this, we try the antifreeze supply pipe to the heater radiator up to the tap and behind it. The same heating temperature of the tube on both sides indicates that the tap is working properly and the problem lies in the radiator. If after the tap the pipe is less warmed up, the tap is jammed or does not open completely.
After this, we determine the temperature at the inlet and outlet pipes of the radiator. If the heat exchanger is not clogged and there is no plug in it, then the temperature of the outlet pipe will be lower than the inlet pipe. But if the outlet tube is cold, antifreeze does not circulate through the radiator, which indicates the formation of an air lock (airing) or clogging.
A common cause of failure of the VAZ-2114 stove is wear and play in the sliders. Because of this, even when they are moved to their extreme positions, the cables do not bring the valve and dampers to the stop (the valve remains closed, and the dampers do not block the air flow channels). This problem can be easily resolved - you need to make an adjustment and shorten the cables a little.
The problem of insufficient heating of one of the zones is associated with a violation of the damper control. This happens due to the same wear on the sliders, the cable jumping off the damper levers, the damper axes jumping out of the seats in the body, which is accompanied by clicks.
In addition to weak warming up, VAZ-2114 car owners are faced with the fact that the intensity of air flow decreases. This happens due to the dispersion of air through the cracks at the junction of the body and air ducts, clogging the latter with debris - many owners do not install cabin filters, so leaves get into the air ducts and interfere with air movement.
. In addition, the reason that the heater on a VAZ 2114 does not heat well (at idle as well) is a breakdown of the thermostat, namely, the failure of the valve to open. Thus, the coolant circulates only in a small circle. With such a malfunction, the car often boils, and in winter the stove does not work or heats very poorly. It's quite easy to check if the thermostat is working properly. When dismantling it, you should place the part in a container of water and heat it on a stove. Before the water boils (bubbles will form), the valve must open. If this does not happen, the element should be replaced with a new one.
. If the stove on a VAZ 2114 does not heat well, the reason for this is airing in the system. The plug may form after the engine is turned off, when the temperature of the antifreeze drops. It is at this time that air can enter part of the radiator from the expansion tank, which will then “get stuck” in the area of the thermostat. Upon subsequent startup, the system will circulate air instead of coolant, which will cause the engine to overheat and the heater to malfunction.
? To do this, motorists loosen the coolant pipe clamp and slowly add antifreeze to the expansion tank to the maximum. By the way, you cannot mix different brands of coolant - the system may foam. Therefore, we add only the brand that was used previously, or use distilled water. The latter method is used in any season, with the exception of winter, since water at subzero temperatures will simply freeze in the tank. The antifreeze itself should be as transparent as possible (factory color does not count), and slightly oily to the touch. If it has not been changed for a long time and has lost these properties and has become cloudy, then it is better to drain it entirely and use a new “anti-freeze”.
If the stove does not heat well (including VAZ 2114 15), you can get rid of the air lock in another way - simply drive the front of the car up an incline and open the cover of the expansion tank. After waiting 3-5 minutes, the system itself will push out all unnecessary air.
The heating system of the VAZ-2114 is not reliable. Over time, the stove stops heating the legs and side windows normally. Moreover, the problem is not in the temperature of the air (on the contrary, it can be hot), but in the strength of the flow with which it comes from the nozzles. In this case, you will have to modify the air flow channels. To do this, remove the front panel so that there is access to the nozzles.
Next, a new corrugated hose is installed (just plastic tubes come from the factory). Additionally, we treat the joints with the heat-insulating material “Spleen”. All cracks between the top and bottom of the panel are also covered with it. Next, you should modify the stove damper, which directs the flow to the desired area.
Often it does not fit well against the body. Because of this, a large percentage of hot air is simply lost in the panel and “walks” in the cracks. So, we remove the damper and remove the old yellow factory seal. We seal all the cracks with modelin. Instead of a sponge, we glue “Bitoplast”. It is advisable to apply it in several layers.
To test the heater switch, you will need a simple 12-volt lamp with two wires. You should remove the central part of the dashboard and do the following:
- Turn on the ignition.
- We close the negative contact of the lamp to ground.
- Next, we alternately connect the positive contact to outputs 1, 2, 3 on the additional resistor.
The switch is considered operational if the lamp lights up. Otherwise, the problem may be an open circuit or a blown fuse. If only the third speed does not work, replace the additional resistor.
There can be many reasons why there is no warm air in the cabin:
- old or dirty heater radiator. A worn radiator should be replaced, and a contaminated one should be blown out and purged with cleaning fluid. To replace the radiator, you need to drain the antifreeze, unscrew the screws of the glove compartment, fastening the cables and side panels. After all the screws are unscrewed, carefully pull the panel towards you, and then unscrew the clamps from the radiator. Now you can pull out the radiator;
- insufficient level of coolant filled into the radiator. This problem is very easy to deal with: just replenish the required amount of antifreeze;
Antifreeze level VAZ 2114
- broken thermostat. The thermostat operates to maintain the required temperature in the vehicle's cooling system. However, if the thermostat malfunctions, the coolant does not warm up enough;
Replacing the thermostat VAZ 2114
- the appearance of an air lock in the cooling system. Air prevents the normal circulation of antifreeze through the system pipes;
Coolant pipes VAZ 2114
- malfunction of the water pump in the system, which must maintain stable fluid circulation;
Water pump VAZ 2114
- faulty heater tap. This is perhaps one of the most common reasons for a non-working stove. A faucet that is completely out of order should be replaced with a new one, and a poorly fixed faucet should be tightened with pliers. When working, accuracy is important - one sudden movement and the interior will be flooded with coolant;
VAZ 2114 stove faucet
- The heater motor is broken. If the motor does not make noise when turned on, most likely the reason why the VAZ 2114 stove does not heat well lies precisely in it. Although, it is possible that the problem lies in the wiring of the motor or in the switch itself.
Read more: What is tiptronic in a car, how tiptronic works in a car and how to use it
One of the simplest options for improving the operation of the stove is to install an additional pump for forced circulation of antifreeze. The pump is installed in the engine compartment, close to the heater radiator. In severe frosts, often even an additional pump does not help to cope with the problem. In this case, insulating the radiator grille will help to prevent cold air from entering the engine compartment.
Radiator insulation option for VAZ 2114
It also happens that the heating system works, but the heat does not reach the feet. The reason may be that the damper switching cable located on the control unit has jumped out of its normal position. To make your feet more comfortable, you can glue the lower air ducts with foam rubber. But the rear air ducts are usually completely ineffective and passengers sitting in the back seat will have to freeze in winter.