How to diagnose air suspension?
Pneumatic is a mandatory element of the Prado 120 - a common form of suspension for Toyota SUVs. The principle of its operation is simple: standard springs are replaced by air cylinders, which, depending on the position of the car in space, raise or lower the body. This suspension is installed only on the rear of the car.
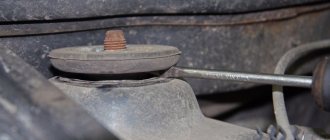
The simplest diagnostic method is visual. If the cylinders are damaged, the rear of the SUV will sag. During operation, microcracks form in the rubber shell of air cylinders, allowing air to pass through. To make sure they are present, you need to moisten the cylinders with soap infusion. The air bubbles that form are a sure sign of a hole. Another way is to jack up the “healthy” car wheel. The part of the car with the damaged cylinder will remain in the air, and the cylinder will begin to slowly straighten, leveling the height. If there are cracks in the rubber, you will hear a characteristic sound with which air escapes.
Electronic problems
A common cause of air suspension malfunction is sensor failure: for some reason the system incorrectly adjusts the height of the car body. Therefore, before removing the air spring or valve block on the Prado 120, it is better to diagnose the “brains” of the car.
The simplest explanation: the automatic adjustment mode is turned on and incorrect parking. If the SUV is not parked level, but at an angle, then the next time it is “turned on” the system will consider this position to be “flat” and when entering the road it will try to return the car to a fixed state.
It happens that the height control sensor is capricious: due to malfunctions, it over- or under-injects pressure into the airbags, setting the wrong value for the body height.
The cause of the breakdown may be:
- contamination: cleaning is carried out with WD-40 or similar substances;
- contact fault: the sensor springs return to their original position;
- violations of the assembly order: after incorrect installation, the sensor may give erroneous readings;
- failure: “treated” by replacing the sensor.
Electronics do not tolerate frost well, so it is better to abandon automatic body height control at temperatures below -30.
The cause of the failure is often malfunctions in the fuses and relays responsible for the condition of the suspension. To get rid of the problem, it is enough to replace these elements.
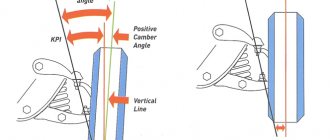
KIA Mohave (Boreggo) air suspension system
System Description
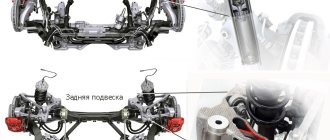
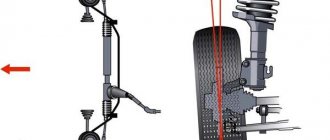
As can be seen from the figure, the general layout of the air suspension is quite simple, since only the rear wheel suspension (double-corner system) is equipped with air springs. The system consists of two air bags, a height sensor and a control unit, as well as pneumatic components such as a reservoir, a compressor (with built-in temperature sensor), a solenoid valve block (with a built-in pressure sensor), and an ESC switch. All components are interconnected by air pipelines.
To raise the car to the desired level, the system takes air from the atmosphere. This type of system is called Open Loop. Unlike closed-loop systems, an open-loop system takes some time to compress the air taken from the atmosphere and feed it into the air suspension bags, so there is some delay when the vehicle's body level is activated. However, even with the body level control system used on Lexus vehicles, the process of adjusting the body height takes several minutes.
If system components are replaced with new ones (except electrical sensors or control unit), the following procedure must be performed: using a stationary air compressor, air must be supplied to the air charging valve located on the left side of the engine compartment. The air will enter the receiver, compressor and air cushions.
Due to the different lengths of the air lines and their location, the air cushions will not fill with air at the same time.
The car is raised (the rubber air cushions are empty before the system is filled with air and are therefore deformed).
For some diagnostic scanner modes, you must turn on the ignition (turn the ignition switch to the ON position), but do not require starting the engine.
While the air suspension system is filling with air, the vehicle's compressor does not operate.
There are two types of air filling:
1. Filling the system with air: compressed air enters from the outside at the factory or in the workshop (1 time) when the compressor is not working. This procedure cannot be performed using a car compressor. Overloading the compressor must be avoided. In addition, a car compressor does not work if there is insufficient air pressure (volume).
2. Air refilling in the garage (additional refilling): whenever additional air is required into the system, air is supplied by the car compressor.
Depending on the discharge pressure of the stationary compressor, the total time to fill the system with air may vary, but the procedure usually takes about 50 seconds.
Required pressure in air suspension components:
- rear suspension air cushions: approx. 8.5 bar
receiver: about 9-10 bar
Note: Air bag pressure may vary depending on vehicle load.
Receiver (number 55830-2J000, 558302J000)
Replacing the receiver
1. Disconnect connector A and unscrew bolt B.
2. Remove the bolts.
3. Installation is carried out in the reverse order of removal.
Attention! Do not reuse connector A.
- Make sure that the pipelines are installed without mechanical stress.
- When making connections, ensure that each air piping is routed through the appropriate holes in the designated areas.
Compressor (number 55810-2J000, 558102J000)
Compressor replacement
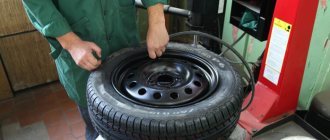
1. Remove the spare tire.
2. Disconnect connector A and remove the air pipe.
3. Disconnect connector A and unscrew the bolts.
4. Installation is carried out in the reverse order of removal.
- Be careful not to damage connector A.
- Do not reuse connector A.
- Make sure that the pipelines are installed without mechanical stress.
- Avoid hitting parts.
- Do not pile pipelines on top of each other.
- When connecting, ensure that each air piping is routed through the appropriate openings in the designated areas.
Solenoid valve block (number 55820-2J000, 55820-2J000)
Replacing the solenoid valve block
1. Remove pipeline A of the receiver, pipeline of the left B and right C air bags, compressor pipeline D.
2. Unscrew the fastening bolts and remove the solenoid valve block E.
3. Disconnect connector A.
4. Installation is carried out in the reverse order of removal.
- Be careful not to damage the connectors.
- Observe the color markings of the pipelines during their connection: receiver pipeline - blue A, left air bag - yellow B, right air bag - red C, compressor - green D.
- Make sure that the pipelines are installed without mechanical stress.
- Avoid hitting parts.
- Do not pile pipelines on top of each other.
- Make sure that the pipelines are not kinked.
- When connecting, ensure that each air piping is routed through the appropriate openings in the designated areas.
Height sensor (numbers: left - 55840-2J000, 558402J000 ; right - 55850-2J000, 558502J000 )
Replacing the height sensor
1. Remove the car wheel.
2. Disconnect connector A and clamp B.
3. Unscrew the mounting bolts and remove the height sensor A.
4. Installation is carried out in the reverse order of removal.
- Do not hit parts.
- Do not allow water to enter the sensor from the electrical connector side.
Height Sensor Calibration
Due to deviations in the installation of the sensor, as well as errors in the sensor itself, calibration of the sensor is required:
- when replacing the sensor
- when replacing the air cushion
- when replacing the ECS control unit
- when replacing the lower rear suspension arm
- when replacing the auxiliary suspension arm
The height sensor is calibrated as follows:
1. Set the vehicle to normal height (if necessary, use the ECS switch). Make sure that the vehicle's normal height is correct.
2. Connect the diagnostic scanner and turn on the ignition.
3. Go to the “Filling reservoir tank using compressor” menu of the scanner, as shown in the illustration below.
4. Go to the “Height sensor calibration” menu of the scanner, press the OK button. The scanner will display the current vehicle height.
5. Measure the actual height of the car using a measuring tape.
6. If the measured value differs from the required value (478+- 10 mm), repeat the procedure from points 3 to 5.
7. Enter the measured value into the scanner (for the left and right sides, respectively). The system will accept the entered values as the current vehicle height.
8. If there is a difference between the left and right sides, the system will self-adjust to achieve the design height.
Air cushions (numbers: left - 55331-2J000, 553312J000, 55331-2J200, 553312J200; right - 55331-2J100, 553312J100, 55331-2J300, 553312J300)
Replacement
1. Remove the rear wheels from the vehicle. The tightening torque during installation is 90-110 Nm.
2. Disconnect connector A and remove the air pipe.
3. Unscrew and remove air cushion A.
4. Installation is carried out in the reverse order of removal.
- Be careful not to damage connector A.
- Do not reuse connector A.
- Be careful not to mix up the top and bottom of the air cushion when installing.
- Make sure that the pipelines are installed without mechanical stress.
- When making connections, ensure that each air piping is routed through the appropriate holes in the designated areas.
Electronic air suspension control unit
Replacing the electronic control unit
1. Remove the left front seat.
2. Unscrew bolts A.
3. Remove the electronic control unit and disconnect connector B.
4. Installation is carried out in the reverse order of removal.
- Be careful not to check the connector.
- Be careful not to damage the connector pins.
- Do not hit the electronic unit.
Repair and replacement of air cylinder
Working with the air spring is the most difficult part of repairing the Prado 120 air suspension. In most cases, it cannot be restored, but you can still try to fight for it.
To restore the cylinder, the rubber shell is cut off from it. In the best case, the repair will be completed by replacing the silent block. If the problem is in the clamps holding the pillow, they are sealed or tightened to reduce the outflow of air.
Replacement
The air cylinder is replaced as follows:
- The car is jacked up and the bridge is raised.
- The springs of the rear axle are tightened with ties.
- The lower shock absorbers are removed, the upper ones are weakened.
- Remove the strut stabilizers and kinetic suspension stabilization systems.
- The bridge is lowered.
- Pull out the spring with the air cylinder inside.
- The rubber bumper is cut off from the factory bumper bowl (inserted into the upper part of the spring).
- The bowl is cleaned of dirt.
- Holes are drilled in the bowl and cylinder corresponding to the holes in the upper part of the air cylinder.
- The bowl and cylinder are bolted together. The inside of the cylinder is hollow, so you can take bolts of almost any length. But it is worth remembering: if the bolts are too long, there is a danger that they will pierce the cylinder from the inside.
- An air supply tube is connected to the nipple.
- The system is assembled in reverse order.
Usually, air springs from BlackStone of size L are used as a replacement.
If the ride of the car after installing new cylinders seems too harsh, the spare wheel, connected to the system with a detachable connection, is made into a receiver. The rear wheel cylinders are thus combined into one circuit.
Air suspension valve block repair
You can determine the malfunction of the Prado 120 air suspension valve block by the behavior of the car: if during a long stop the SUV “squats”, but returns to its original position when the engine is running, the problem is most likely in the valves that are leaking air.
For repair:
- Raise the rear axle of the car and inflate the air springs.
- Remove the electrical contacts and the tube leading to the compressor from the valve block.
- Remove the receiver together with the block.
- To protect the wires and compressor tube from dirt, wrap them in a bag or cling film. Fix.
- Remove the compressor relay (to the left of the fuse box on the right side of the engine compartment).
- Remove the valve block by unscrewing the bolts. If the bolts are soured, moisten them with WD-40.
- Unscrew the valve block. Clean off dirt, replace seals and worn valves.
- To protect the block from dirt, coat the joints with sealant.
- Insert the valve block into the receiver.
- Connect the contacts and compressor tube.
Often, during the repair of a block, the plastic base into which the valves are screwed breaks. It won’t be possible to solder it: Prado owners claim that the plastic melts.
You will have to either purchase a new part or repair the old one with similar plastic and a hair dryer.
When replacing a unit, the procedure is similar to the repair one, with the only difference being that a new part is installed in the receiver.
Replacing air springs in springs with inserts - can this improve the suspension?
The desire of motorists to improve their vehicles is as old as the very existence of cars.
And in principle, there is nothing wrong with this. It can even be said without exaggeration that if individual enthusiasts had not strived to improve cars, then today we would continue to drive what was offered at the beginning of the last century!
But not everything is so rosy. And often motorists spend their passion and imagination, money, time and effort on very strange “projects”. For example, a pendant. There is a lot of discussion about how it can be improved, but rarely a consensus is reached. In addition, in principle, according to experts who manufacture cars, suspensions are very difficult to experiment with and modify. Theoretically, in each specific car, everything possible has already been done with them, and in the starting, factory conditions.
But all the same, many drivers one day think about how to strengthen the rear springs, “making” them withstand a few additional tens of kilograms. And in principle, it’s not so difficult to screw something into the spring besides the air spring. But what will be the effect of this? Is it possible to achieve a benefit or is the real maximum a slight change in spring stiffness and nothing more?
A few words about silicone screws. They are used to strengthen one of the coils, as well as to prevent them from contacting each other, which will allow the car to be raised by 1-2 cm and prevent breakdowns of the suspension, even if it can be described as “tired”. But in principle, you can easily get by with a simpler solution - replacing the springs and suspension bumpers.
However, you should also not underestimate silicone screws and air springs in general - they are really important and needed for the rear suspension. After all, it is the “tail” part of the car that often bears the maximum loads - when transporting goods or simply passengers, which causes the springs to sag.
Comparison of screws, autobuffers and pneumatic cylinders. In principle, autobuffers and silicone screw-ins are very similar in appearance and often in materials. The price range is wide - from 500 to 10,000 rubles, but which is better - one can argue endlessly and often experienced drivers opt for cheaper options.
In search of an answer to the question posed in the title of the article, experienced car enthusiasts conducted several tests. And it turned out that silicone inserts and autobuffers are not only similar, but also in terms of efficiency and benefits, they are almost equivalent in the results achieved.
As for pneumatic cylinders, also often called air bags, their results turned out to be much better. Air springs are also good because they can be inflated - that is, adjusted to the spring, adjusting the degree of “interaction” of these parts.
Bottom line. Thinking about how to improve a car is good, but at the same time it is important to understand that sometimes it is better not to look for something new and not come up with tricks, but to use what has already been tested and approved by millions of drivers. For example, air springs that improve suspension.
- Why does the Chinese manufacturer GAC have no chance in Russia?
See all photo news >>
Air spring repair and replacement
Replacing an air spring on a Prado 120 is a relatively painless event, compared to other interventions in the air suspension. In the best case, everything will be done by patching microcracks that form during the operation of the car. The holes detected by the “soap test” are coated with sealant. To prevent the appearance of new holes, the pillow is impregnated with silicone.
If the rubber casing bursts while driving, you need to immediately stop and remove the one responsible for the operation of the compressor from the fuse box. If it is not turned off, there is a high probability that in addition to the need to repair the air springs, the replacement of the Land Cruiser 120 compressor will be added.
When completely replacing a pillow:
- Disable automatic suspension adjustment.
- Raise the car.
- Disconnect the compressor pipe from the receiver.
- Disconnect the airbag tube from the valve that regulates the suspension height.
- Raise the car higher, freeing the cushion.
- Remove the fork holding the air spring in the seat cup.
- Put on a new pillow.
- Secure the plug.
- Connect the valve pipe and the compressor pipe.
- Lower the car.
There is nothing complicated about how to change the air spring on a Prado 120. But sometimes, after tampering with the suspension, the computer refuses to work correctly.
To eliminate the problem, you will have to carry out diagnostics. The diagnostic block is located on the left side of the front panel, not far from the driver’s seat. A wire is connected to it, the other end is connected to a laptop with the diagnostic program installed. Any errors detected are corrected and the Prado operates normally again.
How to check air suspension before purchasing?
Without a factory test and computer diagnostics, it is possible to initially check the system for operability, thereby protecting yourself as much as possible from unnecessary expenses.
1.
It is necessary to raise the pneuma to the highest level (+2), wait 60-120 seconds, and you need to listen for the compressor to work after the rise to the upper level is completed. If the compressor turns on periodically, it means the circuit is leaky and the pressure is unstable; if there are no complaints, we move on to the second stage.
2.
We lower the pneuma from the uppermost position (+2) to the loading position (-2). The time for complete “settlement” of the body should not exceed 15-22 seconds; if the time exceeds or uneven lowering of the body occurs, there is a malfunction of the drain valves. Usually it is the air spring valves of the rear axle that turn sour.
3.
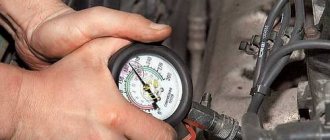
The third stage shows the actual state of the pneumatic compressor and its implementation without simultaneous computer diagnostics does not give much. It is necessary to raise the pneuma again from the loading position (-2) to the maximum clearance position (+2). Simultaneously with the rise, you need to listen to the characteristic sound that the compressor makes. The sound should be quiet, not hysterical. After the rise is completed, the Data Stream table needs to look at the compressor temperature. It should not exceed 60-70 degrees in summer and 40-50 in winter. If the compressor makes loud noises or the temperature is elevated, the compressor may require replacement or restoration within the next six months, and if during tests it turned off due to overheating, then it needs to be replaced yesterday.
I would like to add that a visual inspection of air springs is a fool’s errand; their wear is almost never possible to assess visually. The valve block and pressure in the receiver can only be checked using computer diagnostics of the Level Control unit.
How is Tuareg pneuma better than conventional suspension? Differences between pneuma and springs
A reasonable question, especially for ardent supporters of a spring “problem-free” suspension. Many argue that pneuma is only needed to change the ground clearance, otherwise there is no difference, and this is a very deep misconception.
The first and main advantage of pneuma over springs is increased comfort
, controllability and lack of roll. Pneuma cannot be responsible only for ground clearance due to the fact that Tuaregs do not have springs on their pneuma, and their role is played by air cylinders with variable pressure inside.
Due to the laws of physics and the behavior of gas in a closed volume under pressure, a pneumatic cylinder physically cannot deform as much as springs can deform under strong lateral overloads. In other words, rolls
air suspension is significantly smaller due to the laws of physics of gaseous media, as well as due to much less inertia when returning to the rest position after deformation.
Air suspension allows the car to “squat” at high speed or during aggressive driving, while lowering the center of gravity
and thus further reduce body roll. Pneuma gives versatility to a large, heavy car, which, in the presence of shock absorbers with variable stiffness, can be exciting or comfortable, stable at high speed or passable. Taking into account the large number of budget repairs and the general reliability of air suspension on the VAG group, there is no reason not to buy a Tuareg with air suspension. Back to contents
engages in professional selection and diagnostics of Volkswagen Touareg diesel and gasoline versions of all years of production. Find out more about why you should use the services and what we can check. How much do our services cost?