Matiz protection device
Installing fuses on Daewoo Matiz is a mandatory procedure, without which the car will not be released from the assembly line. The absence of these components in the design of the machine will quickly lead to irreparable consequences. Fuse boxes must be located in the vehicle because these elements protect on-board power systems and equipment from overloads and short circuits.
These components on Daewoo Matiz are able to indicate the presence of a problem in advance (before the built-in devices fail). If the car's fuses constantly blow, then it is necessary to send the car to a service station to check the condition of the on-board equipment. The frequent occurrence of such problems indicates the presence of a break in the wiring or other, no less dangerous faults.
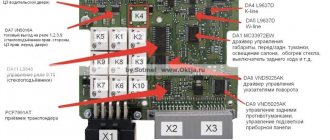
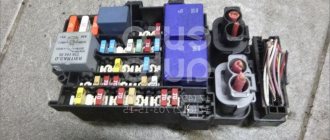
Relay and fuse diagram for Daewoo Matiz 1 M100 and 1 M150 under the hood
Relay
| Relay number | Relay purpose |
| K1 | Tailgate glass defroster element relay |
| K2 | Main relay |
| short circuit | Turning on the high speed engine cooling fan |
| K4 | Fog lights |
| short circuit | Fuel pump |
| KB | Enable low speed |
| K7 | Sound signals |
| K8 | Side light |
| K9 | Headlight |
| K10 | A/C compressor clutch |
Fuses
| Fuse number | Fuse color | Protected target | Current strength, A |
| 1 | Red | Spare | 10 |
| 2 | Red | Fog lights | 10 |
| 3 | Red | Engine Management System, A/C Compressor Clutch Relay, High Speed Fan Relay, Low Speed Fan Relay | 10 |
| 4 | Yellow | Headlight relay, headlight switch | 20 |
| 5 | Blue | Sound signals | 15 |
| 6 | Red | Spare | 10 |
| 7 | Red | Engine cooling fan | 10 |
| 1 | Red | A/C compressor clutch | 10 |
| 9 | Red | Parking light on the left side of the vehicle and license plate light | 10 |
| 10 | Red | Side lighting on the right side of the car | 10 |
| 11 | Red | Low beam left headlight | 10 |
| 12 | Red | Low beam right headlight | 10 |
| 13 | Green | Left high beam | 30 |
| 14 | Red | High beam right headlight | 10 |
| 15 | Red | Rear window defroster element | 10 |
| 16 | Yellow | Electric heater fan | 20 |
| 17 | Blue | Spare | 15 |
| 18 | Blue | Power supply for the engine control system electronic unit, fuel pump relay, anti-lock brake system control unit, generator field winding, ignition coils, speed sensor | 15 |
| 19 | Blue | Fuel pump | 15 |
| 20 | Red | Constantly, regardless of the position of the key in the ignition switch, consumers are switched on (installed on parts of cars) | 40 |
| 21 | Orange | Anti-lock brake system (if equipped) | 50 |
Block location
Now you have learned about the nuances and rules for replacing fuses, so now it’s time to start analyzing fuse decoding tables. The mounting block has 20 fuses, three of which are not used in Matiz - they are spare. Such fuses are located in the following positions: Ef5, Ef16, Ef21. The most powerful fuse is the one responsible for activating the ignition - the nominal current value is 40A. Mostly weak 10A fuses are installed here.
| Fuse designation | Current, A | Source | Protected Circuits |
| Fuses in the fuse and relay box in the engine compartment | |||
| Ef2 | 40 | Accumulator battery | Ignition switch, control panel fuse box (F11-F13) |
| Ef3 | 10 | Accumulator battery | Fuel supply switch (inertia switch) |
| Ef4 | 10 | Ignition 1 | Fuel, generator, speed sensor, fuel pump relay, main relay, ignition coil |
| Ef5 | — | — | Not used |
| Ef6 | 20 | Accumulator battery | Heater fan motor |
| Ef7 | 15 | Accumulator battery | Rear window defroster |
| Ef8 | 10 | Accumulator battery | High beam headlights, right side |
| Ef9 | 10 | Accumulator battery | High beam headlights, left side |
| Ef10 | 10 | Accumulator battery | Low beam headlights, right side |
| Ef11 | 10 | Accumulator battery | Low beam headlights, left side |
| Ef12 | 10 | 58 | Tail lights and lighting, right side |
| Ef13 | 10 | 58 | Tail lights and lighting, left side |
| Ef14 | 10 | Accumulator battery | Air conditioning compressor |
| Ef15 | 30 | Accumulator battery | Radiator fan |
| Ef16 | 10 | Spare | |
| Ef17 | 10 | Accumulator battery | Sound signal |
| Ef18 | 20 | Accumulator battery | Headlight relay, high beam switch |
| Ef19 | 15 | Accumulator battery | Electronic control unit, main relay |
| Ef20 | 15 | Accumulator battery | Front fog lights |
| Ef21 | 15 | Spare | |
The functions and systems that are protected by the fuses located in the mounting block are: ignition activation, alternator coil, heater fan motor, low and high beams, tail lights, air conditioning compressor, rear window defroster, horn, radiator fan, front fog lights, and is responsible for the operation of the electronic control unit and the main relay, high beam switch and directly supplies
Fuse box in the passenger compartment
The main thing to remember is that you have spare fuses with a current rating of 10 and 15 Amps, respectively. If you do not find a suitable fuse, then do not use jumpers under any circumstances, as in this case the electrical circuit may fail, and in the worst case, entire automotive systems. Of course, none of you wants to allow this situation to happen, so we strongly recommend purchasing the fuse you need.
This is interesting: The CV joint is crunching: reasons, how to determine which grenade is crunching, is it possible to drive and what to do
If one of the above systems or functions does not work in your car, then most likely you will need to replace the fuse located in the mounting block, which is located in the engine compartment.
If you did not find one of your non-working functions above, it means that you need to look for a blown fuse in the second fuse box, which is located inside the Daewoo Matiz car. The fuse box is located under the dashboard. There you will be able to find 14 fuses, all of which protect specific vehicle systems. The rated current of the most powerful fuse in this block is 25A (activation of an emergency light signal), the weakest one is 10A, respectively.
Among the systems that protect the fuses in this block, it is worth highlighting the instrument panel, SDM, starter motor, clock, interior lighting, windshield wipers, audio system, power mirrors and door locks, brake light, cigarette lighter, and so on. You can find a diagram and description of the table for decoding the fuses that protect the above systems below.
| Fuse designation | Current, A | Source | Protected Circuits |
| Fuses located in the fuse and relay box inside the vehicle | |||
| F1 | 10 | Ignition 1 | Instrument panel, clock |
| F2 | 10 | Ignition 1 | SDM |
| F3 | 25 | Ignition 1 | Hazard light switch |
| F4 | 10 | Ignition 1 | Turn signal lamps |
| F5 | 15 | Accumulator battery | Stop signal |
| F6 | 10 | ACC ignition | Audio system |
| F7 | 20 | ACC ignition | Cigarette lighter |
| F8 | 15 | Ignition 2 | Wiper |
| F9 | 15 | Ignition 2 | Rear wiper motor, front and rear windshield washers, reversing light |
| F10 | 10 | Ignition 2 | Electric exterior mirrors |
| F11 | 10 | Ef2 | Audio system, interior lighting |
| F12 | 15 | Ef2 | Hazard light, clock |
| F13 | 20 | Ef2 | Electric door locks |
| F14 | 20 | Starter | Starter motor |
Right now you have learned not only about the location of fuses in a Daewoo Matiz car, but also about the rules and nuances of directly replacing them. The main thing that each of you should have remembered today is that under no circumstances should you use jumpers instead of the intended fuse - this can lead to rather sad consequences (including burning out the wiring in the car). Therefore, take the solution to this problem seriously. If you do everything correctly, the car systems will function again as before.
Relay unit in the cabin
Also in the block on the Daewoo Matiz there are separate sockets for connecting additional fuses and relays. The latter provide work:
- front windshield wiper;
- turn signals;
- alarm;
- rear fog lamp.
Problems with the relay are determined “by ear”. If, after turning on the indicated components, clicks do not occur in the block under the dashboard of the Daewoo Matiz, then the fault lies precisely in these parts.
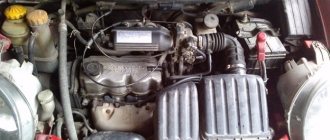
Block under the hood
The second unit on the Daewoo Matiz is located under the hood on the left next to the battery. This arrangement simplifies repair work caused by failure of protection elements.
Description of fuses
1 (50 A) - ABS.
2 (40 A) - constant power supply to devices when the ignition is turned off.
3 (10 A) - fuel pump . If the fuel pump does not work when you turn on the ignition (you cannot hear the sound of its operation), check relay E, this fuse and the voltage on it. If there is voltage at the fuse, get to the fuel pump and check if voltage is supplied to it when the ignition is turned on. If it does, you most likely need to replace the fuel pump with a new one. When installing a new one, also change the pump module filter. If there is no voltage to the pump, most likely the problem is in the wiring or the fuel pump circuit breaker (for example, in an installed alarm system). The wires could be frayed under the seats, in the harnesses, or there might be poor contact at the joints/twists.
This is interesting: How to make a rear shelf on a Daewoo Matiz with your own hands?
4 (10 A) - ECU power supply, fuel pump relay winding, ABS unit, generator winding at start, terminal B from ignition coils, speed sensor.
5 (10 A) - reserve.
6 (20 A) - stove fan . If the stove stops working, check this fuse, its fan motor by applying 12 V voltage to it, as well as the handle and cable of its drive going to the heater tap. If the heater blows cold, this cable could fly off; it is located on the driver's side near the center console under the dashboard. If the heater speeds are not adjustable, also check relay C under the hood. It could also be an air lock.
To remove air from the system, drive up a hill with your front end up, open the expansion tank cap and release the gas. On a hot engine, be careful when opening the reservoir cap. It could also be a problem with the heater core or clogged air intake pipes.
7 (15 A) - heated rear window.
If the heating stops working, check the fuse, as well as the contacts in its socket. If there is poor contact, you can bend the terminals. In many models, due to the lack of a relay in the rear window heating circuit, the power button receives a large current load, so it often fails. Check its contacts and if it no longer locks in the pressed position, replace it with a new button. You can get to it by removing the dashboard trim or pulling out the radio. It is best to install a relay, thereby relieving the load on the button. In some models, a relay C under the hood is installed on this button, check it.
Also check the threads of the heating elements for breaks; broken threads can be sealed with a special glue containing metals. It could also be the terminals at the edges of the glass, a poor grounding connection, or the wiring from the rear window to the button.
8 (10 A) - right headlight, high beam . 9 (10 A) - left headlight, high beam . If your high beams stop lighting when you turn on this mode, check these fuses, fuse F18, the contacts in their sockets, the lamps in the headlights themselves (one or two could have burned out at once), relay H in the engine compartment and its contacts, the steering column switch and its contacts. Often the contact in the switch connector is lost, disconnect it and check the condition of the contacts, clean and bend if necessary. Also check the wires coming from the headlights for breaks, short circuits and insulation damage. The negative on relay contact H may also disappear due to oxidation or burnout of the track in the mounting block.
To replace the lamp in the headlight, disconnect its connector with wires, remove the rubber cover (boot) from the side of the engine compartment, squeeze the “antennae” of the lamp clamp and remove it. When installing a new lamp, do not touch its glass part with your hands, as Hand marks will darken when turned on. The lamps in the headlights are double-filament, one lamp for low and high beams; for the dimensions, separate smaller lamps are installed in the headlights.
F10 (10 A) - right headlight, low beam . F11 (10 A) - left headlight, low beam . Same as high beam, except F18.
12 (10 A) - right side, clearance lamps.
13 (10 A) - left side, clearance lamps, license plate lighting lamps . If your side light goes out, check these fuses and relays I and their contacts. Check the serviceability of the headlight lamps, connector contacts and wiring.
This is interesting: Signs and symptoms of a blown cylinder head gasket
14 (10 A) — air conditioning compressor clutch (if equipped) . If your air conditioner does not work and the clutch does not move when you turn it on, check this fuse and relay J, as well as the power button and its contacts, and wiring. The movement of the operating clutch should be audible through a characteristic sound when the air conditioner is turned on. If the clutch works but cold air does not flow, the system most likely needs to be charged with freon.
Do not forget that in winter it is necessary to periodically turn on the air conditioner in a warm place - a box or a car wash, so that the seals are lubricated and remain in good condition after winter.
15 (30 A) - electric radiator cooling fan . If your radiator fan stops turning on, check relays A, B, G, this fuse and their contacts. The fan is connected through a thermal switch, which is installed on the radiator; 2 wires are connected to it. Take them out and short them together; when the ignition is on, the fan should start working. If it operates in this position, most likely the thermal switch is faulty; replace it.
If the fan does not work, it is either the wiring or a faulty fan motor. The motor can be checked by applying voltage from the battery directly to it. Also check the coolant level, temperature sensor and thermostat.
16 (10 A) - reserve.
17 (10 A) - sound signal . If there is no sound when you press the signal button on the steering wheel, check this fuse and relay F and their contacts. The signal is located in the left fender, on the driver's side, to access it you need to remove the left fender liner, the signal is located behind the fog lamp. You may have to remove the left front wheel for convenience. Check the wires that go to it, if there is voltage on them, most likely the signal itself is faulty, disassemble or replace it. If there is no voltage, the problem is in the wiring, steering contacts or ignition switch.
18 (20 A) - power supply to the head light relay, high beam switch . If you have problems with high beam, see information about F8, F9.
19 (15 A) - constant power supply to the ECU, winding of the air conditioning compressor clutch relay, winding of the main relay, windings of two radiator fan relays, camshaft position and oxygen concentration sensors, exhaust gas recirculation and canister valves, injectors, power supply to the fuel pump relay . If there are problems with the listed devices, also check the main relay B.
20 (15 A) - fog lights . If your fog lights stop working, check relay D under the hood, this fuse and their contacts, as well as the headlight lamps themselves, their connectors, wiring and the power button.
21 (15 A) - reserve.
Relay unit under the hood
Under the hood there are relays connected to:
- radiator cooling system elements;
- fuel pump;
- fog and head lights;
- lamps on the dashboard and direction indicators;
- air conditioning compressor clutch.
It is recommended to check the exact layout of the relays and fuses in the blocks in the instructions that come with the Daewoo Matiz.
Where are the fuses and block located on the Daewoo Matiz?
The Daewoo Matiz fuse and relay box is scattered in two places.
Relay and fuse box under the hood
It is located next to the battery and is covered with a lid.
Fuse box in the passenger compartment
Closed with a lid. To open, you need to squeeze the latches in the directions indicated by the arrows.
Replacing fuses on Deo Matiz
Always replace the fuse with another fuse of the same capacity. Each fuse is marked with its rated current. Do not replace a fuse more than once without determining the cause of its blown. If the fuse is blown, it means that the conductor connecting the fuse contacts is broken. Install a new fuse rated for the same amperage. The amount of current protected is indicated on the back of each fuse. If the installed fuse has blown again, check the electrical circuit protected by the fuse. Do not replace the fuse with a jumper wire as this may seriously damage the vehicle's electrical circuit. The circuits protected by fuses are shown in the table below.
Sources
- https://mirkeicar.ru/obslug/predohraniteli-deu-matiz
- https://matiz-club.com/1751-tablicy-rasshifrovok-predohraniteley-daewoo-matiz.html
- https://automend.ru/daewoo-matiz/daewoo-37045-10.m_id-4919.html
- https://vsepredohraniteli.ru/daewoo/matiz.html
- https://remocars.ru/daewooman/matiz/elektrika/blok-predohraniteley-deu-matiz.html
[collapse]
Fuse and relay diagram of Daewoo Matiz in the cabin
Relay
| Relay number | Relay purpose |
| K1 | Turn signal and hazard warning relay |
| K2 | Windshield wiper |
| short circuit | Turning on the rear fog light |
Circuit breakers
| Fuse number | Fuse color | Protected target | Current strength, A |
| 1 | Red | Cigarette lighter | 10 |
| 2 | Red | Radio tape recorder | 10 |
| 3 | Beige Red | Brake lights | 15 |
| 4 | Red | Direction indicators | 10 |
| 5 | Blue | Electric windows | 25 |
| 6 | Red | Airbags | 10 |
| 7 | Yellow | Instrument cluster, clock, burglar alarm | 10 |
| 8 | Red | Reserve | 10 |
| 9 | Blue | Reserve | 15 |
| 10 | Yellow | Reserve | 20 |
| 11 | Blue | Windshield wiper | 15 |
| 12 | Blue | Tailgate glass cleaner, windshield and tailgate glass washers, reverse lamp | 15 |
| 13 | Red | Electric exterior mirrors | 10 |
| 14 | Red | Radio, interior and trunk lamps, open door warning lamp, immobilizer | 10 |
| 15 | Blue | Alarm | 15 |
| 16 | Yellow | Electric door lock drives | 20 |
| 17 | Yellow | Starter traction relay | 20 |
The cigarette lighter fuse for the Daewoo Matiz is designated number 1.
Replacement step by step instructions
The power supply system on the Daewoo Matiz, like most cars, has a combined layout - there are 2 blocks with fuses located in the cabin and engine compartment.
To replace faulty elements, you will need no more than 15 minutes of free time, as well as the presence of a flat-blade screwdriver and tweezers - the whole process is performed as follows:
- First you need to disconnect all terminals on the car battery;
- Next, we find a fuse block in the engine compartment - it will be located on the right side of the power unit. Using the thin tip of a slotted screwdriver, unclip the plastic pistons and remove the cover from the fuse box;
- Then we look for the faulty element and, using ordinary tweezers or a specialized puller, remove the blown fuse;
- Fuses are installed by lightly pressing the part onto the socket until a characteristic click is heard. If there is carbon deposits or traces of oxidation on the landing cell, it would be a good idea to eliminate the defects with a coarse brush;
- If, when inspecting the engine compartment fuse box, no faulty elements were found, we move on to the interior. Inside the car, the unit is located in the area of the driver’s left foot - to dismantle it you will have to remove the protective plug;
- After searching and replacing faulty components, we connect the battery back and test all the functions of the car with the engine running.
However, if the fuses in the car regularly blow out, you need to go to a service station for diagnostics - it is quite possible that the generator in the car has unstable operation or there is a breakdown or weak contact in the electrical circuit.
Remember, you shouldn’t skimp on fuses - the safety and service life of your car directly depends on their performance!
