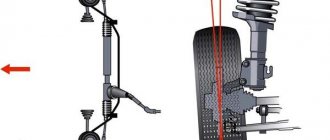
What is camber, toe and castor
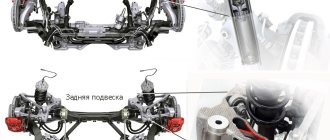
Despite the fact that the operation is called “wheel alignment,” there is another parameter that greatly affects the controllability of the car. What do these names mean? Camber is the deviation of wheels in a vertical plane. Toe is the deviation in the steering angle of the wheels. Castor - the inclination of the shock absorber strut.
If the camber is done correctly, the contact patch of the wheels with the road is maximum, which provides the best traction and control while driving. If the camber is incorrect, the contact patch of the wheels is reduced, grip and controllability deteriorate, and tire wear also increases. Correct wheel alignment ensures a minimum level of lateral loads while driving, which increases vehicle controllability, reduces driving resistance, and also increases tire life. The correct castor ensures optimal distribution of dynamic loads, making the car more controllable.
What is needed to adjust the wheel alignment
To make your own wheel alignment or camber you will need:
- suspension diagnostics, repair if necessary;
- a special stand, pit tracks, an inspection hole or just a flat area;
- a device for measuring camber and toe angles. If you don't have it, you will need:
- ruler;
- long rail;
- rope;
- masking tape;
- several wooden blocks;
- calipers;
- a set of keys;
- adjusting washers;
- WD-40 liquid;
- jack;
- car repair manual.
How to understand that adjustment is needed and why it is important
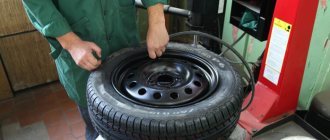
This procedure should be performed twice a year when replacing tires seasonally. Modern cars are most often serviced in specialized car repair shops. Specialized stands and computers are used here. This procedure can be carried out on your own.
First, it is important to learn to recognize the need for such adjustments. In this case, you should focus on the following signs:
- uneven tire wear;
- constant pulling of the car to the side during straight-line movement;
- difficulty driving a car;
- uneven wear of the edges of the front wheel groove.
If at least one of the listed signs is present, then you need to immediately take adequate measures to solve the problem.
What operations can you do yourself?
The only operation that cannot be done correctly on your own is fine adjustment of the castor. If the accident has not changed the geometry of the body, then symptomatic adjustment of the castor can be done. When the car does not listen well to the steering wheel, turns unsteadily and with a delay, you just need to increase the caster for 20–40 minutes. If, during sharp acceleration, the steering wheel begins to be pulled out of your hands, the castor needs to be reduced. It must be remembered that an increase in castor leads to an increase in wheel camber. You can also adjust the wheel alignment yourself. If the body is damaged as a result of an accident, which led to a violation of its geometry, then any adjustment of the suspension is pointless. You will spend a lot of time, and the result will be extremely doubtful. Therefore, after even a minor accident, be sure to check the body geometry on a special stand.
How I got to a private owner
I spent all the holidays with my parents in my hometown. The city itself is small and everyone knows each other. So, my father and I started talking about the angle of the wheels. He told me that not far from them lives a master who does wheel alignment himself. It would seem that there is nothing surprising, it works and it does work. But only, he assembled the entire installation himself. Do it yourself, so to speak.
Well, I decided to visit his “car repair shop”. As I understand it, he has been working for more than 10 years. And during this time, not a single client left him dissatisfied. It’s just unknown how he found a free minute for me.
I drove into the pit and the first thing the mechanic did was check the tire pressure and install special clamps. What surprised me most was the Chinese lasers. They are the ones installed on these same clamps. The beam of light from them is not the most accurate. Therefore, to level the plane of rotation of the wheel, the master installed adjusting washers on the mechanisms. And the guideline for him was the marked strip on the rear wheel.
How to adjust caster, camber and toe
First of all, you need to check the condition of all suspension parts. If anything is suspicious, carry out repairs. Without this, all suspension adjustments, including camber or toe-in yourself, are meaningless. A special stand and pit tracks are best suited for adjustment. The problem is that pit tracks cost from 70 thousand rubles, and the stand is even more expensive. However, pit tracks differ from an inspection pit or a flat concrete platform only in greater comfort of work, but do not affect the adjustments in any way.
- Roll the car onto a stand, pit tracks or a flat concrete area, and press firmly on the body several times in the area of all wheels. Then position the steering wheel so that the front wheels point straight ahead.
- Adjustment of the castor on the MacPherson suspension is carried out by rearranging the washers installed on the brace. This adjustment is performed differently on other types of suspension, so read your vehicle's repair manual carefully.
Remember, this is an approximate setting, so there is always a chance that the car's handling will deteriorate in some modes.
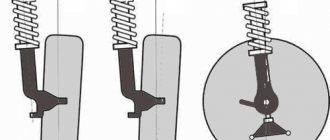
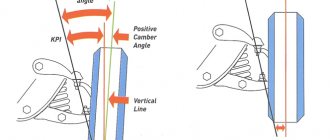
Camber
- To adjust the camber, tape a string to the fender so that it passes through the center of the wheel but does not touch the rubber.
- Hang a weight (a pair of 14–24 nuts) to the rope.
- Using a caliper, measure the distance to the rope at the top and bottom of the rim. If the distance to the rope is greater at the top than at the bottom, this is positive camber. The optimal camber value is written in the car maintenance and repair instructions and may differ for different cars.
Convergence
The method of toe adjustment depends on the type of suspension. On the MacPherson suspension, a bolt with an eccentric is used for this, connecting the steering knuckle and the shock absorber. Camber adjustment on other types of suspension is done using special washers. This operation is described in more detail in the car repair manual.
If you do not have a laser stand or a device for adjusting camber, then using masking tape, vertically attach two identical beams 20–50 mm thick to the front wheel disk and place a stool or some kind of support at the level of the wheel bearing. Place a long, even strip on the support and press it against the bars. Measure the distance from the rack to the near edge of the rear wheel rim and subtract from the resulting value the thickness of the block and half the difference between the width of the rear and front tracks. If the result is different from zero, make an adjustment.
This operation is described in more detail in the repair instructions for your machine. If you cannot find a strip, a ruler at least 1 meter long will do, to which you need to attach a thin rope using masking tape.
Option using a tight rope
The ruler should lie on the stand and fit snugly against the bars. Pull the rope and watch carefully that its direction completely coincides with the ruler. If you look along the rope, it is easy to notice a deviation of even 2–3 mm. With the string taut, measure the distance to the nearest edge of the rear wheel rim and carry out the same calculations as described above. But, this procedure is less accurate than using a slate.
DIY adjustment
Carrying out wheel alignment with your own hands is not easy. Not because alignment is very difficult to do, but because it requires purchasing an expensive tool. If you decide to carry out adjustment work on your own, then be prepared for some costs.
I would like to note that it is recommended to perform a wheel alignment after every twenty thousand kilometers.
Therefore, it is much more profitable to buy a tool and do everything yourself. From the tool you will need:
- Camber meter (digital). It is the most convenient and takes measurements quite quickly.
- Toe regulator. It measures the level of toe-in and uses it to select the required angle.
- A set of keys.
Considering all the above information, you can perform the wheel alignment yourself. So how is it done?
- The first thing you need to do is make sure that the set of necessary tools, without which it is not possible to complete this process, is ready.
- Before starting the main work, it is necessary to complete a number of mandatory activities. You need to measure the old location of each wheel. This must be done in order to put everything back as it was if your adjustment suddenly fails. Each wheel must be measured, and the data obtained must be written down on a piece of paper. You also need to check, or better yet, double-check the alignment that will appear after the new changes. This is important, since when the camber changes, the toe-in will also change, and this also happens in the opposite case. You need to make sure that all the wheel nuts are tightened. You should also check the wheels for the number of atmospheres in them. If you notice that identity is not respected, then take all measures to change this situation. The difference between the wheels can have a maximum of 0.5 atmospheres. After the preparatory work, you can do the alignment and camber yourself.
- Do-it-yourself collapse. You need to jack up the vehicle and check the suspension geometry. You need to carefully inspect the suspension to identify any mechanical damage (wear, cracks). You don’t have to do this, but if you already have the opportunity to look under the car, why not look at other elements. If no defects are found, then you can continue further, and if there are any, you should immediately replace the damaged parts with new ones.
Elements such as a lock nut and an eccentric bolt secure the car's suspension arms. To adjust the camber angle, you need to loosen the nut a little in order to freely rotate the eccentric. By rotating it, you can change the angle, and you will also notice how the suspension rotates. Now you need to get a piece of paper with records of your old readings to determine how much you need to set the new position. Next, tighten the loosened nuts and remove the car from the jack. Roll it back a few meters and then return it to its original position. After this, re-measure the camber. If you achieve the required optimal performance the first time, great. If not, try again. This way you need to adjust each wheel.
- Do-it-yourself alignment. Place the car on the jack again and loosen the steering linkage locknuts you already know. Toe adjustment is adjusted by rotating the steering rod. So, by rotating the rod, we change its length. It's important to remember that your specification is only one inch of toe-in, which means you can only move the rods half an inch on each side. After this, tighten all loose fasteners and remove the car from the jack. After this, you also need to roll the vehicle back a few meters and then return it to its place. Now you need to measure new changes to make sure everything is done correctly. If everything is as expected, you need to complete the execution - thoroughly tighten the nut and eccentric. This completes the adjustment. After this, you can move to the second side of the car - to the other wheels. If the result is unsatisfactory, well, let's repeat everything, starting with the camber, checking each wheel.
Doing a wheel alignment yourself means doing something that only service technicians do. If you are happy with your work and the new parameters meet the requirements of the car, then you have really done an excellent job with this task.
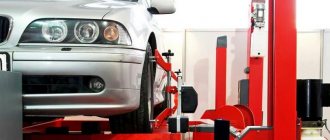
Car diagnostics and repair: wheel camber adjustment
Need a master?
The car is parked on a level area or driven into a garage with an inspection hole. For diagnostics, you will need regular chalk, a standard set of tools for your brand of car.
All wheels of the car are aligned directly in the direction of travel. Marks are drawn with chalk, starting from the diameter of the wheel. Next, measure the distance from the rim to the rope or cord.
The standard difference in measurements should be no more than 3 mm. After the first measurements, the car is driven out, the wheels are turned and the measurements are repeated again.
Then each wheel is removed and the mounting bolts are loosened. Adjust the angle until it meets the standard.
Telescopic sliding ruler PSK-LG for checking wheel alignment
Front or rear wheel alignment measurements should be checked or adjusted on a mechanical or optical plane because the measuring device has some impact on the wheel rims and tire sidewalls. To properly adjust and install the wheels, you must follow the instructions, and those car enthusiasts who prefer to service their cars individually should use a telescopic ruler.
The design of a telescopic ruler is that its movable end with a stop is extended to a certain level. The required length is determined depending on the track of the front wheel axle of the car, after which it should be fixed with a clamp. Chains are attached to the ends of the telescopic ruler, which are designed to allow the ruler to be installed between the wheels at the same distance from the floor surface.
Telescopic ruler for convergence of corners
The principle of operation of the telescopic device is based on the fact that the distance between the wheels of the car is measured using a rod, which is located inside the stationary cylinder of the tube. This tube is connected to the movable end and is also connected to the drum indicator and stop. The process of moving the rack is carried out using a gear along a drum indicator, the movement of which is measured within 20-25 mm.
Note!
Considering the standard measuring range and the procedure for extending the movable rings, it is strictly prohibited for the zero position of the drum device scale to exceed 7 mm.
Wheel alignment stand (wheel alignment)_Hunter - WA330VM/20LE-421LZ5M
Hunter has developed the HTA-MB-R wheel alignment system specifically to meet the stringent requirements of Mercedes-Benz workshops and provide accurate wheel alignment on all passenger cars and light trucks. Specially developed Hunter WinAlign® software meets the specifications of all Mercedes-Benz models.
The development allows us to significantly simplify and speed up the process of adjusting wheel alignment angles. The HAWKEYE stand is like no other. In HAWKEYE sensors, four cameras continuously photograph projections of geometric shapes on targets mounted on wheels. Four cameras (two in each corner) mounted on the crossbar of the frame structure are surrounded by an array of LEDs that act as a photo flash. The LEDs flash at a frequency of about 8 times per second. Cameras, using the digital processor to which they are connected, are able to determine all the parameters from the photographed projection of the figure.
Advantages:
- 3D measurement technology – ensures quick execution of work operations (due to the absence of the need to hang the car wheels during the compensation procedure)
- Reflective targets:
- Designed specifically for use with high-precision HawkEye™ sensors, providing a larger viewing angle, both horizontally and vertically
- Compact and lightweight targets are very easy to handle
- They have increased corrosion resistance, have an unbreakable front panel, impact-resistant housing, and a protective rubber contour
- No electronic circuits that could be damaged if dropped! Targets do not require calibration and therefore require virtually no maintenance
- Wheel Adapters - Exclusive features of self-aligning wheel adapters provide even greater versatility, extra strength and ease of use.
- HawkEye™ High Resolution Sensors:
- Provide quick “capture” of targets to achieve high speed characteristics thanks to the use of multi-D technology
- Use 3D modeling technology to ensure high accuracy of measurement results
- Four high-definition video cameras instantly update information on the monitor
- Reduce the size of the work station to perform measurements
- Four video cameras provide a wide camera angle, unlike analogues with two cameras
- Impact-resistant aluminum reflective targets have an unlimited service life
- Wireless stand without batteries
- USB printer support
- Hunter's WinAlign® software includes new procedures necessary for proper wheel alignment on all MB models.
- MB homologation - in the dealer version of the HTA-MB stand
- 12 month warranty
Stand equipment:
- Mobile stand in dark color HUNTER
- WinAlign® VAS6292 Software
- LCD monitor 26″
- Color inkjet printer
- Keyboard and optical mouse
- HUNTER HAWKEYE measuring system
- Central column with movable traverse
- Wheel adapters MB
- 4 brackets for storing sensors on a rack
- Brake pedal depressor
- Steering wheel holder
- Operating instructions in Russian
Ruler for wheel alignment of trucks
The design of the PSK-LG device is of average complexity. The elements that make up the device include the following:
Wheel alignment ruler
- measuring tip and tube;
- reference scale and housing;
- retractable rod and screw;
- movable sleeve, extension;
- plug and rod.
Inside the main cylinder there is a retractable rod on which a movable sleeve is securely attached. To fix the rod in a certain position relative to the sleeve, there is a locking bolt inside the cylinder and tube.
The manufacturer must place an index barcode on the sleeve.
It is worth noting that springs are built into the sleeve with the rod so that it moves along the scale and body. Also, an extension must be installed in the rod, on which there is a second measuring tip with limiting rods that rotate freely around its axis. In order to adjust the toe-in of truck wheels, the rods must also have plugs.
Note!
To control the convergence process, installing a limit extension between the rods is mandatory.
The principle of operation of the device is that it determines the difference in distances that are measured between points on the wheels of vehicles. These points, in turn, are formed due to the fact that the car rolls over a distance approximately equal to the diameter of the wheel rim. The ruler is represented by a tube with a measuring tip at one end, and with a body with a movable reading scale at the other. This movable scale is fixed with a screw.
The main technical characteristics include the scale division price, which is 1 mm, and the reading range ranges from -10 to +10 mm. The permissible error of the ruler is 0.5 mm, and the weight of the assembled device reaches 1.5 kg. As for the overall dimensions, they are 1930x40x35.
Wheel alignment ruler design
What is the purpose of a truck wheel alignment ruler?
The design, which is used to control the process of toe-in of machine wheels, is designed to regulate and correctly determine the angles. Today there are two modifications of this device, which is popular among many motorists:
- PSK-L line, which is designed to control the toe-in of the front wheels of the vehicle;
- The PSK-LG device is necessary to control the toe-in of wheels of trucks and cars.
You might be interested in this About Forward Safari wheels on Niva and UAZ
Only if the steered wheels are installed in compliance with all rules and requirements will the stability of the machine be increased. Correct alignment also makes the vehicle easier to drive, driving safety will increase several times, wear of spare parts and wheels will be reduced, as will fuel consumption.
Important!
The use of the PSK-LG line is possible only at service stations or in the automotive industry. Today, many experienced motorists have such a device in their garage, because they individually use it to service their vehicles.