Relevance and features
It should be borne in mind that in many cases it is possible to repair minor damage to the windshield only with your own hands. This is explained by the fact that workshops and car services usually do not undertake the repair of single defects of this kind. Instead, they suggest replacing the windshield. Naturally, repairing chips with your own hands is much cheaper.
Chips are small depressions formed on the glass surface as a result of small stones or gravel. That is, they consist of a broken fragment and a depression remaining in its place.
Despite the fact that defects of this type have little effect on visibility, their elimination should be done immediately. This is because they weaken the glass, thus causing cracks to form. They usually appear in several directions around the chip. Cracks are most likely to form in cold conditions. It is much easier to eliminate a chip than to repair cracks.
What additional services does Carglass® offer?
Polishing headlights at Carglass
Polishing car headlights allows you to restore the optical characteristics of the device.
More details
Application of Anti-rain product
Improves visibility of windows during rain.
The drops take the form of balls and easily roll off the glass surface. Reduces glare from headlights of oncoming cars. More details
ADAS Camera Calibration
At Carglass®, our top priority is the safety of our customers while driving on the road.
More details
Preparatory stage
As mentioned, you should start repairing a chip immediately after it appears. If it is impossible to eliminate this defect immediately, measures should be taken to prevent further destruction of the glass. So, first of all, you need to seal the damaged area of the glass surface with tape. This will greatly simplify the repair and allow it to be done more efficiently, preventing water, dust and foreign particles from entering there. Moreover, in the warm season, it is advisable to place paper under the tape in order to prevent glue from getting into the defect.
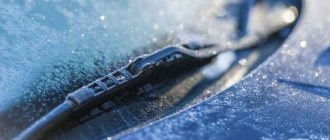
During cold periods, the interior heating should be diverted away from the damaged windshield. In addition, it is recommended to warm up the interior gradually, without immediately turning on the heating at full power. The same applies to cooling the interior during warm periods. That is, you should not direct the air ducts to the damaged glass and immediately turn on the cooling to the maximum level. Before warming up the interior in winter, you need to clear the windows of snow and ice. Windshield wipers also need to be cleared of snow and ice before use.
It is unacceptable to use frozen wipers, and to avoid them freezing to the glass, before long-term parking in winter, these parts should be bent away from it.
Old windshield wipers that make sounds when they rub against the glass need to be replaced. In addition, it is not advisable to wash damaged glass using chemical detergents, since their entry into the crack can also affect the quality of the repair. It is recommended to clean with a soft cloth. Finally, when operating a car with a damaged windshield, you need to take into account that vibrations and shocks can cause the defect to grow, so you should drive carefully.
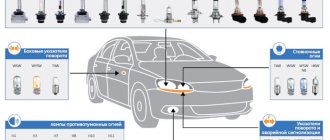
Restoring the transparency of headlight glasses
It is the headlights that suffer the most during vehicle operation. Rain, snow, hail, road dust or asphalt chips flying from under the wheels - sooner or later these factors lead to yellowing of the plastic and the formation of scratches. Restoring headlights is:
✔ COST SAVINGS. You do not need to order headlights, pay for the removal of the old one, and then install a new set.
✔ LOOKS LIKE NEW. The headlights look perfect! It's like you just bought a new car!
✔ LONG-TERM EFFECT. The coating provides reliable additional protection, allowing the headlights to maintain their ideal appearance and functionality for up to 10 years.
We offer an innovative method for restoring headlight glasses in Moscow, which will return your car to its original appearance and functionality, and also provide long-term protection from all negative factors. The headlight restoration method is a set of measures that allows, at affordable prices, to restore and protect headlights after polishing.
Three-step scratch polishing:
1. The deepest scratches are removed first. Then the headlights are thoroughly polished in two stages, after which the surface becomes perfectly smooth and takes on its original, factory appearance. We use advanced equipment and high-quality materials to minimize the thickness of the layer that is removed during polishing. 2. Varnish for restoring headlights. If prolonged or severe aggressive exposure (sandblasting, chemicals, etc.) has caused significant damage, polishing alone may not be enough. We use a restoring varnish, which, penetrating into scratches and microcracks, creates an optical lens, ensuring high-quality transmission of light. In addition, varnish coating forms a new protective layer. In our work we use Standox 2K-HS VOC Platinum Klarlack K9570 varnish - this is a special VOC varnish with a Reflow effect with increased resistance to abrasion, for example, by brushes of automatic car washes. 3. Film for headlights We use Suntek anti-gravel film, which reliably protects headlights after polishing from the aggressive effects of sandblasting and potentially aggressive chemicals that can damage the plastic.
However, even if the damage to the headlights is minor, we recommend using a protective kit “varnish + film” or “headlight polishing + film”. Because preventing further damage is much easier, faster and more profitable than just polishing newly scratched headlights every few months. After all, no matter how gentle the processing, the thickness of the plastic is not infinite. In addition to standard protection kits, we also offer enhanced ones – “polishing of headlight glasses + varnish + film for headlights”. This way you will not only get the safety of your car optics, but also minimize preventive maintenance. Our company’s specialists use only high-quality, professional materials and equipment that are not available in retail sales to restore and polish headlights. This sets the quality of our repairs apart from private repairmen and car repair shops that use cheaper “semi-pro” products. And most importantly, we will help you make the right decision and offer competitive prices.
| Types of jobs | Cost, rub.) |
| — Restoring the transparency of headlight glasses (restoring varnish) | from 3000 |
| — Polishing 2 headlights or 2 lights | from 1000 |
| — Polishing 1 headlight or lantern | from 500 |
Call our specialists by phone: 8-962-993-03-03 and we will restore the transparency of your car’s headlights in a short time and on-site!
Repair principle
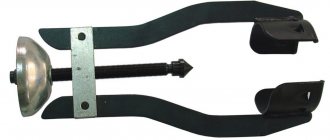
The essence of glass repair is to repair the damage. At the same time, defects are made less noticeable and the strength of the glass is restored. Repairing chips involves filling the indentation with a special substance. An injector is used for work. The specialized substance used to fill chips is a polymer characterized by the same optical properties, including the refractive index of light, as glass. It reliably adheres to the internal cavities of the chip as a result of hardening under the influence of ultraviolet rays.
After this, the glass is polished and it takes on its original appearance. As a result of such repairs, the strength of the material is restored by 87-97%. However, it must be taken into account that only minor defects can be repaired using this technology.
Why is it necessary to troubleshoot?
Water in the optics unit is extremely undesirable and even dangerous. Here are just a few consequences:
- rapid wear of reflectors;
- frequent failure of light bulbs and diodes;
- there is a high probability of moisture getting on the wires, which leads to their oxidation and may result in a short circuit.
A beam of light passing through glass clouded by condensation turns out to be dimmer and more diffuse. Water droplets become an additional lens that changes the direction of light. Visibility is greatly impaired, which is very dangerous when driving in the dark or in poor visibility. For this reason, the car may be refused registration with the traffic police.
Article on the topic: 2009-mercedes-benz-sl-class-interior-top
Headlights or taillights that regularly accumulate water will not last long because they operate in very unfavorable conditions . If the reflective coating is damaged, the scratches will begin to oxidize and the reflective film will bubble, which can no longer be eliminated. The entire optics unit will need to be replaced, which is not cheap. Also, water getting on hot light bulbs shortens their service life. Lamps and diodes burn out more often and also require replacement. Connectors oxidized due to moisture damage the entire headlight. Often, water-damaged wires cause a short circuit, which has serious consequences and can even cause a fire. Therefore, fogging of the headlight from the inside, especially regular and severe, cannot be ignored, but should be eliminated as quickly as possible.
Equipment
To carry out the repairs in question, professional kits are usually used, including the following tools and materials:
- ultraviolet lamp;
- a brush with hard bristles;
- translucent plates or film;
- mirror;
- scrubber;
- interior cleaning brush;
- spare blades for glass cleaning;
- vacuum pump and connecting hose with a nozzle for it;
- assembly platform with injector;
- drill;
- cleaner;
- lubricant;
- polymers of medium and low fluidity.
It should be taken into account that the composition of the components of different sets differs. It is possible to purchase these materials and tools separately, but this is much more difficult than getting it all in a set.
Result
As a result, you will be able to get a good effect that can be compared to polishing. Liquid glass will fill the slightest damage and return the headlights to their former shine. And most importantly, to get this result you don’t need to remove the top layer of plastic.
Liquid glass will remain in the bottle; it will be enough to treat the car body in several layers. Thanks to this simple procedure, your entire car will look like new!
So, now you know how to restore your car's headlights yourself.
How to eliminate foggy headlights?
In the event of a factory defect, when the joints and gaps are not even, the headlight can be replaced under warranty, having first obtained a conclusion from an authorized dealer about the faulty unit. In other cases, troubleshooting will require different repair methods.
You can quickly remove condensation from the inner surface of the glass by simply turning on the low and high beams: the air will quickly heat up and the water will evaporate. But the moisture itself will not go anywhere, but will remain inside.
Universal recipe
The easiest way to eliminate water is to dry the inside of the headlight. This is effective when there is a small accumulation of moisture that has entered through a check valve or microcracks. Drying can be done without removing the blocks or removing it, completely disassembling it, drying it thoroughly and reassembling it.
In the first case, hot air is supplied through the holes for replacing light bulbs, creating additional ventilation of the interior of the headlight. It is most convenient to use a household hair dryer or vacuum cleaner for this. If it is not possible to use an electrical device, then in hot, dry weather, open the hood, open all the holes in the headlight housing and turn on the headlights. Free access of air and good ventilation due to the temperature difference will remove condensation in a few hours. The main thing is to avoid rain or dew.
Complete drying with removal of the optics unit is more effective, but takes more time and effort. This method is good when a large amount of liquid accumulates. To completely remove water from the headlight you need to:
- Remove the headlight or tail light from the car.
- Take out the light bulbs.
- Bring to a warm, dry place to dry.
- If the unit is not removable, then place it entirely on a heat source (battery) and leave it for 8-10 hours, preferably overnight. You can also use an electric oven, but the temperature should not exceed 60-80 degrees, otherwise the plastic case may become deformed.
- If the headlight has removable glass, carefully remove the glass and wipe it with a dry cloth. Dry the non-removable part on the radiator, see point 3. Once drying is complete, reassemble the headlight. The reflector must not be wiped! Remove dirt and dust from it only with a jet of air under pressure.
- If the glass is glued, then carefully cut it out of the factory sealant, remove it, and wipe it. Dry the non-removable part. When installing glass, clean the surface of the case from residual sealant, degrease, apply a special sealing compound for glass (transparent or white), and glue the glass. Remove excess sealant and leave until completely dry (12 hours, unless the manufacturer specifies another time). Install the headlight on the car.
Article on the topic: Adjusting valves in a car: just the important things
Checking the tightness of seams
You can check the tightness of the headlight or rear light at a car service using a compression tester. You can independently verify the tightness of the block by removing the part and carefully immersing it in a container of water. Lower the glass downwards, slowly, preventing water from entering the holes on the back of the case. If after several minutes of immersion there is no water inside, then the glass fits tightly to the body and there are no cracks in it. If water gets in, the optics unit will have to be completely dried or replaced.
Repairing cracks in headlights
If small cracks appear in the glass or headlight housing, they can be removed in several ways.
- Cracked glass is repaired using a special flowing sealant, which is applied to a previously prepared, grease-free surface and allowed to dry completely. If the glass is removable or glued in, then it is better to replace it;
- the damaged housing is also repaired using leaking sealant;
- If the case is plastic, then significant cracks can be carefully soldered and filled with sealant.
Large cracks in the unit body cannot be eliminated; the unit must be replaced.
Sealing the internal space
You can prevent water from getting inside the headlight by sealing the interior. To do this, remove the part and apply sealant to all seams and joints. If the block is not removable, then the sealant is applied only from the outside. For removable glass, it is better to treat both the inside and the outside by disassembling the unit and first removing the light bulbs.
Important! Each removal of the optics is a reason to check the condition of the reflector. If the film becomes cloudy or damaged, it must be restored or the entire unit replaced.