Design
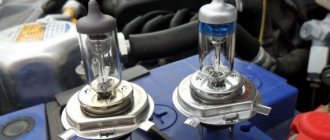
The headlight consists of a light source, a reflector (reflector), corrugated glass (light diffuser) and a housing with a holder (mount). The light source (incandescent, LED, metal halide, xenon, halogen) usually has adjustable/switchable power. In incandescent lamps this is usually the presence of two filaments: high beam
gives a high-power filament (or simultaneous activation of both), located at the focus of the reflector,
low beam
gives a low-power filament, usually shifted forward from the focus of the reflector (for example, a double-filament H4 lamp).
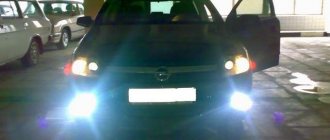
Almost any vehicle is equipped with headlights (in the case of two headlights, they should be located symmetrically to the longitudinal axis of the vehicle). Many cars have fog lights. Special vehicles have searchlights that can be rotated in different directions (spotlight). On tractors and other work vehicles, headlights are also installed at the rear to allow visibility of trailed machines and implements.
Headlights using . The big advantage of LEDs is their ultra-low power consumption and very long service life, ranging from 30,000 to 100,000 hours. For example, a regular car halogen lamp has a lifespan of 2000 hours.
Serial vehicles on which the automaker installs LED headlights:
- Lexus LS600h
- Lexus RX 450h
- Toyota Prius from 2010
- Cadillac Escalade Platinum
- Audi R8
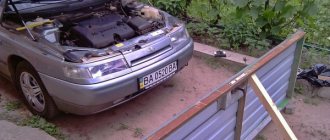
Ready-made PTF kits
Today you can find 2 types of foglights on sale, in which the light spot is formed:
- Due to scratches on the glass (classic headlight with reflector);
- Due to the lens (so-called lensed).
A complete set of lensed headlights - wiring, relays and PTF with an adjustment system and plugs.
Which of them to choose depends not only on your desire, but also on the configuration of the set.
In particular, to install PTF you will need:
- Full compliance of the kit with your car model (in this case, VAZ 2110);
- The adjustment system is easy to use (meaning, without removing the bumper or partially disassembling the headlight itself);
- Visual instructions on how to connect fog lights on a VAZ 2110.
Each “correct” kit contains a wiring diagram for VAZ 2110 fog lights
The famous “Kirzhachi” are produced at the Avtosvet Plant.
So, we found out that cars of the 2110 family may differ in the way they install PTF due to the technical features of the instrument panel and front bumper.
Everything else (installation of headlights and their integration into the electrical circuit) will not create problems, because:
- The automaker has prepared the vehicle as much as possible for the installation of PTF;
- Independent work will take only 1.5-2 hours of pure time.
Automotive
Lighting in cars is a set of lighting devices on vehicles used to illuminate the area around the vehicle and to indicate the vehicle for other road users. Lighting equipment includes headlights, sidelights, spotlights, side lights, brake lights, daytime running lights, direction indicators, reversing lamps, fog lights and lamps, as well as license plate lamps.
- Headlights and sidelights on a VAZ-2106 car, operating in low beam mode
- Turn signal repeater on a VAZ-2106 car
- Rear block light on a VAZ-2106, operating in side light mode
Question about glass color for fog lights
On old cars, the glass of the fog lights was yellow, so many people think that it should be like this now, it is more correct and more efficient.
In reality, everything is different. Today, auto industry leaders use exclusively clear glass for fog lights, which are superior to yellow ones in many components.
The current fog lights on the VAZ 2110 are available in two versions - transparent and corrugated. Most people choose transparent glass, although in fact, corrugated glass is better. They provide a clear directional beam that can show its best side during fog or rain.
Device
In general, a headlight consists of an emitter, a diffuser, a reflector and a housing.
Emitter
The emitter is the light source in the headlight. There are several types of emitters.
- Incandescent lamp. Traditional emitter. A vacuum is created inside the glass flask, inside which the tungsten filament is heated by electric current to 2000°C. Work 500 – 1000 hours.
- Halogen lamp. The glass flask is filled with a halogen buffer gas - iodine or bromine. Thanks to halogens it works up to 4000 hours.
- HID lamp. In a flask made of molten quartz or aluminum oxide, heated gas (xenon) emits light. Operates up to 25,000 hours.
- Light emitting diodes (LED). They work by filling empty “holes” with electrons in a semiconductor and releasing a photon. Repeated release of photons leads to glow. Energy efficient. Works up to 50,000 hours.
Diffuser
There are two types: with a pattern and a transparent coating.
- Diffuser with a pattern. Optical elements - recesses and notches on the lens, scatter light partially polarized by the reflector to obtain the desired angle of illumination of the road. Made from glass and plastic. The design is outdated and is now used extremely rarely.
- Diffuser with transparent coating. Does not have optical elements. Used for 3 types of headlights: with xenon lamps, with an additional diffuse lens, for free-form headlights. The main function is to protect the lamp from dirt and water. Made from glass or plastic. Plastic has a number of advantages: it is more durable, lighter, and it is easier to make a headlight of any design from plastic.
Reflector
The light source emits unpolarized light, the rays of which do not have one direction, but are emitted in all directions. The reflector collects the rays and directs it towards the road. The inner surface is made of brass, plastic or glass and coated with a reflective layer of silver, chrome or aluminum.
Frame
It contains all the components of the headlight - source, reflector, wires, etc. Installed in the car body. Protects the lamp from overheating, humidity and mechanical damage. Typically made from thermoplastic.
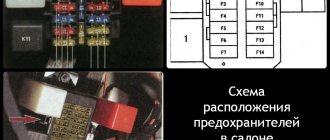
Replacement example
Since all fuses are located in a common block, the replacement principle is the same for all. Therefore, we can consider an example of only one element that needs replacement. Let this be the cigarette lighter. It is designated F6 and F18 (see table).
The first priority before replacing a fuse is to check its functionality. Many people immediately change the element without even considering whether the problem of the unit failure really lies in it.
To check the fuse, you should perform several step-by-step operations:
- Start the car by turning the key in the ignition;
- Make sure that the cigarette lighter is inside its socket, where it should be;
- Wait about 20 seconds;
- Take out the cigarette lighter and check if it is warm. If the temperature remains the same, that is, the element is cold, then the fuse needs to be changed.
How to do it? Pretty easy.
- Get to the panel on which the board with the relays and cigarette lighters is located. The mounting block is located, as you remember, to the left of the steering wheel, at the bottom of the dashboard.
- By pressing the special latches, the cover will move away from its seat. Be careful not to break the latches.
- The mounting block has now opened in front of you.
- If you look at it carefully, you will see special tweezers on the edge. It is provided by the factory in order to carefully remove fuses and insert new elements in their place.
- Remove the affected fuse. In this particular situation, we are talking about the cigarette lighter fuse, so you need an element designated F6 or F18.
- This component burns out due to the fact that modern motorists need additional electrical equipment, such as vacuum cleaners and electric pumps. All this is connected to the fuse and overloads it. Hence the frequent breakdowns.
- Using the same tweezers, insert a new fuse with the same parameters indicated on the mounting block.
If for some reason you don't have tweezers inside your black box, small pliers can serve as an alternative to this tool. Never try to remove the elements with your fingers. The nests are quite fragile, and with your hands you can only loosen it and damage it.
Replacing relays and fuses is a simple and inexpensive repair. But if you damage the block itself, then you will have to spend more, and you will definitely have to work hard.
Are fuses repairable? No. These are fusible elements that simply become deformed when burned. Therefore, repair is possible only in one option - replacing blown fuses.
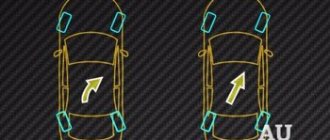
The car is equipped with lighting devices, which are necessary for safe movement on the road and driving in the dark. Turn signals are one of the most important light signals. Serves to indicate when changing lanes, as well as to turn on the hazard warning lights. Quite often the VAZ-2110 fails. This happens for various reasons, which we will discuss in this article.
Car headlight markings
Headlights are installed on cars using the following types of light sources:
- Incandescent lamps: “C” - low beam, “R” - high beam, “CR” - two-mode light (low and high beam).[1]
- The letter H on the headlight is a designation of the lamp category, for example: H1, H3, H4, H4-1, H4-3 H1, H2, H4, H7, H9, H11, H15, HB3, HB4, HB5.
- In the USA, headlights are marked with the abbreviation “DOT” (Department Of Transport/Ministry of Transport), and “European” ones are marked with the letter “E” in a circle with a number - the code of the country where the headlight is approved for use (“E1” - Germany, “E2” - France, etc.). The markings on the headlights “HB” - “1, 2, 3, 4 ...” indicate their compliance with American standards. Headlights with this marking are usually installed on American and some Japanese cars. The peculiarity of these lamps is the unusual design of the base.
“HB1” and “HB2” are double-filament lamps for American cars, “HB3” and “HB4” are single-filament lamps. Single-filament lamps “HB3” provide only high beam, “HB4” - low beam. The markings “HB3” and “HB4” indicate the type of high and low beam, respectively.
Let's pay attention to the markings of the lamps themselves. Lamps with the indexes “D1R” and “D1S” are the first generation of gas-discharge lamps; they are combined with an ignition module.
“R” – for reflex (reflective) optical design, “S” – for spotlight (lens) optics. “D2R” and “D2S” are gas-discharge lamps of the second generation (“R” - for a reflector optical circuit, “S” - for a floodlight).
The lamp markings “HR” and “HS” indicate: “H” – halogen lamp (Halogen), the letters “R” and “S” for reflector and spotlight optical circuits, respectively. Based on this, the marking of Navik headlights is deciphered as: American standard headlights, low beam “HB4” with a first generation gas discharge lamp “D1R” for a reflective optical circuit, high beam “HB3” with a halogen lamp “HR” for a reflective optical circuit.
- Letter D2S, D2R, D1R (xenon)
- But the inscription, or more precisely the Halogen marking, means a halogen lamp
- Halogen incandescent lamps: “C” - low beam, “R” - high beam, “CR” - dual-mode light.[1]
- Gas-discharge lamps: “DC” - low beam, “DR” - high beam, “DCR” - dual-mode light.[2]
Halogen incandescent lamps are marked beginning with "H" and should only be used in headlights designated "HC", "HR" and "HCR". By analogy, gas discharge lamps are marked with a category starting with “D” and should only be used in headlights of the “DC”, “DR” and “DCR” types.[3]
- Double-filament halogen lamp H4.
Approval mark
Headlights installed on American cars are marked with the abbreviation DOT (Department Of Transport, Ministry of Transport).
For European headlamps, where the headlamp lens can be separated from the headlamp housing, the lens itself and the headlamp housing are marked with the letter "E" in a circle with the number of the country that granted the approval and the approval number with additional letters indicating edits to original rules.
Marking with official approval marks “E” or “e” (for wheeled vehicles) is equivalent to marking with a single sign of product circulation on the market of the member states of the Customs Union.[4]
| Approval number | A country |
| 1 | Germany |
| 2 | France |
| 3 | Italy |
| 4 | Netherlands |
| 5 | Sweden |
| 6 | Belgium |
| 7 | Hungary |
| 8 | Czech Republic |
| 9 | Spain |
| 10 | Yugoslavia |
| 11 | United Kingdom |
| 12 | Austria |
| 13 | Luxembourg |
| 14 | Switzerland |
| 15 | not assigned (formerly Ostzone) |
| 16 | Norway |
| 17 | Finland |
| 18 | Denmark |
| 19 | Romania |
| 20 | Poland |
| 21 | Portugal |
| 22 | Russian Federation |
| 23 | Greece |
| 24 | Ireland |
| 25 | Republic of Croatia |
| 26 | Slovenia |
| 27 | Slovakia |
| 28 | Republic of Belarus |
| 29 | Estonia |
| 30 | not assigned |
| 31 | Bosnia and Herzegovina |
| 32 | Latvia |
| 33-36 | not assigned |
| 37 | Türkiye |
| 38-39 | not assigned |
| 40 | Republic of Macedonia |
| 41 | not assigned |
| 42 | European Community |
| 43 | Japan |
The remaining countries are assigned subsequent serial numbers, distributed in the chronological order of their ratification of the Agreement on the Adoption of Uniform Technical Prescriptions. All parties to the agreement are informed of the new numbers by the UN Secretary General.
Location
Since AvtoVAZ engineers tried to do everything so that car owners would not have problems replacing relays and fuses, it would be stupid to come up with a clever arrangement. Therefore, finding them is not difficult.
- The main unit is located to the left of the steering wheel;
- You will find the first additional block in the dashboard inside the niche, directly behind the main mounting block;
- The second additional block is located in the same place, only on the opposite side.
We will get acquainted with each block separately so that you do not have any confusion when searching for one or another fuse.
On injection engines with 16 and 8 valves, the location of the MB is identical, so the instructions are equally relevant for owners of both versions of the dozen.
Main MB
Relays and fuses are located here. Let's look at their descriptions in more detail and separately.
Let's start with the relay.
| Designation | What is he responsible for? |
| Car lamp operation | |
| Electric windshield wipers | |
| Special relay that interrupts the turning lights when the hazard warning lights are activated | |
| Turning on the low beam | |
| Turning on the high beam | |
| Area for installation of additional device | |
| Rear window heating operation |
Each fuse is indicated with a current rating and designation. This allows you to use a new fuse with parameters that meet the requirements of the equipment connected to it.
| Designation | Rated current | What is he responsible for? |
| Lamps for license plate illumination, instrument panel illumination, indicator lights on the instrument panel, left side position lights, luggage compartment illumination | ||
| Low beam left headlight | ||
| Left high beam | ||
| Right front fog lamp | ||
| Electric door windows | ||
| Carrying lamp, cigarette lighter | ||
| Radiator fan, horn (horn) | ||
| Heated rear window | ||
| Windshield wipers and washer | ||
| Backup fuse | ||
| Right dimensions | ||
| Low beams in the right headlight | ||
| High beams in the right headlight | ||
| Left fog lamp | ||
| Heated seats in the cabin | ||
| Hazard signal, turn signals | ||
| Stop signal, ignition switch illumination, interior lighting | ||
| Interior heater, glove compartment light, cigarette lighter | ||
| Reversing light, brake light monitoring | ||
| Rear fog lights |
First additional block
Inside the central panel there is the first of two additional blocks provided for the VAZ 2110. You can find it at the bottom left on the front passenger side.
This block provides three fuses. Each of them has the same power rating - 15A.
- The first fuse is responsible for your vehicle's ignition and controller module.
- The second protects the mass air flow sensor, heating sensor, speed sensor and purge valve.
- The third is necessary to ensure protection of the injectors, as well as the fuel pump. So if problems arise with the fuel pump, the first thing we recommend is to check the condition of the fuse responsible for it.
Plus, the same block includes three relays:
- Relay number 4 is responsible for the electric fan;
- Relay number five is the electric fuel pump;
- The third relay is part of the ignition protection group on your VAZ 2110.
Second additional block
The second additional block should be looked for already in the driver’s feet, on the right. Behind the protective cover on the console you will find the required board.
There are three more components on it. They are responsible for:
- Immobilizer operation;
- Additional optics (mostly fog lights);
- For the operation of the car's central locking control.
Aviation
Headlight PRF-4M in the retracted (flight) position
Lighting equipment of aircraft, airplanes and helicopters, can be divided into internal and external.
Internal
lighting is divided into in-cabin general and local lighting, lighting of passenger compartments and lighting of aircraft compartments. In most cases, in-cab working lighting is provided by shadowless (red-white, blue) lamps with continuously adjustable light intensity. To perform work in the cabin on the ground, emergency lighting is additionally used. In passenger cabins, lighting is divided into general and local, as well as emergency lighting. In the cockpit, the number of lighting bulbs (not counting signal lamps and displays) can reach a thousand or more.
External
lighting equipment is designed to provide the crew with visibility at night during takeoff, landing, and taxiing; illumination of structural elements and symbols of LA in space, to illuminate the parking area; in other cases, in accordance with the design features and purpose of the aircraft.
PRF-4M is a landing and taxi headlight, which is widely used on Soviet-made aircraft as a light source to illuminate the space in front of the aircraft - taxiways and runways, at night and in limited visibility. Also, according to generally accepted international practice, landing and taxi lights are turned on during takeoff and landing under any visibility conditions, including during the day, in order to indicate the aircraft on the take-off run, and on the glide path and descent.
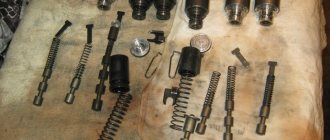
The headlight housing contains a headlamp bulb holder SMF-3 and an exhaust mechanism with a gearbox and a DC electric motor ED-12. After takeoff, the headlight is retracted into the fuselage to reduce aerodynamic drag, and is released upon landing. The angle of the headlight is adjusted in accordance with the manufacturer's instructions for a particular aircraft and is periodically checked and adjusted when performing routine maintenance or when replacing a burnt-out headlight bulb. Some aircraft have a system for automatically cleaning landing and taxi lights after takeoff. The time for repositioning the headlight lamp at the maximum possible release angle of 88 degrees is no more than 12 seconds. The headlight has two operating modes: taxiing (low light) and landing (high light). In landing mode, a DC supply voltage of 28 volts is supplied to the main filament with a power of 600 W (the PRF-4MP modification has a power of 1000 W), and in taxiing mode to an additional filament with a power of 180 W, while long-term operation in landing mode without airflow incoming flow (when parked on the ground) is not allowed due to overheating of the bulb. As a rule, at least two headlights of the PRF-4M type are installed on airplanes.
The lighting equipment for in-flight refueling consists of FPSh-5 type headlights for illuminating the refueling aircraft, a hose with a cone and a refueling rod. These headlights are structurally similar to the PRF-4, are installed in the front part of the fuselage and can be extended to any angle up to 90 degrees using push switches in the cockpit. The headlamp bulb holder is driven through a gearbox by a DC electric motor ED-12. The lamp power is 65 watts at a supply voltage of 28 volts.
VAZ-2115 fuses and relays, electrical diagrams
Lada 2105 Bright White 15 R Logbook Installation of steering column switches for Chevrolet Niva ignition switch for VAZ 2110
VAZ-2115 fuses and relays, electrical diagrams
VAZ 2115 is a fairly common car model that can often be found on the streets of Russian cities. When something breaks down and an electrical device stops working, it causes inconvenience to the driver and passengers. In case of serious malfunctions, movement may become impossible or dangerous. For example, if the headlights stop working at night or the car stops starting.
Most of the causes of such problems lie in the fuse box. It is necessary to periodically check the fuses and relays of the VAZ-2115, clean and replace parts that have become unusable. This article will discuss which fuses are responsible for what in the “fifteenth” and how to solve many electrical problems.
Relay mounting block
The mounting block is located under the hood, near the windshield.
K1 – headlight cleaner relay. If the headlight cleaners do not turn on, check fuses F1 and F7. Inspect the wiper mechanism; dust may have gotten into it or a stone has flown in, damaging or jamming its operation.
K2 – relay-breaker for turn signals and hazard lights. If your turn signals or hazard lights stop working, check fuses F2 and F16, this is the relay. If the hazard lights work but the turn signals do not, check the power handle, its contacts and connector. If only the emergency lights do not work, check the power button, contacts and wiring. Don't forget to check the turn signal bulbs. There may be a short circuit in one of the headlights. Carefully inspect the connectors and wiring for insulation damage.
If the turn signals work unstably or intermittently, this may be caused by poor contacts in the mounting block, as well as burnout or damage to its tracks. Contact may disappear not only in the block, but also in the headlights themselves, as well as on the way to them. If the wiring has been changed or something has been done to the wires, check them first.
K3 – windshield wiper relay.
If your wipers stop working, first check the relays and contacts. The steering column switch could also stop working or its contacts could oxidize. Inspect the wiper mechanism; due to poor tightening, the nuts securing the mechanism slats may have become loose, or a foreign object may have gotten in, interfering with their normal operation.
The motor could burn out, you can check its performance by applying voltage directly to it from the 12 V battery. Near the motor there is another fuse that protects it from overheating. It is located either on the trapezoid bracket or in the motor itself, depending on its type.
K4 – lamp performance monitoring relay.
K5 – power window relay. If your window does not go up or down with the power window, check fuse F6 and this relay. If the window lifting mechanism is of a cable type, it lowers normally but rises with difficulty, it is necessary to lubricate the cables and glass guides with silicone grease. To do this, you need to remove the door trim and get to the mechanism. The motor may have stopped working, in which case it needs to be replaced.
Sometimes it helps to close the glass by hitting the door to temporarily revive the motor. To disassemble the window lifter mechanism, you need to unscrew the bolts securing the brackets and disconnect the glass itself from the mechanism.
If only one window regulator does not work, the problem may be in the power button and its contacts.
K6 – sound signal relay. If your “horn” stops working, check fuse F5, relay. The signal may not work due to a lack of contact in the steering wheel. Remove the steering column housing and look at the serviceability of the plates and contacts. Turn the steering wheel left and right; when turning, the mechanism may jam or the contacts may move. One bolt on the casing secures the position of the switch mounting bracket, the second secures the casing.
For the signal to work, you need to securely fix them, setting them in such a way that the contacts close when the switch is pressed. The contacts are located above the steering shaft. The design of the contacts in the steering wheel could also be damaged. Inspect the mechanism; the 3 screws and springs should reliably open and close the circuit.
By water transport
River ships "Arabella" and "Mikhail Sholokhov".
Headlights are clearly visible in the bows of ships and on the railings of the navigation bridge. On seagoing vessels, there are usually no headlights as such, since there is no point in illuminating the water surface in front of a moving seagoing vessel. Numerous rotating spotlights are used to illuminate the water area around the vessel when maneuvering or searching for people and objects. But on river vessels, headlights are used, since on rivers there are many small navigational hazards (sinks, floating logs, boats without lights, various types of debris) and in order to detect them at night, the water surface in front of the vessel must be illuminated. To avoid dazzling those on watch on oncoming vessels, the headlights of river vessels have a clear cut-off line (similar to the low beam of car headlights) and are directed slightly downward. Riverboat headlights are quite powerful. Thus, on passenger three- and four-deck motor ships, lamps with a power of 350 W each are used in the headlights, which allows illuminating the water surface at a distance of up to 600-800 meters from the ship. In addition to headlights, river boats are also equipped with rotating spotlights, which use even more powerful lamps (up to 2.5 kW).
Why PTF fog lights don't work
12/24/2014 Fog lights
As I think, you have already seen that on the VAZ 2114 and other Samaras the headlights leave much to be desired, and in cloudy and rainy weather you feel like a hedgehog in the fog. Therefore, fog lights significantly improve the situation and illuminate the roadside.
But it happens that at a certain moment the PTFs stop working, and you need to urgently look for the cause of the malfunction. In this article we will look at the main possible causes of malfunction of fog lights (FTL) and methods for eliminating them.
The most basic and common cause of malfunction is oxidation and corrosion, which appear during long-term operation and in the Russian climate. But still, we will touch on specific problems, and start from the simplest to the most complex.
Fuse
VAZ 2114 fuses
Each PTF has a separate fuse F8 and F9 in the fuse block with a rating of 7.5 A. Check its integrity - replace it. If you did not find a fuse in the mounting block, then most likely, in your case, the PTFs were installed by the previous owner, and the fuses on them are located either next to the fog lights themselves or next to the relay. If both PTFs do not work for you, then most likely the problem with the fuses disappears - because It is not possible for both fuses to blow at the same time, although everything happens in our lives.
Burnt out lamps in PTF
In this case, all that remains is to check and replace. When you remove the lamp and look, the filament of the lamp may visually remain intact, so it is better to check with a known working lamp. Again, if both fog lights have failed, then most likely this is not your case.
Relay
The relay is either located in the mounting block or installed in another location if the PTF was not installed at the factory. The easiest option is to replace and check with a relay that is known to work, or you can also try knocking on it. When you turn on the PTF button, the relay should click. If the relay does not click, either replace the relay, or there is simply no power going to it.
Notes
- ↑ 1 2
Uniform provisions for motor vehicle headlights emitting an asymmetrical low-beam beam, a high-beam beam or both beams and equipped with incandescent lamps.
GOST R 41.112-2005
. - Uniform provisions concerning the approval of headlights of motor vehicles with gas-discharge light sources. GOST R 41.98-99
. - Uniform provisions concerning the approval of gas-discharge light sources for use in approved gas-discharge optical elements of motor vehicles. GOST R 41.99-99
. - TR CU 018/2011 On the safety of wheeled vehicles (as amended on October 14, 2020) clause 102