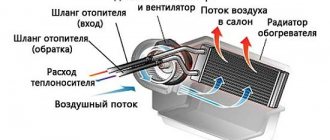
Daewoo Lanos - Fuel and temperature gauge
Many drivers do not wait for the red light on the panel to light up and refuel the car, focusing on the gasoline level indicator. Crankshaft The crankshaft sensor is located at the ring gear of the crankshaft pulley.
Avto.ru contains an up-to-date list of all car services, car washes and tire service points. Easy search, location on…
Where is the engine temperature indicator sensor located on Daewoo Lanos, Nexia and Chevrolet Lanos cars with a displacement 1 engine. It is advisable to carry out work on replacing the sensor on a cold engine. You will find it on side 4 of the cylinders, just below the ignition coil.
Loosen the nut that tightens the sensor.
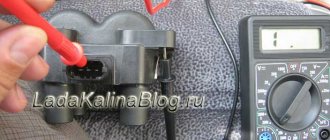
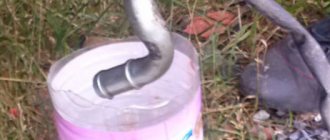
This completes the dismantling. Next you need to check the serviceability of the sensor. We take the sensor and connect it to the tester, and then lower it into boiling water along with the thermometer.
Why the daewoo lanos temperature sensor doesn't work
At a certain temperature there must be a certain resistance. You can take the nominal values from the table below.
Nominal values If the resistance is normal, we advise you to look for a breakdown in something else, preferably with the help of specialists.
Chevrolet Lanos engine temperature sensor Chevrolet Lanos engine temperature sensor The operating principle of this sensor is no different from the previous one.
Except that its shape is different. It is located in the air outlet sleeve. If it is not possible to buy a GM sensor, then I recommend choosing from manufacturers such as: These not only work, but also show data that is close to the truth.
To replace the engine temperature gauge sensor on Lanos and Nexia, you will need a socket wrench with a 13mm head, preferably with a high head.
It is advisable to carry out work on replacing the sensor on a cold engine.
Site navigation
If there is no opportunity or desire to wait until the engine has completely cooled down, then you should get down to business only 15 minutes after you have turned off the car.
We unscrew the cap of the expansion tank photo 2. This will relieve pressure in the car’s cooling system. Remove the negative terminal from the battery.
The engine temperature sensor is located on the intake manifold, near the fuel injector of the first cylinder photo 3. Disconnect the wire from the sensor photo 4.
Checking the coolant temperature sensor and its circuits Chevrolet Lanos
You will need to remove the fuel pump, on the side of which there is the part itself in a small plastic clip. It is quite easy to remove and install, but first disconnect the wire block.
Oil pressure It is located in the oil pump housing, into which it is screwed. First you need to disconnect the minus from the battery again. Then release the lock and remove the wires. Installation is in the reverse order.
Crankshaft The crankshaft sensor is located at the ring gear of the crankshaft pulley. To replace it, you will need a 5th hex key from the tools. Now all that remains is to unscrew the bolt and remove the part itself.
It is a valve that is part of the IAC idle speed control. To replace, you will need a Phillips screwdriver. You will need to turn off the ignition and disconnect the wiring harness, just like with the previous parts.
The regulator itself is secured with two screws, unscrew them. Then simply remove it. The regulator is replaced in the reverse order.
Source: https://diabloarea.ru/zamena/shevrole-lanos-zamena-datchika-temper.html
Reference
Counterweights.
Made on the continuation of the cheeks of the engine crankshaft. Counterweights are designed to balance the forces and moments of inertia that arise during the movement of the crank mechanism during engine operation.
Channels.
Made in the body of the crankshaft. They serve not only for supplying oil from the main shaft bearings to the connecting rod bearings, but also for centrifugal cleaning of engine oil from solid particles and deposits during rotation of the crankshaft.
Flywheel.
Ensures that the engine pistons move from top and bottom dead centers and more uniform rotation of the crankshaft at idle. Makes it easier to start the engine and its operation when moving the car away.
Piston rings.
Compression rings prevent gases from escaping from the cylinder into the engine crankcase and help remove heat from the piston to the cylinder. The oil scraper ring removes excess oil from the cylinder walls as the piston moves.
Hydraulic compensator.
Selects the gap between the camshaft cam and the valve lever by moving the hydraulic compensator plunger under the action of its spring and supplying engine oil under pressure when the engine is running.
The Chevrolet Lanos 1.5 liter engine with a power of 86 horsepower is essentially a development by Opel engineers. This is a naturally aspirated gasoline engine from the A15SMS series, which can be found on the Daewoo Nexia. The simple and reliable 8-valve engine has a number of design features, which we will talk about in more detail.
Chevrolet Lanos ECU - diagnostics, troubleshooting and replacement
Chevrolet Lanos, like most other cars in the Chevrolet model range, is equipped with an electronic engine control system (ECU) with distributed fuel injection. or as it is also called a controller.
The Chevrolet Lanos ECU is a special-purpose mini-computer. It consists of random access memory and programmable read only memory.
Chevrolet Lanos ECU - what functions does it perform?
Based on the information received from the sensors, the Chevrolet Lanos ECU calculates the parameters for regulating fuel injection and controlling the ignition timing.
In addition, in accordance with the established algorithm, the ECU controls the operation of the electric motor of the engine cooling system fan and the electromagnetic clutch for turning on the air conditioning compressor, performs the function of self-diagnosis of system elements and notifies the driver of any malfunctions that have arisen.
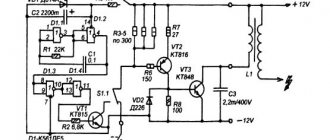
Diagram of the electronic engine control system: 1 - rechargeable battery; 2 - ignition switch; 3 - electronic engine control unit (ECU); 4 – diagnostic block; 5 - absolute air pressure sensor IN the intake manifold; 6 - air temperature sensor in the intake manifold; 7 - detonation sensor; 8 - coolant temperature sensor; 9 - control relay for cooling system fans; 10 – main fan motor relay; 11 – additional fan motor relay; 12 - electric fans of the cooling system; 13 – instrument cluster; 14 - phase sensor; 15 - diagnostic and control oxygen concentration sensors; 16 - rough road sensor; 17 - air conditioning compressor relay; 18 - air conditioning compressor; 19 - vehicle speed sensor; 20 - fuel pump relay; 21 - fuel module; 22 – solenoid valve for purge of the adsorber; 23 - ignition coil; 24 - exhaust gas recirculation valve; 25 – idle speed regulator; 26 - throttle position sensor; 27 - nozzle; 28 - crankshaft position sensor
If individual sensors and actuators fail, the ECU turns on emergency modes to ensure engine operation.
The engine control system, along with the electronic control unit, includes sensors, actuators, connectors and fuses.
Where is the Chevrolet Lanos ECU located?
The Chevrolet Lanos ECU is located in the engine compartment - it is attached using a bracket to the front panel.
Video: No power supply to Chevrolet Lanos ECU, how to fix it?
Chevrolet Lanos ECU - what causes it to fail
One of the main reasons for the failure of the Chevrolet Lanos ECU is standard burnout. What and how can burn out in the ECU? In most cases, we are talking about many tiny connectors and connections, those tracks that make up the ECU system.
It is almost impossible to visually determine what exactly has burned out. In most cases, such a malfunction causes voltage overload. Which, in turn, may be an indication of the failure of one of the solenoids or something else that may give too strong a discharge.
Besides this, there are also purely external reasons. They can also cause the ECU to fail quite quickly. These include:
- vibration. Strong vibration can cause anything to break, and the ECU is no exception.
- simple overheating. Trite but very destructive
- moisture. As you know, humidity, any drops of water, is the number one enemy of technology. If the ECU (electronic control unit) leaks inside, drops of moisture can cause irreversible consequences and completely damage the electronic unit system. Moreover, due to corrosion, failure is usually incompatible with further repairs.
Chevrolet Lanos ECU - self-diagnosis of faults
Many people believe that diagnosing the engine control system is the domain of highly qualified specialists. Meanwhile, the Chevrolet Lanos controller (ECU - electronic control unit) has a fairly powerful built-in self-diagnosis system (implemented at the software and hardware level), which greatly facilitates the search for possible faults even for a non-professional.
The ECU is a kind of mini-computer designed to solve specialized problems in real time. These tasks can be divided into the following categories: processing signals from sensors, calculating control actions according to given algorithms, controlling actuators.
I recommend diagnosing the performance of the Chevrolet Lanos ECU in two stages:
- First stage, visual inspection and fault diagnosis
- Diagnostics using a scanner.
How to do it? Yes, very simple! Failure of the electronic control unit has a number of features unique to it. For example:
- The Check controller light comes on
- Lack of response to Lambda regulation, temperature sensor and throttle position sensor
- There are no control signals for injectors, fuel pump, idle air valve and other actuators.
- There is no communication with the diagnostic tool.
- Physical damage to the unit (burnt radio elements and conductors)
If you find the above-mentioned malfunctions, you must proceed to the second stage of diagnosis, namely scanning errors.
At the next stage of verification, you cannot do without special equipment. You can connect to the vehicle controller to read diagnostic data using a diagnostic tester (a separately purchased device) or a computer with a special program installed.
Daewoo Lanos Fuse location
YouTube fuse boxes and fuses for Lada Largus
Location of fuses
Fuse locations may vary depending on model. The location of the fuses is shown on the fuse box cover and also in the vehicle owner's manual.
From 9/85 to 9/89 issue
The fuses are located in a box in the left footwell.
| The main fuses are located in a box in the engine compartment, in front of the left shock absorber housing. |
Fuse location
| Consumer | |
| 1 | Power window |
| 2 | brake lights, horn |
| 3 | engine control |
| 4 | compressor motor (ride height adjustment)* |
| 5 | devices |
| 6 | rear window defroster |
| 7 | tail lights |
| 8 | radio, cigarette lighter, mirror adjustment |
| 9 | rear fog lights |
| 10 | headlight washer |
| 11 | central locking device |
| 12 | interior lighting |
| 13 | air conditioner |
| 14 | transfer case lock* |
| 15 | Luke |
| 16 | windshield wiper and washer system |
| 17 | fan motor |
| 18 | rear wiper |
| 19 | heater fan |
* - only on vehicles with all-wheel drive
From 10/89 issue.
| The fuses are located in a box in the left footwell. |
The main fuses are located in a box in the engine compartment in front of the left shock absorber housing.
Fuse location
| A* | Consumer | |
| A | 15 | rear window washer, washer pump |
| B | 10 | sound signal |
| C | 10 | interior lighting, trunk lighting |
| D | 15 | engine control |
| E | 15 | radio, clock, cigarette lighter, electric mirrors |
| F | 30 | central locking device |
| G | 10 | rear right side light |
| N | 30 | electric windows |
| I | 15 | instruments, reversing lights, direction indicators |
| J | 20 | windshield wiper, washer pump |
| K | 15 | seat heater |
| L | 15 | rear left side light, parking light, instrument lighting, license plate light |
| M | 15 | Luke |
| N | 10 | anti-lock braking system (ABS) |
| O | 15 | daytime driving light |
| P | 30 | headlight washer |
| Q | 30 | heater fan |
| R | 10 | left low beam |
| S | 10 | right low beam |
| T | 10 | left high beam |
| U | 10 | right high beam |
| V | 10 | rear fog lights |
| W | 10 | anti-lock braking system |
| X | 30 | rear window defroster |
* - A = amperes
Fuse box in the engine compartment
| A* | Consumer | |
| 1 | 30 | fuel injection system |
| 2 | 30 | alarm |
| 3 | 80 | main fuse |
| 4 | 60 | hazard warning lights, interior lighting, central locking, brake and tail lights, generator |
| 5 | 60 | anti-lock braking system |
| 6 | 30 | fan |
| 7 | 20 | air conditioner fan |
| 8 | 10 | brake lights |
| 9 | 10 | engine control device |
| 10 | 30 | headlight leveling motor (hatchback only) |
* - A = ampere
Chevrolet Lanos thermostat: where is it located and how to change it?
Replacement
admin
Replacing the thermostat and timing belt 1 part Chevrolet Lanos Chevrolet Lanos 2008
In this article we will tell you how to change the thermostat on a Lanos, engine displacement 1. Unscrew the two timing case fasteners. Getting to the thermostat is not easy - to do this you will have to remove a number of other parts.
% discount on spare parts and accessories for foreign cars in Academy Plus stores.
Until the operating temperature is reached, the antifreeze moves in a small circle, and therefore the thermostat is closed. Good luck to everyone and don't let anything break.
I installed a new one and lubricated it with sealants just in case, the reassembly went quickly in minutes. Good luck to everyone and whatever happens to break.
Heads of various diameters; A set of spanners or spanners of several sizes; Hexagon 5 for pump mounting screws.
Materials and spare parts you will need: New thermostat article number; Gasket for it article number; Automotive sealant. You will also need to prepare a container for antifreeze and rubber gloves, since you will have to drain it. If you changed the coolant recently, you can fill it back later, otherwise buy new antifreeze.
It is strictly forbidden to replace the thermostat with a warm engine. Drain the coolant completely from the system.
How to Replace thermostat change car
Remove the timing case cover. Align the timing belt to the marks by briefly starting the engine.
How to replace a thermostat
You are allowed to tighten it manually to the desired marks. To do this, you need to put the car in neutral and turn the timing clockwise.
After reading the forums, I realized that it can be changed without removing the timing belt by bending the casing and loosening the power steering pump and the camshaft gear. I went to a friend’s garage, he has a pit, I thought I’d do everything in an hour, but it wasn’t there, I fumbled around from 7 pm to 1 am.
I removed the air filter housing with the corrugation, having first disconnected all the hoses and the temperature sensor wire.
I unscrewed 3 10mm bolts of the timing case and here the most interesting thing is to unscrew the power steering pump, there are two 12mm bolts, for this you need a cape wrench, don’t even think about flattery with a carob, don’t make my mistakes, I licked the edges and there was no cap, all the neighboring garages ran around in search cap, so it was unscrewed with it, and then with anti-seize and with the help of a pipe.
I removed the gear housing and fastened the belt tightly to plastic ties. Hang the thermostat on a wire over a container of cold water.
Place the thermometer in the water so that the bulb is close to the thermostat. Heat the water, recording the thermometer readings at the moment the thermostat opens, then compare the result with the values in the specifications for the car. If the readings obtained differ from those specified in the specifications, then the thermostat is faulty and must be replaced.
Before installing the thermostat cover, apply a layer of sealant to the flange. Install the timing belt and adjust its tension
Source: https://iaarus.ru/zamena/chevrolet-lanos-zamena-termostata.html
Chevrolet Lanos brake system diagram
The brake system in a car should always be in perfect condition and work well. Bad brakes can be fatal. So keep an eye on them, change pads, discs, drums and brake fluids on time. Here is a diagram of the brake system so that you understand what is located and where.
Chevrolet Lanos brake system diagram
Chevrolet Lacetti engine temperature sensor
27.06.2018
Chevrolet Lacetti engine temperature sensor ( part number 96182634 ) - is responsible for informing the electronic engine control unit about the coolant temperature. This is necessary to ensure that the optimal fuel-air mixture enters the cylinders and that its ignition is correct. This is very important when starting the engine.
Engine temperature sensor location
This sensor is located under the intake manifold on the left side, between the first and second cylinders.
Signs of a malfunctioning temperature sensor
- Difficulty starting the engine .
This is due to the fact that the engine control unit takes data from the temperature sensor to supply the fuel-air mixture. Accordingly, the sensor can tell the control unit that the engine is warm, but in fact the engine temperature is 30 degrees (for example in winter). And the control unit will give incorrect signals to other engine systems. - “ floats” . Everything here is clear in principle; if the temperature sensor is faulty, then the readings of the engine temperature gauge will be incorrect.
- Fuel consumption has increased noticeably . It's no secret that when starting and warming up the engine, more fuel mixture enters the cylinders. This is done intentionally so that the engine reaches operating temperature faster. After this, fuel consumption decreases. Therefore, by the way, fuel consumption on any car is higher in winter (and not only because of this). Accordingly, if the coolant temperature sensor is faulty, this will affect the fuel consumption of the Lacetti
- The engine does not enter closed-loop mode . This is the mode of operation of the engine after it has warmed up to operating temperature, when the ECU uses information from the oxygen sensor (lambda probe) to accurately adjust the fuel-air mixture.
To check the sensor you will need a multimeter (tester) and a thermometer. The whole test consists of measuring the resistance of the sensor at different temperatures, which must correspond to the following values:
All work is performed with the temperature sensor removed. We switch the multimeter to resistance measurement mode and connect to the sensor terminals. Now you need to prepare a container of water, the temperature of which must be measured using a thermometer.
Bring the water temperature to any whole value (for example +20 degrees ) and lower the Lacetti engine temperature sensor into the water. The reading on the multimeter should be 3520 ohms.
After this, you can further heat or cool the temperature to any other integer value and measure the sensor readings again.
Also note that the readings should change smoothly, without sudden jumps. It is important. Well, if the data differs from the table, then the sensor must be replaced.
Removing, replacing and installing the temperature sensor
- Work must be done on a cooled engine. It is necessary to drain the coolant (although some car owners manage to do without this)
- Disconnect the connector from the temperature sensor.
- Use a 19 mm wrench (or a long socket) to loosen the sensor.
- Unscrew it completely (if you did not drain the coolant, you can plug the hole with a plug or your finger)
- If necessary, replace the O-ring under the sensor.
- We wrap the new sensor.
- Fill with coolant (or simply add to the required level).
- Reconnect the connector to the sensor.
- We start the engine and check the operation of the sensor.
If you cannot get to the sensor, you may have to remove the intake manifold.
Chevrolet Lacetti engine temperature sensor Link to main publication
Source: https://mychevi.ru/datchik-temperatury-chevrolet-lacetti/
Relay block under the torpedo Lanos, Sens and Chance
Behind the control panel for the headlight range control of Lanos, Sens and Chance cars there are four relays responsible for the operation of the rear fog lights, direction indicators and hazard lights, heater fan and windshield wipers.
Under number “1” in the photo above there is a relay that is responsible for the operation of the electric heater motor, which is turned on at 4 speeds. If the stove stops working in position 4, then you need to check the serviceability of the relay. Number “2” is the device responsible for the operation of the car’s turn relay and hazard warning lights. Number “3” is the relay responsible for the operation of the windshield wiper, which operates in intermittent mode. Number “4” is the rear fog lamp relay on Lanos, Sense and Chance.
Separately, it should be noted that under the hood there are two more or one relay, which depends on the year of manufacture of the car. The devices are located on the left when the hood is opened near the engine shield. One element is responsible for sending a signal to start the engine, and the second is intended to control the operation of the generator. The relay supplies power to the generator integrated board.
This is interesting!
Short-circuiting relay contacts directly without using the device is strictly contraindicated. This will not only lead to the fuse tripping, but also the failure of electrical appliances.
Chevrolet Lanos temperature sensor: coolant and engine temperature
The Chevrolet Lanos temperature sensor has two purposes: measuring engine temperature and coolant temperature. Today we will tell you where the Chevrolet Lanos temperature sensor of both types is located, and also tell you how to remove them and check for functionality.
Chevrolet Lanos coolant temperature sensor
Let's start with the coolant temperature sensor. It is located under the ignition coil. This sensor is a thermistor, that is, as the temperature increases, the resistance decreases. The controller, based on the sensor readings, calculates the optimal consistency of the enrichment mixture when the engine warms up.
Replacing a Chevrolet Lanos coolant temperature sensor is not a complicated process that any novice car enthusiast can handle. In order to remove the sensor you only need a 19 mm wrench, and to check its functionality you need a thermometer and a tester.
The sequence of actions is as follows:
Helpful advice: You don’t have to drain the cooling liquid, but simply plug the hole with something when pulling out the sensor. Liquid loss will be minimal.
- Disconnect the negative terminal of the battery.
- Drain the coolant
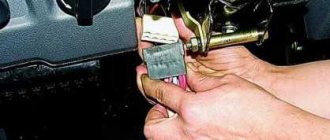
- Disconnect the wires from the sensor by releasing the locking clip.
- Loosen the nut that tightens the sensor.
- We unscrew the sensor from the cylinder head.
Note
This completes the dismantling. Next you need to check the serviceability of the sensor. We take the sensor and connect it to the tester, and then lower it into boiling water along with the thermometer. At a certain temperature there must be a certain resistance. You can take the nominal values from the table below.
Nominal values
If the resistance is normal, we advise you to look for a breakdown somewhere else, preferably with the help of specialists. This completes the replacement of the Chevrolet Lanos coolant temperature sensor.
Chevrolet Lanos engine temperature sensor
Chevrolet Lanos engine temperature sensor
The operating principle of this sensor is no different from the previous one. Except that its shape is different. It is located in the air outlet sleeve.
The amount of fuel injected depends on the readings of this sensor. To remove the sensor, you need pliers and a flat-blade screwdriver.
You need to check its functionality using the same method as the previous one, but the table of values there is slightly different:
Data from the intake temperature sensor
It is not possible to remove the sensor itself; you will have to remove the completely corrugated air exhaust pipe. To do this, you just need to bend the strands that hold it in place. The sensor is also replaced along with this tube; the entire structure is sold assembled.
Video on the topic:
Source: https://chancecar.ru/datchik-temperatury-shevrole-lanos.html
Chevrolet Lanos 1.5 engine design
Engine Lanos 1.5 petrol, four-stroke, four-cylinder, in-line, eight-valve, with overhead camshaft. The location in the engine compartment is transverse. The operating order of the cylinders is: 1-3-4-2, counting from the auxiliary drive pulley. The power supply system is phased distributed fuel injection (Euro-3 toxicity standards). The engine has a cast iron cylinder block.
The engine, gearbox and clutch form the power unit - a single unit mounted in the engine compartment on three elastic rubber-metal supports. The right support is attached to a bracket located on the front wall of the cylinder block, and the left and rear ones are attached to the gearbox housing.
Checking the phase sensor and its circuits (Chevrolet Lanos 2002-2009
Sensors are needed to be able to monitor various vehicle indicators. There are temperature sensors, level sensors and position sensors. Today we will look at pressure and position sensors. We talked about temperature sensors in the previous article.
Chevrolet Lanos pressure sensor
Absolute pressure sensor
This car has several pressure sensors, namely:
- Chevrolet Lanos absolute pressure sensor. This is a micromechanical sensor whose main task is to determine the absolute pressure inside the intake manifold. The Chevrolet Lanos air pressure sensor is the same absolute pressure sensor, that’s just what the common people call it.
- Chevrolet Lanos oil pressure sensor. This sensor is capable of converting mechanical pressure into an electrical signal, which allows you to monitor this indicator in real time on the car’s dashboard. If the oil pressure drops, it means that there is too little of it in the system. If you do not add it in time, the mechanisms involved in friction will wear out much faster, and a major engine overhaul will not be far off.
The Chevrolet Lanos air sensor is an important element; if it does not work correctly, the vehicle’s internal combustion engine will also begin to function incorrectly.
Chevrolet Lanos throttle sensor
Throttle position sensor
The Chevrolet Lanos throttle position sensor is a potentiometer.
The throttle valve and the current collector are connected to each other, respectively, when you press the gas pedal, the valve opens and the current collector begins to move along the surface of the resistive element.
As a result, the resistance of the potentiometer changes. As a result, receiving data from this sensor, the ECU selects one of the fuel supply modes.
In a Chevrolet Lanos, adjusting the throttle sensor is not an easy task; we advise you not to do anything yourself, but to contact a specialist. If you still decide to do all the car settings yourself, be sure to read the instructions for the car, literature on the Internet and watch more videos on this topic. Here, by the way, is one of the best:
- Sensors, especially on Chevrolet Lanos, cost pennies and are very easy to change... So don’t delay replacing them in order to identify other, more serious car faults in time!
Source: https://inter-foto-press.ru/chevrolet/proverka-datchika-faz-i-ego-cepej-shevrole-lanos.html
Chevrolet Lanos 1.5 engine cylinder head
The 8-valve Chevrolet Lanos cylinder head is cast from aluminum alloy, common to all four cylinders. The head is centered on the block with two bushings and secured with ten bolts. A sealing gasket is installed between the block and the cylinder head.
The intake and exhaust ports are located on opposite sides of the cylinder head. Valve seats and guides are pressed into the cylinder head. The valve closes under the action of a single spring. Its lower end rests on the washer, and its upper end rests on a plate held by two crackers. The crackers folded together have the shape of a truncated cone, and on their inner surface there are beads that fit into the grooves on the valve stem. The valves are driven by the camshaft. The camshaft is cast iron and rotates on five supports (bearings) in an aluminum bearing housing, which is attached to the top of the cylinder head.
Chevrolet temperature sensor (Lanos and Niva): how the temperature meter works
In Lanos model cars, the engine system is controlled by an electronic unit, also known as an ECU. The ECU monitors the condition of the machine using a network of sensors located in different places of the machine, which are responsible for oil pressure, coolant temperature, and so on.
DTOZH
The antifreeze temperature meter is located at the end of the cylinder block. It is located directly behind the ignition coil.
The device is a thermistor with a negative temperature coefficient. The higher the temperature of the liquid, the lower the e. resistance. The ECU processes the signal received from the sensor and acts on the basis of the received data to cool the engine, enriching the working mixture, or turning on additional fans.
Temperature sensor Chevrolet Lanos T100 A15SMS 2007
To remove the device you will need a key for 19:
- first of all, disconnect the wire from the minus terminal on the battery;
- drain the coolant;
- disconnect the wire from the sensor itself;
- use a wrench to loosen the meter;
- carefully turn it out by hand.
To install a new meter, it is necessary to carry out the reverse sequence of actions.
Fuel level
The level performs the same signaling function as the Chevrolet Lanos temperature sensor. It is necessary to notify the ECU about low fuel levels.
Often, cars in this model complain about a malfunction at this level, since the light does not light up when the needle approaches zero.
The thing is that the level is only two centimeters from the bottom of the tank, so the special signal is triggered a little later.
To replace the device, you need to lift the rear seat cushion. Open the hatch found behind it and remove the fuel pump. There will be a detail on the side. Before any actions, disconnect the wiring block.
Oil pressure
The meter is screwed into the oil pump housing. To remove it, disconnect the negative battery, remove the wires, and then unscrew the part itself. The work uses a 24 key.
Crankshaft
We find the gear ring of the crankshaft pulley and unscrew the hex key with a 5m key. We disconnect the minus and the wire block, and then remove the part from the holder.
Idling
The location of this part is in the upper part of the throttle assembly. To replace, as usual, you will need to disconnect the wires and simply unscrew the two screws with a Phillips screwdriver, after which the part can be removed.
ECU operation
The ECU processes sensor data to ensure proper operation of the vehicle. Many may answer that the number of such warning devices is significantly less than in the same Chevrolet Niva, but this is primarily due to the purpose of the car and its characteristics.
The Chevrolet Niva operates in accordance with Euro 2 standards, and can even be converted to the Euro 4 standard, which is why it contains some devices, including those to comply with these standards. They provide a more environmentally friendly exhaust quality and are responsible for the operation of fuel injection systems.
How does the SNS M 02 motion sensor work?
Lanos, on the other hand, does not meet Euro standards and does not need some of the meters used in the field, but this does not prevent you from installing your own modifications on the car, thereby tuning it to your needs. In both machines, the sensors are located in easily accessible places and allow them to be quickly accessed if necessary, including replacing them yourself.
The Chevrolet design in many ways makes it easy to care for your car and remodel it in your own way. In this regard, Chevrolet can compete with many even foreign models in terms of the simplicity of its design. In the same Subaru, getting to the property without additional tricks is not possible.
Returning to the ECU, it is worth noting that, receiving signals simultaneously from several sources, it simultaneously processes them all and puts them into an overall picture. According to the data, the ECU increases the efficiency of the vehicle, reduces fuel consumption, and in some cases even increases the overall power of the vehicle, although not significantly.
So, for example, if you install additional meters on the radiator grille (at the inlet and outlet), you can more effectively control the operating fan cooling the antifreeze. The temperature will remain at the desired level.
Placement of the temperature gauge sensor on the A15SMS engine
A lambda sensor increases the environmental friendliness of a car, often due to its power. Some argue that if compliance with the Euro standard does not mean anything to you and you don’t care about the environment, then it is better to remove the lambda sensor altogether. However, this statement is controversial, as is the decision to remove the meter itself. Therefore, make any changes to the car at your own peril and risk.
Daewoo Lanos (Sense, Chance) why doesn't the stove heat up?
Source: https://alertok.ru/oborudovanie/datchiki/temperaturnyj-datchik-shevrole-lanos.html
Detailed guide to replacing the Chevrolet Lanos fuse box
The Chevrolet Lanos has earned an excellent reputation and is in demand among domestic drivers.
Almost everyone notes its reliability, unpretentiousness, efficiency and ease of maintenance. Chevrolet Lanos car
The design is really simple and thought out to the smallest detail
The developers also paid attention to the electrical equipment protection system, placing fuses in two blocks, as well as in one additional block with a relay.
But a situation where some electrical consumer fails can happen even on such a reliable vehicle. For example, very often the cigarette lighter, lighting or heating fails. Some drivers immediately get lost and go to a service station, spending a lot of money for something they could do on their own in just a few minutes.
Chevrolet Lanos cars are purchased mainly by people with average incomes, so performing many jobs is very important for many.
Where are the Chevrolet Lanos fuses located?
In a Chevrolet Lanos car, electrical fuses are located in two compartments, the first is the main one in an easily accessible place under the hood next to the battery. The second is in the cabin on the left side of the dashboard. There is also another block with a relay under the headlight control cover.
You will definitely find this useful video about automotive electrical fuses useful.
Removal and replacement instructions
Replacing fuses and relays on a Chevrolet Lanos, both under the hood and in the interior unit, is almost identical.
Blown electrical fuse
Preparation
Before proceeding to replacing the fuse, we recommend de-energizing the system. To do this, turn off the ignition and, to be on the safe side, take out the key. It would also be a good idea to disconnect the negative terminal of the battery.
Steps
- If some consumer fails, the first thing we do is determine which block it is located in. This is done very simply. We look at its number in the decoding, then find its location on the diagram.
- If the electrical fuse is located in the engine compartment, then we need to remove the steam exhaust hose and open the cover. If the element we need is located in the interior compartment, then it is enough to open the lid itself. These are all the differences between replacing a fuse in the engine compartment or the passenger compartment.
- Next, using tweezers, remove the problematic fuse. We examine it, trying to visually determine whether it is intact or burnt out. It is better, of course, to do this work using a tester. Although it should be visually noticeable that the conductive part is burnt out, and in some cases the plastic shell itself may be melted.
- Now we need to remove a fuse of similar rating from the spare set and install it in place of the blown one.
- Replace the “-” terminal of the battery. We start the car.
- We check the work of the consumer.
If the problem was in the fuse, then the equipment should work. If the fuse blows again, then the problem is much more serious. It is necessary to inspect the wiring and the consumer itself.
Deciphering the circuit with protective elements in the interior compartment
Recommendations for use
- Every prudent driver must have a set of electrical fuses of various ratings, this is especially necessary for those drivers who drive long distances. They cost pennies, but at some point they can help out a lot.
- Sometimes, if some equipment fails, but the electrical fuse is intact, it is enough to move it a little in the connector. Perhaps carbon deposits or rust caused the chain to break.
- Replace only with an item of similar value. If you put in less, it may burn out immediately. If it is more, it will not be able to properly protect the equipment.
- Under no circumstances should you install wires or bugs, which in some situations can cause the car to catch fire.
Video “How to find the required protective element”
This video shows which fuse is responsible for the fuel pump. The cigarette lighter fuse is changed in the same way.