Hyundai Accent crankshaft sensor: where is it located, replacement
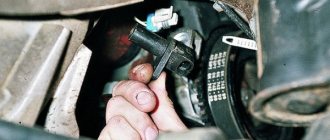
Since sometimes the car does not start, and I have so far found the reason, a crankshaft position sensor was ordered. It seems like they write that if it is not working properly, electricity will not be supplied and the car will not start. It can also cause the car to stall while moving. It's not difficult to find. It is located to the right of the oxygen sensor and sits on 1 bolt of 10. You can unscrew it with a long tube of 10 or a wrench like mine. And everyone seems to write that it’s easy to remove, but as always, it took me about 40 minutes to remove it. I unscrewed the bolt immediately, but the sensor itself became stuck to the engine. I think this would be easy to solve if VD40 was on hand, but there was none. Therefore, everything that was in the toolbox was used. As a result, when I was completely desperate and scratched my hands, at the very bottom of the box I found a holder from a spark plug wrench, stuck it in the hole of the sensor where there was a 10-point bolt and it gave in) I removed it so that the eyelet broke off at the sensor. I think five seconds and I’ll install a new one. Yeah, naive. Although it is original, as it turned out, either it should be like this, or it is defective, in general, the old sensor was completely pressed against the engine, but this one is not. At first I thought that the seal was in the way, so I took it off and tried it on, exactly the same. In general, I put the sensor on a flat surface, and it goes straight in the area of the hole, and then closer to the sensor above. And with the old one, the entire site is flat. Therefore, the sensor itself does not fit tightly to the engine. In short, I set it like this, checked it, the car starts. I took it off again, applied sealant-gasket where it did not fit, put it in place, and tightened it. I waited a bit, started it, everything seemed fine. In the morning it was minus and snowing, it started with half a turn. We'll see how it behaves further)))
Honda CR-V Reliable › Logbook › Cleaning under the cover of the automatic transmission lever position sensor! Honda CRV III
In the summer, it was fashionable for CRV III owners to clean under this cover. I also decided to take a look for prevention, so as not to end up having to replace the automatic transmission cover itself (HONDA 21240RCV010 - for 12 tr)
1. Remove the left front wheel and clean the sensor cover from the outside of the dirt.
2. Using a 10mm socket, unscrew the three bolts (the right one is longer) and remove this cover.
3. Remember the location of the sensor! (photo or tag).
4. Unscrew two more 10mm bolts, since there is also dirt under the sensor. To prevent dirt from getting into the threaded holes, I tightened the bolts. By pressing the latch, remove the connector from the sensor and clean everything from dirt. I used liquid cleaner + rags first, and then degreaser.
5. We put the sensor in place (as it was!) and secure it with bots (we treated all surfaces with Movil in advance and let them dry a little).
I decided to use a universal colorless sealant to seal the entire space under the lid from dirt.
6. Place the cover and secure it with bolts (I added more sealant and removed the excess).
The sensor itself was not opened, there was no reason and no dielectric grease.
After a week of using the car, I turned on the autostart during the day and went outside. The Pandora alarm key fob shows the engine is running, but in fact it is not. I opened the door using the key fob, and the pictogram shows that the engine is running. Turned off the AZ. I turn the key - silence... For about 40 minutes I could not start the engine: I turned off the whitefish using the Valet button, entered the unlock code through the phone, checked the voltage on the battery and removed the terminals. I tried to start it in neutral, but no, I was already starting to think something was wrong with the starter... But suddenly the car started and I went to work. At work, I explained to a colleague that the car started after some manipulation of the automatic transmission lever. I stayed at work, and my colleague went to the city in my car, he then went to the airport to meet his family, and confirmed over the phone that to start it was necessary to move the selector (down-up)... While I was at work, I read Drive2, and in time who I posted a post about cleaning under the automatic transmission sensor cover, and in the comments a good person wrote that it is necessary to note the position of the automatic transmission sensor before removing it (many thanks to him!). I immediately remembered and looked at the before and after photos... When I arrived home, I immediately checked, if you lightly press the automatic transmission lever with your finger (play 1.2 mm), the car does not start (silence) and you need to open the cover of the automatic transmission lever position sensor.
I used a thin flat-head screwdriver to go around the edge of the lid to cut the frozen silicone. Loosened the sensor bolts, turned the sensor slightly counterclockwise (the holes are oval), and slightly tightened the bolts. I checked it and it starts, even when you lightly press the automatic transmission selector with your finger. Tightened the bolts.
Hyundai Accent Crankshaft Sensor
On cars of the Hyundai Accent family, the crankshaft position sensor (hereinafter referred to as CPKV) is installed in the engine compartment, at the end, above the dirt visor. This is typical for Hyundai Accent MC, Hyundai Accent RB.
In the Hyundai Accent X3, Hyundai Accent LC, the DPKV is installed under the thermostat housing.
“P0507” is the most common error that appears on the dashboard of owners of the third generation Hyundai Accent. The reason is a faulty crankshaft sensor.
The controller is designed to read the number of crankshaft teeth and transmit data online to the electronic control unit (ECU).
The on-board computer analyzes the received data, increases and decreases the crankshaft speed, and restores the ignition timing.
The average service life of the controller is 80 thousand km. The sensor cannot be prevented; it must be replaced entirely.
During systematic use of the vehicle, the DPKV wears out, as evidenced by unstable engine operation. The process of self-replacement is not at all difficult, but requires care on the part of the repairman.
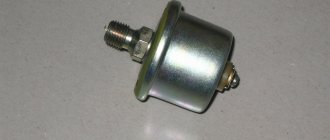
Oil temperature sensor
Why do you need an oil temperature sensor in a Hyundai Tucson engine?
The sensor monitors the temperature of the engine oil. When the permissible standards increase, the controller receives information about overheating. If the sensor is faulty or there is damage in the circuit, the ECM writes an error (P0196 - Engine oil temperature (EOT) sensor - range/performance problem) into memory, and as a result of this, the “CHECK ENGINE” indicator lights up - the engine goes into emergency operation mode.
Possible error codes on the on-board computer if the engine oil temperature sensor is faulty
P0195 - Engine Oil Temperature Sensor Circuit Malfunction P0196 - Engine Oil Temperature Sensor Signal Out of Range P0197 - Engine Oil Temperature Sensor Signal Low P0198 Sensor Signal High P0199 - Engine Oil Temperature Sensor Signal Intermittent
Hyundai Tucson oil temperature sensor original part code
39220-23990
Where is it located and how to replace it
The sensor is screwed into the rear of the cylinder head; to replace it you will need a 19mm open end wrench.
- Remove the top plastic casing;
- Disconnect the battery;
- We disconnect the contact chip by first prying up the wire retainer with a flat screwdriver;
- Using a wrench, unscrew the sensor and install a new one in its place, tighten it with a force of 20-40 Nm.
Checking the oil temperature sensor in the Hyundai Tucson engine
Just as in the case of the coolant temperature sensor, you will need a glass of hot water, a thermometer and a multimeter. We lower the sensor into the water and measure the change in resistance. If the received data matches the data from the table below, then the sensor is working.
Data for checking the oil temperature sensor
| Temperature, °C | Sensor resistance, kOhm |
| -20 | 16,52 |
| 0 | 6,00 |
| +20 | 2,45 |
| +40 | 1,11 |
| +60 | 0,54 |
| +80 | 0,29 |
Crankshaft sensor for Hyundai Accent: what it does, where it is located, price, part numbers
What the controller is responsible for:
- Fuel injection phase synchronization;
- Supplying a charge to ignite the fuel in the combustion chamber.
The timeliness of supplying the fuel mixture to the combustion chamber depends on the functionality of the controller.
DPKV reads the number of teeth and sends the received data to the ECU. The control unit increases or decreases the number of revolutions.
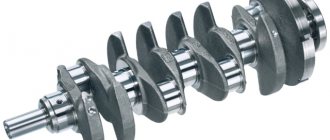
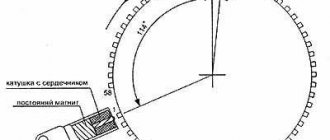
The angle of the teeth is six degrees. The last two teeth are missing. The "cut" is made to center the crankshaft pulley at TDC.
Where is the controller located: in the engine compartment, above the mud visor. Access to preventive maintenance equipment is through the top of the engine compartment.
In the first and second generation Hyundai modifications, the DPKV is installed under the thermostat housing.
Signs of a faulty crankshaft sensor:
- The engine does not start;
- Difficulty starting the engine;
- Idle speed is unstable;
- Sudden drop in power of the power unit;
- Detonation during operation;
- Passive acceleration dynamics;
- Increased fuel consumption;
- When driving “downhill,” the engine does not have enough power and “requires” a transition to a lower row.
The indicated symptoms are also signs of other malfunctions. Carry out comprehensive diagnostics using digital equipment for data objectivity.
| Name / catalog item | Price in rubles |
| Lucas SEB876, SEB877 | From 1100 – 1350 |
| Topran 821632 | From 1100 – 1350 |
| Meat & Doria 87468, 87239 | From 1100 – 1350 |
| Autolog AS4668, AS4655, AS4678 | From 1100 – 1350 |
| Standard 18938 | From 1100 – 1350 |
| Hoffer 7517239 | From 1100 – 1350 |
| Mobiletron CS-K004 | From 1100 – 1350 |
| Hyundai Accent: Hyundai/Kia 3918023910 | From 1100 – 1350 |
| TAGAZ CS-K002 | From 1100 – 1350 |
| 7517222 | From 1100 – 1350 |
| SEB1616 | From 1100 – 1350 |
| Kavo Parts ECR3006 | From 1100 – 1350 |
| Valeo 254068 | From 1100 – 1350 |
| Delphi SS10152-12B1 | From 1100 – 1350 |
| FAE 79049 | From 1100 – 1350 |
Technical characteristics of DPKV for the third and fourth generation Hyundai Accent:
- Winding resistance: 822 Ohm;
- Winding inductance: 269 MHz;
- Minimum sensor voltage amplitude: 0.46V;
- Maximum amplitude: 223V;
- Dimensions: 23x39x95 mm;
- Weight: 65 grams.
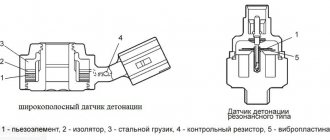
Knock sensor
Why do you need a knock sensor on a Hyundai Tucson?
To monitor the degree of detonation during operation of a gasoline engine, a knock sensor is provided in its design. It is one of the important elements of the electronic engine control system, which allows you to ensure fuel efficiency at maximum power. As is known, detonation occurs when the part of the fuel-air mixture removed from the spark plug, due to compression by the flame front, heats up and spontaneously ignites with the formation of an explosion. Detonation is accompanied by acoustic signs - a metallic knock in the crank mechanism.
Possible on-board computer error codes if the knock sensor is faulty
P0325 - Knock Sensor No. 1 Circuit Malfunction P0326 - Knock Sensor No. 1 Signal Out of Range P0327 - Signal Low P0328 Knock Sensor No. 1 Signal High P0329 - Knock Sensor No. 1 Signal Intermittent P0330 - Sensor Circuit Malfunction Knock Sensor No. 2 P0331 - Knock Sensor No. 2 Signal Out of Range P0332 - Knock Sensor No. 2 Signal Low P0333 - Signal High P0334 - Knock Sensor No. 2 Signal Intermittent
Where is the knock sensor located and how to replace it?
The knock sensor on a Hyundai Tucson is located in the upper part of the block between cylinders 2 and 3. If it fails, the ECM starts an emergency operation of the engine with a reduced ignition timing to prevent detonation. To replace the knock sensor you will need a 13 key.
- Disconnect the battery;
- Remove the decorative casing at the top of the engine;
- Squeezing the latches, disconnect the contact block;
- Unscrew the mounting bolt and remove the sensor;
- Installation and assembly are carried out in the reverse order.
Hyundai Accent Crankshaft Sensor
On cars of the Hyundai Accent family, the crankshaft position sensor (hereinafter referred to as CPKV) is installed in the engine compartment, at the end, above the dirt visor. This is typical for Hyundai Accent MC, Hyundai Accent RB.
In the Hyundai Accent X3, Hyundai Accent LC, the DPKV is installed under the thermostat housing.
“P0507” is the most common error that appears on the dashboard of owners of the third generation Hyundai Accent. The reason is a faulty crankshaft sensor.
The controller is designed to read the number of crankshaft teeth and transmit data online to the electronic control unit (ECU).
The on-board computer analyzes the received data, increases and decreases the crankshaft speed, and restores the ignition timing.
The average service life of the controller is 80 thousand km. The sensor cannot be prevented; it must be replaced entirely.
During systematic use of the vehicle, the DPKV wears out, as evidenced by unstable engine operation. The process of self-replacement is not at all difficult, but requires care on the part of the repairman.
Mass flow and inlet air temperature sensor (combined)
Why do you need a mass flow and incoming air temperature sensor?
The purpose of the mass air flow sensor is to control the incoming air to form the fuel-air mixture necessary for engine operation. In one stroke, 1 part of fuel and 14 parts of air should enter the cylinders; it is this proportion that allows the engine to operate in optimal mode; deviation from this norm leads to loss of power and excessive fuel consumption. The mass air flow sensor calculates the approximate mass air flow based on the crankshaft speed and throttle position.
Possible error codes on the on-board computer if the mass flow and incoming air temperature sensor is faulty
P0100 - Air flow sensor circuit malfunction P0101 - flow sensor signal out of range P0102 - flow sensor output low P0103 Air flow sensor output high P0105 - Air pressure sensor fault P0106 - Air pressure sensor signal out of range range P0107 - Air pressure sensor output low P0108 - Air pressure sensor output high air temperature sensor malfunction P0111 - Intake air temperature sensor signal out of range P0112 - Intake air temperature sensor P0113 - Sensor high intake air temperature
Catalog number of the original part of the mass flow and incoming air temperature Hyundai Tucson
28164-27900
Where is it located and how to replace it
The Hyundai Tucson mass air flow sensor is installed in the air duct between the air filter housing and the throttle valve. To replace it you will need a 10 key.
- Remove the plastic decorative cover;
- Disconnect the battery;
- Squeeze the latches on the terminal block and remove it;
- We loosen the clamps securing the air duct and remove it from one side of the mass air flow sensor and from the other, after which the sensor should remain in your hands, i.e. will be dismantled;
- Installation of the sensor is carried out in the reverse order of removal. However, make sure that the arrow on the housing coincides with the direction of air flow.
Checking the Hyundai Tucson mass air flow sensor
To check, you will need a multimeter and a thermometer. Switch the tester into ohmmeter mode and connect to terminals “1” and “5”. Using a thermometer, measure the air temperature and compare the measurement data with the data from the table. If they match, the Hyundai Tucson mass air flow sensor is working properly.
Crankshaft sensor for Hyundai Accent: what it does, where it is located, price, part numbers
What the controller is responsible for:
- Fuel injection phase synchronization;
- Supplying a charge to ignite the fuel in the combustion chamber.
The timeliness of supplying the fuel mixture to the combustion chamber depends on the functionality of the controller.
DPKV reads the number of teeth and sends the received data to the ECU. The control unit increases or decreases the number of revolutions.
The angle of the teeth is six degrees. The last two teeth are missing. The "cut" is made to center the crankshaft pulley at TDC.
Where is the controller located: in the engine compartment, above the mud visor. Access to preventive maintenance equipment is through the top of the engine compartment.
In the first and second generation Hyundai modifications, the DPKV is installed under the thermostat housing.
Signs of a faulty crankshaft sensor:
- The engine does not start;
- Difficulty starting the engine;
- Idle speed is unstable;
- Sudden drop in power of the power unit;
- Detonation during operation;
- Passive acceleration dynamics;
- Increased fuel consumption;
- When driving “downhill,” the engine does not have enough power and “requires” a transition to a lower row.
The indicated symptoms are also signs of other malfunctions. Carry out comprehensive diagnostics using digital equipment for data objectivity.
| Name / catalog item | Price in rubles |
| Lucas SEB876, SEB877 | From 1100 – 1350 |
| Topran 821632 | From 1100 – 1350 |
| Meat & Doria 87468, 87239 | From 1100 – 1350 |
| Autolog AS4668, AS4655, AS4678 | From 1100 – 1350 |
| Standard 18938 | From 1100 – 1350 |
| Hoffer 7517239 | From 1100 – 1350 |
| Mobiletron CS-K004 | From 1100 – 1350 |
| Hyundai Accent: Hyundai/Kia 3918023910 | From 1100 – 1350 |
| TAGAZ CS-K002 | From 1100 – 1350 |
| 7517222 | From 1100 – 1350 |
| SEB1616 | From 1100 – 1350 |
| Kavo Parts ECR3006 | From 1100 – 1350 |
| Valeo 254068 | From 1100 – 1350 |
| Delphi SS10152-12B1 | From 1100 – 1350 |
| FAE 79049 | From 1100 – 1350 |
Technical characteristics of DPKV for the third and fourth generation Hyundai Accent:
- Winding resistance: 822 Ohm;
- Winding inductance: 269 MHz;
- Minimum sensor voltage amplitude: 0.46V;
- Maximum amplitude: 223V;
- Dimensions: 23x39x95 mm;
- Weight: 65 grams.
Replacement of dpkv and msk. — Hyundai Sonata, 2.0 l., 2004 on DRIVE2
I ordered the sensor on Tuesday. Wait 3 days. Price 2100. Original. I agreed with a friend on Saturday about a replacement. He was at work for 24 hours. The sensor just arrived. Had arrived. The engine has cooled down a little. Off we go. Everything that needed to be filmed was filmed. Timing casing The power steering pump was unscrewed. We further realized that the timing belt was in the way. They didn’t want to take it off, they bent the belt a little, but in this position only the wires could get through, the chip couldn’t get through. I didn’t want to do any twisting. We decided to drop the timing belt, and at the same time change the MSK, since they had been lying there for 3 months already. The oil was eating up the engine, so we had to try to get by by replacing them. I'll go further and see what's going on with the consumption. In general, I arrived at 13.00. At 14.00 they started disassembling, at 21.00 everything was changed, and at 23.30 everything was assembled and checked. The reason for such a long repair was the rain, and since they were dismantling it in the open air, there were not many options. I borrowed a friend's golf course and went to get some film. I took 10m by 1.5m. We stuck 5m to the hood, threw it over the gas pipe and continued... It didn’t start the first time, I don’t know what the reason is, right now everything seems to be normal. I also immediately ran the diagnostics because I was tweaking it and saw an error...
I started it this morning, it started sluggishly, but it seemed fast. I saw a video from a man where, after replacing the fuel pressure regulator, everything worked out for him.
I think maybe I have the same problem. Or maybe the starter is drizzling, I’ll find out further. Thank you all for your attention.
Full size
We looked at the timing belt, pump, crankshaft oil seal - everything is normal
Price: 2,100 ₽ Mileage: 358,000 km
Page 2
I ordered the sensor on Tuesday. Wait 3 days. Price 2100. Original. I agreed with a friend on Saturday about a replacement. He was at work for 24 hours. The sensor just arrived. Had arrived. The engine has cooled down a little. Off we go. Everything that needed to be filmed was filmed. Timing casing The power steering pump was unscrewed. We further realized that the timing belt was in the way. They didn’t want to take it off, they bent the belt a little, but in this position only the wires could get through, the chip couldn’t get through. I didn’t want to do any twisting. We decided to drop the timing belt, and at the same time change the MSK, since they had been lying there for 3 months already. The oil was eating up the engine, so we had to try to get by by replacing them. I'll go further and see what's going on with the consumption. In general, I arrived at 13.00. At 14.00 they started disassembling, at 21.00 everything was changed, and at 23.30 everything was assembled and checked. The reason for such a long repair was the rain, and since they were dismantling it in the open air, there were not many options. I borrowed a friend's golf course and went to get some film. I took 10m by 1.5m. We stuck 5m to the hood, threw it over the gas pipe and continued... It didn’t start the first time, I don’t know what the reason is, right now everything seems to be normal. I also immediately ran the diagnostics because I was tweaking it and saw an error...
I started it this morning, it started sluggishly, but it seemed fast. I saw a video from a man where, after replacing the fuel pressure regulator, everything worked out for him.
I think maybe I have the same problem. Or maybe the starter is drizzling, I’ll find out further. Thank you all for your attention.
Full size
We looked at the timing belt, pump, crankshaft oil seal - everything is normal
Price: 2,100 ₽ Mileage: 358,000 km
www.drive2.ru
Self-diagnosis instructions
You can check the controller with a multimeter. Most motorists have equipment in their garage.
- We open the hood, above the mud visor we find a block with wires from the controller. Disconnect;
- We connect the terminals from the multimeter to the DPKV. We measure the resistance. The permissible range is 755 - 798 Ohms. Exceeding or underestimating is a sign of a malfunction.
- We make a decision on the advisability of replacing or installing new equipment.
The location of the DPKV may be different depending on the generation of the technical device.
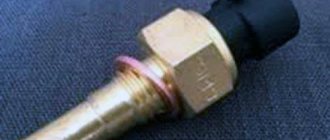
Coolant temperature sensor
Hyundai Tucson Engine Coolant Temperature Sensor Function
The purpose of the coolant temperature sensor is to monitor the coolant temperature in the engine cooling system. Just like all sensors, it interacts with the ECM, its information serves to adjust the operation of the power unit depending on thermal parameters. For example, after starting the engine, when it has not reached the optimal temperature (the fuel-air mixture is enriched), or during its operation (maintaining the nominal temperature with the thermal relay contact closed). If the sensor fails, the ECM stores a fault code and uses a bypass engine control program (calculates the approximate value of the coolant temperature based on engine operating time and air mass flow)
Possible error codes on the on-board computer if the coolant temperature sensor is faulty
P0115 - Coolant Temperature Sensor Malfunction P0116 - Coolant Temperature Sensor Out of Range P0117 - Coolant Temperature Sensor Low P0118 - Coolant Temperature Sensor High
Catalog number of the original part of the Hyundai Tucson coolant sensor
39220-38020
Where is it located and how to replace it
The coolant temperature sensor is screwed into the thermostat housing. To replace it you will need a 19 key
- Remove the protective plastic engine cover;
- Disconnect the battery;
- Further, the repair manual advises draining the coolant, but you can omit this procedure and close the hole with your finger after removing the sensor. In this case, coolant losses will be minimal;
- Disconnect the electrical harness connector;
- Using a 19mm wrench, unscrew the sensor from the thermostat housing and install a new one in its place, the tightening torque should be 15-20 Nm.
How to check the Hyundai Tucson coolant temperature sensor
To check, you will need a thermometer, a multimeter and a glass of hot water. Pour boiling water into it and after lowering the sensor into it, measure the resistance between terminals “1” and “3”. By monitoring the cooling process of the water with a thermometer, compare the data with those indicated in the table. If the received data does not match, the sensor must be replaced.
Data for checking the coolant temperature sensor
| Temperature, °C | Sensor resistance, kOhm |
| -20 | 14,98 |
| 0 | 5,79 |
| +20 | 2,45 |
| +40 | 1,15 |
| +60 | 0,59 |
| +80 | 0,32 |
How to replace the crankshaft sensor on a Hyundai Accent yourself
The time interval for prevention is 10 - 15 minutes, if tools and spare parts are available.
Step-by-step DIY replacement guide:
- we place the car on the overpass (inspection hole);
- above the dirt visor we find a block with wires, disconnect the terminals;
- Unscrew the DPKV lock (key set to “10”);
- we remove the controller, carry out troubleshooting of the seat, clean it from residual dust and dirt;
- insert a new sensor and assemble the structure in reverse order.
Replacing the DPKV on a Hyundai Accent with your own hands is completed.
Camshaft position sensor
Why do you need a camshaft sensor for a Hyundai Tucson engine?
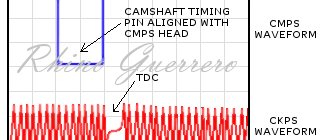
The camshaft position sensor is directly related to the operation of the gas distribution mechanism. Using DPRV pulses, which occur as a result of a change in the magnetic field due to the closure of the magnetic gap on the reference (a metal tooth on a disk mounted on the camshaft), the ECM controls the injection of the fuel mixture into the cylinders and its subsequent ignition. The operating principle of the sensor is based on the Hall effect, which is why it is sometimes also called a Hall sensor. If the camshaft driver is faulty or does not work correctly, the “CHECK ENGINE” indicator lights up on the instrument panel, and the ECM automatically switches the gas distribution mechanism to standby mode without changing the valve timing. In this case, the fuel mixture will enter all cylinders simultaneously, accordingly the engine will operate in emergency mode, and fuel consumption will increase significantly. In this case, it is necessary to replace the Hyundai Tucson camshaft position sensor with subsequent adjustment of the ECM software.
Possible errors on the on-board computer if the camshaft sensor is faulty
P0340 - Camshaft Sensor Malfunction P0341 - Camshaft Sensor Signal Out of Range P0342 - Camshaft Sensor Signal Low P0343 - Signal High P0344 - Camshaft Sensor Signal Intermittent
Hyundai Tucson camshaft sensor original part code
39350-37110
Where is it located and how to replace it
The DPRV is installed in the front part of the engine cylinder head. To replace it you will need a 10mm open end wrench.
- Remove the plastic protective top cover of the engine;
- Disconnect the battery;
- Squeezing the latch, remove the contact block from the sensor;
- Using a 10mm wrench, unscrew the fastening screw and remove the sensor from the block head. We install a new one in its place.
Characteristics and features of replacing controllers
For high-quality operation of the car, all its controllers must work properly. Therefore, you need to monitor the serviceability of the devices and change or repair them in a timely manner. To replace the controllers, you need to turn off the power to the car by disconnecting the negative terminal from the battery.
Crankshaft
The crankshaft position sensor (CPS) is located on the oil pump cover. From it, the control unit receives information about the operation of the crankshaft (the author of the video is Injector-Service Voronezh).
When replacing the DPKV, you need to disconnect the connector with wires, unscrew the fastening bolt, remove the old device and install a new one in its place. Next, assembly is performed in reverse order.
Idle move
This regulator executes the ECU command to close or open the air channel. Based on its data, it is calculated how much air must be supplied when the throttle valve is closed. By pressing the latch, disconnect the wire block. Unscrew the throttle cable holder bolt. Having unscrewed two screws, we disconnect the IAC from the throttle assembly and make a replacement.
The coolant temperature sensor responds to temperature changes. If the temperature is low, the resistance is high. Depending on the DTOZ voltage, the computer calculates the coolant temperature. When replacing the sensor, disconnect the wire block. Then you need to use a wrench to loosen the tightening and unscrew the temperature sensor. After checking, the DTOZH is either returned to its place or replaced with a working one. Installation is carried out in the reverse order of removal.
Speeds
The speed sensor is installed on the gearbox. It is activated when the drive wheels rotate. The ECU determines the speed of the vehicle based on the pulse frequency. When replacing, the wiring harness is disconnected by pressing the latch. Next, unscrew the fastening stud nut. Then the controller is unscrewed from the gearbox and checked for serviceability. If it is broken, a new one is installed and reassembled.
Detonation
The knock sensor (DS) is designed to monitor how the combustible mixture burns in the cylinders and send commands to the ECU to control the ignition angles. When detonation processes occur, the computer reduces the ignition timing.
The most accurate diagnosis of DD can be performed using an oscilloscope.
It is better to change the DD from below. Unscrew the two protection bolts and use a short “12” wrench to unscrew the sensor. A new device is installed in place of the old one. Do not tighten too much, as you may damage the thread.
To replace the anti-lock braking system sensor, loosen the front wheel ABS adjuster mounting bolt and remove it from the front suspension. Next, you need to unscrew the bracket, remove the wiring harness and disconnect them from the device. To replace the rear ABS sensor, you must remove the rear door trim. After disconnecting the wiring harness, you need to unscrew the mounting bolt and remove the regulator from the hole in the brake shield. After checking the sensors and wiring integrity, reassemble everything in reverse order.
Photo gallery “Replacing ABS sensors”
Oxygen
The oxygen sensor induces a voltage depending on the volume of oxygen in the exhaust gases. The readings affect the fuel ratio in the fuel assembly and the opening of the injectors. When replacing, you need to disconnect the regulator wire holder. Next, the old device is unscrewed from the collector and the new one is screwed in. The threads should be lubricated with graphite lubricant. Assembly is performed in reverse order.
Turning on the fan
The procedure for replacing the fan switch sensor is similar to replacing other regulators. First you need to disconnect the block with wires by pressing the latch. Then unscrew the device from the radiator and screw in a new one. The connection is done in the reverse order (the author of the video is Denremstroy).
Fuel
The fuel level sensor is located next to the fuel filter. To replace it, you need to remove the rear seat, behind which you will find a hatch hiding the fuel filter assembly. After opening the hatch, you need to disconnect the hoses from the filter. Having pulled out the fuel pump, you need to thoroughly rinse everything, removing any dirt that has fallen into it. Then we change the meter and install the pump in place, changing the O-ring and filter.
Crankshaft position sensor
What is the function and malfunction of the Hyundai Tucson engine crankshaft sensor
The main task of the DPKV is to synchronize the ignition timing and fuel supply by directing ECM pulses. If the sensor does not work correctly or fails, the car significantly loses acceleration dynamics, engine operation at idle and low speeds is unstable until it stops and cannot be restarted. Also, with this malfunction, the “CHECK ENGINE” indicator lights up on the instrument panel, this means that the ECM has received an error command and it has been stored in memory. To restore normal operation of the internal combustion engine, it is necessary to find and eliminate the malfunction, then connect the ECM to external software and reset the error. For diagnostics, it is recommended to check the sensor and ring gear for tooth damage, runout or other defects.
Possible error codes on the on-board computer if the crankshaft sensor is faulty
P0335 - Crankshaft position sensor error "A" P0336 - DPKV "A" error (missing one tooth) P0337 - Low level or short to ground DPKV "A" P0338 - High level or short to +12V DPKV "A" P0339 - Intermittent signal DPKV "A"
Catalog number of the original part of the Hyundai Tucson crankshaft sensor
39180-37150
Where is it located and how to replace it
The DPKV is located at the rear of the engine cylinder block, in front in the direction of travel of the vehicle. To remove and replace, you will need a flat-head screwdriver and an 8-mm open-end wrench.
- Remove the plastic decorative trim;
- Turn off the battery power by removing the negative terminal;
- Disconnect the contact block from the sensor by first releasing the latch;
- We unscrew the mounting bolt and remove the sensor from the cylinder block and install a new one in its place.
Hyundai Accent crankshaft sensor: where is it located, replacement
Since sometimes the car does not start, and I have so far found the reason, a crankshaft position sensor was ordered. It seems like they write that if it is not working properly, electricity will not be supplied and the car will not start. It can also cause the car to stall while moving. It's not difficult to find. It is located to the right of the oxygen sensor and sits on 1 bolt of 10. You can unscrew it with a long tube of 10 or a wrench like mine. And everyone seems to write that it’s easy to remove, but as always, it took me about 40 minutes to remove it. I unscrewed the bolt immediately, but the sensor itself became stuck to the engine. I think this would be easy to solve if VD40 was on hand, but there was none. Therefore, everything that was in the toolbox was used. As a result, when I was completely desperate and scratched my hands, at the very bottom of the box I found a holder from a spark plug wrench, stuck it in the hole of the sensor where there was a 10-point bolt and it gave in) I removed it so that the eyelet broke off at the sensor. I think five seconds and I’ll install a new one. Yeah, naive. Although it is original, as it turned out, either it should be like this, or it is defective, in general, the old sensor was completely pressed against the engine, but this one is not. At first I thought that the seal was in the way, so I took it off and tried it on, exactly the same. In general, I put the sensor on a flat surface, and it goes straight in the area of the hole, and then closer to the sensor above. And with the old one, the entire site is flat. Therefore, the sensor itself does not fit tightly to the engine. In short, I set it like this, checked it, the car starts. I took it off again, applied sealant-gasket where it did not fit, put it in place, and tightened it. I waited a bit, started it, everything seemed fine. In the morning it was minus and snowing, it started with half a turn. We'll see how it behaves further)))
Honda CR-V crankshaft sensor problem
amberovsky
Guest
Kiryan
True Hondavod
amberovsky
Guest
As they tell me, the problem is that no one sells the distributor for disassembly, only the whole one.
Kiryan
True Hondavod
As they tell me, the problem is that no one sells the distributor for disassembly, only the whole one.
The distributor has nothing to do with it. This is a CKF sensor error, but will most likely cost you an electrical repair. wiring.
amberovsky
Guest
Thank you very much for the detailed information.
I was in the "service". The technician cleared the code (the check light was on, he couldn’t turn it off, it came on again) - he says: the error is “no signal from the IBS sensor.” Then he disconnected the group of contacts from the distributor (if I call it correctly - to the left of the engine, it combines sensors from the crankshaft and camshaft), rang the bell, poked me into the Honda book and said that according to the book there is one resistance, but mine is different (I don’t remember — I’m not an electrician) — that means your sensor has died, and it’s in the distributor. Change it.
I want to believe you - your solution is apparently cheaper, but who is right?
Added after 20 minutes 45 seconds More: the master said that this is a modification of the car in which the crankshaft and camshaft sensors are located together in the above-mentioned distributor. This is a 98 HONDA CR-V, American
Kiryan
True Hondavod
Thank you very much for the detailed information.
I was in the "service". The technician cleared the code (the check light was on, he couldn’t turn it off, it came on again) - he says: the error is “no signal from the IBS sensor.” Then he disconnected the group of contacts from the distributor (if I call it correctly - to the left of the engine, it combines sensors from the crankshaft and camshaft), rang the bell, poked me into the Honda book and said that according to the book there is one resistance, but mine is different (I don’t remember — I’m not an electrician) — that means your sensor has died, and it’s in the distributor. Change it.
I want to believe you - your solution is apparently cheaper, but who is right?
Added after 20 minutes 45 seconds More: the master said that this is a modification of the car in which the crankshaft and camshaft sensors are located together in the above-mentioned distributor. This is a 98 HONDA CR-V, American
source
Hyundai Accent Crankshaft Sensor
On cars of the Hyundai Accent family, the crankshaft position sensor (hereinafter referred to as CPKV) is installed in the engine compartment, at the end, above the dirt visor. This is typical for Hyundai Accent MC, Hyundai Accent RB.
In the Hyundai Accent X3, Hyundai Accent LC, the DPKV is installed under the thermostat housing.
“P0507” is the most common error that appears on the dashboard of owners of the third generation Hyundai Accent. The reason is a faulty crankshaft sensor.
The controller is designed to read the number of crankshaft teeth and transmit data online to the electronic control unit (ECU).
The on-board computer analyzes the received data, increases and decreases the crankshaft speed, and restores the ignition timing.
The average service life of the controller is 80 thousand km. The sensor cannot be prevented; it must be replaced entirely.
During systematic use of the vehicle, the DPKV wears out, as evidenced by unstable engine operation. The process of self-replacement is not at all difficult, but requires care on the part of the repairman.
Throttle position sensor
Why do you need a throttle position sensor?
The TPS monitors the position of the throttle valve while the engine is running. Why is this necessary? While the car is moving, the driver presses the gas pedal at different speeds and amplitudes in order to provide the necessary air supply for preparing the fuel-air mixture. The TPS transmits data to the ECM, which in turn, depending on the engine operating modes, gives commands to other systems to optimize performance. internal combustion engine processes. For example, when starting the engine, the sensor monitors the angle of deflection of the damper; if it is open more than 75%, the process of purging the cylinders is automatically started so that the combustion chambers are not flooded with the fuel mixture. If the damper is closed, the engine goes into idle mode. On a Hyundai Tucson, the TPS is a variable resistor that is connected to the throttle axis, and it is located directly on it.
Possible error codes on the on-board computer if the throttle position sensor is faulty
P0121 - Throttle Position Sensor "A" Out of Range P0122 - Throttle Position Sensor "A" Output Low P0123 - Throttle Position Sensor "A" Output High
Hyundai Tucson throttle position sensor original part code
35170-22600
How to replace TPS on Hyundai Tucson
To remove and then replace the throttle position sensor, you will need a Phillips screwdriver.
- Remove the protective plastic cover from the top of the engine;
- Disconnect the battery;
- Squeeze the latch and disconnect the terminal block;
- Unscrew the two screws securing the TPS;
- Install the new sensor in reverse order.
How to check TPS on Hyundai Tucson
To check you will need a multimeter. After removing the terminal block, measure the resistance on contacts “1” and “2” at the extreme positions of the throttle valve. When fully closed 0.71-1.38 and fully open - 2.7 kOhm.
Crankshaft sensor for Hyundai Accent: what it does, where it is located, price, part numbers
What the controller is responsible for:
- Fuel injection phase synchronization;
- Supplying a charge to ignite the fuel in the combustion chamber.
The timeliness of supplying the fuel mixture to the combustion chamber depends on the functionality of the controller.
DPKV reads the number of teeth and sends the received data to the ECU. The control unit increases or decreases the number of revolutions.
The angle of the teeth is six degrees. The last two teeth are missing. The "cut" is made to center the crankshaft pulley at TDC.
Where is the controller located: in the engine compartment, above the mud visor. Access to preventive maintenance equipment is through the top of the engine compartment.
In the first and second generation Hyundai modifications, the DPKV is installed under the thermostat housing.
Signs of a faulty crankshaft sensor:
- The engine does not start;
- Difficulty starting the engine;
- Idle speed is unstable;
- Sudden drop in power of the power unit;
- Detonation during operation;
- Passive acceleration dynamics;
- Increased fuel consumption;
- When driving “downhill,” the engine does not have enough power and “requires” a transition to a lower row.
The indicated symptoms are also signs of other malfunctions. Carry out comprehensive diagnostics using digital equipment for data objectivity.
| Name / catalog item | Price in rubles |
| Lucas SEB876, SEB877 | From 1100 – 1350 |
| Topran 821632 | From 1100 – 1350 |
| Meat & Doria 87468, 87239 | From 1100 – 1350 |
| Autolog AS4668, AS4655, AS4678 | From 1100 – 1350 |
| Standard 18938 | From 1100 – 1350 |
| Hoffer 7517239 | From 1100 – 1350 |
| Mobiletron CS-K004 | From 1100 – 1350 |
| Hyundai Accent: Hyundai/Kia 3918023910 | From 1100 – 1350 |
| TAGAZ CS-K002 | From 1100 – 1350 |
| 7517222 | From 1100 – 1350 |
| SEB1616 | From 1100 – 1350 |
| Kavo Parts ECR3006 | From 1100 – 1350 |
| Valeo 254068 | From 1100 – 1350 |
| Delphi SS10152-12B1 | From 1100 – 1350 |
| FAE 79049 | From 1100 – 1350 |
Technical characteristics of DPKV for the third and fourth generation Hyundai Accent:
- Winding resistance: 822 Ohm;
- Winding inductance: 269 MHz;
- Minimum sensor voltage amplitude: 0.46V;
- Maximum amplitude: 223V;
- Dimensions: 23x39x95 mm;
- Weight: 65 grams.
Why did the Check Engine light come on on a Honda?
The causes of the Check Engine light on various Honda models can be any malfunction in electrical circuits or actuator components. In this case, the vehicle’s electronic system receives a signal pulse with parameters different from the tolerance range. This data is written to the control unit memory as an error.
The most common reasons are:
- Violation of the composition of the mixture. Caused by low quality fuel, breakdown of any fuel system sensor, clogged injection nozzles or failure of the fuel supply pump from the tank.
- Mechanical problems in the engine. They are determined by sensors, for example, valve timing offset.
- Breakage of sensors, rupture or oxidation of wiring harnesses between them.