REED WATER LEVEL SENSOR
One of the most popular types of sensor, which is an improved version of float devices with a mechanical switch.
Reed level gauges are characterized by their low cost, simple and reliable design, and the ability to monitor changes in water level over a wide range. There are several types of reed sensors. In the simplest version, the mechanical switch of the float sensor is replaced with a reed switch, which somewhat increases the reliability of the device (this is how side-mounted reed switch level meters are designed). But more often a circuit with several reed switches and a float with magnets is used.
As an example, we can consider one of the most popular designs. The sensor is made in the form of a tube through which the float moves freely. Reed switches are installed inside the tube, the number of which may vary depending on the requirements for measurement resolution.
That is, the more water levels you need to monitor, the more reed switches you need to install.
When the water level changes, the float rises or falls, causing the built-in magnet to activate the reed switch, which is connected to the control circuit. In the simplest version, one reed switch is used to signal the maximum water level.
The housing of reed switch sensors can be made of various materials; the budget version uses plastic; more expensive and durable models are made of stainless alloys. The choice of material mainly depends on where the sensor will be installed (mechanical strength and reliability requirements).
Reed sensors are one of the most common and are often used in domestic autonomous water supply systems. The simple design allows you to make the sensor yourself, while its reliability and measurement accuracy will be at a fairly high level. Reed level meters can be used for a variety of liquids.
In particular, these devices are widely used to control fuel levels on vehicles and are used in the chemical and oil and gas industries.
If we evaluate the above options for water level sensors based on the criteria of reliability and measurement accuracy, then electronic level meters will come first.
But it is worth considering that their technical characteristics often exceed the requirements for domestic water supply systems. Therefore, float and reed sensors are the best option, with an affordable price and easy installation.
2012-2019 All rights reserved.
How to check the device for serviceability
Insufficient coolant level sensor in the expansion tank - check and replacement
So, you have noticed that your engine often gets very hot, or other negative signs associated with the cooling device have been discovered. To begin with, you should check this device, and there are two ways, which we will take a closer look at.
The first option is to remove the device
- With the engine running, check the readings shown on the instruments. If the arrow is at the maximum height, then the engine is still in a cold state. Here you should break the contacts on the device and look: if the arrow points down, then it’s time to replace the coolant temperature sensor of your car.
- When the pointer remains in the same place, try to examine the system contacts; a short circuit often occurs in them. Then the problem can be fixed much faster.
- Another type of failure: the engine heats up evenly, and the instrument needle begins to jump in one direction or another. There is a high probability that the issue is with fuses that are inoperative.
- If the fuses are working, it is necessary to close the contact to ground, and again, if the arrow sharply goes up, you can safely state that there is a malfunction in the operation of the DTOZH.
Second option
- You need to take a multimeter and turn it on in resistance mode.
- Then arm yourself with a thermometer that has notches above one hundred degrees Celsius.
- Take a durable container that will not deform when the coolant is heated to a high temperature.
- After that, you need to connect the probes of the device to the sensor.
- Having made the necessary connections, the DTOZH is placed in a prepared heat-resistant container and heated.
- Here you should monitor the performance of two devices at once.
Below is the data by which you can determine the health of the sensor. The method allows you to check a new device before installing it in place of a faulty device.
The first indicators are temperature C, the second indicate resistance in Ohms.
- 30 – 1350-1880
- 50 – 585-820
- 70 – 280-390
- 90 — 155-196
- 110 — 87-109
How much will it cost to replace a cooling sensor at a service station?
Replacing the coolant temperature sensor of a VAZ 2114 will cost the car owner no less than 1,500 to 2,000 thousand rubles. And you will have to pay this money only for the work itself, and you also need to understand that you will have to buy some parts. Therefore, experienced car owners recommend replacing the cooling sensor on their own. The procedure is simple; almost every car enthusiast who has at least some slight understanding of the VAZ 2114 will be able to do this on their own.
Detailed instructions for replacing the sensor are in this video:
Below we will present another solution to this problem.
High signal level of the coolant temperature sensor We know how to fix it
Lada Granta Blonde Logbook Installing the coolant temperature indicator
- Accelerating warming up of the power unit to operating temperature;
- Responsible for creating comfortable conditions inside the car.
- Problems starting the engine in any condition;
- Significant increase in gasoline consumption;
- Changes in the composition of exhaust gases;
- Poor engine controllability;
- Flashing error code on the signal board.
- There is a break or disconnection of the connector with wires from the DTOZH;
- The “mass” wire of this device is disconnected or broken;
- The device connection wires are accidentally mixed up;
- There is a short circuit between the signal core and the power circuit;
- Break inside the sensor;
- Problems with the electronic control unit.
AutoFlit.ru
How to change the temperature sensor on a VAZ-2115
The instructions for replacing the VAZ-2115 DTOZH are clear even to a beginner:
- Dismantle the old model, first draining the antifreeze from the car.
- Using the key number 21, place the new unit in the right place.
- Apply heat sealant while tightening the threads.
- Fill in new antifreeze; before using this special product, it is advisable to clean the entire cooling system.
Why the new unit may not work:
- You may have bought a defective device, which is why experts recommend checking the serviceability of the product with a multimeter.
- If there was an antifreeze leak, there is a possibility of the generator getting dirty.
- Screw the sensor tighter.
Step-by-step video instructions for replacing the coolant temperature sensor can be viewed below:
In a VAZ 2109 car, the coolant temperature sensor plays a very important role. Without it, the system will not function properly, which can lead to overheating or hypothermia of the machine. Therefore, if any problems are observed with the sensor, they need to be diagnosed in advance so that later it is not too late. On a VAZ 2109, you can easily check the coolant temperature sensor on your own.
How to check the coolant temperature sensor of a VAZ-2114
If the coolant temperature sensor is faulty, then the engine on the VAZ-2114 may boil no matter where you are driving your car. It is enough not even to get into traffic jams for the engine to overheat.
Video of replacing the coolant temperature sensor on a VAZ-2114
In most cases, a faulty sensor cannot be repaired, but before purchasing a new one, you need to check the old one; the problem may be in the wiring and not in the sensor itself.
Monitoring the temperature indicator on the instrument panel
In order to prevent such a malfunction in advance, it is necessary to monitor the indicator on the instrument panel, because it will be the first to signal a problem, moving the arrow to the red zone. Below we will tell you how to check the coolant temperature sensor on a VAZ-2114 with your own hands.
Where can I find the temperature sensor?
The VAZ-2114 is equipped with a liquid-type engine cooling system, that is, the whole process occurs due to the circulation of antifreeze or antifreeze inside the system.
Pay attention to this article in order to find out what is better antifreeze or antifreeze!
Cooling system VAZ-2114
The entire system includes the following elements: cooling and heating radiator, radiator fan, thermostat, pump (pump - approx.), expansion tank, various pipes and finally, a coolant temperature sensor.
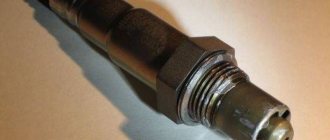
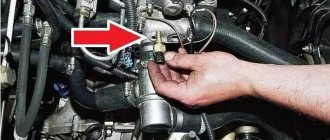
The sensor is easy to find under the hood.
The coolant temperature sensor is located in the area between the cylinder head and the thermostat, that is, on the engine block itself.
Its body has edges (for a wrench - approx.), for the greatest ease of dismantling, and connection is made by connecting a block with two wires.
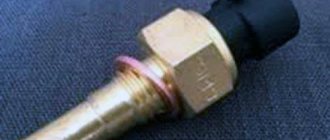
Design
The design of the sensor can be compared to a conventional resistor, which changes its resistance parameters depending on the degree of engine heating.
Major sensor failures
There are not many reasons why the coolant temperature sensor may fail, because due to the simplicity of its design there is nothing to break there
And if it does break, you should pay attention to the following:
- There is no contact with the sensor - the cause of such a problem can be a simple break, or deformation of the wire due to the effects of corrosion on it.
- The device has failed due to the expiration of its service life.
Checking the sensor yourself
As you can already understand from the above, the temperature sensor transmits the level of heating of the coolant to the dashboard to the driver, so that the driver can independently visually assess its condition.
And in order to diagnose it, you need to do the following:
- We start the car in advance, let it idle until the needle shows the maximum operating temperature, that is, 90-98 degrees.
- Next, you need to disconnect the contacts and look at what the arrow on the instrument panel will indicate.
In this case, there may be two types of further course of events.
- The arrow remained motionless and does not react in any way to what is happening - the reason lies in the wiring or in the sensor itself. It is necessary to check the wires themselves for integrity, and only then proceed directly to the sensor.
- The arrow goes to “zero” - in this case it is necessary to check the fuse. If the fuse in the block is intact, and when the contact closes to ground, the arrow begins to jump, the temperature sensor does not work.
Checking with a multimeter
Checking the operation of the coolant temperature sensor with a multimeter
Before you start testing in multimeter mode, you need to prepare a container that will be able to withstand a temperature of 100 degrees, a water thermometer and a boiler, with which we will heat the prepared antifreeze for testing the sensor.
- On the multimeter, set the values to ohmmeter test mode.
- Next, we attach the probes to the body and to the sensor contacts.
- We put the sensor in a container with antifreeze and slowly begin to heat it.
We compare the data you receive with the results of a fully functional device. And if they are lower or higher than these readings, then the sensor can be considered faulty.
Thermometer and multimeter readings with resistance test mode.
Possible sensor malfunctions
If the DTOZH breaks down, the ECU considers that the engine temperature is zero, so it enriches the combustible mixture. A broken device must be replaced as quickly as possible. Most often, a meter malfunction is a calibration violation. In this case, the resistance does not change correctly, and since the control unit is based on meter readings, it does not work correctly.
You can identify a DTOZ malfunction by turning on the fan. It should turn on if permissible values are exceeded. True, there is also a fan switch sensor, which can also fail.
Thus, the fan may not turn on if:
- contacts have oxidized;
- wiring is damaged;
- sensors are faulty.
Incorrect operation of the DTOZ leads to increased fuel consumption, detonation, and high idle speeds.
The most dangerous thing is if the engine temperature sensor is broken. In this case, the fan does not start, there is no cooling of the engine, it overheats, and as a result, the cylinder head may misfire.
How to check the coolant temperature sensor
Before you start checking the sensor itself, you need to make sure that there is no fault in the car's wiring. For the DTOZH to work correctly, a voltage of 5 Volts must be constantly supplied to it. This is quite simple to check; you need to disconnect the wires from the coolant temperature sensor and check the voltage output from them with the engine running using a voltmeter (multimeter). If no problems are found and 5 Volts are supplied to the sensor, you can begin diagnosing the thermistor itself.
To check the coolant temperature sensor for correct resistance determination, you will need: a multimeter, a thermometer, an electric kettle (or other device capable of constantly heating water), and a key for removing the sensor.
When the tools are prepared, the first thing you need to do is remove the sensor from the car. Next, you can proceed in two ways.
Method 1: Checking the DTOZH in an electric kettle
The first way to diagnose a sensor is to test it using an electric kettle. To do this you need:
- Place a thermometer (preferably an electronic one, since you will need to measure high temperatures) in a kettle with cool water;
- Next, connect a multimeter to the sensor (in the position for measuring resistance);
- Place the sensor in the kettle;
- Measure the sensor reading and write it down;
- Turn on the kettle and record the sensor resistance readings when the key heating points are reached - +10, +15, +20 degrees Celsius and so on;
- Compare your results with the table below.
If the values obtained differ greatly from the ideal values, then the coolant temperature sensor is faulty and will need to be replaced.
Method 2: Checking the DTOZH without a thermometer
A less accurate but easier way to check the sensor is without using a thermometer. Its essence lies in the fact that when water is heated, it reaches 100 degrees Celsius, and its temperature cannot rise higher. Accordingly, this point can be taken as a control value and the resistance of the sensor can be measured at a given temperature.
Place the coolant temperature sensor in boiling water and measure its resistance using a multimeter. At a temperature of 100 degrees, the sensor should show a value of about 177 ohms. Taking into account the error in reducing the temperature during the boiling process (to approximately 95-97 degrees Celsius), at the time of measurement the sensor resistance should be at a level of about 210-190 Ohms.
Methods for checking the regulator for operability
Before checking the meter, you should first check the serviceability of the fuses, the integrity of the wiring and measure the incoming voltage, which should be 5V. If there are no wiring faults and the voltage is normal, then the meter is checked for resistance. To check it, you need to remove it (the author of the video is Car Design and Repair).
To check, you will need an electric kettle, a thermometer to measure the outside temperature, and a multimeter set to resistance measurement mode.
It is advisable to take an electronic thermometer not to measure the outside air temperature.
There are two ways to check:
- At first, the thermometer is placed in an electric kettle. In this case, the device must be connected to the tester. The electric kettle should be plugged in and monitor the readings. As the temperature increases, the resistance should increase. When it becomes +15 degrees, the resistance should be 4450 Ohms, +40 - 1459 Ohms. At 100 degrees, the resistance reaches a minimum of 177 Ohms. If the values are different, this indicates a malfunction.
- If there is no thermometer, then the meter is checked after the water boils. When immersed in freshly boiled water, the multimeter should display a resistance of slightly more than 177 ohms. Otherwise the device is broken.
Why does the temperature light on the car panel light up?
Not so long ago, cars were designed quite simply. Look at the dashboards of any old car - speedometer, tachometer and a couple of indicators. But everything is changing. Machines are becoming more and more advanced in technical terms. Accordingly, the dashboard becomes more complicated. It became difficult to figure it out on my own. And salespeople at a car dealership often skimp on their responsibilities. They say, you don’t need to pay attention to these icons, they’re lit and leave it to yourself. But that's not true.
If the temperature sensor is on, you should immediately pay attention to it.
Indicators signal dangerous changes in vehicle operating parameters. Therefore, the motorist must not only know why the engine temperature light is on, but also be able to take the necessary measures.
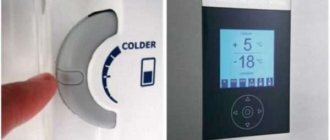
Your temperature indicator lights up
This light comes on when you turn on the ignition. This is fine. But a few seconds after the engine starts running, it should go out. If it continues to light, the coolant level in the cooling system is too low or there is a malfunction in the system itself. It happens that the indicator lights up directly while driving. This again may be a consequence of a lack of antifreeze. Another option is that the cooling system can no longer cope with the increase in the temperature of the unit.
It is worth noting that the color indication of different brands of cars may vary greatly. For example, blue indicates a low engine temperature, and red indicates a high temperature. You can learn about these subtleties from the operating instructions for a particular car.
Why is engine temperature so important?
The internal combustion engine, which is installed in modern cars, is not the simplest unit. It consists of a large number of both individual mechanisms and entire systems. The operation of the “iron heart” of a car is influenced by many different factors. But the temperature regime is one of the key ones.
If the temperature of the unit is less than optimal, the process of formation of the fuel mixture in the cylinders will suffer. As a result, we have a decrease in internal combustion engine power and accelerated wear. Engine overheating is even more dangerous. It leads to deformation of the cylinder head, the cooling and lubrication systems will lose their tightness. A drop in antifreeze level and increased oil consumption is not the worst option. The consequence of overheating may well be loss of elasticity of the piston rings, damage to the cylinder walls and a seized engine as the final sad result. In any case, it will not be possible to do without lengthy (and costly) repairs.
What to do
So what should you do if the temperature indicator lights up? First of all, you must immediately turn on the heating system (this will remove some of the heat from the unit). Calmly, without sudden acceleration, choose a quiet place and stop. Before turning off the engine, you need to open the hood and make sure the fan is working to cool the radiator.
The temperature lamp may be on due to a faulty thermostat.
Now you can turn off the ignition. Touch the radiator. Cold? Most likely the thermostat has failed. Does your hand feel warm? The radiator silted up or the pump “flew”. Don't forget to check the drive belt tension.
Take a break - the internal combustion engine should cool down. If you open a hot engine, you risk being burned by steam from the radiator neck. A sign of sufficient cooling will be the restoration of softness of the water pipes. Now you can open the radiator and bring the coolant level to normal. You cannot add antifreeze to a hot engine! The block head may crack.
Now slowly, without pressing the gas pedal too hard, drive to the garage. It is better to drop off fellow travelers, if any.
If the temperature sensor is on, do not accelerate too much.
So, if the engine temperature indicator lights up, you need to:
turn on the heating; stay; check the fan with the engine running; shut down the unit; estimate the temperature of the radiator; check the tension of the drive belt; wait until the engine cools down; add coolant; Drive carefully to the garage. https://www.youtube.com/embed/xW-UeQKWXmQ
https://youtube.com/watch?v=xW-UeQKWXmQ
Summarize
A lit engine temperature light indicates a serious problem. Ignoring this signal will lead to serious damage to the vehicle and very expensive repairs.
Engine cooling system
Any driver, both beginner and experienced, knows very well that the most important element of any car is the engine.
No car can move without an engine. Since the motor operates with flammable substances, it is subject to the release of a large amount of heat. The heat generated from burned fuel has a detrimental effect on the condition of engine mechanisms and can lead to their premature failure. To prevent engine overheating, they use closed cooling systems, which are a system of pipes and channels. This system moves coolant, which receives heat from the engine and is cooled in the radiator. After this, it is returned back to the engine, and the cycle continues throughout the entire operation of the installation.
To relieve excess pressure in the cooling system, an expansion tank is provided. As the coolant temperature and pressure increase, the gas resulting from the excess pressure escapes through the hole in the expansion tank.
The second purpose of this tank is to control the coolant level. It is in this that the coolant level sensor is installed.
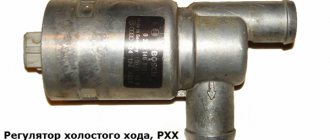
Reed switch as a fuel level sensor.
With the introduction of electronic units into the car, a cooling system fluid level sensor, a fluid level sensor in the windshield washer barrel and an oil level began to appear. The operation of these sensors is based on reed switches. A reed switch is a pair or several pairs of ferrimagnetic contacts sealed in a glass flask. When a reed switch enters the magnetic field of a permanent magnet or electromagnet, the contacts close. The reed switches in the sensors are located in the lower part, and the float contains a permanent magnet. When the liquid level is low, the float moves down and the reed switch enters the magnetic field, which leads to the closure of the contacts. The main disadvantage of such sensors is the low power of the reed switch contacts, so they are used only with electronic units that do not require high current to operate.
With the development of electronics, other types of sensors appear, for example based on a Hall sensor.
admin12/03/2013
A comment
Name *
Website
This site uses Akismet to reduce spam. Find out how your comment data is processed.
« Throttle Position Sensor
Ropits - personal robotic intelligent vehicle »
Tags
VAZ, VAZ malfunctions Sensors Ignition Injector Devices Starter Circuits Electric cars Power supply VAZ 2110 gazelle gazelle business recorders car repair
Recent Entries
- Laser headlights.
- Advantages and disadvantages of halogen lamps
- Design and principle of operation of parking sensors
- Multifunctional device Roadgid X7 Hybrid GT
- Malfunction of the GAS ignition system
Archives
Archives Select month September 2020 August 2020 July 2019 December 2020 August 2020 July 2020 June 2020 May 2020 April 2017 March 2020 December 2020 November 2020 October 2020 September 2016 August 2020 July 202 0 June 2020 May 2020 April 2020 March 2016 February 2020 November 2020 October 2020 August 2020 July 2020 June 2015 May 2020 April 2020 March 2020 February 2020 January 2015 December 2014 November 2014 October 2014 September 2014 August 2014 July 2014 June 2014 May 2014 April 201 4 February 2014 January 2014 December 2013 November 2013 October 2013 August 2013 June 2013 May 2013 March 2013 February 2013 January 2013 November 2012 October 2012 September 2012 August 2012 July 2012 June 2012 May 2012 April 2012 March 2012 February 2012 January 2012 December 2011 November 2011 October November 2011 September 2011 August 2011 July 2011 June 2011 May 2011 April 2011
Categories
- Accumulator battery
- Video
- Generator
- Sensors
- Diagnostics
- Ignition
- News
- Equipment
- Devices
- Repair
- Spark plug
- Starter
- Scheme
- Devices
- Electric cars
- Electricity supply
We are in social networks
Autoelectrics@ All rights reserved. When copying site materials, you must provide a link to the site.
Condition measurement
The oil condition sensor allows for a more rational use of the coolant lubricant resource, since the replacement period is determined not only by the manufacturer’s mileage recommendations, but also by the actual chemical and physical composition of the engine oil.
The device of the condition and oil level sensor of the N57 engine from BMW.
The meter consists of two cylindrical capacitors (6). The outer and inner metal tubes are used as electrodes, between which there is a dielectric - oil. The operating principle is based on a change in the dielectric properties of the oil during aging, which affects the capacitance of the capacitors.
When the level drops, the capacitance of the upper capacitor (5) changes. The temperature is continuously measured using a platinum temperature sensor (9). The change in capacitive characteristics of the capacitors, as well as the signal from the temperature sensor, is converted into a digital signal and sent to the DME unit. Based on the received data, the DME unit calculates oil change intervals.
How to check the coolant temperature sensor Current diagnostic methods
- Stopping the engine, squeezing the handbrake, locking the wheels for safety;
- Using the key “10”, unscrew the air filter cover and take out the filter element itself. We carry out diagnostics along the way, and if there is severe contamination, we clean it or replace it with a new one;
- Using the “12” key, remove the negative terminal from the battery;
- Using all safety measures, carefully unscrew the drain valve on the radiator, first placing a 10-liter container for antifreeze underneath. Be careful, as liquid that is too hot can cause burns on your hands;
- Remove the terminal blocks from the DTOZH;
- Using keys “19”, remove the sensor itself.
- We lower the dismantled sensor into a container with coolant;
- We connect the wires of the digital multimeter to the terminals on the DTOZh;
- We begin to heat antifreeze or antifreeze on a gas stove with a blowtorch;
- 20°C - 3620 Ohm;
- 40°C - 1559 Ohm;
- 60°C - 697 Ohm;
- 80°C - 342 Ohm;
- 97-100°C - 187 Ohm.
- Turn off the engine, leave it to cool a little so that you can work on the parts;
- Place a container under the bottom of the radiator to drain the antifreeze, unscrew the drain plug in the radiator;
- While the liquid is draining, disconnect the battery terminal;
- Using a Phillips-head screwdriver, unscrew the two pipe clamps;
- Get the thermostat itself. Before installing a new one, you should diagnose all cooling system pipes for integrity. Only after this can you install a new one;
- Assembly is carried out in reverse order. If the fluid is not dirty, you can fill in the old one, otherwise you will have to buy a new one, since rust particles can damage the “water jacket” during circulation;
- Start the car and warm it up to a temperature of 80 C. Watch the thermostat valve open. The average service life is about 30,000 km. mileage, provided that the part is original and not a cheap fake.
AutoFlit.ru
Replacing a non-functioning sensor
If this element stops functioning, it must be replaced. It is necessary to carry out such work on a cold engine, since it involves completely emptying the expansion tank reservoir.
- To begin work, you need to open the hood and depressurize the cooling system. This is done by opening the filler cap.
- Remove several bolts securing the expansion tank to the fender body.
- Place a small container where you can drain the remaining refrigerant, and then remove the clamp of the lower pipe of the cooling system.
- Drain the antifreeze into a container, then remove the tank completely and put it aside, so it will be more convenient for you to work with the element.
- Place this tank on the table, remove the fixing bracket holding the sensor in the recess of the tank.
- Rotate this element in several directions, thereby freeing it from its seat. This part is secured with a rubber O-ring.
- After dismantling the sensor, it is necessary to clean the installation cavity and then lubricate it with oil.
- Install the new sensor into the seat, then secure it with the retaining ring.
General position
It's no secret that the engine in any car is the main part of its design. When creating the car, engineers took into account all the necessary points related to ensuring the safety and reliability of all transport elements.
Thanks to this part, reliable control of the expander required in the system is ensured. The operating principle of this part is quite simple, since simplicity of design is the key to reliability.
Inside this part there is a special winding that creates an electromagnetic field; a round magnet (float) is fixed around this winding, which changes the resistance at the output of the winding. This system is called a “reed switch”. The main control unit monitors the performance of this sensor and changes the data in the event of a particular winding resistance. Thus, the refrigerant level inside the system is carefully monitored.
This element is located inside the expansion tank, usually at the bottom of its body. As a result, when the liquid exceeds the float threshold, the sensor informs the control unit that the level is within a positive tolerance. If the volume of refrigerant in the tank drops below the float, the sensor changes the resistance, thereby informing the driver that the level is critical and the antifreeze supply should be replenished. This scheme is the most common among modern cars.
The coolant level must be checked in the morning with the engine completely cold, as antifreeze tends to expand. You also need to monitor the state of the electrical contacts on the circuit coming to this sensor. There is a high probability that certain wires with which the sensor monitors the antifreeze level may be damaged. As for the repair and restoration of this unit, this process is impossible. The production technology of this element is based on a completely sealed housing, which is cast in special molds, and its disassembly is completely impossible. Fortunately, the cost of such parts is kept to a minimum, and almost every car owner can fully replace it.
Possible sensor malfunctions
The temperature sensor is usually installed between the head and the thermostat. It has two contacts. Each of them performs its specific function. So, the first one is needed to give readings to the control unit. The second one turns on the fan.
Note: next to it there is a single-contact sensor, which is usually confused with the second one.
The main purpose of the sensor is to cool the liquid, since the colder it is, the richer the fuel mixture. However, in some cases the sensor does not function well. Let's look at possible problems:
- The electrical contact located inside the sensor is torn or has a small crack. In the first case, the sensor burns out completely. In the second, it continues to work, but due to poor contact it gives incorrect or inaccurate data.
- Insulation violation. If the wiring is poorly insulated, this can lead to a small short circuit, and as a result, the sensor burns out.
- Broken wires near the sensor. As a result, the sensor loses the ability to influence the fan. Therefore, the second one does not turn on when it needs to. The result is overheating of the car.
At the same time, the machine can operate for some time without a sensor. Having not received a response from him, the computer automatically injects liquid with zero temperature into the system. In the summer, sensor failure will be faintly noticeable. However, in winter this problem is very noticeable - in cold weather starting will be very difficult.
Signs of trouble
The following signs indicate that a new sensor is needed:
- can turn on at any time, even if the engine is not overheated. Although it should only work when it is needed, that is, when the engine is overheated.
- It is difficult to start the car when the engine is hot. The cooling system is supposed to regulate the temperature, but due to a faulty sensor, it does not receive a replacement signal.
- The car spends much more fuel than it did before. It just gets overloaded and continues to drive with a hot engine. Actually, this is why she spends extra gasoline.
Possible breakdowns of DTOZH
We will name the most common malfunctions that are associated with malfunctions in the operation of the device: contact failures or breaks in which insulation is lost, the fan does not function as required.
Signs of failure include the following:
- When the engine is not warmed up, the fan starts to work;
- The engine is warm enough, but its performance can be considered unsatisfactory;
- Excessive fuel consumption is observed.
Among the common erroneous beliefs, there is one: young and inexperienced motorists do not see the difference between two concepts: DTOZH and coolant temperature indicator sensor.