Buggy front suspension. Part 1. Preparation
First approach
For our buggy we decided to make an independent wishbone suspension. What you need to do (algorithm, plan): 1. Make the lower arm (photo below) 2. Make the upper arm 3. Insert the shock absorber and the suspension is ready. Yeah, a hundred times. If everything is as simple as 1-2-3, why didn’t all those who wanted to build their own shaitan machines a long time ago?
Lower arm:
Upper arm:
Looking ahead, I will inform you that the article about the front suspension will be divided into several parts. This is due to the large number of topics on which it is not so easy to find information. And without practice, it is difficult to come to such things right away. We decided to fill this gap and talk about the process of building a suspension in our own way.
Let's go back to the algorithm and see what's missing.
Firstly, in this cunning plan there is no zero point - a drawing. There is no suspension in the drawings that we found and posted! Therefore, we had to manufacture it, as they say, “on site.” And all the fears and risks appeared in all their glory. More on this later.
Secondly, there are a bunch of small related parts that need to be made, and first find the necessary materials, tools and consumables. Which, of course, takes time, money and effort.
Of course, pipes and metal plates also need to be purchased.
Thirdly, there are parts that need to be purchased: bolts, nuts, washers and others. Read more about which nuts and spare parts to purchase below. But how to connect them together is in the following parts.
Now that the search for excuses is complete, let's try to create a more concrete plan.
Front suspension construction plan
Part 1. Preparation Selection of pipes Silent blocks Plates for the lower arm and lugs Spare parts
Part 2. Design Lower arm Upper arm Suspension calculation: camber, ground clearance What other suspension options are there?
Part 3. Making ears Rings for silent blocks Levers
Plate for lower arm
Part 4. Disassembly and assembly Pressing silent blocks Removing shock absorbers from a VAZ 2109 Compressing the shock absorber spring Refining the shock absorber
Part 5. Testing Does theory match practice?
Let's get down to business and see what happens.
Pipe selection
To collect the levers you will need to get the pipes. Accordingly, you need to know which pipes to hunt for. At the nearest metal warehouse we find two suitable options: 1. Diameter - 27 mm on the outside, suture, wall - 3 mm 2. Diameter - 32 mm on the outside, suture, wall - 2 mm
Here we leave the range of diameters and wall thicknesses at your discretion to suit your needs. To give you some guidance, we suggest looking at pipes with a diameter of 25 mm or more. The bigger and thicker the stronger (thanks, Cap!).
If you are an expert on pipes, metal grades, alloys and know what ranges of diameters and thicknesses to use in different cases for buggies, please share with readers in the comments. And if you are the happy owner of a buggy you have assembled or purchased, we also suggest that you do not stand aside and boldly share your happiness with others!
But we purchased 10 meters of pipe with a diameter of 27 mm. We cut 2.5 meters and load them into a passenger car. We express our gratitude to the store sellers for providing the packaging paper. If you don’t want the “Salon” scene in the car. Rust. Everywhere” - stock up on paper or polyethylene wrapping before your trip.
Here is a front photo of the delivered pipe:
Silent blocks
To attach the front suspension arms to the buggy frame, you will need to purchase at least 8 silent blocks of the VAZ 2108 family. For the left and right sides: 2 for the lower arm, 2 for the upper (4+4).
Silent blocks may also be needed for shock absorbers (depending on its configuration and type). It may turn out that each of your shock absorbers will already have a pair of suitable silent blocks.
In our case, we used a shock absorber from a VAZ 2109, which had its own silent block at the bottom, and had to buy one for the top. That is, we needed 10 silent blocks (actually 11 - we ruined one).
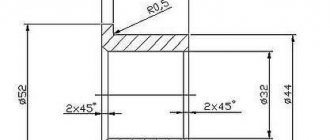
Dimensions of the VAZ 2108 silent block:
Plates for lower arm and lugs
For our case, the initial dimensions of each plate of the lower arm: thickness - 6 mm width - 120 mm length - 90 mm
You need two such plates for the front suspension.
Dimensions of the ears for our case: thickness - 4 mm width - 110 mm length - 70 mm
The minimum number of lugs for the front suspension is 20. Another 4 lugs will be of a special design - for shock absorbers.
Additionally, metal drills are needed - 12.5 mm for the ears, 8 mm for the bottom plate. As well as cutting and grinding discs for the grinder.
Accordingly, the tools you will need are: a drill, a small grinder.
Spare parts
For each side you will need:
Lower ball joint VAZ 2101 and 3 bolts with nuts and a lock washer for fastening the ball
Steering knuckle VAZ 2101
Tie rod end short VAZ 2101 + tie rod clamp VAZ (the tip is screwed into the thread of the clamp)
4 bolts securing the rear shock absorber strut of the VAZ 2108 + locknuts - for fixing the arms to the ears
Shock absorber with spring from VAZ 2109
Castle nut of the tie rod end + stud 5 bushings of the rear shock absorber VAZ 2108 (silent blocks)
What's next?
After spare parts, materials and consumables have been found and delivered, we proceed to
Part 2: front suspension design. You will be right if you say that you need to do the design first, and then supply the parts.
It’s just that in our case we knew which parts would definitely be useful in any version of the designed suspension. Therefore, do not crowd at the entrance, gentlemen, and boldly move on to the second part!
General repair information
Today, repair work on the GAZ-3110 is very often carried out independently, this saves the budget, and finding the necessary information will not be difficult.
But before you start repairing yourself, it is important to properly diagnose it, and do it as quickly as possible, at the first malfunction of the car. For example, repairing the front suspension of a GAZ-3110 will cost much less when the fault is detected in the early stages, and not when the unit is completely out of order. Thus, you should not ignore the “first signs” of malfunctions.
By the way, drivers usually carry out repairs to the GAZ-3110 suspension themselves, since assembling and disassembling this unit is not difficult. The main thing is to immediately replace all worn-out elements with new ones, since repairs and welding are not possible here.
The same goes for the stove. As a rule, it starts to work incorrectly due to a leaking radiator. It is advisable to replace it immediately.
Of course, it is not always possible to repair a GAZ-3110 yourself. For example, a generator or battery must be repaired by specialists, since it is impossible to do without professional tools, special devices, and test benches.
Building a buggy with your own hands (26 photos + videos)
Photo report from the “handy” guys who made the buggies with their own hands!
My friend suggested making a buggy, a real one in the right way smile.gif After thinking a little, I agreed to his provocation. My friend purchased 99.9% of the parts for the buggy, and I helped with welding, ideas, tools, space and, most importantly, company (I can’t do all this alone)
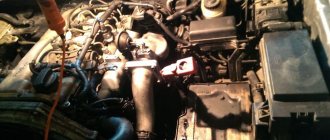
So here is the uprooted motor with gearbox. The heart so to speak...
Start. This means, as usual, the soul demanded rational decisions, so the buggy from the Soviet magazine “Modelist Constructor” was taken as a basis, it was called AB-82, and had most of the spare parts from the world’s kindest motorized vehicle, ZAZ 968, i.e. Zaporozhets. For some time we found tools, did a mega-cleanout in the garage and looked for a donor. Tools (the most necessary) were found. You can work in the garage (cleaned up, made the lights, etc.) Purchased a ZAZ 968, red rear-engine coupe. So we chased the ghost around the city, it drives around, it’s alive. We cut it up in the garage (there is no photo of the cut-up, apparently we were very carried away by the process) We arrived at the garage, cleaned up, made light, it seemed like decent, more or less working conditions... We bought ordinary iron profiles (profile pipe) from a metal warehouse and started sculpting with welding apparatus means... Art
The art grew, first the bottom was welded, then the drawings were 90% followed. The frame was made a little larger than in the drawings.
Somewhere along the way, a rear suspension appeared. These are original Zaporozhye levers with hubs, and on original “ears”, carefully removed from the donor body in advance. The opportunity arose to move into my garage, which we did. We worked hard to create light, order and beauty; nothing comes for free.
As it was
How it became Pay attention to the high-tech technology of painting walls (we thought about making it lighter, like beauty and light is reflected) The technology is like this, one paints chaotically in one place, the second in another, the paint suddenly runs out (sellers are such sellers... they promised that for the whole garage 10 layers is enough for a bucket.. but really...) and that’s the end of the event))
The front control arms and suspension were made. The lever pipes are rods from the rear suspension of a VAZ classic. With silent blocks. The ears on the frame for silents are homemade from 2mm metal. The ball mounts on the bottom are a piece of the VAZ front arm. Ball vase of course. On top there is a relay tip of a vase instead of a ball one. The bushing for adjusting the camber is welded into the upper arm (the bushing was made by a turner). The turner also made a spacer for the upper ball joint (they have different cones). Initially, IZhP 4 shock absorbers were installed, but this is too weak an option. Later they changed it. So far there are some tires to roll around.
The suspension, it must be said, was not welded from scratch. The kinematics of the levers are measured in such a way that the contact patch of the tire with the road is always maximum. Checking the suspension travel. This is already a very interesting moment when the structure can already be rolled somehow! Joy like 7 year old children.
Fiery heart, engine i.e. Let's try it on. The engine and gearbox mounts remain factory, with minor modifications.
A general photo with a suspension and a homemade bucket made of 0.8 metal according to drawings from our wonderful Internet (what would we do without it?!)
Again, erotic fantasies on themes with a roof... Design and engineering (from the word engineer or fig?))
Time has passed. We chose how beautiful it would be.
Space gravitsap. The shot in between is meaningless and cool.
By the way, here's a closer look at the motor mounts. Just in case)
We started making pedals, fastening tanks and cylinders. Alas, there are no high-quality photos of the process left, either covered with writing or in between, like here. But the main thing is there is gas)) The steering rack is also fixed offhand. This moment is adjusted for a long time so that the balls in the steering rack are in a certain place relative to the suspension mounting lines. In short, so that you steer the car, and not it steers you over the bumps. Steering rack OKA (1111) VAZ 2107 steering joints, very comfortable and for safety + VAZ classic steering ends.
The first descents from the hill, the steering wheel is on a stick with duct tape, there are no seats, there are no brakes, there is nothing... Don’t do this, it’s dangerous for everything)))) An ocean of joy, of course. The front wheels are normal, VAZ, the rear wheels are ZAZ (the VAZ is a temporary dummy for a photo, in reality only the ZAZ wheels are on the ZAZ hub)
Bottom. Because it's dangerous to ride without it. Sheet of metal, 0.8 in my opinion. Initially it was attached with self-tapping screws with a drill, but as practice has shown, they are not suitable for these purposes, they fall out from vibration, and are often cut off by the ground when jumping and so on. And then there’s the mystery of who will assemble them with wheels... Later, the bottom was welded with spots. By the way, from the start the project was cooked with electrodes. And with the move to a new home, the machine was created only with semi-automatic CO2 and 0.8mm wire. More convenient, faster, lighter, this type of welding has a lot of advantages.
After the first tests, hopes for compact, lightweight shock absorbers dissolved. We put two of these on each side, it got better, we rode them for a while, but not the same. By the way, out of the corner of your eye you can see that there is a throttle cable, clutch and brake reservoirs, brake pipes and a high-quality steering rack. These kinds of moments require a lot of thought and creativity, so we forgot about the photo. There is linoleum on the floor of the buggy)) It looks like it was temporarily cultivated.
Somewhere along the way they screwed a generator to a VAZ engine. To be honest, the ZAZ generator is rather weak. By the way, they sculpted it interestingly. We welded the fasteners, went to get the belt, took it and tried it on - it didn’t fit a little. Exchanged, arrived - doesn't fit a little. Exchanged - arrived - doesn't fit a little. We cut off the mount, welded it, the belt fit)))) The charger is excellent.
Comfort)) Carpet))) But I must admit there is already a steering wheel and a lying unconnected (never before) tidy from ZAZ)
By the way, the rear suspension looks like this. Stand-ammo from various vases, inlaid solarium. The belt limits the suspension travel so as not to pull the axle shafts from the box and the shock absorber rod. The mounting lugs are the same homemade ones made of 2mm thick metal. The axle shaft is extended by a hollow pipe (you can’t do this, the results will come later)
Germ fuel tank, 5 liter canister, year of manufacture 1956! Excellently preserved! Later it will have a neck, a fancy cap, pipes, a fuel level sensor (float)
Gasoline, oil, brake fluid, sandwiches, everything. First trip to the cross track! Let me add that a VAZ carburetor was installed through an adapter, a “cut” air filter housing onto the carburetor, such as tuning with a focus on a lighter intake, a helmet was found, a brake light appeared, test headlights and ship toggle switches. Ignition, start, headlights.
Source: nik-labs.ucoz.ru
Problems in the power system
If the fuel supply is poor, first of all you need to check the gas line for the formation of a vapor lock (it often occurs in hot weather and blocks the access of fuel). This problem can be easily solved - you can cool the gas line with a wet rag or just wait until the engine cools down. In winter, the problem may be due to freezing of water that gets into the fuel; you can heat the gas line using hot water.
If the buzzing of the fuel pump is no longer heard, then the fuse may have burned out (replacement will be required) or the fuel pump itself may have failed. It can be sorted out or replaced.
To check the operation of the fuel pump, you need to disconnect the fuel hose from the carburetor and lower it into a clean container. When the starter turns on, gasoline should flow out of the hose. If this does not happen, the diaphragm or pump valves may be damaged.
Thus, repairing a GAZ-3110 is also possible in “garage conditions” with the appropriate skills and tools.
Homemade all-frame all-terrain vehicle with CHEBOKA suspension
What a handsome man, isn't he? Then let's figure out how this all-terrain vehicle was built by the author, on the Lunokhodov.net forum his nickname is mishanya68
.
Characteristics and components of the all-terrain vehicle: all-wheel drive 4x4, all-frame with suspension, engine and gearbox from Oka, transfer case from Niva, axles with pneumatic locking, wheels from Krasovka tubeless tires. Suspension – A-frame + Panhard rod, struts with springs. Suspension travel is within 25 - 30 cm, the body is open.
Sketch of the A-arm mounting to the bridge
The lever is attached to the bridge, like clubs on a spring suspension, to the frame through the joint. The dotted line is panhard.
The tire tread pattern was chosen as follows, because... The all-terrain vehicle will travel mainly along forest roads and bushes. It will stay confident on the water.
This is the bending profile the author made for bending blanks onto beadlocks
Blank for cones
Cone with beadlock assembly
Ready disc
Wheel assembly
We finish welding the remaining cones and you can start rebuilding the engine and gearbox, rebuilding the axles and rebuilding them. And only after these actions we begin the main construction.
The CHEBOKA frame is solid and this is what it looks like on wheels:
We install the motor
Some specifics: the clubs are taken from Nivov rods, the salen block near the frame is from the rear rack 2108. The front axle stocking had to be redone in order to move the gearbox to the driver’s side - this makes it possible to more conveniently place the transfer case and cardan shafts.
To avoid flat tires (let me remind you that we have tubeless ones), you need to fill each with 2.5 liters of logway and 2.5 liters of antifreeze, and while hanging, turn them for about 5 minutes. After these manipulations, keep them for at least 3 weeks.
We install the transfer case, in the photo the suspension is in the middle position, a 1-meter ruler is placed as a guide.
We check the suspension travel - raise the wheels diagonally 220 m from the ground and see that the travel of the struts is almost exhausted and is limited by standard bump stops.
We put all the units on the frame and proceed with the further construction of the body Front brakes
Sheathing with sheet aluminum
First departure of CHEBOKI
Let's sum up the work done to create the all-terrain vehicle. The unit turned out to be quite huge, it barely fits in the garage, 5 cm from top to ceiling.
CHEBOKA in the open spaces The work of the locks is clearly visible. The author also welded a trailer for transporting an all-terrain vehicle:
A little video Source Delivery of new homemade products to the post office
Receive a selection of new homemade products by email. No spam, only useful ideas!
*By filling out the form you agree to the processing of personal data
Become the author of the site, publish your own articles, descriptions of homemade products and pay for the text. Read more here.
Front suspension of a homemade car | Working moments of building a car with your own hands
| ||||||||||||||||||
DIY car pendants
This article will help those who are looking for an answer to the question “How to make a pendant softer with your own hands?” It is worth understanding that this is quite a complex job that requires certain skills and knowledge. It can only be performed by an experienced craftsman, with knowledge of the design features of the model on which the modification will be carried out.
Vehicle suspension device
The suspension design of any car consists of 5 main components.
1. The elastic elements are the first to absorb the entire load and transfer it to the body. These include the following elements: • Springs are a unit consisting of several metal strips of different lengths. They are connected using special steel clamps. When the permissible load is exceeded, these parts are the first to fail. • Springs can be either with variable or constant stiffness. The design of the former differs in the different diameter of the rod and the very shape of the element. The latter have the same cross-section of the material itself and a uniform spring shape. Special rubber bumpers are installed inside them. They ensure smooth operation of the system and smooth out fluctuations. • Hydraulic and pneumatic components play a critical role in ensuring the efficiency of the system, significantly improving the ride quality and controllability of the vehicle. The former are a sealed structure with several moving elements. Its job is to move fluid under compressed air pressure. Pneumatic units use only compressed air, which is regulated by a compressor. The advantage of such elements is the ability to change suspension parameters in a matter of seconds using a special control unit. • Cables are elements that create additional forces. Visually, they look like an ordinary steel pipe, inside of which a rod is placed. Before installation, they are wound along their axis, which generates the necessary force when unwinding.
2. Force distribution unit . These mechanisms include transverse, trailing and double wishbones. They perform two functions: securing the suspension to the car body and dampening the received energy, distributing it evenly relative to the body in both directions.
3. Load absorption elements . Load absorption mechanisms include shock absorbers. Damping units perform the function of smoothing vibrations caused by elastic mechanisms. They are made in the form of metal pipes with cylinders and fasteners. The operating principle of shock absorbers is hydraulic resistance. Shock absorbers are divided into three types: pneumatic, oil and gas-oil. Modern models have a lot of nice improvements and additional functions, including the ability to change the calibration holes. This allows you to quickly change system parameters and adjust the suspension to your driving style.
4. Stabilization elements . First of all, this is a rod that connects the wheel arms with the supports of the body mounts. These segments distribute lateral loads and reduce roll when cornering.
5. Fasteners are the most important parts of any suspension. They combine all segments into a single node. For fixation, bushings made of metal with layers of rubber, bolts and ball-type hinge supports are used.
Types of pendants
Suspensions can be of two main types: dependent or independent. The former are characterized by the presence of a rigid connection of opposite wheels. Such designs are quite popular. In modern transport they are most often used on trucks. Independent suspension is a more complex and efficient system. In these designs, opposite wheels are connected by a mechanism consisting of individual parts. Thus, when moving, they do not depend on each other, which has a positive effect on driving performance.
How to make the suspension softer
After a little modification, you can make the suspension with your own hands more comfortable. To change the rigidity, it is enough to notice several elements. First of all, you should install softer shock absorbers and springs. Instead of standard shock absorbers, you can install gas-oil analogues with double action. Springs with variable stiffness will also significantly improve the required characteristics.
Video - Do-it-yourself car suspension diagnostics
Design features
Multi-link suspension, like all independent types, is universal and can be used on both axles of the car. But more often it is still installed on the rear axle, although there are cars that have a multi-link at the front.
Multi-link suspension is not some kind of new development, moreover, it is just a modified version of one of the oldest types - double-wishbone independent. And they started using it on cars quite a long time ago.
Mercedes-Benz rear suspension
The whole point of this type of design is that the transverse arms of the double wishbone suspension (which usually had an A-shape) were simply divided, thereby receiving four arms instead of two (upper and lower). Although in some variations of this suspension the upper arm remains A-shaped and there is only one. Additionally, another lever was added to the multi-lever design - a longitudinal one.
Since the multi-link suspension is independent, an anti-roll bar is used to combat the sway of the load-bearing part, reduce its roll and ensure constant adhesion of the wheels to the road surface.