04/13/2020 1,801 Media devices
Author: Victor
Many car owners, in particular, fans of high-quality sound, replace standard audio systems with more efficient and high-quality car radios. This is due to the higher functionality of radios that the automotive electronics market offers consumers today. How to connect a radio in a car and what nuances should be taken into account - read more below.
[Hide]
Connectors and their markings
When purchasing a new radio, many come with an adapter for a Euro connector.
Before you connect the radio in your car at home, you need to understand the connectors, as well as the colors of the wires. You need to understand that you will be working with a 12-volt network, not 220, if the electrical components are connected incorrectly, this will affect the overall sound quality. If you don’t know how to make a linear output or what cables are used for car radios, then first let’s look at the theory. Today, most audio systems are equipped with two standard ISO connectors, each of the plugs is eight-pin.
One of these plugs is designed to consume current in amperes, respectively, power output A is connected to it. The second plug B is used to connect speakers, as a rule, black wires are connected to it. How many amperes a particular system consumes depends on the car radio itself; this parameter should be indicated on the packaging. Depending on the design features of the vehicle, the machine may be equipped with other types of connectors.
But in most cases, such components are marked according to the same principle, so to solve the problem you can use one of the options:
- A more barbaric method is to simply cut off the existing plug and then connect the wiring from the audio system to it. You will use electrical tape to connect the wires. But you need to keep in mind that this method is less practical.
- It would be best to purchase a special adapter, in which case you will just need to install it on the section of the circuit between the power from the car and the radio output. You can buy such a device at any car audio store.
As for the connectors themselves, plug A is an output that consumes current in amperes and is used for power supply and antenna installation.
Despite the fact that this output is equipped with eight contacts, in fact only four function in it:
- A4. Responsible directly for powering the audio system memory with current in amperes. This memory stores all the necessary data about the device settings. If the output is disabled, the car radio will reset the configuration to factory settings. The red wire is connected to this pin and connects to the battery.
- A5. This contact is connected to the antenna adapter; a blue wire is connected to it. This wire also carries a linear current, and if its value is higher than expected, this can lead to breakdown of the amplifier stages. Accordingly, this may affect the functionality of the audio system as a whole.
- A7. The yellow wire is connected to this pin and is used to provide power to the audio system. That is, it is through this output that the radio is powered. As a rule, this contact goes to the ignition switch; its circuit is protected by a safety device. Please note that if the radio is connected incorrectly, this may lead to accelerated discharge of the car battery . If necessary, power can be provided via a toggle switch, bypassing the ignition switch. But this option is not particularly suitable, since for each activation and deactivation of the audio system, the car owner will have to activate and disable the toggle switch. The main disadvantage of this method is that there is a possibility that the driver will forget to turn off the toggle switch, which will lead to battery discharge.
- A8. This contact is used to connect the car radio to the ground of the car, that is, its body. A black cable is connected to the contact. Much also depends on the mass, so to connect you need to make sure that it is securely fixed to the body.
As for plug B, it is used to connect peripheral devices, in particular speakers. Since most car radios on sale today are designed to connect to a four-speaker system, the connector is equipped with 8 pins. For example, pins B1 and B1 connect to the rear right speaker, with the first being the positive pin and the second being the negative pin.
Photo gallery “Connection diagrams”
1. Standard diagram for connecting an audio system
2. Connection diagram for a subwoofer in a car
3. Layout of the radio, speakers, subwoofer and amplifier in the car
Connecting the radio
When both the head unit and the car are equipped with standard ISO connectors with the same pinout, connection takes a matter of minutes. This is the simplest case. All work comes down to dismantling the old radio, connecting a new one to the same connectors and assembling the console.
Connecting a radio in the absence of a standard ISO connector
If there are no ISO connectors in the car or radio, then the best solution to the problem is to buy an adapter corresponding to the model of the head unit and the car and connect through it.
Video: ISO adapter
An alternative option is to cut off the standard cable and the cable that came with the new radio, and then connect all the wires in accordance with the connection diagram, making a homemade adapter.
When connecting in this way, special attention should be paid to the reliability of the contacts and insulation of the wires. They are connected using twisting, soldering and clamping clip connectors. It is better to insulate the places of twists with heat-shrink casing, discarding the adhesive tape.
Wires are connected using twisting, soldering and clip-on connectors
Connection without plug
In some cases, desperate experimenters try to connect a car radio without a plug, soldering wires to the connector pins. If you assemble the circuit without errors, then the radio will, of course, work. But the reliability of such a connection is very low.
At best, such experiments lead to periodic mutes. In the worst case, there may be a short circuit of the fallen power wire to the housing with unpredictable consequences.
In 1959, Blaupunkt-Werke released its millionth car radio - the best proof that radio had become truly accessible.
Igor Syroedov
https://steer.ru/node/29859
Alternative ways to connect power to the radio
In standard mode, the +12 V supply voltage is supplied to the radio via two wires. Red (signal circuits) is connected to the battery through the ignition switch. The presence or absence of voltage on it is determined by the position of the key.
The yellow wire constantly powers the radio's memory, where all settings are stored. Therefore, it is constantly connected to the positive terminal of the battery directly. When the battery is disconnected from the vehicle's on-board network, the individual settings of the head unit are lost. If there is control voltage at the signal input (red wire), +12 V from the yellow wire is supplied to all blocks of the device.
With a standard power connection, the yellow wire is connected to the battery directly, the red wire is connected through the ignition switch
Some vehicles have a lock position marked ACC. In this mode, the ignition is turned off, but power is supplied to individual devices, including the red wire of the radio.
If there is no ACC mode, the signal wire is connected together with the ignition. In this case, the radio will not be able to work autonomously.
The need for alternative power connection schemes arises when the owner wants to use the radio without turning on the ignition.
Connecting the radio to the battery, bypassing the ignition switch
Connecting the signal (red) power wire directly to the battery positive (in parallel with the yellow one) will ensure that the radio can be turned on at any time, regardless of the position of the key in the ignition switch. To minimize the consequences of short circuits, a separate fuse is included in the circuit.
To minimize the consequences of short circuits, additional fuses are included in the circuit
Connecting a radio via a button
It should be remembered that even when turned off, the radio consumes the energy necessary for memory operation. Current consumption may increase due to leakage if the red power signal wire is constantly connected to the battery, which negatively affects the battery charge level during prolonged periods of inactivity.
The simplest way to eliminate this drawback is to include a button or toggle switch in the circuit, which forcibly breaks the control circuit.
A button or toggle switch allows you to save battery energy when parked
Automatic power off of the radio when the alarm is turned on
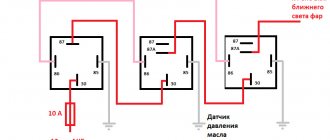
More complex ways to save energy when connecting a radio, bypassing the ignition switch, involve the use of relays that respond to the activation of the car's security alarm.
The relay that turns off the power supply to the radio is triggered by a command from the alarm unit
In the diagram above, the relay that turns off the power to the radio is triggered by a command coming from the alarm unit.
There are many other similar schemes. The choice of a particular option depends on the signaling capabilities.
Connecting the radio to the cigarette lighter
Connecting the radio to the cigarette lighter is a type of direct connection to the battery, bypassing the ignition switch.
When connected via a plug, the red and yellow wires are connected together. For long periods of parking, it is better to disconnect the plug from the cigarette lighter. This will save battery power, but will lead to loss of radio settings.
Turning on the head unit via a plug makes it difficult to use the cigarette lighter for its intended purpose. The disadvantage is eliminated by connecting the radio without a plug directly to the wires of the cigarette lighter socket.
The red and yellow wires are connected together to the cigarette lighter power contact
The red and yellow wires of the radio connected together are connected to the red wire of the cigarette lighter, which is supplied with +12 V from the battery. If the head unit is not protected by a built-in fuse, it will not hurt to install an additional one in the power circuit.
Some people are misled by the similar color coding of the radio and cigarette lighter wires. Without thinking, they are connected red to red, yellow to yellow. The radio will turn on anyway, but using the signal lights will disrupt normal operation.
The color markings of the cigarette lighter and radio wires do not match
The head unit consumes a current of about 10 A. A fuse of approximately 15 A is installed in the cigarette lighter circuit. You should check the current values and fuse ratings in the technical documentation before connecting the radio to the cigarette lighter. It is possible that the fuse will not withstand the additional load when the radio and cigarette lighter are turned on together.
Connecting the radio via diodes
Diodes are used when there is no ACC position in the lock so that the radio does not turn off along with the ignition.
The diagram for supplying power to the control input of the radio through diodes is shown in the figure. The yellow main power wire is connected, as usual, to the battery positive. Red (power supply for control circuits) - to the anodes (pluses) of two diodes. The cathode (minus) of one of them is supplied with power through the ignition switch. The cathode of the second is connected to the blue wire - the ANT+ contact of section A of the ISO connector - of the radio or (if available) to the REM signal output to turn on an additional amplifier.
Connecting the radio through diodes allows you to use the device when the car ignition is turned off
After turning on the ignition, +12 V is supplied to the ACC input via the red wire through the lock and the first diode. The radio turns on, voltage appears on the blue ANT+ wire and goes through the second diode to the ACC input.
Now the head unit will remain on even if the ignition is turned off. You can turn off the radio using the built-in controls. To turn it on again, you will need to turn the key in the ignition switch again.
Video: connecting a radio via diodes
Connecting a second (additional) radio
Two radios in a car are not a typical case. As a rule, if the owner is dissatisfied with the quality or capabilities, he changes the head unit to a new one. But when the standard radio does not just reproduce sound, but also performs other important functions for the car, it is difficult to find a full-fledged replacement.
Some owners prefer to solve the problem not by replacing, but by installing an additional device. In this case, it remains possible, for example, while playing music on the new radio, to use the on-board computer and listen to the radio using the old one.
When installing an additional radio, you have to solve two main problems: placing the second device in the cabin near the driver's seat and connecting the speakers independently.
Not all car models have free space in the console for additional devices. Therefore, for the sake of the second radio, they sacrifice low-value cavities: coin drawers, compartments and shelves that are in the area accessible to the driver’s hands. Often you have to adjust holes in plastic parts or cut new ones. Sometimes special podiums are arranged. Unfortunately, an extra device does not always fit organically into the interior of the cabin.
Gallery: examples of placing an additional radio in the car interior
Installed on the dashboard, the additional radio tape recorder attracts attention. The 2 DIN seat allows you to place two radio tape recorders in 1 DIN format. The radio tape recorder in the glove compartment is invisible, but it is not very convenient to use. Sometimes, to install an additional radio tape recorder, you have to cut out additional holes
If connecting the power to the second head unit is not fundamentally different from the case with one radio and usually does not cause any special problems, the acoustics require more attention.
Speakers cannot be connected in parallel to both devices at once. This significantly reduces the sound quality and can easily lead to malfunction of the final stages of the radio. Speaker systems must be connected one by one, that is, switch between outputs manually or automatically.
To implement this method in practice, various automotive relays are used. One of the possible schemes with manual control of switching acoustics using a button is shown in the figure.
To alternately connect acoustics to the outputs of two radios, use various car relays
Possible extensions
The connection diagram for the car radio should be included with the audio system, but the diagram alone is not enough to correctly install the device. You also need to take into account possible extensions that allow you to provide additional functions of the audio system.
Extensions can be different:
- Mute. This feature is used to instantly mute the sound, typically when the driver needs to talk on the phone. If a mobile device is also connected to the audio system, the radio will turn on this function itself when it detects an incoming call to the phone.
- Ant. This extension will be useful for those vehicles that are equipped with a retractable antenna adapter. Accordingly, if it is necessary to turn on or turn off the antenna, the driver will only need to give the appropriate command.
- Illumination. Quite a useful extension that allows you to automatically reduce the brightness of the display while driving and restore it when the engine is stopped. This feature promotes safer driving so that the driver is not distracted by the screen while driving.
- Another useful extension - Remote - allows you to connect an amplifier to the radio, thanks to which you can provide better sound. This extension will be more relevant for large vehicles; practice has shown that it is useless in small cars (video author - Sergey Rybkin).
How to connect a car antenna
Nowadays, the range of musical works is quite large and many car enthusiasts do not use the radio. However, there are people who prefer to listen to different radio stations in the car. When the vehicle is not equipped with a factory antenna, it is worth purchasing an active type antenna, because installing a regular one will be quite expensive.
Installing an active type antenna is quite easy. It must be attached to the windshield of the car. It also needs to be connected to a specialized wire on the car radio, which is painted white and designated AMP or REM. This antenna is equipped with a power on/off button for the active amplifier. It provides reliable reception and helps you tune the signal in any area.
Nutrition
Power supply to the radio can be provided in two ways. It is possible to connect the radio through the ignition switch or directly to the battery. Two wires are used as power, and each of them has a special insert that allows you to protect the acoustics. If you decide to connect the radio through the ignition switch, and during operation the device encounters problems, then most likely, installing an additional capacitor will solve the problem. Using a capacitor, you can stabilize the power supply to the head unit.
Installation
Installing a car radio on a VAZ 2107
We will begin our story with the simplest way to install a car radio. This approach is completely justified, because it is impossible to learn complex installation options right away and you need to start from the simple. Before purchasing expensive equipment, you should decide on the choice of installer. If you intend to carry out such an operation on your own, then you need to know many secrets. On the contrary, an inexpensive device is very easy to connect and there is no need to spend money on the services of a specialist. So, what does a typical speaker system consist of? Of course, the main role here is occupied by the car radio, the installation of which we will do. But don’t forget about the four standard speakers that come included. You will need to connect wires from the head unit to them.
Note. All speaker components are installed only in places designated in advance by the automaker. This is done not only for the sake of simplicity, but also to avoid short circuits.
Car radio installation
So, how to connect a car radio with your own hands? Of course, first of all, the connection diagram of the radio should be studied, without this there is nowhere. The audio system may have certain features, which are usually marked on the diagram. In addition, the kit may include installation instructions. Before you begin the task, you need to make sure that you have all the components and fasteners necessary for proper installation (the author of the video is the Auto Electrician HF channel).
How to connect the radio correctly:
- First you need to prepare the installation site. The audio system is mounted in a specially designated place in the center console. The exception in this case is old cars in which such a place is not provided, for example, ZAZ or VAZ-2101. If there is no space to mount an audio system, then you can install the device in the glove compartment.
- If you already have a radio installed, you will need to remove it to install a new audio system. To remove, use special keys made in the form of metal plates; if you don’t have them, you can use a screwdriver.
- Place the new car radio on the seat, but do not fix it yet. Make sure that after installation there are no large gaps between the device and the center console. Dust can penetrate through these cracks, which will not do anything good for the audio system, and they can also cause vibrations.
- Next, connect all the necessary plugs - connectors, as well as power wires and antennas. The connection is carried out in accordance with the diagram, but in general there is nothing complicated about it. Then turn on the device and check its functionality - sound quality, all functions, etc.
- If everything works fine, then install the audio system in the seat and securely fix it. Finally, install the frame.
Speaker placement
When installing high power rear channels, they must be installed correctly. Oval speakers are mounted on the rear parcel shelf so that the speaker axis is directed diagonally across the vehicle. The rear right column should be aimed at the driver, and the left column at the front passenger. Only after proper installation has been carried out can the speakers be connected to the audio system.
To ensure high-quality sound, the speakers cannot be covered - they need more space to work properly. As for the tweeters, they need to be installed on the windshield pillars. If you mount them away from low-frequency speakers, you can achieve a bright quad effect. The direction of the tweeters is done in a similar way - the front left one is directed towards the passenger, and the right one - towards the driver. The wiring must be secured securely.
