When creating a passenger car, designers pay great attention to the glazing of the car. Glass plays an important role in the design of a vehicle. They protect the driver and passengers from wind, dust and dirt. They serve as a soundproofing barrier that allows people in the cabin to talk without strain.
The visibility from the cabin and the driver’s ability to properly control the road situation depend on their shape. To achieve this, various modifications are made to the windows, including heated rear windows.
Design of the rear window heating system
The system that helps clear the rear window of ice, snow or fog is not very complicated in design. The electrical circuit in general terms can be depicted as follows:
- C - generator.
- E230 - OZS system switch.
- J519 - on-board electrical network control unit.
- Z1 - heating element of the OZS system.
Although there may be some differences in different car models, nevertheless, if we consider it in detail, then in principle it includes the following main elements.
- Mounting block.
- Ignition switch.
- Heating switch ZS.
- Indicator lamp signaling the activation of the OZS.
- Heating element of the OZS system.
K6 - additional relay. K7 - OZS switching relay. A - connection to power systems.
In addition, the system has fuses, terminals and wires that connect all elements into a single whole.
When the ignition key is turned, the OZS is turned on by pressing a button, to which power is supplied through an additional relay K6. At the same time, the rear window heating relay K7 is activated, the heating element is connected and at the same time the control light comes on.
The design of the heating element on the rear window may also vary. In the standard version, it is a mesh of thin metal nickel threads, which are connected by two conductive busbars located on opposite sides. On one side, a 12V current is supplied to the bus, and on the other, the bus is shorted to ground. Such devices are attached to the glass using special glue.
On some car models, the heating element is applied to the glass using spraying, for example, aluminum. A thin film with good light transmission is attached on top of this coating using glue that conducts current.
How does the heated rear window work?
In fact, the glass heating system is a fairly simple mechanism, the principle of which everyone can understand. So, the main purpose is to heat the rear window of the car, taking into account the fact that there are some models of heaters that can interact with both windshields and side windows. In fact, many car models can be equipped, as an additional option, with temperature control of literally all windows and places where the wipers are located.
The heating of the glass works in such a way that no traces of fogging or frostbite appear on the glass, regardless of the time of year. We all know very well that at zero temperatures water begins to freeze. If you leave wet glass in the cold for even a short time, it will quickly become covered with a thin crust of ice. The rear window heating system ensures the creation of conditions on the surface that in every possible way prevent the formation of icing in winter. This result is achieved using ordinary strips that conduct current with low voltage. They connect to your vehicle's on-board systems. When the heating is turned on, current begins to flow through the strips, the surface of the glass heats up and, thereby, the danger of ice formation is prevented.
Troubleshooting in the OZS system
If you find signs that the rear window heating is not working, you must carefully check the entire electrical circuit of the vehicle's EOS system.
The first thing to check is the serviceability of the fuses. So, for example, on a VAZ-2110 these are rear window heating fuses F4 and F7, which are located in the mounting block. Their malfunction may occur due to a factory defect, short circuit or voltage surge in the on-board network. The faulty fuse needs to be replaced, for which it must be removed from the mounting block.
Next, you need to check the terminal connections in the OZS system. When operating a vehicle, all equipment is subject to strong vibrations. As a result, the contacts may be damaged or a terminal may become disconnected or loose.
The heated rear window relay must also be checked. Breakdown of the relay is possible when the wire in the working coil of this part breaks or due to burnt contacts, due to a manufacturing defect or short circuit. To check it, the relay must be removed and checked using a tester. If this part malfunctions, it needs to be replaced with a working spare part.
You should also check the rear window heating contact. A conductive element is attached to the rear window using glue, which is a contact to which an electric current is supplied through a wire, which is transmitted through this contact to the heating filaments.
In this place, the wiring may break or, due to the fact that the glue was of poor quality, the contact element may peel off from the glass.
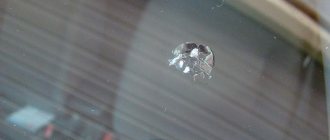
Quite often, the failure of the rear window heating is caused by a break or damage to the threads in the heating element on the rear window. This is detected by visual inspection or instrumental analysis. Visually, only obvious damage to the thread can be detected by identifying a gap between the damaged ends.
It is possible that during some repair work on the car, mechanical damage was caused to the surface of the glass on which the heating element is attached using glue.
However, the main tool for diagnosing this malfunction is a voltmeter or ohmmeter.
They allow you to accurately identify an area with faulty threads, even if this break cannot be visually detected.
Troubleshooting and repair
It is believed that it is quite simple to determine damage to the heating system, and every driver can cope with the given task. Before starting work, it is recommended to count the threads applied to the glass, so that later it will be easier to remember which one is damaged. There are times when the gap cannot be seen: it is so small that one of the devices should be used. This could be a voltmeter or multimeter. In any case, in order to repair the rear window heating threads, you need to carefully examine the surface and identify damage.
There are several effective troubleshooting methods:
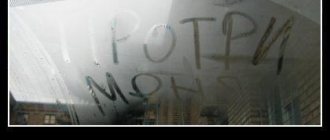
- Visual diagnostic method - in damaged areas, when the heating is on, the glass does not warm up and remains fogged up.
- Using a voltmeter - with the heater on, one probe should be placed on the “ground” of the machine, and the second, wrapped in foil, should be placed in the center of the thread. It is necessary to monitor the voltage; its value should not exceed 5 V. If the device shows 0 or 12 V, then there is a gap in this place.
- Using an ohmmeter, the device is turned on in “kilo-ohm” mode and connected to the opposite terminals of the heater. You should moisten the cotton wool and run it along the thread. In the place where the arrow will twitch, there is a gap.
Determining whether the rear window heating is faulty
You can repair the heater using a variety of methods, for example, purchase a special kit for repairing the rear window heating filaments.
You can repair the system using a repair kit, conductive paste and traditional methods. The main difference between all options is the materials that are used during work.
The procedure for repairing a faulty OZS system
Having determined the reason why the rear window heating does not work, you can begin to repair this system.
- If the fuses or relays of the OSZ system are faulty, then the faulty parts must be removed. Replacing them with new, functional ones is not difficult. The main thing is that they are installed as indicated by the on-board electrical system diagram.
- In the case where the culprit of the damage in the OZS system is the terminal connection, restoring the heated rear window is also not difficult. It is enough to clean the contacts in the terminals. The terminal box may need to be replaced, but this will not take much time either.
- If the glue that was used to attach the contact on the rear window turned out to be of poor quality and peeling occurred, then in this case you need to buy a new high-quality conductive glue. Remove the layer of old glue from the peeled contact using a napkin with an alcohol solution. Then apply a layer of new connector and glue the contact in place.
- If a wire is torn off on one of the buses, it is necessary to solder this wire to the old place using the connection diagram. The procedure is as follows:
- remove the remnants of old solder from the wire, stripping the end; in addition, you need to clean the connection point on the bus;
- Using a brush, apply rosin paste as a flux to the cleaned surfaces of the bus and wire;
- Apply solder containing three percent silver to the cleaned and rosin-coated wire core;
- solder the wire to the bus, while avoiding overheating of the surfaces.
- The greatest care when repairing the heated rear window with your own hands is required if a break is detected in the conductive threads of the heating element of the OZS. To make this work easier, special repair kits for this system are available. To correct the damage, perform the following steps:
- in the area of the rupture, clean an area six millimeters long in each direction from the damage site;
- wipe the cleaned area with a napkin or cloth soaked in alcohol or an alcohol solution;
- On both sides of the damaged thread, stick thin strips of repair adhesive tape or ordinary construction tape, if there is no repair kit. Avoid sticking adhesive tape onto nearby threads to avoid damaging them;
- if you have a repair kit, mix the hardener with a silver-colored composition, which, after application, will act as a conductive thread. After mixing, apply this composition with a stick or brush to the damaged area, closing the circuit.
- if there is no repair kit, then the role of a special mixture will be played by glue, which conducts electricity well; it can be applied with a brush, being careful;
- after repairing the damage, you need to give time for the glue or special mixture to harden; you can use a hairdryer to speed up this process;
- after the conductive strip has dried, you must carefully remove the self-adhesive tape; to do this, it is best to cut it with a knife at the junction of the thread being repaired, so as not to damage it when removing the tape;
- After the work has been completed, you need to check the functionality of the OZS by starting the car engine and pressing the OZS power button.
See also video on the topic:
Related publications:
- We repair a car generator on our own
- DIY car starter repair
- Different ways to charge a car battery
- Alternator belt tensioner - device, check, replacement
- Alternator belt - types, signs of wear and replacement
[heated rear window] repair - soldering - Lada 2109, 1.5 l., 2002 on DRIVE2
2 strips didn’t work, which are in the middle where the contacts are... I repaired one and soldered it, but couldn’t handle the second)) and retoned it with a new one)
You need to find the break point: 1st method: - on the fogged glass, turn on the heating and at the break point the glass quickly fogs up with a stain, while the entire thread with the break does not fog up.
2nd method: - to detect a break in the rear window defogger conductor, turn on the ignition and turn on the rear window defroster. - connect one voltmeter probe to the ground of the car, and wrap the second probe in foil and move the foil along the heater conductor. — Connect the voltmeter probe in the center of each conductor of the rear window defroster. If the voltmeter shows a voltage of about 5 V, then the heater conductor is working. If the voltmeter shows a voltage of 0 V or 12 V, then there is a break in the heater conductor. — to locate the break point in the heater conductor, connect one voltmeter probe to the positive terminal of the heater, and move the second probe along the heater conductor from the negative terminal of the heater. The point at which the voltage indicated by the voltmeter drops from a few volts to zero is where the heater conductor breaks.
3rd method: - ohmmeter, in kilo mode, or better yet mego. One probe clings to one terminal of the heater, the second probe to the other terminal of the heater. Take a piece of cotton wool soaked in distilled water and move it along the threads of the heater, monitor the readings of the kilometer, the megohmmeter at the point of break, the needle will twitch. — it is better to use an analog ohmmeter (with an arrow). — works if there is a break in one place!
Direct thread repair:
In all the methods listed below, you must first clean the conductive strip from varnish (preferably with a bent steel wire or paper clip) until a metallic sheen appears and degrease it.
1st method (conductive paste): - you can restore a broken conductor of the rear window heater using conductive paste. — before starting repairs, turn off the rear window heating and allow time for the glass to cool. - Using caution, strip the heater conductor and rinse it with alcohol. - Use adhesive tape to mark the area to be repaired. - Apply conductive paste approximately 20mm from each end of the damaged conductor. — after drying the electrically conductive paste for 24 hours, you can use the rear window defroster. You can dry it at a high temperature, then you can use heating earlier.
2nd method (electrolytic coating): - the reagents you need are copper sulfate - better known as copper sulfate (used in crop production and construction), and sulfuric acid - an electrolyte from a battery is quite suitable. - from a tool - a piece of copper (preferably copper - not brass. Several pieces of copper wire folded into a bundle are quite suitable) tube or rod with a diameter of 6-10 mm and a strip of fabric 20-30 mm wide and about half a meter long. - wrap a strip of fabric half its width around the end of the rod - you should get something like a tassel. You need to put a thread bandage on top to prevent the fabric from unwinding. - preparing the electrolyte - not to be confused with the battery electrolyte - is also not difficult. Pour a couple of teaspoons of copper sulfate into half a glass of water and stir until dissolved; if it doesn’t dissolve completely, don’t worry, don’t pay attention. To the resulting pp you need to add 0.2-0.3% concentrated sulfuric acid or 0.5-1% battery electrolyte - this is about half a teaspoon of electrolyte for this half glass. — the process itself. Both terminals of the glass are connected to ground (if the glass is installed in the car and at least one heating thread is intact, nothing needs to be done), and the positive of the battery is connected to the tube with a rag. We wet the positive electrode in the solution and begin to actively and continuously rub the area where the thread broke for 3-5 minutes. A current passes through the solution, which transfers copper ions from the electrode to the heating filament. In case of slight damage to the thread, the gap is completely covered with copper; in case of large gaps, the copper-plated areas should be tinned with a non-overheated soldering iron and a jumper made of thin wire should be soldered. There is no need to limit the current, because After a few seconds, the anode becomes passivated and limits the flow of current. Don't forget that the solution contains sulfuric acid!
3rd method (paint with shavings): - take a copper-brass bar (graphite will also do) and start making shavings with a small file. — paint (can be red, to match the color of the threads) is mixed with shavings, the proportion is approximately 50/50. You should get a dough-like mixture. — the heating is turned on and paint is applied to the thread, having first made a stencil from electrical tape or adhesive tape. During the process of applying the paint, a hissing sound appeared from the point of contact, then it disappeared, but the thread warmed up. - done. Literally after a minute the composition hardens.
4th method (magnet and glue): - prepare very fine iron filings, a small magnet (from a speaker) and transparent glue (type BF-2) or nitro varnish. — place a magnet on the outside above the break point, then sprinkle sawdust on the side of the conductor, gently moving the magnet to achieve electrical contact at the break point (this will be noticeable by the heating of the strip - unless, of course, the break is in one place, otherwise more magnets will be needed). - Apply a drop of glue to the sawdust with a small squirrel brush and let the glue (varnish) dry. - then remove the magnet and remove excess sawdust with a blade. You can reapply another layer of glue (varnish). - enough for several years.
5th method (special adhesives): - special adhesives for restoring heating filaments, there are also Russian-made ones - reviews are contradictory, some like them, others don’t - instructions for use are included with the glue - it is recommended to add a little iodine to the glue. In this case, the glue turns out red and matches the color of the other threads
6th method (soldering): - damaged areas can be soldered with soft low-tin solder POS-18 or POSS-4-6, using zinc chloride as a flux. If a long section is damaged, it is better to solder a thin copper or silver core from the wire.
7th method (sawdust and glue): - silver sawdust (for example, an alloy ground off with a file from the contact of an unusable power relay) should be poured into the fold of a piece of paper, and a drop of nitro glue should be added there. Quickly roll a cylinder 2…3 mm long and 1 mm in diameter with the tip of a knife and apply it to the damaged area. Then crush it to tightly compress the sawdust and remove excess.
To implement this idea, I used the 2nd method - electrolytic coating.
I chose the method with copper sulfate... nothing complicated and no cost
taken from here - www.autolada.ru/viewtopic.php?t=205326
www.drive2.ru
Diagnostics
Checking the performance of the heater
First you need to determine the cause of the breakdown. Our further actions will depend on this. A thorough visual inspection of the rear window is necessary. Particular attention is paid to heating cores. In some cases, cliffs are visible even to the naked eye.
For reliability, it is worth using a voltmeter - we apply one terminal to the current-carrying wire, and the other in turn to each core. By reducing the fragments, you can find the exact location of the break.
This stage does not cause any particular difficulties, so if the reason is the gaps, then almost every motorist will be able to find them. If breaks cannot be found, then perhaps the reason is something else. In this case, you should really seek help from professionals.