Symptoms of a crack in the cylinder head
Cracks can appear in different places, hence different consequences. Basically, there is an opinion that when the head is broken, white smoke comes out of the exhaust pipe, but this is only one special case. A crack in the head can occur between different channels, and accordingly, the signs of a crack in the cylinder head will be different.
Oil system
— when oil and antifreeze are mixed in the engine, instead of oil, an emulsion appears, a whitish foam, like biscuit dough, and an oil film forms in the expansion tank of the cooling system.
Inlet channel
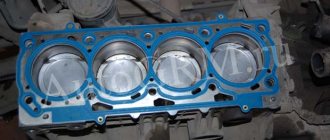
- if coolant starts to get into it, then first of all it will wash the pistons to a shine, you can look through the spark plug hole - the pistons will be like new. And when it gets into the combustion chamber, this is exactly the case when white smoke may come out of the exhaust pipe, although it is not a fact that it will come.
With release channel
— here the coolant will simply fly out into the chimney in the form of steam. The engine is constantly releasing steam and it is unlikely that you will notice anything in this case; the liquid will simply leave the tank. Most likely, there will not even be a smell of exhaust gases in the tank.
With combustion chamber
— through the crack, some of the liquid will go into the combustion chamber, but a very small amount, all due to the pressure difference. When fuel burns, a lot of pressure is generated in the engine, and exhaust gases enter the cooling system through this very crack, increasing the pressure in it. Because of this, the pipes swell, and the tank stinks of exhaust gases. But liquid can also go into the combustion chamber - the cooling system is still under pressure, but a vacuum has already set in in the combustion chamber and air has begun to be sucked in. Due to the difference in pressure, coolant begins to leak into the combustion chamber. A sign of such a crack will be clean pistons (not always), a smell in the tank, elastic pipes and a cold heater radiator (air lock).
SIGNS OF CRACKED BLOCK HEAD
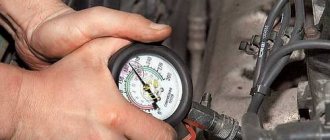
It is impossible to determine the presence of a crack in the cylinder head without disassembling the engine! To reliably determine a crack in the cylinder head or cylinder block, it is necessary to perform pressure testing. This is only possible with special equipment and specially trained people.
In what cases is cylinder head pressure testing necessary:
- It “expels” antifreeze from the expansion tank.
- The engine constantly overheats and boils. During the hot season, the engine temperature often changes (drops and rises sharply).
- Formation of an oil film in the expansion tank. A crack in the cylinder head may allow antifreeze to leak into the coolant, and vice versa.
- Frequently adding refrigerant means the crack may be on the exhaust manifold side. Thus, the antifreeze enters the exhaust pipe and exits along with the waste gases.
Typical places for cracks to form in the cylinder head
Automakers allow cracks to form in the head, and this will not be considered a malfunction, since the crack will be shallow and it will not connect two containers. In VW diesel engines, a head with a crack between the valves is allowed to be used.
But finding all the cracks is a problematic task even for an experienced mechanic. It would seem that cracks should form in the same places on the same engines. But this does not make the search any easier. There are places that can be detected with one glance at the head:
—between valves
— the crack is immediately visible, passes under the seats of two adjacent valves.
—between spark plug and valve
- the same situation, again, everything is in plain sight and you don’t need to look anywhere
—in a diesel engine
a crack can go
from the valve towards the prechamber
, such a crack is easy to notice, but how can you see it if it forms under the prechamber and does not come out?
—under the valve guide
- another sweet spot where the crack is not visible, firstly, it’s already dark in the channel, and secondly, the crack is covered with a guide bushing. This requires a different approach, not just a visual one. And what is the use of detecting a crack between the valves if gases do not escape through it? Let’s not rely on chance, especially since the diagnostic method was invented a long time ago and has proven itself to be the best.
How to determine the presence of damage
In the early stages of crack formation in the cylinder head and cylinder block, you can use one of the methods to detect a violation of the integrity of the surface of parts:
- pneumatic pressing;
- ultrasound scanning;
- diagnostics using special equipment with increased magnetic sensitivity;
- hydrocontrol.
All these methods make it possible to accurately determine the presence of any damage, even of a minor nature. The presence of microcracks can be detected in a service center, subject to high-quality engine diagnostics using one of the above methods.
The most commonly used methods are based on pumping water or air into the cylinder block in order to identify areas with broken seals.
No less effective is the use of a magnet, which gives the most accurate result. To do this, magnets are placed on both sides of the area being diagnosed, and metal filings must be placed between them, which, if there are cracks, will concentrate at the location of the crack due to disruption of the magnetic field lines.
Checking the cylinder head for cracks
To check the cylinder head for cracks, it must be pressurized, that is, all holes must be hermetically sealed, and air must be blown into the channels. If you put the head in water, bubbles will come out of the crack. Or vice versa - plug all the holes and pour water into the channel, then pump air into it with a pump, creating a pressure of 0.6-0.7 MPa, and let the head stand for 1=2 hours. If the water goes away, it means the head is broken.
There are also dyes that are used to tint water. They are very clearly visible on the crack.
And the holes in the cooling jacket are closed very easily: a rubber gasket, which is slightly larger than the hole, is placed on the nick, a metal plate is placed on top, which is screwed to the head. And no water will pass like that. And a pump is connected to the fitting that will protrude from the head and air is pumped in. This type of crimping allows you to identify all cracks.
Video “Repair of microcracks”
Checking valve tightness
- an important event, since the tightness of the intake and exhaust valves to the seats largely depends.
Today you will learn how to check the tightness of valves,
as well as
how to grind valves at home
using special probes and a set of accessories.
Without the correct and coordinated operation of the timing mechanism (gas distribution mechanism), uninterrupted operation of the engine is impossible; this must be understood and all existing problems in the operation of this system must be identified in a timely manner. Valves play a key role in timing
intake and exhaust, as is already clear from the name, some release, and others let in... The tightness of the valves is an important point, on which, as mentioned above, a lot depends, otherwise the necessary pressure and operation of the internal combustion engine will not be created in the combustion chamber will be ineffective, and perhaps even impossible.
In order to check the tightness of the valves you must have:
- A wide bench ruler or a special template;
- Lapping paste;
- Kerosene;
- A special “device” for grinding in valves.
Crack repair
The only way to properly seal a crack is by welding. No adhesive composition will be able to properly seal a crack in the heads, because when heated to operating temperatures, the head will expand and the crack will become larger, that is, a composition for sealing the crack is needed that would have the same linear temperature expansions as the head material, to also be resistant to other loads. All this can only be achieved by welding.
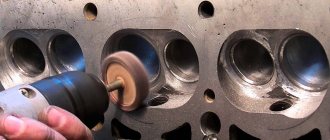
Preparing the head for welding
Before welding, the crack must be cut; to do this, the metal is drilled out along the entire length of the crack using a milling machine. The groove should be quite deep, 6-8 mm in depth and approximately the same in width; it is advisable to make it wedge-shaped in shape. This will help to better weld the metal. To cut a crack between the saddles, you first need to, and only then cut the crack.
After cutting the cracks, the head must be heated to a temperature of 200-250°C, but not higher, so that the head does not lead. Heating allows you to reduce the stress in the metal that occurs during welding. For heating, it is best to use an acetylene torch or oven, but you cannot use a blowtorch, because it can easily overheat the cylinder head.
Welding cylinder head
Gas welding using filler material can be used to weld the cylinder head, but argon arc welding (TIG) gives better results. A ground is connected to the head, and the arc burns in an argon environment between the tungsten electrode and the head, where the aluminum filler wire is inserted.
After welding, the seam must be cleaned, pressed again, and if all is well, then the surface adjacent to the block must be milled so that it is perfectly flat.
Checking valve tightness
- an important event, since the tightness of the intake and exhaust valves to the seats largely depends.
Today you will learn how to check the tightness of valves,
as well as
how to grind valves at home
using special probes and a set of accessories.
Without the correct and coordinated operation of the timing mechanism (gas distribution mechanism), uninterrupted operation of the engine is impossible; this must be understood and all existing problems in the operation of this system must be identified in a timely manner. Valves play a key role in timing
intake and exhaust, as is already clear from the name, some release, and others let in... The tightness of the valves is an important point, on which, as mentioned above, a lot depends, otherwise the necessary pressure and operation of the internal combustion engine will not be created in the combustion chamber will be ineffective, and perhaps even impossible.
In order to check the tightness of the valves you must have:
- A wide bench ruler or a special template;
- Lapping paste;
- Kerosene;
- A special “device” for grinding in valves.
Crack in the cylinder block of VAZ 21083. Video
Gorobinsky S.V.
You will need
- - metal ruler,
- – a piece of conveyor belt – 1 m,
- - compressor,
- - a piece of organic glass - in accordance with the size of the cylinder head,
- — clamps – 4-6 pcs.
Instructions
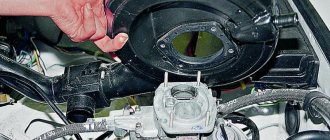
One of the most unpleasant moments for a motorist is considered to be the opening of the expansion tank cap, accompanied by a short-term release, not to mention its continuous squeezing out when it bubbles for a long time, although the engine temperature has not reached a critical level. This factor clearly indicates the penetration of gases into the water jacket of the system.
To thoroughly determine the cause of this malfunction, the cylinder head is removed from the engine and placed on a workbench. After which it is completely disassembled, right down to removing the gas distribution mechanism from it.
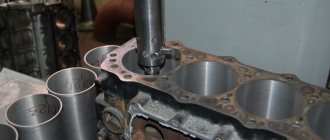
The cleaned surface of the head is checked for distortion with the edge of a metal ruler. Having placed a ruler on top along the length of the head, move it with your hands from one edge to the other, while carefully observing the lower edge of the ruler and the plane of the cylinder head. Any gaps detected at this point indicate that the head is moving, usually due to engine overheating.
To identify microcracks in the engine part being examined, you will need to make something like a head gasket from a piece of conveyor belt, with the only difference being that only holes for the combustion chamber are cut out in it.
Then the manufactured gasket is applied to the working surface of the cylinder head, organic glass cut to the shape of the head is placed on top of it, and this entire “sandwich” is compressed with clamps. After that, the holes in the place intended for mounting the pump are tightly sealed, and a hose connected to the air compressor is put on the fitting for the outlet to the heater.
The head prepared in this way is placed in a bath of clean water. Then the compressor is turned on and compressed air is pumped into the water jacket of the part being tested, within 1.6 atmospheres. At this stage, the cylinder head is pressurized. Any appearance of air bubbles will indicate the location where a crack has formed in the head.
Sources:
- Removing and installing the cylinder head
Engine repair work is one of the services provided by technicians at service stations. For this they are equipped with everything necessary. Often among the malfunctions there are breakdowns, the repair of which requires non-standard approaches. Among them are cracks in the engine housing. Therefore, it is recommended to entrust the solution to this problem only to experienced specialists.
There are several factors that contribute to the occurrence of cracks. First of all, these are mechanical damage caused by an accident or impact (for example: unsuccessful dismantling, falling of the engine). In addition, temperature differences lead to the appearance of defects. This happens when the coolant freezes. It happens that cracks form over time due to wear and tear of the metal.
When considering the problem of cracks, one must keep in mind that they can be both visually detectable and invisible (microcracks). It is not difficult to detect the former, but there are a number of ways to identify the latter; this is done using special equipment.
The first way is using a sound tester. Its work is based on the principle of the difference in the speed of reflection of a sound wave from surfaces of different structure and thickness. This makes it possible to assess the dimensions of the cylinder walls and the integrity of the “jacket” walls.
The next method is using a magnetic tester. In this case, metal powder is applied to the part being tested, after which it is magnetized. Based on the pattern formed by the powder, it is possible to determine whether there is damage on the surface being tested.
Another way to detect microcracks is using ultraviolet radiation. To do this, the surface under study is coated with a special solution and then magnetized. Then, in the dark, the ultraviolet flashlight is turned on. As a result, microcracks will be defined by contrasting lines.
Another method is a photochemical process in which microcracks are detected using penetrating paint. It includes three stages of processing the part being tested: solvent, special paint and developer. After this, the cracks become visible to the naked eye. At some service stations, technicians search for microcracks on special stands using high-pressure air injection.
Well, the easiest way is to grind chalk powder on the surface being studied, and any crack will immediately appear.
Depending on the structure of the surface being tested and accessibility to it, professional mechanics choose the optimal research method to detect microcracks.
The defects that most quickly appear on the cylinder head are the smallest cracks. Their appearance does not have the best effect on the operation of the cylinder block, and therefore the engine as a whole. What signs indicate the appearance of damage to the head, how to check the cylinder head - we will find out in this article.
Signs of the appearance of microcracks on the BC head are as follows:
- Vibration or so-called engine tripping when the car goes uphill. This phenomenon may be a consequence of the appearance of microcracks. If coolant gets into the cylinder block, it will definitely be on the spark plugs. Just unscrew one of the spark plugs; if its electrode is wet, taste the liquid. If it is antifreeze or antifreeze, then the taste will be slightly sweet, and this will indicate that antifreeze enters the cylinder block through microcracks in its head.
- Foaming of the engine oil should also lead to suspicions of microcracks, so check the cylinder head head. Engine oil foams due to antifreeze (antifreeze) getting into it. At the same time, the coolant level in the tank is constantly decreasing and requires replenishment to a normal level, and an oil film forms on the surface of the antifreeze in the tank. The engine also reacts to this, in warm weather - either by dropping the temperature or by increasing it.
- Antifreeze is boiling. To determine if the cylinder head is faulty, you need to open the expansion tank, add the required amount of antifreeze and start the engine. If the coolant boils almost immediately, then the cylinder head is not working properly.
- Engine oil drains too quickly. If a crack in the BC head has formed near the intake valve, then when the engine is running, oil will constantly be drawn into the cylinder. If antifreeze, rather than oil, is drawn through the intake valve, the cylinder pistons will become perfectly clean - you can check this by unscrewing the spark plugs.
How to check the cylinder head
There are several ways to check. Watch the video below.
Testing with magnets and metal shavings
This is the fastest and easiest option for checking the cylinder head. Magnets are installed along the entire plane of the head, and the head itself is sprinkled with metal shavings. The chips begin to move towards the magnets, getting stuck in cracks and small depressions and thus making them obvious to the eye.
Checking with a special liquid
- Wash the head surface with any solvent.
- Apply a special liquid to the washed surface and let it stand for several minutes.
- As soon as you remove the remaining liquid with a dry cloth, any defects on the head will appear.
Pressure test
You can pressure check the cylinder head by immersing it under water or without immersing it.
Submerging underwater:
- Before immersion in water, all head channels must be closed. Then put the cylinder head in a container and fill it with hot water.
- Apply compressed air to the head circuit. If there are tiny cracks somewhere, then bubbles will appear in this place.
Without immersing in water:
- Just as in the first case, close the channels of the head contour.
- Prepare a soap solution and then pour it onto the head cover.
- Apply compressed air to the circuit. Microcracks in the cylinder head can be detected by soap bubbles.
Testing with water
To check the cylinder head, you will need to pour water into it.
- Close all head openings tightly.
- Pour a large amount of water into the channel.
- Raise the pressure in the channel to 0.7 MPa by pumping air into it.
- Leave the cylinder head for several hours. If, after this time, the water leaves the head completely, then there are cracks in the part.
Video: How to check the cylinder head for microcracks
If the video does not show, refresh the page or
An experienced motorist knows that the performance of a car depends on the performance of the engine. And one of the main components of the motor is the head. How to check the cylinder head for microcracks and what are the signs of cracks on the head? You can find out more about this here.
[Hide]
How to check valve tightness?
Checking the tightness of the valve and seat is carried out as follows:
1. The cylinder head (cylinder head) is removed.
2. The cylinder head and bearing housing are cleaned from dirt, carbon deposits and other oil deposits.
4. After we inspect the working surfaces of the bearing housing, camshaft supports, as well as the walls of the mounting holes of the hydraulic pushers, there should be no traces of metal overflow or scuffing on them.
5. Valve guides and seats must fit tightly and adhere to the “body” of the cylinder head. There should be no cracks or burn marks on the seats and valves.
6. Using a template, check the flatness of the cylinder head,
if this is not available, this can be done using a wide bench ruler. Attach the ruler with its edge to the lower mating plane of the head diagonally, check if there is a gap between the cylinder head and the edge of the ruler. As a rule, it can be seen in the central part or along the edges. Measure the gap on both sides using flat feeler gauges, the maximum allowable gap is 0.1 mm. If you get more, you will need to mill the mating plane or completely replace it.
7. Next you need to check the tightness of the cylinder head
. To perform such a check, it is necessary to plug the supply window to the thermostat on the end surface of the block head. Next, turn the head over and pour kerosene into its cooling jacket. Make sure that there are no leaks anywhere; if any are found, the cylinder head should be repaired or completely replaced.
8. Now it’s the turn of the valves. To check the tightness of the valves
Place the cylinder head on a flat table with the mating plane facing up, then pour kerosene into the combustion chambers of the head and wait a couple of minutes. This procedure is also called “draining”. If you notice that the level of kerosene in the combustion chamber has begun to decrease, or a puddle has appeared on the table, this means that in this chamber one of the valves or both valves are leaking, which means that the valves need to be ground in.
How can I check?
Before making repairs or replacing the cylinder head, it must be checked. Below we will consider methods that will allow you to identify the presence of damage to the cylinder head at home. A video about diagnosing the cylinder head for microcracks was filmed by the Hydraulics Repair channel.
Magnetic powder diagnostics
This method is the fastest way to find out about the presence of defects. The essence of the method is to install magnets on all sides of the cylinder head. After their installation, the block head should be sprinkled with metal shavings. This will cause it to move towards the magnets. And chips will remain on the defects, which will make it possible to identify damage.
Pressure test
There are several ways to detect a crack in the cylinder head: immerse the head under water or not. Diagnostic method with cylinder head immersion:
- Remove the cylinder head from the engine. We will not describe the removal process, since it is individual for each vehicle.
- Tightly close all circuit channels at the top of the device.
- Immerse the block head in the container. Pour hot water into it. The container must be large so that the cylinder head is completely immersed in it.
- After this, supply compressed air to the device circuit. There are defects and cracks in the place where the bubbles appeared.
You don't have to immerse the cylinder head in water:
- Securely close all channels on the device circuit.
- Prepare a soap solution by mixing soap and water.
- Pour the resulting solution onto the surface of the cylinder head cover.
- Apply compressed air to the circuit. There are microcracks in the place where soap bubbles appeared. A video about diagnosing a cylinder head under pressure was made by Pavel Shilin.
Water test
This method is performed using water. Only the cylinder head does not need to be lowered into it; the liquid is poured directly inside. For diagnostics you will need a pump:
- Close all existing openings tightly.
- Pour liquid into the device channel.
- Take a pump and pump air into the channel. It is advisable that the tool have a pressure gauge. The air supply pressure must be at least 0.7 MPa.
- After this, the cylinder head should stand for 2-3 hours. If water leaves it, this indicates the presence of microcracks on the body. Accordingly, more detailed diagnostics and repairs will be required.
Diagnostics using liquid
How to check the cylinder head for microcracks using a coloring liquid:
- First, the surface of the device must be completely rinsed. To clean, use acetone or another solvent. You can also use kerosene.
- Afterwards you need to prepare the coloring liquid. It is applied to the surface of the block head, then wait 3-5 minutes.
- Then you need to use a rag to wash off any remaining liquid. You need to look at the cylinder head housing - if there are cracks, you can see the damage.
How to fix valve leaks? Valve lapping
1. Elimination of valve leaks is carried out by grinding them into the seats; if there are no cracks or damage on the plate and valve, it can be restored by grinding. To perform this procedure you must:
2. Remove the oil seal from the valve.
3. Remove the valve that does not fit well from the guide sleeve.
5. The valve is installed in the cylinder head, and a “device” for grinding valves
.
6. Pressing the valve to the seat, grinding is performed by rotating the valve from side to side, making 10-15 such movements, turn it 90° and continue grinding again. Grinding should be carried out until a uniform, flat surface is formed on the plate and seat, and the parts themselves fit perfectly to each other.
7. Upon completion, the remaining lapping paste is removed, and the valve with new oil seals is installed in place.
That's all for me, I wish you good luck in your work! Thank you for reading us, see you again on !
The cylinder head gasket is responsible for the tightness of the connection. This gasket makes it possible to seal the combustion chamber and the cooling jacket channels through which the coolant moves. The gasket can be made of thin metal. The second available option is reinforced paronite, which additionally has a metal edging in those places where the gasket has holes for the combustion chamber.
Burnout or breakdown of the cylinder head gasket is a serious and fairly common malfunction. The obvious answer to the question of whether it is possible to drive with a broken cylinder head gasket is the need for urgent repairs. It should be added that if there is a slight loss of tightness, you can move under your own power in a car, but it is advisable to eliminate such a defect urgently. In the event that the cylinder head gasket is severely punctured and signs of failure are clearly visible, operation is prohibited.
Read in this article
Before disassembling the cylinder head
Before disassembling the cylinder head you must:
- Remove all holders, sensors and other attached electrical equipment. If you are dealing with the cylinder head of a diesel engine with electromagnetic injectors, they also need to be removed (it is not necessary to remove the pump injectors).
- Before removing the head from the block, it is necessary to ensure that the marks used to adjust the gas distribution mechanism are visible. If this is not possible, the timing parts should be marked accordingly.
Further actions are described using the example of a cylinder head with an overhead camshaft (OHC):
- Loosen the cylinder head cover mounting bolts in the same order as they were tightened during installation. Remove the cylinder head.
- Mark the camshaft bearing caps (if applicable) to determine the correct position for assembly.
- Remove the camshaft bearing caps by turning them slightly.
- Remove the camshaft and bearings.
- Remove the hydraulic compensators and pushers (depending on the design of the cylinder head). If you intend to use them in the future, then mark the jobs of each.
- Using a suitable tool, compress the valve springs and remove the retainers, spring retainers and the springs themselves. Place the parts in the order in which they were dismantled.
- Remove oil seals from valve stems (if installed).
- Turn the head over and remove the valves, marking the places where they were installed.
- Retain all components until all new and replacement parts are accurately sized.
Then the cylinder head should be cleaned. Assembly must be done in reverse order.
Causes of failure and how to check the cylinder head gasket
The consequences for the engine can be disastrous even when driving a car with this problem for a short time. If the breakdown of the cylinder head gasket is ignored, even after a short mileage, a major overhaul becomes necessary.
This breakdown can occur in both a gasoline and diesel engine, in a unit with or variant. Gasket failure requires correct and timely diagnosis. An increase in fuel consumption, difficult engine starting and unstable operation, a decrease in internal combustion engine power, a drop in the coolant level in the expansion tank, and low compression in the cylinders can indicate a problem at an early stage.
The most common causes of breakdown or burnout of the cylinder head gasket are:
- engine overheating;
- incorrect installation when replacing the gasket;
- consequences of power tuning of internal combustion engines;
- the tightening force of the cylinder head bolts does not meet the standards;
- driving on low quality gasoline, which is accompanied by;
Engine overheating is the main cause of cylinder head gasket failure. Overheating of the engine occurs for various reasons, ranging from a malfunction to phenomena such as engine detonation or. Both metal (asbestos) gaskets and paronite gaskets in such conditions usually cannot withstand the rising temperature during overheating and burn out. After such a burnout, the strength of the gasket becomes less and it blows out.
It is noteworthy that among the indirect signs of a burnt-out cylinder head gasket, in some cases an increase in engine temperature, that is, overheating, was noted. A breakdown of the combustion chamber edging on the gasket leads to hot gases breaking into the engine cooling system and overheating the antifreeze. It turns out that overheating of the engine often damages the gasket, and then a breakdown of the gasket provokes an increase in engine temperature.
The list of consequences of overheating of the power unit also includes curvature of the cylinder head, or rather its plane. In everyday life, the definition “cylinder head led” is found. Most often, the block head suffers from overheating if the material used for its manufacture is aluminum alloy. Note that cast iron heads are more resistant to high temperatures, although in some cases cracks may occur. If the head has moved, then such curvature is eliminated by grinding. As a preventive measure (unnecessary), grinding the cylinder head is not recommended.
Checking the cylinder head gasket for breakdown | Topic Author: Momoko
The main sign of a breakdown of the cylinder head gasket is an increase in the level of coolant in the expansion tank during engine operation, until the tank overflows and liquid is released, while the engine temperature remains normal.
Also, a breakdown of the gasket is sometimes accompanied by a decrease in the coolant level in the absence of external leaks, the appearance of a white or gray creamy coating under the oil filler plug, and the appearance of a café-au-lait emulsion in the oil on the dipstick.
The cylinder head gasket is checked like this. When the engine is cold, open the radiator cap and check the coolant level in it. If the radiator tank is not full, add coolant. Close the radiator cap. We remove the drainage tube from the expansion tank and lower it into a small transparent container with clean water (for example, a mayonnaise jar). We start the engine and watch the snorkel in the water. As the engine warms up and the coolant expands, air bubbles first come out of the tube, which got there while we were removing the tube from the expansion tank. After all the air has been displaced from the tube, coolant will come out, which is colored and therefore clearly visible in the water. After this, no more bubbles should appear from the tube. If the bubbles continue to flow, it means that gases from the combustion chamber(s) are entering the engine cooling jacket. As a rule, the reason for this is a breakdown of the cylinder head gasket, which can occur if the cylinder head is installed incorrectly during repairs, the material of the gasket itself is of poor quality, or after the engine overheats. When replacing the gasket, be sure to check the cylinder head plane for distortion and, if any, grind it on a plate. If a bent cylinder head is detected, you should also inspect the bolts securing it to the cylinder block; if stretching is noticeable on the bolts, they should not be reused. Less commonly, the cause of gas breakthrough is cracks in the cylinder head itself; as a rule, this occurs in diesel engines when they are used incorrectly. In this case, the cracks in the cylinder head are welded (if possible), but more often the cylinder head is replaced. Tags:
How to check a cylinder head for microcracks
Signs of a broken cylinder head gasket
If the cylinder head gasket has burned out or is punctured, then the list of main symptoms of such a malfunction includes:
- gas breakthrough or leaks in the area where the head meets the cylinder block;
- the appearance of an emulsion in the engine lubrication system;
- the engine begins to smoke white smoke;
- oil and/or exhaust gases entering the engine cooling system;
If exhaust gases break through at the place where the cylinder head meets the cylinder block, then this is a clear sign of a broken cylinder head gasket. This phenomenon is also accompanied by a significant increase in noise during engine operation. A noticeable escape of exhaust gases through a broken gasket is not common, but it is quite easy to diagnose. If the outer shell of the gasket ruptures, coolant or engine oil leaks may also appear on the outer surfaces of the engine at the junction of the head and block. Among the signs that require a more thorough examination are:
It is more difficult to diagnose a breakdown or leakage of the cylinder head gasket if the defect is localized between the cylinders. If the cylinder head gasket is burnt out, symptoms in this case may not appear on the outside, and the problem itself is accompanied only by indirect signs: fuel consumption increases, the engine runs unstably and stalls, and there is a drop in power.
It is worth adding that in the event of a burnout of the head gasket between the combustion chambers, mixing of exhaust gases and the fuel-air mixture in adjacent cylinders may occur. More often, the malfunction manifests itself in the form of unstable operation of a cold engine, which normalizes after warming up. These malfunctions in the operation of the internal combustion engine can be caused by various problems. As for checking the gasket, for accurate diagnosis it is necessary to measure engine compression. If there is a similar drop in compression in adjacent cylinders, then a defective cylinder head gasket is quite likely.
Symptoms of a crack in the cylinder block and cylinder head
There are several signs that, if detected, should sound the alarm and send the engine for diagnostics. They may indicate both the formation of cracks in the engine and other malfunctions. Most often, cracks in the cylinder block and cylinder head are indicated by:
- Regular. If, due to a crack, the system is no longer sealed, this will lead to coolant leakage and constant overheating of the engine. This problem can also occur due to burnout or other defects;
- Problems with the operation of the temperature control device (thermocouple). This is fraught with severe overheating of the engine and its deformation;
- The expansion tank does not hold pressure and air pockets form;
- Incorrect indicators. If the temperature sensor needle changes chaotically, either up or down, this may indicate sharp changes in the temperature of the engine itself during operation;
- Engine vibrations. One of the most obvious signs of cracks in the cylinder block. If the engine vibrates or shakes excessively, especially when driving uphill, this may indicate the presence of microcracks in the engine block.
How to change the cylinder head gasket correctly
Let's start with the fact that removing the cylinder head on some engines is a complex and time-consuming procedure that requires draining fluids and dismantling individual units and components. When replacing the cylinder head gasket, you must make sure that the head has the most even plane of contact with the cylinder block.
Dirt, deep scratches and other defects are not allowed on adjacent surfaces. If the block head has been ground, then it is necessary to separately take into account the thickness of the removed layer from the adjacent surface.
It is imperative to follow the recommended sequence and force when tightening the cylinder head bolts. To obtain accurate data, the engine manufacturer and cylinder head gasket manufacturers provide a diagram according to which it is necessary to tighten the fasteners. The recommended tightening force (torque) is also indicated. Let us add that when replacing the cylinder head gasket, it is recommended to also replace the mounting bolts. After unscrewing and then tightening with proper force, the old studs cannot withstand the load, resulting in the bolt breaking.
If the cylinder head stud breaks off, but the gasket does not burn out, then the broken part must be unscrewed. After this, the bolt must be replaced with a new one. To remove a broken bolt, you can use a simple method that involves welding a metal tube to the remainder of the bolt. This tube should have a smaller diameter compared to the bolt. The tube is applied to the broken pin and scalded from the inside. You can also weld a nut onto the top of the tube, after which you can unscrew the broken pin without much difficulty.
Is it necessary to stretch the cylinder head after replacing the gasket?
As mentioned above, in the process of replacing the gasket, increased attention is paid to the fastening bolts, as well as correct tightening. The head must be tightened only with the recommended torque according to a clearly defined pattern (sequence). Over-tightening or under-tightening is unacceptable.
Overtightened cylinder head bolts can cause the head of the mounting bolt to come off. Loss of pressing force will mean that the head of the block does not fit tightly enough, a loss of tightness occurs and the gasket breaks again.
As for pulling the cylinder head after replacing the gasket, it is advisable to carry out this procedure after several tens of kilometers. During this time, the driver is obliged to closely monitor the engine and its operation. An engine with a new gasket must operate stably in all modes, the exhaust must be clean, and the operating temperature of the engine must not exceed the permissible limit.
The head must be pulled if there are any leaks in the area of the joint with the cylinder block. To do this, you need to use a torque wrench and tighten with the force recommended by the car manufacturer for tightening the head on a specific engine.
Crack in the cylinder block: signs
There are symptoms that, if detected, require that the engine be diagnosed for serious damage. The following signs especially often indicate the presence of faults:
- Constant overheating of the motor. Depressurization of the system leads to oil leakage and overheating of the power unit. The problem may occur due to the gasket burning out.
- Thermocouple malfunctions. The consequence is overheating of the motor and its deformation.
- The expansion barrel does not hold pressure, resulting in air pockets.
- The temperature sensor is giving incorrect readings. If the instrument needle behaves erratically, this may indicate sudden changes in the temperature of the motor during operation.
- The motor vibrates. This is the main sign that a crack has formed in the cylinder block. A crack is also indicated by “tripping” of the engine during high load.
Metal or paronite cylinder head gasket: which is better?
Many car enthusiasts are wondering which cylinder head gasket is better, metal or paronite. According to experts and auto mechanics, a metal cylinder head gasket can withstand greater loads compared to a reinforced paronite gasket. This is especially true for turbocharged engines and those on which the paronite cylinder head gaskets are quickly blown out after installation.
If the engine is naturally aspirated, is in stock configuration and there are no plans for tuning it, then a metal-paronite gasket is a completely suitable option. Moreover, the undeniable advantage of such a gasket is the ability to slightly smooth out small nuances and unevenness of the adjacent surface.
It is also necessary to add that the walls between the groups of holes in the gaskets are very thin. For this reason, the service life of metal or paronite gaskets is primarily affected by correctness and accuracy during installation, and only then by the material of manufacture. The result of incorrect installation is that the gasket quickly burns out, after replacing the cylinder head gasket, the car does not start or the pistons knock. The latter case is more typical for diesel engines.
If diagnostics show that the head gasket is burnt out, then further operation of the car is highly not recommended. Possible consequences for the engine and the costs of eliminating them can be tens of times greater than the cost of a cylinder head gasket and the work to replace it. For different car models, the cost of the gasket can range from 15 to 50 USD. Mounting bolts will cost an average of 10-20 USD.
Separately, it is worth paying attention to the question of whether the cylinder head gasket can be reused. There cannot be a definite answer even if the gasket is in perfect condition. As practice shows, if it is necessary to remove the cylinder head, it is better to carry out a preventive replacement of the gasket and fasteners.
Finally, we add that increased attention must be paid to the quality of the gasket. Taking into account the complexity and amount of work involved in dismantling the cylinder head, it is better to immediately buy a branded original gasket or an analogue from a well-known manufacturer than to remove the head again after 10-15 thousand km. The purchase of a gasket of proper quality will be fully justified even taking into account the higher cost (25-50%) compared to more affordable budget options in a group of similar products.
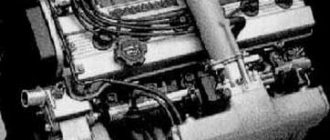
The internal combustion engine is designed in such a way that during its operation a huge amount of heat is released. If engine parts are not cooled during operation, the engine may overheat and be destroyed.
There are two types of engines - with air and water cooling systems. Engines with an air-cooled system are cooled with air, while engines with a water-cooled system are cooled with antifreeze. Cooling with antifreeze is the most effective method because... in the internal part of the motor there are many channels that pass by hot zones and thereby save from unacceptable overheating of engine parts.
Let's take the cylinder head for example. Based on the loads and the amount of heat generated, designers calculate the location of the channels in such a way that the parts do not overheat, and the heat is removed from the valve seats, guide bushings, and combustion chamber most efficiently. It is necessary to sacrifice the thickness of the block head walls, and the channels are cast in the immediate vicinity of the cooled zones. During operation, the cylinder head constantly experiences thermal cyclic loads and the formation of thermal fatigue cracks, for example in the inter-valve partition, is not uncommon in loaded engines. Also, a fairly common reason for the formation of cracks in the cylinder head is a violation of the thermal operating conditions of the engine. In case of overheating, the head becomes deformed, internal stress is created and microcracks appear.
Should I pay attention to cracks in the cylinder head (cylinder head)?
During the process of engine repair, many mechanics do not pay attention to cracks in the cylinder head. We can safely say that any microcracks in the cylinder head are a potential danger. It all depends on the location of the cracks. On the one hand, if the crack is located in the inter-valve septum, then there is a possibility of weakening the tension of the valve seats (the seat may fall out of the seat). On the other hand, it is not so deadly, because... With such cracks, engines travel for hundreds of thousands of kilometers, and in some AUDI and VW gasoline engines, cracks between the seats are allowed by the manufacturer. The main threat to the performance of the engine comes from those cracks that penetrate the cooling system. Not all cracks in the cylinder head can be recognized visually, as they can be located under the valve seat, prechamber, or simply under a layer of carbon deposits. But what if the crack found does not pose any threat, and you were in vain condemning the head to be replaced. What should I do? The technology for checking hidden cavities for leaks, or otherwise CPRESSING, will help you understand all this. The presence of a special stand allows you to quickly, accurately and inexpensively determine the performance of the cylinder head. Crimping the cylinder head will guarantee that the cooling system is intact and will prevent the mistaken installation of a leaky head on the car.
In what cases is it advisable to perform pressure testing of the cylinder head: 1) Oil getting into the coolant 2) Antifreeze getting into the oil 3) Gases getting into the cooling system 4) Antifreeze getting into the combustion chamber 5) Engine overheating 6) When repairing diesel engines 7) After performing welding work to weld microcracks When purchasing a used block head to replace your faulty one. 9) After replacing the nozzle cups (those engines where the cup is washed with antifreeze)
What to do if there is a cylinder head gasket failure
The presence of a broken cylinder head gasket does not interfere with driving a car, however, it is extremely undesirable to do this, because this disrupts the operation of other functional blocks and mechanisms, and parts wear out faster. Compared to other working components of the machine, the gasket is inexpensive, and its replacement does not take much time. However, repairs at a car repair shop can cause greater expenses than purchasing the spare part itself:
- If, when removing the cylinder head, specialists discover that the mounting bolts do not meet the performance specifications due to the fact that they have become loose, they will have to be replaced as well. Sometimes the bolts have to be roughly torn off - the violation of the geometry of the gasket does not allow them to be unscrewed carefully. In addition, modern cars are often equipped with bolts that work at the yield point, and they have to be changed after removing the cylinder head.
- If gasket deformation has led to distortion of the cylinder head plane (this happens rarely), grinding is needed. This work is carried out using special equipment and requires additional costs. It should be taken into account that after grinding it is necessary to buy a new gasket taking into account the removed layer of metal.
When replacing the cylinder head gasket with your own hands, it is necessary to thoroughly clean the removed head from scale, carbon deposits, drips and pieces of the dismantled gasket. Next, using a measuring ruler, the flatness of the head is checked - the difference across the surface should not be more than 1 mm, otherwise the part will have to be sent for grinding. Thick glass (5 mm thick or more) is also suitable for checking flatness. After laying it flat on the surface of the oil-lubricated head, the differences become noticeable as air spots.
Signs of a crack in the cylinder head and cylinder block
In order to promptly identify the presence of damage in the working components of the cylinder block, you need to pay attention to emerging signs of cracks. Also, these signs may indicate any other damage to engine parts, so diagnosis will be inevitable. You need to contact a service workshop if you find:
- Constant overheating of the engine due to leakage as a result of the formation of defects on the cylinder block gaskets and the leakage of coolant due to this.
- Due to pressure drops and the occurrence of air pockets in the expansion tank, heat exchange in the engine is disrupted.
- Malfunction of temperature sensors and temperature control devices, which leads to overheating and deformation of engine parts.
- Increased engine vibrations, especially when driving up an inclined road.