Significant advantages of Generel screens
1.Easy to install. Installation does not require much time, you just need to cover the surface and remove any residue. All this can be done independently without special tools, and without resorting to the services of specialists.
2. Does not restrict visibility. The tint is not purely PET and its light transmittance is much higher, and visibility from the interior is almost ideal. The heat-resistant screen is installed in the window opening of the car and does not interfere with the view. In addition, in bright sunshine it provides protection for the driver's eyes.
3. Affordable price. One of the main advantages of this design is its reasonable cost. With proper care, the tint will last quite a long time and by purchasing it, you can count on long-term use.
4. Doesn't heat up. Thanks to the use of several layers of high-quality material during the manufacture and construction of the layers, the surface does not heat up and the product does not deform, and it does not fade in the sun.
5. Using removable tinting will generally help you avoid committing a crime. Due to the fact that the design is largely a removable car accessory and does not exceed the standards established by GOST, people are not held administratively liable for its use. In addition, there is no corresponding regulation for temporary parking screens.
6. Not subject to deformation due to temperature changes. Made from heat-resistant material with heat-resistant properties, the design retains its shape even at extreme temperatures.
Video:
How are they punished for removable tint in practice?
For removable tinting, as for regular tinting, inspectors can issue an order requiring the repair of a fault in the car. Of course, peeling off removable tint is much easier than getting rid of regular tint. However, if you remove and re-apply the removable tint after some time, the requirement will not be considered fulfilled.
If the next time any other inspector stops the car and finds out about the presence of an order by checking the vehicle against the data base, he will definitely check whether the described malfunction has been eliminated. If the tint is still on the car windows, then the driver will face a new punishment: 1000 rubles. fine or up to 15 days of arrest (according to Article 19.3).
However, this is not all that the State Traffic Inspectorate has prepared for car owners. For repeated violations of the operating conditions of the vehicle, its registration may be suspended. Most often, such punishment is applied to those who unauthorizedly made changes to the design of the vehicle and did not register them with the traffic police. However, sometimes this measure of punishment can be applied to those who like tinting.
Choosing the best film for self-window wrapping
Mazda tribute
For the optimal choice, many parameters should be taken into account. The first is the type of film. They come in painted and metalized varieties (there are others, but inexperienced pasters should not mess with them). The second option is preferable, as it is more durable and provides good protection from sunlight, but the price is twice as high. It makes sense to take high-quality colored film for “training”. Its resource will last for 2-3 years, after which (based on the experience gained) you will decide which one to glue for the second time.
You should not take the cheapest options (most often Chinese) to learn how to tint. During installation, you will encounter additional difficulties: creases, poor glue and rapid wear. With such materials and without experience, it is unlikely that you will be able to complete the pasting process.
Recommended and trusted manufacturers (if there is a quality certificate, there may be fakes):
- SunTek - strong adhesive, high strength and excellent thermal insulation. The Standard series is suitable for beginners. An example of one of the varieties of SunTek film
- Llumar has been on the market for a long time, so the production process is mature and the quality is high. The ATR 10 LUX series has a bronze tint. The price is above average. Is one of the top manufacturers
- Sun-gard - painted films from this manufacturer have a five-year warranty due to the protective silicone coating. Most Sun-gard films are six-layer.
- SunControl has a “trick” in ultraviolet protection. The company is Indian, but the quality does not suffer from this. SunControl pleases with an abundance of tint coating colors
- SolarGard uses expensive metals (copper, aluminum, titanium) in the production of its films. This gives an excellent variety of shades not available from other manufacturers (white, blue, bright green and many others). SolarGard factories are located in the USA
Choose which brand suits your liking and wallet, and we’ll get to work.
DIY tinting
UAZ on tracks
Tinting car windows is one of the first steps in car tuning. In fact, doing tinting yourself is not difficult and you can find many reports on tinting on the Internet. But you won’t find complete instructions on tinting with photos and videos in one place. That’s why I decided to look at this issue in more detail and collect all the useful materials on tinting in my report.
Due to the introduction of new fines for car tinting, the so-called “Do-it-yourself removable tinting” or “Automatic tinting” has recently become increasingly popular. In this report I will show you how to tint a VAZ 2110 in a simple way.
Pros of tinting
- The biggest advantage of tinting yourself is saving money compared to tinting at a car service center. That is, tinting a car at a service center will cost about 10 times more than tinting it yourself.
- Window tinting will help you reduce interior heating by 50-60% in the summer.
- Car tinting blocks up to 99% of harmful ultraviolet rays
- When glass breaks, tinting holds the broken pieces of glass, thereby protecting you from cuts.
- Tinting protects against glare from the sun or headlights of an oncoming car.
- Tinted car windows hide the interior contents from prying eyes.
- Tinting protects the plastic and interior panel from sunlight, which can crack from strong heat.
- A tinted car looks more attractive.
Choosing a film for tinting
The main questions when buying a tinting film are usually: Which tinting film is better? What is the difference between tinting films? Which manufacturer should I choose for tint film?
At the stage of purchasing a film for tinting a car, I suggest not saving on time and price, but it is better to find a product from a trusted manufacturer than to buy just anything and do the window tinting work at home.
List of quality films with certificate and guaranteed performance:
- SunTek Film by Commonwealth Laminating & Coating, Inc.,
- llumar film by Courtaulds Performes Films.
- Sun Control film produced by Garware Polyester Ltd.,
- Sun-Gard, Glass-Gard and Safe-Gard film from Film Technologies International, Inc.
- Johnson Window Films.
- Films MСС/Solar Gard
- Films from 3M Corporation
The package usually contains 1.5-2 square meters of film, a plastic spatula for smoothing and a knife. The simplest and most short-lived film for tinting is single-layer with a colored adhesive layer. The highest quality film for tinting is multi-layer, neutral in color, coated with metal.
Preparing a car tinting tool
All necessary consumables and tools for car tinting:
- A roll of tint film (usually 2 sq.m. of film per roll, this is enough for 4 side windows. About 3 sq.m. of film is needed for the side windows and rear window); Price: from 200 rub./roll.
- Rubber spatula or plastic scraper (the latter is less desirable as it leaves micro-scratches). Price: 30 rub.
- Shampoo (for example, Johnson's Baby 100ml). Either a similar shampoo or soap solution, but the main thing is not to use window cleaning liquid. Price: 100 rub.
- Spray bottle (for example, “Mr. Muscle” without contents).
- A sharp utility knife with a retractable blade. Price: 150 rub.
- Dry, lint-free cloth
- Clean/filtered warm water
- A technical or home hair dryer (not necessary for tinting side windows, but preferable). Price: 800 rub.
Preparing for car tinting
Prepare a 10-20% solution of shampoo in water and pour it into a spray bottle.
I recommend starting tinting with your own hands from the side windows. And only after you have some experience, move on to the rear or windshield.
The further scenario can unfold according to two scenarios: 1-Tinting with glass removal For more convenient and high-quality tinting, it is better to remove the glass. How to remove glass in a VAZ 2110? It takes a little pain, but you get a really pleasant and useful effect. Window tinting should be done in a clean place. If indoors, then without dust, because... dust is one of the causes of bubbles. 2-Tinting without removing the windows If you decide to tint the windows without removing them from the car, then you need to clean the car interior from dust. It is advisable to do car tinting on a cloudy day, after rain (then there will be less dust) and in the absence of insects That's it, let's move on to tinting the car windows.
xn--2111-43da1a8c.xn--p1ai
Description of removable reusable tint “M TONIC”
A car owner who bought removable tinting 2020 and installed it on the car windows will appreciate its sun protection properties, glare protection, and level of transparency. Darkening the windows will protect the car from overheating, preserve the color of the upholstery from fading, and will protect the personal space of the driver and passengers from prying eyes.
Russian legislation prohibits gluing tint film on the windshield. Surely most car owners know that shading glass in the usual way is a complex procedure that requires installation skills. Removing a stationary darkening is also not easy - it takes time and skill.
- “M TONIC” is confidently gaining popularity, being an excellent means of maintaining normal temperature conditions in the car and creating comfortable conditions. And most importantly, it makes it possible to avoid conflicts with traffic police officers who strive to issue a fine for the slightest violation.
- “M TONIC” is a removable 2020 generation static tint and most car owners want to buy it, unlike the usual removable silicone tint, which is now becoming a thing of the past.
Advantages of installing removable tinting on a car:
• Removable tinting on the windshield – excellent protection for people in the cabin from sun glare and overheating; • For thicknesses up to 1/10 mm (100 microns). – reliably protects the glass from damage while driving; • Does not affect the operation of accessories attached to the glass; • Stays on the glass due to the static effect; • Does not reduce the quality of far and near visibility; • Protects the interior from prying eyes; • High-quality toner material can withstand repeated application and removal. • Helps to find a compromise, taking into account changes in the legislation of the Russian Federation.
Affordable tinting at home
Pajero mini
One of the new products in this tuning industry is spray tinting. Real glass spraying is a process that requires specialized skills. As a rule, spraying is carried out in the factory when ordering a car from the assembly line. The strength of this coating is very high, the saturation meets all standards established by law. This tuning is also carried out at service stations using custom-made materials. But there is also the option of applying such a coating at home. To do this, purchase a special tonic in a bottle and apply it to the glass. The problem is that the quality of such a coating from a cylinder leaves much to be desired. Not only does the end result suffer, but problems also arise during operation. The coating goes on unevenly and with streaks. This spray is wiped off from the container very quickly. The biggest problem is that there is no way to remove this substance without damaging the glass; in any case, traces of tonic will remain. Therefore, if the goal is to save money, then it is better to stick a removable film on the car.
spray tinting
Film tinting also has several variations:
- standard dark film with varying degrees of darkness;
- multi-colored film;
- mirror shimmer;
- transparent film with a pattern;
- perforated film.
Toning at home largely depends on the quality of the material used. Like any coating, the film is available in several price categories. The cheapest option is thin film cut to fit certain car models. This type of film has a less durable structure. Thin material is usually covered with a layer of another film, rather than painted like most tinting materials. As a result, the top layer with tone peels off and after one winter-summer season it becomes unusable. Therefore, preference should be given to such a coating only in the most extreme cases. One of the advantages is that it is much easier to glue such a film. But this procedure will have to be repeated every year.
Film in rolls is available in a full range of colors. This coating differs in the level of density and darkness, which determines its price. This film must be glued after cutting. But this process will not take much time and will make it possible to cover any area of glass. This film is also called removable. The secret is that the removable tinting can be changed according to desire and mood, while the glass underneath remains untouched. Roll length is standard. One roll is enough to tint all car windows.
Advantages of roll film:
- large selection of options;
- possibility of individual cutting;
- high density;
- resistance to damage;
- removable base without harm to glass.
Perforated film is more durable and more versatile. The coating is a surface with many small holes of the same diameter. With the help of these holes, the film retains light transmittance and allows it to be used on cars. In order to apply perforated tint, you need the same set of tools as for roll coating. This tint allows you to apply any pattern to the car body, which allows you to decorate the car in an original way. Using a mono pattern, you can emphasize the shape of the body. You can also add style to the body itself using parts cut from perforated film. It is denser than regular tinting and resistant to mechanical damage. But the material is not able to reflect ultraviolet radiation and protect the interior from the sun.
glass pasting
Features of tinting
Today, tinting is widely used on various car models. It has both positive and negative sides. They largely depend on the quality of its implementation. Pasting car windows is a difficult job, as it requires knowledge, skills, experience and accuracy. Otherwise, the appearance of the car will be ruined. If the pasting is done poorly, air bubbles appear and it will quickly peel off.
It is also worth paying attention to the material that is used. It is worth giving preference to leading manufacturers who have long been known in the market and have won the trust of consumers. This approach will guarantee long-lasting tinting service. At the same time, do not forget the operating rules. Violating them is strictly prohibited.
The main indicators of a quality film is its appearance after gluing. It should not crack, move away from the surface, or change color. In addition, the film must have a number of properties. Protect from sunlight, be resistant to mechanical stress, and have a high thermal insulation rate. At the same time, her appearance is quite natural.
How to stick tinting on the rear window of a VAZ 2107, 2106 yourself
The peculiarity of applying tinting to the rear window lies in its curved shape. Even the elasticity of the tint film does not always allow for trouble-free application. In this case, to apply the film yourself, a hairdryer is added to all the necessary tools.
To give the tint film the necessary bends, without removing the protective film, it is applied to the glass that has been cleaned and generously covered with soapy water and heated with a hairdryer in problem areas. Use a spatula to remove unnecessary bubbles from the center to the edges, and the film takes the necessary shape. The form is ready, now the whole procedure is repeated, removing the protective film.
In cases where the properties of the film or the curvature of the rear window do not allow tinting to be applied in one whole fragment, it is composed of 2-3 strips. The strips are glued from top to bottom, alternately, overlapping. The alignment line of the stripes will be less noticeable if the junction of the stripes is aligned with the rear window heating lines. To increase the service life of tinting, it is not recommended to use heated glass for 2 days.
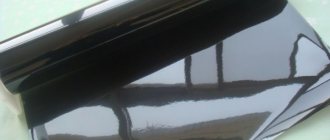
Varieties of silicone, PET and others
To produce removable tinting, different materials can be used, which determine the appearance and technical parameters of the finished product. Among the common types are the following:
Silicone, capable of absorbing ultraviolet rays. Due to the specificity of the tinting, the possibility of creating a mirror effect and blinding the light of other vehicles is eliminated. In order to install silicone film, a special approach is required, since quick gluing poses the risk of a loose fit to the glass. It is easy to stretch such a film, as well as straighten it. Photochromic (electrochromic) film, which becomes lighter or darker depending on the degree of voltage applied to the glass. The advantage of this tinting method is that the transparency of car windows can be changed independently at any time. The disadvantage is the high cost compared to other options. Monopolycarbonate based tint, also called static plastic. This film reliably adheres to glass and has a relatively low cost. However, the visibility of the road with this tint is greatly reduced at night, so whether to hang it or not is a moot point. Tinting using double glass technologies, one of which is darkened and lowered separately from the standard transparent glass. Despite the maximum convenience in everyday use, tinting a car using this method is much more difficult.
Removable tinting can be soft or hard, depending on the needs of the car owner.
Watch a video about removable tinting
- Next Reserving car windows with film
- Back Front-wheel drive or rear-wheel drive: which is better?
- Engine/Ratings
Aug 23, 2019
- Hyundai crossovers / News
Aug 23, 2019
- Aug 22, 2019
- Volkswagen crossovers / News
Aug 21, 2019
- Crossovers Ford / News
Aug 20, 2019
- Audi crossovers / News
Aug 20, 2019
- April 13, 2019
- March 12, 2019
- Feb 17, 2019
- April 11, 2019
- July 27, 2017
Popular crossovers
Acura crossovers Audi crossovers BMW crossovers Cadillac crossovers Chevrolet crossovers Chery crossovers Citroen crossovers Dodge crossovers Ford crossovers Honda crossovers Infiniti crossovers Jeep crossovers Hyundai crossovers Kia crossovers Lexus crossovers Lada crossovers Land Rover crossovers Mazda crossovers Mercedes crossovers Mini crossovers Mitsubishi crossovers Nissan crossovers Porshe crossovers Peugeot crossovers Crossovers Opel Crossovers Renault Crossovers Ssang Yong Crossovers Skoda Crossovers Subaru Crossovers Suzuki Crossovers Toyota Crossovers Volkswagen Crossovers Volvo Crossovers
Installing removable tinting yourself at home
A man is trying to correctly install removable silicone tint, and he succeeds!
Installing silicone removable film yourself is practically easy. The only condition that must be strictly observed is to prevent small particles of debris and dirt from getting between the glass and the film itself.
With due care and strict adherence to all instructions, you can tint your car in just a few minutes.
In general the process looks like this:
- Moisten the surface of the glass with water on which you intend to install the tint film (you can use a spray bottle for this);
- In the same way, moisten the film itself with water;
- Press the film onto the glass with a rubber or plastic spatula.
The video shows the entire process of installing silicone tint film from start to finish. You can also see here how the film is removed for cleaning and reinstalled:
https://youtube.com/watch?v=UP2JrrccMKM
Of course, this process will take a little longer for a non-professional, but if you deal with some pitfalls, then everything will go smoothly.
- Firstly, it is worth considering that “wetting the glass and film” means using a sufficient amount of water, and it is recommended to use a soap solution: this will help when smoothing the film to avoid mechanical damage with a spatula.
The main thing is not to overdo it with water. You can use a hose like these guys.
Which removable tint should you choose?
As you can see from the image, darkening decides a lot. How much do you want to be “invisible”?
If we talk about which manufacturer of silicone tint film to choose, there is no clear answer to this question. Everyone chooses according to their financial capabilities, the availability of a film of a certain light transmittance and based on personal preferences.
As for manufacturers, in this case there are no particular differences between similar products, however, removable tinting itself is divided into several types: silicone, plastic and static silicone tinting.
The guy from the authorities wants to fine someone for not removable plastic tint. This is not a threat to you.
But you should also pay attention to such an option as silicone removable static tint. This type of tinting has its own characteristics and advantages, and therefore deserves to be considered in more detail.
How to avoid punishment?
Removable tinting is purchased precisely in order to avoid punishment: drivers think that if they manage to remove the film before the traffic police officer inspects the car, then they will not face a fine. However, in practice, almost everything depends on the attitude of the inspector. Perhaps he will turn a blind eye to this trick, or perhaps he will only get angry. In any case, he has the right to draw up a protocol. Even if he did not have time to check the light transmittance of the glass, he can draw up a protocol under Part 1 of Art. 12.5, which provides the same sanction (500 rubles fine), but punishes for any damage included in the list of faults.
Thus, removable tint cannot guarantee a 100% chance of avoiding punishment, but it definitely increases the chances.
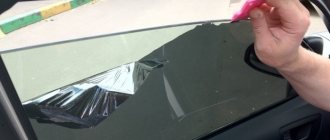
Pasting the film
Tinting should be applied to the outside of the glass. On the inside of the glass it gets scratched very quickly, peels off and takes on a shabby appearance.
After watching the video you will learn more how to do it yourself:
If you do tinting in winter, the room must be heated to a temperature of at least +10 degrees. Otherwise, the film will not adhere well and will peel off very quickly.
We apply tint to the car in several stages:
Before applying the tint, spray the surface of the glass evenly with shampoo. This will temporarily neutralize the effect of the adhesive on the film, and it can be moved freely across the glass to precisely fit the shape of the surface being glued; We separate the protective coating from the upper corner of the film and glue this corner to the corresponding edge of the glass. Hold the film on the glass and carefully remove the remaining protective layer.
In this case, you don’t have to rush, since the shampoo neutralizes the adhesive base for at least 20 minutes; when the protective coating is completely removed, press the film against the glass and slowly move it so that it fits exactly in its shape; pointing a hairdryer at the tint, warm it up, carefully smooth it out and remove air bubbles with a rubber (plastic) spatula from the center to the edges. If some bubbles cannot be removed, pierce them with a thin needle
This will not affect the appearance of the tint or its service life; After removing the remaining shampoo with a dry cloth, leave the tint to dry. In order for it to stick well, the glass should not be touched for at least a day. It is highly not recommended to turn on heating devices to speed up the process. This may cause the film to deform. The adhesive base should dry naturally and adhere securely to the glass.
The process of gluing film onto glass (click to enlarge)
The windshield and rear glass require a special approach. Even a spatula will not help you apply tint perfectly to such glass. You will have to heat the tint material with a hairdryer, while smoothing it with a spatula and removing air bubbles. It is quite difficult to do all this yourself, so it is better to take an assistant.
The process of gluing tint will not seem very complicated and long if you first study all its subtleties and important points. Knowing how to properly apply tint, you can protect yourself and your car passengers from the scorching sun, and protect your glass from mechanical damage, while saving a considerable amount on the services of professionals.
Installation of gel and silicone films
Now let's look at how to properly glue removable tint on a gel or silicone base. For this procedure you will need the following equipment:
- sharp scissors;
- spray;
- soap-based detergent;
- alcohol;
- small rubber roller;
- microfiber cloth.
Removable gel-based tint
Once you have stocked up with everything you need, you can get to work:
- Before applying the film, thoroughly wash and dry the car glass.
- Degrease the surface using alcohol.
- Try on the film and cut it so that there are allowances for cutting of several mm on each side.
- Using a spray bottle, apply a soap solution to the surface of the glass and the prepared tint.
Applying soap solution to car windows
- Place the film on the glass, align and press firmly.
- Using a rubber roller, gently smooth from the center to the edges, expelling any remaining liquid and getting rid of air bubbles.
- Trim the remaining edges and wait two to three hours to dry. To reduce waiting time, you can use a hairdryer to dry. Be careful not to overheat the film.
Gel removable tint
You can get rid of this tint in a few seconds by lifting it by the edge and gently pulling it towards you. At the same time, make sure that the elastic soft material is removed without tears or damage.
When driving a car, many drivers are faced with the problem of glare and excessive heating of the interior during the warm season. The most practical solution to these problems is removable tint film for car windows. The great popularity of this film is also explained by the fact that when a vehicle is stopped by a traffic police officer, you can easily remove the tint and resume its use in the future. A nice bonus is that you can make such a product and stick it on your car windows with your own hands.
Types of hard removable tinting
Economy option
- 2 layers (tinting + PET);
- material: PET-G;
- density: 700 microns;
- equipment: front 2 windows;
- tolerates temperatures: from -30C to +30C;
- installation without water;
- light penetration reaches 20%;
- moves with glass;
- does not ripple;
- 100% visibility through tinting;
- screen usage: autumn, winter, spring.
Cost 2000 rubles. Just right for the budget conscious!
Standard option
- 3 layers (tinting with a composite heat-resistant base);
- manufacturing based on rigid composite;
- density: 500 microns;
- equipment: front 2 windows;
- tolerates temperatures: from -50C to + 50C;
- installation without water;
- light penetration reaches 20%;
- moves with glass;
- does not peel off, does not ripple;
- one hundred percent visibility;
- Screen usage: summer, autumn, winter, spring.
Price per set is 3000 rubles.
VIP option
- 4 layers (tinting + composite heat-resistant base);
- made on the basis of: rigid composite;
- density: 600 microns;
- set: front 2 glasses;
- withstands temperatures: from -70C to + 70C;
- installation without water;
- light penetration: up to 20%;
- moves with glass;
- does not tear off, does not ripple;
- visibility: up to 100%;
- use: summer, autumn, winter, spring.
You will have to pay 4,000 rubles for the VIP option.
Dimming options:
- 20% - light;
- 15% - average;
- 5% - dark;
- 5% + - very dark.
General hard removable tinting is an excellent and only replacement for other types of glass tinting. It allows you to forget forever about labor-intensive installation, foam solutions and surface leveling.
Removable tinting: customer reviews and guarantees
For most of us, the question does not arise whether to darken or not darken the car windows. But everyone prefers different means for this. First of all, everyone is interested in the question - how much does removable tinting cost? Most car owners prefer to purchase a product that maintains a reasonable price:quality ratio.
You can, of course, buy hard removable tinting or silicone, reviews and comments on the forums about which are mostly good. However, these types of toners, based on our table, have a number of disadvantages.
With the advent of static autotoner on the market, according to numerous surveys, more than two-thirds of drivers prefer this kind of protection, which can be installed many times.
Customer reviews from the famous site otzovik.com
If we analyze what customers write, we can conclude that today this is the most affordable and quality product developed in the USA. Car enthusiasts love its performance characteristics, as well as the ability to quickly install and remove for repeated use.
It is important to know:
You can order removable tinting on the official website of the manufacturer or its representative in Russian territory. Avoid purchasing from dubious companies and random sellers.
Go to the official website
How to tint a heated rear window An interesting analysis of the points
- Tinting film;
- Construction hairdryer;
- Rubber spatula;
- Spray bottle;
- Shampoo (regular);
- A stationery knife;
- Glass cleaner.
- First you need to wash the glass on both sides. To do this, spray the detergent on the glass and remove it using a rubber spatula. Bring the glass until completely dry. It is not recommended to use rags for this. If fluff remains on the glass, it will significantly deteriorate the quality of the tint;
- The next step is to cut a suitable size piece of film from the roll. It is recommended to stick it in one strip. Please note that you should take extra film. 2-3 centimeters is enough. If the glass is removed, then the film is placed on it and cut off along the edges. Otherwise, you will have to make a pattern, for example, from wrapping paper;
- Before tinting, it is necessary to give the film the shape of glass, because, as you know, the rear glass has a convex shape. To do this, apply the film to the outside of the glass; this should be done with the protective coating facing up. The film is carefully leveled with a spatula; it is advisable to heat it while doing this using a hairdryer. Just don’t be too zealous, too high a temperature will melt the film. After you smooth it out and remove any air bubbles, you need to trim off the excess film. The easiest way to do this is with the glass removed. Simply cut off the excess pieces with a sharp knife. An assistant will be required to carry out work on the vehicle. You will cut off the excess and highlight it with a flashlight. This will allow you to adjust the film as accurately as possible;
- Next we glue the film. To do this, remove the protective film. The glue is immediately moistened with a washing solution (diluted shampoo) from a spray bottle. Before this, we also wet the inner surfaces of the glass. The film is carefully applied to the glass. Make sure that the edges coincide as much as possible with the edges of the glass;
- Using a spatula, smooth out the film. Your task is to expel all air bubbles out. This work must be carried out very carefully. The success of your work largely depends on this.
AutoFlit.ru
How to make and stick with your own hands: instructions
To avoid mistakes when creating and then applying removable tint yourself, you should follow the step-by-step instructions. To make a film, you must perform the following steps:
- Remove the pattern from the glass. First you need to glue a transparent protective layer from the film, carefully smooth it over the surface using a solution of soap and water, and using a knife, cut off the side contours and the bottom along the sealing rubber inserts. After this, you need to slightly lower the glass and cut off the film along the upper border. The result is a transparent glass-shaped sample.
Car tinting technology
You should start with preparation. If you plan to apply tint for the first time, be sure to remove the glass. But before that, they should be washed well with an alcohol-containing degreasing agent and dried with a rag. When deciding on the location for the procedure, keep in mind that the optimal conditions for it are in a garage at a temperature not lower than +20°C. It's great if you find an assistant for your first experience.
Next, the film is cut. It is applied to the glass surface, leveled and cut along the contour, leaving a margin of up to 1 cm. It is better to wet the surface of the window a little so that the film lays evenly and does not slip.
The next step is to directly stick the tinting material onto the car windows. To do this, they are wetted again and try to apply the film as evenly as possible, without tension or distortion. As a rule, you will not be able to perfectly level it the first time. Try to remove any excess jams using a spatula. This will be easier to do using a powerful hair dryer.
Don't forget that the film has a protective coating that should be removed before gluing. And don't worry if, despite your efforts, there are still bubbles under the canvas. They will disappear on their own when the material dries. Next, you should cut off the allowances that you left when cutting and leave the car to dry.
If you take a chance and decide to stick the film without removing the glass, you will need to remove the seals and velvets before the procedure. It would also be optimal to wash not only the windows, but also the entire car, so that if you accidentally touch its surface, you do not leave dust under the film. And after you finish gluing the covering, it is better not to lower the windows for at least three days.
This all concerned the front and side windows of the car. But the most difficult thing is to glue the tint material to the rear window. It has a curved shape, which makes it difficult to cut the film correctly even at the preparatory stage. In addition, you will not be able to perform the procedure without removing it. To do this you will need to remove the seals.
The large surface size makes it necessary to glue the film in two stages. To do this, you should mentally divide the working area in two. First, similar to the process described above, the material for one half is cut, then the procedure is repeated. In this case, it is better to leave a larger margin (3-4cm). Lay both parts on the window perfectly end-to-end; if you get a gap, you will have to remove one of them and re-glue it. As you can see, it is quite easy to complete this process yourself. And with the money you save, you can get something else you need for your favorite car.
Preparation and tools to tint your car
We've sorted out the laws, chosen the film, and now we can get to work. You immediately need to choose a suitable place for the upcoming manipulations. The street is not very suitable for this. Dust, insects, wind and direct sunlight are the main list of unacceptable conditions. A spacious garage or box is ideal.
To ensure that the execution process does not stop “at the most interesting place,” prepare all the tools and materials in advance. You will need:
- The tint film itself is in the required quantity. Decide how many glasses you will tint and calculate the area. Allow a margin of 10–20% for adjustment.
- Water spray in any form. Needed for spraying soap solution.
- Liquid soap or Fairy, clean water.
- Something sharp and cutting: an ordinary blade, a stationery knife, a scalpel.
- Lint-free wipes.
- Forcing is a special spatula with which you will remove the solution from under the film. Should be firm, but without sharp edges. They are usually plastic and some manufacturers include them with film. If you are unlucky, then look for them in construction or automotive stores; they are also definitely available in stores for outdoor advertising specialists.
- Special scraper for cleaning windows (optional, greatly facilitates the cleaning process).
- Electric hair dryer with temperature controller (we need 550 degrees Celsius).