Brief characteristics of garage inspection pits
Before proceeding with the actual construction of a garage pit, we suggest paying attention to all the main features of this object. Consider all the advantages and disadvantages of inspection pits. Determine for yourself the purpose that this auxiliary room will serve you. Any stage of construction of monolithic structures involves one or another technology of work. The service life of the garage pit depends on how accurately everything is done.
Purpose of inspection pits
Sometimes while driving, various kinds of incidents happen. When driving along an uneven dirt road, you may hear an unpleasant sound, or even worse, feel a bump. The dimensions of the car do not always allow access to its underbody. In addition, after every suspicion, you will not go to a familiar car mechanic, but rather inspect everything yourself. If your car is low-slung, access to open parts is limited. If you simply don’t have time to install a jack, then an inspection hole will help you.
The garage inspection pit is designed to help the car owner solve the following problems:
- gain access to damaged parts of the body;
- dismantle or install parts (muffler, gearbox, driveshaft, engine, fuel tank, crankcase protection, etc.);
- replace consumables (drain the oil, change the fuel and air filters, etc.);
- carry out anti-corrosion work on the underbody of the car;
- increase access to mechanisms and parts in case of joint repair work.
As you can see, you can use a garage pit in different ways. An important feature of this room is convenience. If you decide to equip your garage with an inspection hole, then you are not afraid of any minor repairs. In addition, all work will go much faster, since you will not need to resort to using additional mechanisms to gain access to the bottom of your car.
Advantages of inspection pits
In addition to their useful purpose, inspection pits have a number of advantages that allow motorists to save on calling a car mechanic.
The advantages of garage pits include the following:
- The pit makes it easier to repair the car yourself, as it increases access to parts located in “difficult” places.
- By building a hole in an “L” shape, you can create a small usable space. You can arrange a warehouse for tools and consumables in it, or use it as a cellar for home spinning.
- Since the room is located below ground level, the temperature in it remains virtually unchanged all year round. This makes work easier during hot periods.
- A garage containing a viewing hole significantly increases the value of the building, thereby paying off all construction activities in case you decide to sell it.
- With skillful use and placement in the garage, you can set up your own service station. If it is located on a plot near the house, it will help to save a lot. In this case, you will not spend money on travel to work, and you will not pay a penny for renting the premises.
By equipping your own parking space with an inspection hole, you will not only save on repair work, for which you will have to pay other people, but also free up a small space, which is always so lacking in the garage.
Inspection pit size
Before starting construction work, the arrangement of a pit in the garage begins with setting its dimensions. It often happens that the garage turns mostly into a warehouse of unnecessary things, which so cover all the usable space that there is very little space left for the car.
In order to correctly plan the size of the future pit, we advise you to pay attention to the following parameters:
- pit size (take into account this value, which should be 300-350 mm larger than the width of the finished pit);
- depth of the pit (this figure varies depending on the height of the owner of the garage. But it is better to take this value with a margin of 10-20 cm. The main thing is that, standing on the floor of the pit, you can freely reach any part located in the lower part of the car. In if necessary, the height can be compensated by installing small wooden floors on the floor);
- the width of the hole (should be 20 cm less than the distance between the internal parts of the slopes of your car. This is a safety requirement that reduces the possibility of a wheel running directly into the hole);
- length of the pit (to calculate this parameter, just add at least 1 m to the length of the car. But keep in mind that the garage does not always allow you to arrange a pit of the desired length. In addition, the shape of the base of the car may block access to the pit. In any case, it should be such a length that you can go down into it while the car is parked in the garage. Consider this parameter if you plan to equip two parking spaces at once);
- proximity of groundwater (it’s better to find out about this right away than to get an unpleasant surprise later in the form of a flooded hole. If they are close, the dimensions will have to be changed, and sometimes this idea will have to be abandoned altogether).
When calculating the length of the pit, take into account the size of the ladder along which you will go down. Once inside, the width should not limit your movements, and your head should not touch the bottom of the car. Also pay attention to the size of the pit, which may vary depending on the material of the walls. When building a foundation pit, keep in mind that it must be increased depending on the material of the wall surface.
Let's consider these indicators for different types of building materials, namely:
- concrete wall (the width of the pit increases by 12-15 cm in each direction);
- wall made of gas silicate blocks (the pit increases by 20 cm).
In addition, consider drainage and a waterproofing layer. In this case, the width of the pit increases by another 15-17 cm. It is also convenient to arrange small niches in the walls of the inspection pit. When carrying out repair work, it will be convenient for you to put the tool there. If the level of drainage water is higher than 2.5 m, then you will have to additionally install a drainage system that will drain excess water into the sewer. On the preliminary drawing, be sure to mark all the additional details that you would like to see in your pit, then you will get an excellent result.
Material
Let's consider how to make the walls of the inspection pit correctly and from what materials. The walls of the pit are usually made of bricks, building blocks, or cast-in-place concrete.
When choosing the first option, ceramics are preferable as the most moisture-resistant material. It is worth remembering the thickness of the brick when determining the size of the pit - after laying the walls with bricks or blocks, the volume of the pit will decrease.
The choice of material for the walls of the pit depends on the soil. If it is dry and dense, feel free to choose brick. Otherwise, reinforced concrete must be used.
Concrete blocks are resistant to moisture. When using other blocks, waterproofing material will be required. Concrete blocks can interact with moisture without negative consequences, are durable and will not heave in winter.
If the inspection pit is filled with concrete, the layer of such filling should be at least fifteen centimeters. You will also need to reinforce the concrete with 0.5 cm thick wire mesh. Instead of a mesh, it is possible to install a frame. You can use reinforcement for it.
DIY inspection hole in the garage. Preparatory work
When starting to build a pit in the garage, you need to thoroughly prepare. This process is quite delicate, and also requires compliance with the correct sequence of actions. To make all the work easier, it is better to immediately acquire everything you need, then the result will be to your delight.
Tools and materials
Almost any type of construction work requires additional assistance. To make the whole process easier, we advise you to immediately get an assistant, with whom things will go twice as fast. The correct choice of building materials and auxiliary tools is the key to a quality result.
To build a viewing hole, we recommend using the following set of tools:
- concrete mixer, jackhammer, hammer drill, grinder;
- welding machine, screwdriver, concrete vibrator, tamper;
- pliers, crochet hook, hammer, set of keys, construction knife;
- shovels, metal buckets, bath, spatula, ladle, grater, grater;
- level, usually roulette.
In addition to the above tools, you will need the following materials:
- sand, cement, crushed stone;
- timber 30x30 mm or 40x40 mm, inch board or moisture-resistant plywood 10-15 mm thick, planed board 40-45 mm;
- reinforcement 10-12 mm, wire rod 6-8 mm, knitting wire 1.8-3 mm, metal corner 50x50 mm, corrugated pipe 50 mm;
- primer, anti-frost plasticizer, waterproofing material (film, roofing felt or mastic), bitumen tape, primer for metal;
- maklovitsa, fly brush, ph2 bit, wood screws, nails, pins, drills, wood discs;
- PVC pipes d=100 mm, elbows and connectors for the ventilation system;
- cable, corrugated pipe, terminal blocks, tin, rosin, lighting elements, electrical fittings;
- plaster, tile adhesive, jointing.
If you take our advice and get everything you need, you will significantly speed up the construction process. It would also be a good idea to take care of an extra pair of hands, since some installation processes cannot be accomplished alone.
Pit planning
Ideally, it is better to build the pit before installing the garage walls. This is done at the same time as the construction of the foundation, having previously planned everything. The construction of an inspection pit in a finished room complicates the whole process a little, but this option is also possible. But we still advise you to take care of everything in advance. Starting the construction of a garage by arranging a pit will make your work easier.
To dig a pit in an open area, you can use the services of construction equipment, such as a tractor or a hydraulic hammer. If you start digging a hole in a finished structure, then you will have to do everything yourself. In addition, if the garage is located on hard rock, you will have to carve a hole of the required size in the rock for a long time. Sometimes it is better to move the building a short distance than to suffer over digging a hole for a long time.
This will require strong physical strength, and can quickly destroy the jackhammer, which is already expensive. To remove several cubes of soil, you will have to carry out a huge number of walks with buckets containing heavy soil. When planning to dig a pit, be sure to take into account the presence of groundwater. It is better to contact local surveyors with this question. Otherwise, your building may simply sag or collapse.
Marking the inspection hole
Work at this stage involves marking both inside the finished garage and immediately before the start of its construction. When starting to mark the inspection hole, pay attention to the peculiarities of such work for each case. When setting up a pit in a built garage, keep in mind that its outline must be at least 1 m from each edge of the building. In this case, the markings are carried out using chalk, which is used to apply the future dimensions to the garage floor. This will help you imagine the future dimensions of the pit.
In case of work on the street, you can use the services of heavy construction equipment. In addition, cases cannot be ruled out when a hole has to be dug in difficult soil, then calling a pneumatic hammer cannot be avoided. Please also note that during work it may rain, which will flood your hole. Then you will have to wait until the water seeps into the soil and the hole dries completely. To mark a garage pit directly on the site, proceed in the same way as for similar work with the foundation. It is enough to have several metal rods, which are installed in the corners of the future pit, after which the thread is pulled.
In any case, when starting work of this kind, it is better to consult with surveyors. Check with them about the availability of nearby soils. Inquire about the properties of the soil. Sometimes it happens that digging a hole in some areas is not possible.
Bottle jack press
The multi-purpose use of precision pressing equipment makes it relevant not only for production areas, but also for solving everyday problems in the homes and garages of business people. Pressing bearings, compressing all kinds of waste, controlled deformation of metal elements, stamping, forging, squeezing juice and many other diverse possibilities open this beast to a smart owner.
The most budget models cost tens of thousands of rubles and are made of flimsy materials with mediocre build quality. The design of these devices is extremely simple and can be easily recreated at home from available components. The press shown below is made using massive bolt-nut joints with a diameter of 22 mm, and removable stops for a 30 mm platform. It will not be possible to drill such holes with a drill, therefore, you should either contact a metalworking shop or completely replace them by welding.
Required tools:
- Grinder (angle grinder)
- Welding machine
- Wrench
Required materials:
Upper beam Channel P16 (800 mm / 2 pcs - welded into a square profile) Bolts, nuts, washers - M22 (8 sets)
Stand Angle 100x100x10 (1780 / 2 pcs - spread out into plates) Reinforcement pin (130 mm / 6 pcs - posts welded along the length for structural rigidity) Steel pins Ø 29 mm (2 pcs - to support the pressing part)
Footrest Angle 65x65x5 (800 mm / 2 pcs – for legs) Angle 32x32x5 (800 mm / 2 pcs – spacer between the posts)
Plunger Channel P6 (600 mm / 2 pcs) Springs (2 pcs - connected to the upper beam) Eye bolts (4 pcs - for fastening the springs)
Lower clamping part P16 channel (800 mm / 2 pcs) M22 studs (2 pcs - for connecting channels) Nuts, washers (8 pcs, for tightening the studs)
The materials listed above are presented as a sample that such a press was made from such a set of components. In your project, it is far from necessary to thoroughly adhere to the stated list, looking for a metal that can be replaced with another. The main thing is to approach the work with imagination and head, trying not to reduce the strength of the frame.
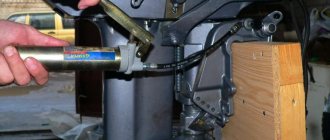
The press shown above uses a 16 ton bottle type jack. It is located in a vertical, working position. If you want to operate this tool upside down, it is very easy to upgrade. Simply unscrew the outer casing, which is the oil reservoir, find the oil supply hole for the pump and tightly insert a tube (made of metal, plastic, etc.) into it so that its upper end almost rests against the upper part of the reservoir (leave 2-3 mm ). Thus, inverted, the oil will be sucked through this tube into the pump.
If a manual pump on a plunger in front of your face seems inconvenient or not aesthetically pleasing to you, you can always build a hydraulic cylinder from a jack with your own hands and pump from any convenient place. This idea has a lot of nuances, and it requires additional equipment, but it’s quite possible to implement.
DIY inspection hole. Step-by-step instruction
When all the preparatory work has been completed, you can begin the main stage of constructing a garage pit. We advise you to ask experts in advance about the quality and nature of the soil. Don’t forget to also acquire all the necessary tools and materials so as not to slow down the work process. It is worth noting that help will also not hurt you, so worry about an assistant in advance, or better yet, two.
Construction of the pit
Once you have marked the pit, you can begin digging trenches. This process is the most time-consuming and difficult, as it will require strong physical strength. Depending on the size of the hole, you will have to dig and drag from 6 to 12 cubes of soil. If the soil allows you to dig a pit yourself, then you can save on calling special equipment. But keep in mind that in this case the duration of excavation work will increase several times.
Helpful advice: if, while digging a pit, you find a layer of clay, then do not rush to throw it into the general pile. It is better to store it separately; it is perfect for sealing external sinuses around the walls of the pit.
To properly equip a foundation pit for a future pit, proceed as follows:
- Compact the bottom of the pit using a hand tamper.
- Fill gravel around the perimeter of the pit to a layer of at least 10 cm.
- Now add sand. A layer of 5 cm will be enough.
- Compact the previous layer, then add gravel again. The better each layer is compacted, the more reliable the garage foundation will be.
- Cover the pit with waterproofing. It should completely cover the entire surface of the floor and walls. If you use thick polyethylene film (200 microns), then keep in mind that the material should not be stretched.
- Now you need to install the ventilation system. Fix one channel at a height of 10-15 cm from the floor. Bring the second one to the upper edge of the pit to a height of 100-150 mm so that it is located near the future wall.
- Tie an armored belt from 6-8 mm reinforcement and knitting wire. It should cover the entire surface of the bottom of the pit. It is placed at a height of 5-7 cm from the bottom. To do this, you can lay it on several pieces of brick, they are just 6 cm thick.
- Mix the cement-sand mortar with the addition of gravel in a ratio of 2:2:1. We recommend adding a special plasticizer to the solution with each batch. It will add plasticity to the mass and perfectly protect the concrete from cracks during frost.
- Fill the reinforcing screed to a height of 10-12 cm (taking into account the height of the “brick+lattice” layer). It is better to pour the first layer of 7-8 cm and let it harden. After this, you can fill the solution to the remaining height.
- Allow the screed to harden. This will take 2-4 days, depending on weather conditions.
If you plan to install a ventilation system in the pit, then it is better to take care of it right away. In the case where it will pass under the foundation and then exit through the wall, it is necessary to dig a separate trench for the pipes. You can read more about the arrangement of ventilation in the next paragraph.
Ventilation arrangement
Over time, an unpleasant musty smell will appear in the pit. Unfortunately, this cannot be avoided, no matter how hard you try. Moreover, at the bottom of the pit there will always be stains from oil, fuel and other liquids that release harmful substances when evaporated. It is better to do ventilation if groundwater flows near the garage, increasing the humidity of the inspection pit.
In any case, work on laying ventilation pipes must be carried out before starting the construction of walls and pouring concrete. You can make either a stand-alone version or combined with the general ventilation of the garage. The pipes can be placed in formwork, or embedded in the wall.
The location of the pipes is determined by the size and shape of the garage. A pipe with a diameter of 100 mm is perfect for ventilation. But it is important to know that the supply pipe must be raised approximately 0.5 m above the ground, and then covered with a grill to prevent large objects from entering. The exhaust pipe is raised to 2-2.5 m, and subsequently a “fungus” is installed to protect the ventilation from moisture and debris. To check the efficiency of the system, hold a lit candle to the inlet. If the flame begins to suck in, or it goes out completely, then you did everything right.
Lighting arrangement
To make being inside the pit comfortable, it is better to immediately take care of its lighting. For some, a headlamp or other lighting device is enough, but we would recommend making a permanent lighting system. Electrical installation is a delicate matter, as it requires certain skills and knowledge. If you have never worked with electricity, then it is better to entrust this issue to a specialist.
To check the correctness of electrical installation work in the inspection pit, use the following indicators:
- Using a voltage of 220 V is unacceptable for constructing pits. In this case, a voltage of 36 V is used;
- all electrical fittings must be located outside the pit;
- the cable must be laid in a special corrugated metal sleeve;
- It is better to use low-voltage lamps (12 V or 36 V) as lighting elements. An installation of this kind is carried out in conjunction with a machine of the required rating, which must be located in a separate panel;
- It is better to recess the lighting fixtures into the wall, then they will not interfere with the work process;
- use waterproof sockets and switches.
You can also use some trick. By arranging the lighting elements evenly, you will achieve brighter lighting. In addition, light-colored tiles can be used as a finishing material; they perfectly reflect light, making the pit even brighter. It’s a good idea to use fluorescent lamps, which allow you to identify breakdowns faster and more accurately.
To better understand the issue of arranging a garage with an inspection pit, we recommend watching the following video, which will help you do everything yourself:
Do-it-yourself inspection pit for a garage made of concrete
So we come to the last question related to the arrangement of a garage pit. If you have completed the work correctly at the preliminary stage: the floor is not cracked, the waterproofing is done correctly, the ventilation is functioning, the wiring is routed and protected, then you can begin building the walls of the pit. Both concrete and piece material can be used as a material. We would advise constructing a pit using concrete, as it is more reliable and durable.
To build a viewing hole at the final stage, you must carry out the following steps:
- Remove waterproofing from the pit walls. Bend down the protruding edges and fold them to the bottom of the hole.
- Build the outer part of the formwork along the perimeter of the pit. Use timber and inch boards as materials. Plywood or OSB boards 12-15 mm are also suitable for panels.
- To prevent the solution from leaking through the cracks of the formwork, cover it with film. Use a stapler.
- Build a grid of reinforcement on the inside of the outer formwork. For this, a 10-12 mm rod and a 7-8 mm wire rod are used. For such a grid, a cell size of 15x15 cm is sufficient. Reinforce the perimeter of the pit in this way.
- Return the waterproofing material to its original position so that it covers the area of the future monolithic structure.
- Start installing the inside of the formwork. Keep the walls parallel. To protect the formwork from deformation, you can install spacers inside the future pit.
- Pour concrete sequentially in layers of 60-70 cm. Before laying the next layer, let the previous one harden.
- Now you can carefully remove the formwork. This is done no earlier than 10-14 days after pouring. Allow the box to completely harden and settle. When arranging niches in the walls, go around these areas with reinforced lattice. Additionally, they can be reinforced with a metal corner.
- Treat the outer part of the box with a special hydrophobic impregnation. You can also apply liquid bitumen to the surface.
- Mount metal corners along the perimeter of the pit in the upper part. To do this, drill identical holes in concrete and metal, then secure everything with nuts and washers. You can also use a flat or round corrugated pipe. Do not forget about treating the metal with special anti-corrosion agents.
- It is possible that the wheel guard is installed differently. To do this, vertical pieces of reinforcement 100-150 mm are inserted into the raw mortar around the perimeter of the pit. Subsequently, a professional pipe is welded to them.
- To equip the pit caisson, use waterproofing. You can also treat the bottom and walls with ready-made mastic, but keep in mind that it is significantly more expensive than the dry mixture.
If you have mounted a metal corner around the perimeter, then it can be used as a template for the pit cover. Having made a wooden shield, it can be placed on a metal base, thereby protecting the car from accidentally driving into a hole. If you lay the corrugated pipe around the perimeter of the inspection hole, you will get an excellent wheel guard.
Now that our inspection hole is ready, we can begin finishing the surface. We recommend equipping the pit with tiles. Be sure to prime the surface before laying tiles. Don’t forget to also carefully unstitch the seams, then the inspection hole will serve you for decades.
Safety precautions
Repair work related to lifting passenger vehicles to a height is carried out in compliance with safety regulations. Lifting the car using a jack is carried out with a preliminary inspection of the device for the absence of mechanical damage and the ability to withstand the weight of the car.
When using non-standard methods of lifting a passenger vehicle, observe the following conditions:
- carry out work on a flat surface when placing the machine for long-term repairs;
- choose places with dense, motionless soil;
- use stands and racks made of durable material - metal, stone, thick wood;
- lift the car using reliable devices or with the involvement of at least 4 people;
- lift the underbody in the area of the side members so as not to cause deformation of the structure;
- when installing the bottom on the racks, fix the elements together to eliminate the risk of the car sliding off;
- ensure a stable position of the vehicle. Hang the body on 2 or 4 racks to achieve balance;
- install homemade shoes or wheel chocks under the wheel elements;
- After fixing the machine, apply the handbrake;
- Use several jacks to lift the vehicle. Lend devices for temporary use to ensure a safe position of the body on the racks;
- keep your mobile phone handy. During repairs, you should be able to call your family or emergency services if the car suddenly falls off the makeshift rack;
- Place the supports on a flat, solid surface. Place a metal sheet, wide board or thick plywood under the structure;
- Place a blanket under the workplace, use special clothing and protective equipment when carrying out repair work.
Important!
Distribute the weight of the machine evenly on the supports. Skewing the mass to one side can upset the balance. A thoughtful arrangement of the car on 2 or 4 racks will eliminate the occurrence of traumatic situations or mechanical damage.
There are many ways to lift a car easily and safely without a jack. The passenger car is lifted by a crane, driven onto a mini-overpass, placed on supports made of rims, boards, bricks, or placed on a curb stone. It is important to follow safety precautions when lifting heavy loads to heights.
- How prices in car dealerships were written off due to coronavirus (a manager’s tale)
- How to choose the right car if you only have 500 thousand rubles
- Digital service booklet - goodbye to tangible service history
DIY inspection hole in the garage, photo
Similar articles
- How to make a viewing hole in the garage with your own hands
The completed garage structure must be equipped with all the necessary attributes that provide not only normal conditions for maintaining the car,…
- How to build a pit in the garage
In order to be able to inspect and repair the car in comfortable conditions, you need to build a pit in the garage. Nowadays there are many... - Caisson for garage
A caisson is a waterproof chamber that is installed in water-saturated soil. In the garage, a caisson is made as a basement for storing supplies...
Additionally
If desired, electricity can be supplied to the inspection hole to provide light. At the same time, do not forget about safety and moisture resistance.
Also, for the same purposes, you should not install sockets with a voltage of more than 35 Volts. 220 Volt lamps cannot be used.
An additional element will be the roof, which is usually wooden. The roof should be reliable, but not too heavy. The golden mean would be a thickness of three cm, which will ensure reliability and will not cause problems when opening.