Air filters are designed to remove dust and microparticles from the air supplied to the engine. The first filter element was invented by Ernest Sweetland, an engineer at the American company Purolator, and the product was patented in early 1922. Since the product is simple in its design, the question is quite appropriate: how to make an air filter yourself?
As for filters, they are consumable spare parts for the car and need to be changed periodically. Therefore, many people periodically have the question of how to make an air filter, if necessary. It may arise when it is not possible to purchase an original product or there is not enough money to purchase it.
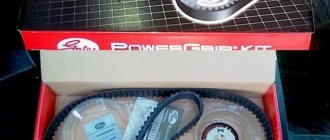
What can an air filter be made from? How are air filters made, without which no car in the world can operate today? They are manufactured on automated lines of large enterprises using special technology, and production per filter takes about 20 minutes. But if you are interested in how to make an air filter, then first you need to purchase the necessary materials. This product can be manufactured in various ways, but the main components are always a split housing and a replaceable filter.
To make an air filter with your own hands, you need to have a certain set of household tools. These are scissors, a knife, a pencil and a ruler.
We make an air filter with our own hands.
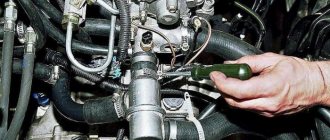
Having collected all the components necessary to make an air filter, you can begin the “do it yourself” process; the air filter, in this case, can be made quite quickly using a new filter, for example, from a VAZ inverter. To do this, it is necessary to cut a new filter to the size of the original housing and insert it in place of the used one; all work should be carried out accurately and carefully. Then carefully apply sealant to all points of contact between the filter and the housing, without making any omissions to prevent the filter from allowing excess air to pass through.
What happens if you don't change the air filter on time?
It is very important to change the air filter on time, otherwise a barrier is created that prevents oxygen from entering the combustion chamber, which leads to an unjustified increase in engine power and increased gasoline consumption. In addition, microparticles in polluted air can damage the gasoline flow meter and even the combustion chamber itself.
How often should you change your air filter?
The degree of contamination of the air filter can be checked by looking through it into the light; if possible, you can clean it. But if it is heavily soiled, the filter should be replaced; the frequency depends on the length and driving conditions of the vehicle, as well as on the manufacturer’s recommendations.
Until the moment when the engine swallows the next portion of air, the air filter must effectively remove dust and oil vapors from its flow. This is physically possible if the air flow interacts with a surface capable of capturing micron particles and even molecules of oil, sulfur, smog, water vapor and bitumen.
The larger the surface, the better the effect and the higher the quality of cleaning by the air filter. The fundamental difference between a standard “air vent” and a “nulevik” is the implementation of the filtration principle, namely, it acts like a sieve, trapping in the thickness of the porous fibrous material everything that is larger than the geometric dimensions of micropores. Whereas a zero-resistance filter removes dust from the flow due to the adhesion of particles to the surface of the filter element.
In this sense, the efficiency of a zero-resistance air filter is neither higher nor lower than a conventional air filter with the same filter element area. In theory, a zero-resistance filter implies the absence of air flow energy losses associated with air fluctuations in the intake tract and redistribution of the dynamic pressure of the air flow in the intake manifold at high speeds.
Among the advantages voiced by manufacturers of various zero-resistance filter models, as a rule, appear:
- power increase of at least 5% for a standard engine, without making changes to the engine design;
- the possibility of restoring the functional properties of the device, including by impregnating the zero-resistance filter with a special composition;
- changing the inexpressive noise of a conventional engine to a bass rumble, characteristic of heavy-duty engines.
Zero Resistance Air Filter Efficiency
A decrease in the resistance of the filter element is equivalent to an increase in air flow speed and, as a result, should lead to an increase in the coefficient of filling the cylinder with an air-fuel charge. And this is true. Instead of a standard device, you can install a zero-resistance air filter with your own hands and get a noticeable increase in power. The engine will start easily and gain speed, but only if the engine is single-cylinder and designed to operate at constant speed, for example, in drives of pumps or current generators.
For a regular four-cylinder car engine, installing a zero-resistance filter instead of a standard one is pointless, otherwise automakers would have long ago equipped their engines with zero-resistance filters at the factories. Why, in this case, is a common air intake used for all four cylinders? The answer is clear - this option is simpler and cheaper to produce, and most importantly, all cylinders receive a guaranteed homogeneous composition of the air-fuel mixture, which eliminates numerous alignment problems.
The main problem is not the performance or resistance of the air filter element, but the proper alignment of the entire intake manifold. Due to the use of one intake (suction) pipe to supply air to four cylinders, the air flow moves unevenly in the intake manifold, with turbulence and waves.
By removing the filter element from the air vent box, you may notice that for a while the engine will run faster, but only in one small speed range. Usually these are idle speeds and slightly higher ones - 1000 rpm. Especially if the filter is already quite clogged with dust. But after a few weeks, dirt and dust particles will migrate into the oil sump and compression rings, sharply increasing oil consumption due to a decrease in its quality and poor performance of the rings.
Air filter for scooters and mopeds - maintenance and replacement of the filter on a moped + Video
Scooters and mopeds are equipped with an internal combustion engine. Therefore, many basic principles and rules for servicing components of gasoline engines of passenger cars also apply to them. In particular, this applies to the air filter of scooters.
When to clean or replace the filter
Scooter air filters serve to clean the air entering the carburetor and then into the engine as part of the fuel mixture. The filter element of a moped performs the same function. The consequences of untimely replacement or cleaning of them can be no less disastrous than with the wrong approach to this issue in relation to automobile air filters. In any case, the owner of a scooter or moped will start filling up more gasoline and will be annoyed that his iron friend has become sluggish and no longer accelerates to the km/h required by the passport.
Manufacturers recommend replacing the air filter of a scooter or moped at least every 5,000 km, and cleaning it after every 1,000 km.
If the scooter or moped is used in very dusty roads or terrain, then maintenance and replacement should be carried out more often. In this case, cleaning should be performed at least every 500 km traveled, and, in order to prevent premature engine wear, you can start with a test inspection and cleaning (if necessary) of the filter after the first 100 km. Based on the results of this check, it will be clear whether it makes sense to service the filter element every 100 km or whether the mileage before the next cleaning should be increased. When the time comes to change the filter altogether, it will be clear either by its appearance or by the behavior of the scooter or moped engine - after the next filter maintenance, symptoms will remain that it is clogged and the motor does not have enough air for it to work.
How to remove and replace the air filter of a scooter or moped
The engines of most scooters and mopeds have a “wet” type filter (on almost all Chinese vehicles) or a “dry” type filter (mainly on Japanese ones). “Wet” is made of oil- and petrol-resistant foam rubber and impregnated with a special oil that ensures the retention of small particles. The filter itself consists of two layers:
- internal, having a fine-mesh structure - to retain the smallest contaminants;
- external, with larger cells - for filtering large particles.
Air filters on scooters are installed in plastic housings in the form of a box (usually flat and oblong). The housing, whether on a moped or a scooter, can be located in different places: in front of the carburetor, above the variator, above the muffler, under the floor guard in front to the right of the engine.
Removing the filter:
- We remove all parts that may interfere with removing the filter;
- We clean the filter housing from dirt (on some models of scooters and mopeds it will have to be removed for this);
- We disassemble the housing - unscrew the screws around the perimeter and carefully remove its cover, trying not to damage the filter element;
- We carefully inspect the filter element looking for damage: through holes, tears, loose fit to the lid or edges of the housing;
- Carefully remove the filter from the lid;
- We carefully clean the body and its cover from dirt, wash it with gasoline if necessary, wipe it dry and make sure that there are no threads or dust left (they can subsequently get into the carburetor, where they will clog the jets and channels).
If the filter is damaged or needs to be replaced due to its service life, then carefully install a new filter element in place of the one that has become unusable.
In this case, its side with smaller pores should be turned inward (for foam rubber). It is also necessary to try not to tear the filter element and to ensure that it fits tightly to the edges of the lid and housing. We assemble the dismantled elements.
Maintenance of filters for mopeds and scooters
Maintenance of scooter air filters consists of cleaning and soaking them in oil if they are “wet” foam rubber (“dry” ones are blown or washed in water with washing powder).
We purchase a special product for high-quality cleaning of air filter elements - for example, K&N. Although this composition is intended for filters from this company, it is also perfect for foam rubber ones. Read the instructions and use them in accordance with them.
We wash the foam filter element in any gasoline (preferably AI-92). Gasoline is poured into a suitable container, where the foam is washed. We wash it carefully and carefully - just let the foam rubber absorb the gasoline itself, and then squeeze it out. After washing, the filter is wrung out - again, carefully, without twisting it. Then dry the foam.
We rinse in warm water with washing powder dissolved in it - excellent cleaning quality at minimal cost. During washing, you must follow the same rules as when processing in gasoline. Then wring out the foam, rinse thoroughly, and then dry.
After washing and drying, moped air filters should be soaked in oil. Or special is the best option. You can use impregnating agent for air filter elements from K&M or similar, cheaper ones from other manufacturers. Spray the aerosol from the can evenly in linear (not circular) movements over the entire surface of the filter. We wait about 20 minutes and then check the uniformity of application. If necessary, we “paint over” all identified spots that did not get oil.
Motor, diluted with gasoline 1:1. In this case, you can soak the foam rubber in a suitable container. Do not pour a lot of oil - its excess can significantly worsen the throughput properties of the filter. When the foam in the container is saturated, it is compressed. This will allow the oil to be better absorbed and remove excess. Then we dry the foam rubber from gasoline.
- Author: Mikhail
carnovato.ru
DIY zero resistance air filter
The cost of such a filter is relatively low, and you can check its effectiveness by installing a zero-resistance filter on your car yourself.
To do this you need:
- get rid of the old filter box and air duct;
- make an adapter for attaching a new filter from scrap materials;
- choose a location for the “nulevik” away from the hot exhaust manifold and splashes raised by the front wheels.
The zero-resistance filter is secured with a regular metal clamp.
The Internet is filled with delight from car enthusiasts who confirm the effectiveness of using the “zero resistance” effect on their own vehicles.
The simplest air filter of this type can be made from a standard version of the “air vent” with the help of some improvements. For example, you can use a Zhiguli “saucepan” by modifying it in the following order:
- Using an angle grinder, or “grinder”, we cut off the side wall of the “pan” on the body, leaving only the bottom and top cover;
- we carefully adjust the dimensions of the resulting elements to the size of a standard “air vent”;
- We assemble the “nulevik” using a standard mount on the carburetor.
A more advanced model of using the principle of zero resistance is to install each cylinder with its own manifold with an air receiver and filter. This option is widely used in aircraft and sports engines. Cars that have undergone professional engine tuning can be easily recognized by the characteristic four air intake pipes leading through the front grille of the car. Setting up the operation of such a motor is not an easy task, but quite realistic.
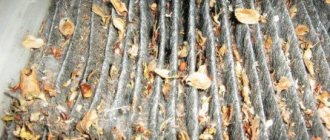
Signs of a clogged filter
You can understand that it’s time to update the air filter in your Lada Vesta even without a thorough inspection.
If the driver feels that his car starts to jerk or pulls worse on uphill climbs, then you should take a look at the filter; it may be clogged.
Clogged air filter. Photo source: https://arhkino.ru/chto-takoe-vozdushnyy-fil-tr-dvigatelya-i-dlya-chego-on-nuzhen/
A direct indication of problems with engine “protection” is an increase in fuel consumption, as well as a drop in engine power.
An obvious sign of a clogged filter is the car braking while driving without pressing the brake pedal.
If at least one of the symptoms appears, you need to open the hood and check the cleanliness of the filter element.
Using a zero-resistance air filter in an internal combustion engine
A similar filter design can be effectively used in turbocharged engines - in engines that use air injection using a gas-driven turbine. For example, a zero-resistance filter on a diesel engine with a turbine would be very useful.
The compressor that compresses air is incredibly sensitive to fluctuations and turbulence in the air flow received at the inlet. For stable operation of the turbine, the air flow must be thoroughly cleaned of dust and stabilized from turbulence and disturbances by a special guide vane. In this case, zero resistance is completely justified.
More details about zero resistance filters in the video:
The background to the encroachment is quite prosaic. A friend had a “damn the kitten” problem with the piston, crankshaft, connecting rod, pin, in general, everything that makes the moped move, the engine on the 24 died, and seriously. The recently held first races on a seagull on a scooter inspired heroic deeds.
As a result, a friend buys a 65cc piston (Honda Takt AF24), a new crankshaft, and makes capital investments, since everything still needs to be changed. Well, after driving 300 kilometers, he complains that he doesn’t feel like he has 65 cc. Accordingly, I give him a bunch of links to engine tuning.
In short, after sitting in the evening, drinking beer, we decided to fire up his apparatus. Since I’m still calculating the pipe (I’m checking different calculation options - so that they match, otherwise I don’t want to buy Leovinci or something like that - it’s expensive) - but we’ll do it anyway. In the end, we decided to make the intake easier. Again, buy a filter
zero resistance is reluctant.
So I was drawn to the garage to “go crazy.” About two years ago, I installed a homemade filter
on his Yamaha Jog-Sekogd Edition (an old guy with a vertical motor), since my dear one simply got lost.
In general, the reliability of the filter element has been tested the hard way, over 2 years, without replacing the housing. It was decided, based on experience, to assemble a fan that was more practical to use and reliable to install.
As a result, having come to the market, we purchased:
Oil filter
for Moskvich KS-71 (411-412 Muscovites) - 4 g.
Siphon for washbasin - from 5g to 21g. (you need to choose from elastic plastic or with polyethylene impurities - in general, pure polyvinyl chloride will not work - it’s too fragile), although the siphon itself is not needed so much as its upper part - and some at the market sell it separately.
The second aspect when choosing a siphon is that a filter should be inserted into its neck diameter.
An M6 hairpin with a length of 220-250mm is selected experimentally. I purchased a mounting anchor of suitable length, since I didn’t have time to look for a hairpin for a long time. For 2.50 UAH.
Well, and, accordingly, a creative accelerator with a capacity of 1 liter. each. — 3.80 UAH each. :O)
I don’t count the mounting silicone and self-adhesive micropork, because it was available in the garage. Oh, and, of course, two clamps with a diameter of 25-32mm for as much as 1 UAH.
As a result, the idea is as follows:
That is, the filter element, without any modifications, is clamped between the neck of the siphon and its counterpart (a metal round flange with a bunch of holes), the whole thing is pulled together with the same hairpin, the length of which is selected according to the location, you should not leave a very long section of the hairpin, it will go into the air intake pipe and may rest against the carburetor.
Homemade dust air purifier with humidification: design No. 3
To implement the task, the following are used:
- volumetric plastic container with a lid;
- 12 V power supply that can be connected to the mains;
- fan of small dimensions;
- filter element.
The design principle is similar to No. 2: a hole is made in the plastic tank for installing a fan and power supply. The fan is firmly fixed in the upper part of the container using bolts to prevent it from sinking into the water. Water is poured into the lower part of the plastic tank. The liquid should not reach the fan by at least 3 cm. This device can be equipped with a relay with which you can automatically control the structure: it will turn on and off independently after a certain time, which, you see, is very convenient.