What you need to know
Timely replacement of the Opel Astra G cabin filter contributes to high-quality cleaning of the intake air. This circumstance is important for two reasons:
- Ensuring efficient operation of the air conditioning system, which is directly related to the cleanliness of the surface of the air conditioner radiator.
- Cleaning the air entering the cabin. If the cassette is highly contaminated, dust particles will not only penetrate inside, but the contaminated surface of the filter material will become a breeding ground for pathogenic bacteria.
Even if there is no air conditioner in the blowing system, a filter is provided in the design. Instead of the model, a carbon element is installed to protect against dust.
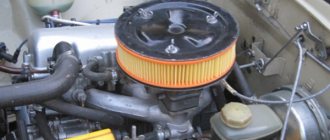
The answer to the question of how to change a cassette in an Opel Astra G must start from the installation site. Traditionally, in Opel, the compartment where the replacement element is located is located behind the glove box. Access to the place where the Astra G cabin filter is located will be indicated by a thematic video or a described algorithm for carrying out the work.
Replacing the Opel Astra cabin filter
When you lift the glove compartment lid towards you, you can see four self-tapping screws along the edges that hold the glove compartment itself in place. Having unscrewed them, you need to pull the glove compartment towards you and put it aside, having first turned off the backlight. You can also remove it before removing the glove compartment - it is held only by clips on the sides; they can be easily pryed off with a knife or a thin flat-head screwdriver.
Behind the glove compartment, to the left of the round fan casing, you can see a cover that is held in place with screws around the perimeter. It is these that need to be unscrewed to gain access to the cabin filter cartridge. The screws have a regular Phillips head.
By pulling the filter to the side, you can begin cleaning the compartment. In the fall, leaves usually accumulate there, and by spring they have time to rot - even a carbon filter is unable to cope with this smell. But the fan prevents you from getting to the compartment with the vacuum cleaner nozzle - you can also remove it by unscrewing the bolts around the perimeter, disconnecting the connector and sliding the fan down, you can remove debris manually with a curved plastic spatula. However, since removing the fan will make it easier to both process the air conditioner radiator and install the filter in place, we can recommend this option. The main thing is not to accidentally damage the impeller.
Air conditioner radiator treatment is usually carried out prophylactically once a year, usually in the spring. If there is a noticeably musty smell coming from the stove, or a runny nose that does not go away, this is a reason to treat the radiator out of turn. To do this, either purchase a ready-made aerosol cleaner, or prepare a homemade composition from pharmaceutical chlorhexidine and fragrance (a few drops of cologne, for example). The first option is more convenient because aerosol cleaners come with a flexible nozzle, but a homemade cleaner will have guaranteed high antiseptic properties.
After spraying the mixture onto the radiator, you need to let it drain into the drainage hole along with the dirt, which will take no more than 10 minutes. Then a new filter is inserted - if the fan was removed, then there will be no problems, but if it is in place, then the filter will have to be twisted and, having inserted it about halfway, push it with your finger from the side of the motor shield so that it does not rest in the compartment.
Reassembly is obvious - the filter compartment cover is attached to three screws, the glove compartment is put in place, and before that the lighting is connected.
Instructions in photo
In a situation where a citizen does not want to spend money on service centers, he can independently change the air filter in his car.
Procedure for replacing the air filter in the Opel Astra H:
- Open the hood of the car and find the location of the desired air filter. It can be on the left or right side.
- Then the bolts located on the air filter cover are unscrewed. The name of the bolts is star or Phillips, and the size is 9. The bolts are unscrewed with a simple star screwdriver.
- After removing the bolts, remove the clamps and pull out the pipe holding the air filter cover.
- The air filter is taken out and checked for dirt in it and the need for replacement.
- If the filter is dirty, install a new one and screw on the cap.
DETAILS: Changing the oil in a manual transmission on a Lada Vesta
Recommendations when purchasing an air filter for an Opel Astra:
- it must be new;
- the marking must correspond to the old one;
- the shape is rectangular.
According to the recommendations of the creators of the Opel Astra, the air filter should be replaced once every 30 thousand kilometers or after three years of vehicle operation.
Replacement procedure
The operation of replacing the filter is not a complex vehicle maintenance procedure. At the same time, in order to correctly replace the Opel Astra, you should study the brief instructions in detail:
- loosen the fastening clamp and dismantle the air duct from the filter unit;
- Unscrew the 6 screws securing the air filter box cover;
- remove the cap and then the filter element, which you evaluate for contamination;
- install a new filter, placing it tightly along the entire contour of the rubber seal;
- fasten all previously dismantled parts in the reverse order.
The entire replacement operation will not exceed 15 minutes. Replacement requires only a flathead and Phillips screwdriver. When purchasing a filter element, it is better to choose without false economy. Only a high-quality element can provide reliable protection against the entry of contaminants into the engine.
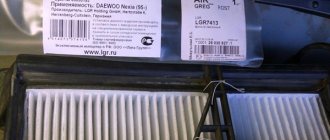
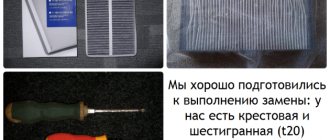
Procedure for replacing the cabin filter in the Opel Astra G
The upcoming replacement of the cabin filter in the Opel Astra G will require a Phillips screwdriver. At the initial stage, unscrew the mounting screws of the built-in glove box to get to the place where the Astra G cabin filter is located. There are 6 of them around the perimeter.
Access to the compartment for replacing the cabin filter in the Opel Astra G is open. Closer to the central tunnel there is a compartment lid with a replaceable cassette. It is mounted on two clamps, and in some versions using threaded connections.
After opening the compartment, the used element is removed. His condition must be assessed. During subsequent operation, the owner can adjust the frequency of replacement if the filter is heavily soiled.
Before installing a new filter element, remove any remaining dust from the plastic housing. The replacement element must be installed taking into account the marked arrows indicating the direction for installation. The assembly process is carried out in reverse order. Replacing the cabin filter in the Opel Astra G is complete.
Replacement process
According to these instructions, the filter can be changed in exactly 15 minutes.
- We turn off the car and move to the next seat
Many motorists move the passenger seat back so that they can turn comfortably during repairs. But if the driver has a small build, then this “extra movement” can be skipped
- Open the glove compartment and remove everything from there
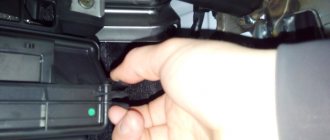
- Unfasten the side of the dashboard. When replacing the cabin filter of the Opel Astra J, you need to be careful when snapping off the side panel. There is a live wire that needs to be carefully removed in order to place the side panel on the floor (or on a chair). The wire is marked in the photo
- We unscrew the 4 bolts on the glove compartment (they are located in the corners) and pull the glove compartment towards you. The wire for illuminating the glove compartment can not be disconnected; it is long and allows you to lower the glove compartment to the floor
- We go to the cover of the filtration unit and unclip the latches. In some models there are latches only on the sides, in other models there are latches on the top, in others on all sides
- Carefully remove the old Opel Astra filter element; replacing the cabin filter can be accompanied by cleaning the filtration compartment (of course, if you have the time and desire)
- We install a new filter. Note the directional arrow. It must coincide with the direction of the air flow. Also, you can find original filters where the arrow points up (against the air flow), but next to it there is the signature “UP”. Regardless of the direction of the arrow, the text information should be turned right side up, not upside down. That is, conscientious labeling can also be considered as a guideline.
By the way, there is a video about this:
Procedure for replacing the air filter Opel Astra J
On an Opel Astra J, a motorist can also independently change the air filter using simple instructions.
Step-by-step instructions for replacing the air filter yourself:
- A new element is purchased.
- Then use a screwdriver to unscrew the screws attached to the air filter cover of the Opel Astra J.
- The cover is removed and the air filter is pulled out, which is secured with 6 bolts. If there is dirt at the site of the old car part, it is cleaned so that dust does not fall on the new element.
- A new air filter is installed and the cap is screwed on.
It is recommended to replace car parts every 15 thousand km, and more often if you have a turbocharged engine.
To replace, a car enthusiast will need the following tools:
- cross;
- flat screwdriver.
DETAILS: Changing the oil in the VAZ 21099 carburetor engine. Photos, instructions on how to fill oil into a VAZ 21099 engine.
Cleaning the filter element of the Opel Astra J air filter
The cleaning and replacement schedule for Opel Astra J air filters is established by the maintenance regulations for a specific model. Both processes (cleaning and replacement) are not particularly difficult and are equally labor intensive.
The only difference for the driver is that if a replacement is necessary, before going to the service, you need to select and purchase a replacement part - an Opel Astra J 1.4 turbo air filter or products for cars with a 1.6-liter engine (turbocharged, non-turbocharged).
The consumables are cleaned by blowing with compressed air. The procedure is as follows:
- After preparing the car for repair or maintenance, the technician will open the hood and remove the screws securing the filter cover (the plan is indicated for the 1.6 liter model, which has 6 such bolts). The fasteners are removed using a regular Phillips screwdriver.
- When the screws are removed, you need to carefully remove the cover along with the air pipe (it cannot be removed to clean the system).
- From under the cover we remove the filter element, which is a plate covered with a special material in a polymer “frame”.
- The lower part of the filter housing must first be blown out, then finally cleaned with a damp cloth.
- Blow out the filter element plate itself with compressed air. It is important not to direct the air flow at a right angle to the surface of the material, otherwise it can be damaged and the air filter will have to be replaced.
- Upon completion of cleaning, you need to return the parts in the reverse order (install the filter element under the cover, fit it in the appropriate place and secure it with screws, applying a little force).
Compressors or foot pumps are usually used to purify components. The flow of compressed air is directed from the side opposite to that where air is supplied for filtration from the street (during operation).
Replacing the filter
To replace the Opel Astra J air filter, you will need to disconnect the pipe. If it is changed along with the part, then the air duct must be disconnected from the other end. The procedure for replacing filters is similar (as when cleaning), only instead of blowing, the filter element is replaced with a new one (or the entire filter is changed, which is rare).
Why and when to change the cabin filter on an Opel Astra J?
The cabin filter is designed to filter the air entering the interior of the car. In older cars there was no such option and the air entered the car interior along with dust, dirt, leaves and insects. Nowadays, cars have become more technologically advanced and almost every model includes a cabin filter in its design.
It should be understood that during operation, the cabin filter, like any other filter element, becomes unusable. Determining a clogged filter is not difficult if you simply remove it and evaluate its external condition. On most cars this can be done in just a couple of minutes and without any tools. The removed filter can be shaken or blown out with a compressor, which will slightly extend its life. However, in some cars, reaching the cabin air filter requires more effort. In this case, in order not to do this work several times, it is better to immediately replace the cabin filter with a new one. Indirect signs will help determine whether the cabin filter is clogged.
Firstly, if in damp weather the windows in the car begin to fog up very much, then the first step is to replace the cabin filter of the Opel Astra J. Secondly, if in the winter season the heater in the car began to blow worse, then the cause of the malfunction may be hidden in clogged cabin filter. Thirdly, if when you turn on the heater or air conditioner you begin to notice an unpleasant odor from the air ducts, then the cabin filter needs to be replaced quickly. The filter became clogged, and due to the accumulation of condensation, bacteria began to multiply on it. These three signs will be enough to understand whether a car interior is required or not. And if you own the car for a long time, you should know that the cabin filter of the Opel Astra J is changed once every 30,000 km. If the car is used in dusty conditions, then it is better to reduce the replacement interval to 15,000 km.
AFL error: causes
The adaptation program stops working in cases where the electrical wiring fails or problems arise with the control unit itself. The age of the machine rarely affects the occurrence of problems, but as operation progresses, the problem may occur more often. As a result, a complete replacement of this auto electrical subsystem will be required. If you encounter a breakdown, the reasons for the AFL service error in the Opel Astra J may be:
- Broken motion or weather sensors.
- Faulty xenon headlight fuses.
- Burnt out light bulbs.
- Breakage or melting of wires leading to the system unit. Often occurs during prolonged or careless use.
Self-diagnosis is allowed only in cases where the driver has an understanding of the structure of the car in general and auto electricians in particular. Otherwise, actions can only cause harm.
Replacement frequency
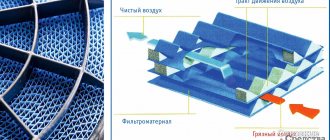
The cabin filter absorbs a huge amount of air, so it tends to get clogged. New cleaning parts that allow enough air to pass through for the climate control system to operate while also blocking dirt and dust from entering the cabin. Single-layer consumables are the cheapest and of lower quality; they clean the air from large dust particles. And two-layer and three-layer parts retain gases and microorganisms.
Of course, there is a specific relationship between the transmission speed and the level of air filtration, but, in general, even three-layer products ensure stable operation of the ventilation system. As they become clogged, the transmission speed decreases, so it is very important to replace them on time. Replacement according to the regulations is carried out after 20-30 thousand km. But in practice it has been shown that consumables need to be changed twice a year.
Installing a new filter
Putting the filter back is even more inconvenient. The main danger is that the filter can be broken, but if it is in a plastic frame, this is unlikely. To install, place your right hand behind the filter and use your fingers to push it towards the cabin, at the same time pushing it inside. Having reached the middle, you need to bend it slightly and push it all the way. The main thing after this is not to discover that the side on which the element should be located towards the air flow is mixed up, otherwise you will have to repeat the installation procedure. After that, put it back and screw the lid on. It is better to make sure that it is hermetically sealed and pressed tightly to prevent dust from entering the interior.
An alternative option for installing a filter element:
- A strip of cardboard is cut out according to the shape of the filter and is slightly longer in size;
- Cardboard is inserted in place of the filter;
- The filter can be easily inserted along it without any effort;
- The cardboard is carefully removed.
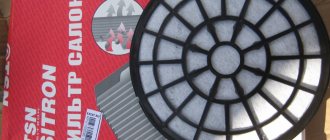
The entire process of replacing the Opel Astra H cabin filter takes about 10 minutes if you have the right tool. As an option, you can use a carbon filter, its quality is slightly higher than that of the “native” paper element. In addition, it is made in a rigid plastic frame, which makes it possible to install the filter almost effortlessly.
Video on replacing the cabin filter in Opel Astra N
Did you like the article?
Share the link with your friends on social networks:
We also have interesting e-mail newsletters, subscribe ! (once a week)
Where is the fuel filter located?
In Opel Astra N cars, the filter device is located in a housing with a fuel pump. According to technical regulations, replacement of this element is not provided for by the manufacturer. The service life of the filter corresponds to the service life of the vehicle.
In petrol versions of the Opel Astra J 16 XER 115 l. s., as well as GTC with gasoline engines produced in 1998 or 2012, the filter is located under the bottom of the car.
In diesel versions of the Opel Astra, the filter element is located in the engine compartment.
Diesel fuel filter