Unwelding the disc with your own hands
Unwelding. Manufacturing technology
Unwelding the disc with your own hands
“Plate Come Out” - cue!
How to make a tow hitch. Do-it-yourself tow bar installation
How to weld discs with your own hands? 2
We muddy the unwelding of two disks r13)
DIY welding discs
How to weld discs with your own hands? 2
DIY welding discs
Unwelding discs with your own hands
Workshop - Making unweldings. Part 2 “RESET” – Bodybeat.ru
welding and rolling (5*139.7)
Unwelding wheel rims - Wheels Auto review
How to weld discs with your own hands
How to weld discs with your own hands? 2
set of stock 15″ wheels for UAZ * AUTO 4x4 market - sale, purchase of all-wheel drive cars and ATVs, spare parts
How to make welding yourself
.
Technology for making wheel rims with your own hands.
Materials and tools for making welds:
— 2 wheel rims (for making each unwelding);
— Seam sealant (required only when installing tubeless tires);
— Paint for painting.
What are weldings and what are they for?
Unwelding - wheels of increased width. Welding joints are made from two factory stamped disks. At the same time, the width of the shelf of such a product is practically unlimited and can reach 10-12 inches (25-30 cm). In specialized services, the production of a product is carried out by sawing a disk lengthwise and welding a strip of metal between the two halves.
As for tires, such wheels, as a rule, are fitted with standard “rubber”, installing it in a “house”. It is generally accepted that such an installation provides additional advantages to welding.
However, the real reason for installing standard tires on a widened disk usually lies in the too high cost of “rubber” suitable for welding in size. Thus, 1 cylinder of rubber for unwelding a VAZ-2106 can compete in cost with the price of the car itself. A set of such tires usually covers this cost.
When it comes to why welding is needed, fans of newfangled tuning usually say that the car is on welding:
- holds the road better;
- looks stylish;
- has better handling;
- increases in price when sold;
- Unwelding on a gazelle can be used instead of a rear “sparkle” of wheels.
In reality, all of the above is quite controversial and does not stand up to expert criticism. The negative qualities of welding include:
- rapid tire wear;
- risk of destruction of welded seams when the vehicle moves;
- an increase in rolling resistance, which leads to an increase in fuel consumption and indirectly increased wear of suspension components, engine, gearbox;
- claims from technical control services and traffic police;
- increase in braking distance due to failure of the factory settings of the braking system.
Actually, everyone decides for himself the question of why welding is needed. The answer depends on what goals the car owner sets for himself. However, how to expand disks with your own hands?
Making boils (manual)
Good afternoon) I want to tell you about the welds and the method of their manufacture and installation
smokaaat actually I was surprised when I didn’t find a detailed article here about creating boils. I rummaged around on the internet and found some information + my comments.
So, first of all, what are boils? Welds are wheel rims of increased width, converted from serial ones by welding two wide rim flanges taken from two rims to each other. Or by welding an expanding insert. For the purpose of installing wider tires. In fact, it’s quite a budget option to give your car some old-school style and an unusual appearance for little money)
Let's get down to business. To make one wide disk, you will need: - a standard steel disk (stamped) - 2 pieces - an angle grinder - a welding machine - seam sealant (not necessary, read about this at the very end of the article)
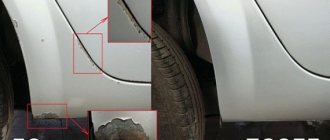
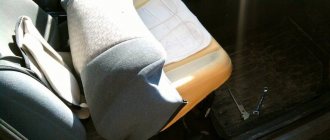
We take two disks and cut through the 2nd disk (see picture) with a grinder along the red line, cutting off the outer rim and throwing it away.
1 disk has only a cut along the red line of the outer rim to the inner part of the disk a little closer to the middle; after disconnecting the outer rim, we throw it away.
We remove unnecessary residues from the second disk with a grinder. We put the remaining part of disk 1 on the rear axle hub, fix it with nuts and put on the second part. We align the second rim relative to the first, eliminate the runout, and weld it at four points at the joints. Boiling areas are indicated in green. And this is what came out of it:
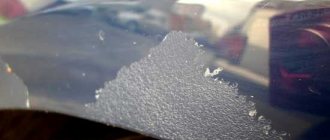
For tubeless installation we simply need to seal the seam in the middle of the rim. This of course should be done before painting. For this purpose, we will use 3M Joint Sealant. Alternatively, it can be diluted with a Degreaser. Attention! Precisely a degreaser, and not a solvent or, God forbid, white spirit! Apply diluted sealant to the seams. Wait until it gets up, remove the excess (a chisel, sandpaper, etc.), and paint it so that it doesn’t rust and makes you happy with its appearance.
and in conclusion, you cannot drive a car with the welds installed in this way! This is done for a quiet ride! take care of yourself and those around you) thank you for your attention)
Independent production of welding joints
It is not difficult to make welding joints for a VAZ with your own hands. To do this you will need a garage and a minimum set of tools:
- Angle grinder with metal discs;
- welding machine, preferably semi-automatic;
- hammer;
- tape measure or ruler;
- 2 stamped discs for each weld.
» alt=»»> They begin to boil the discs by sawing them in half. One of the disks is sawed along the edge of the inner shelf, removing only its edge. The second is by removing the inside and leaving the shelf intact. Next, the surfaces are ground, after which the resulting halves are connected to each other, putting one on top of the other, and welded with a continuous seam. Particular attention should be paid to the quality of the weld, otherwise the welded disk may fall apart when hitting a hole or unevenness.
When did the leaks appear?
If you delve into the history of car tuning, you will notice that welding joints first appeared on Russian cars in the 70s. These were cars participating in various competitions. Drivers installed tires to benefit from wider tires when driving on the highway.
Please note: Unwelding can often be seen on cars of drift enthusiasts. This is due to the fact that such wheels allow the car to more reliably stay on the road when maneuvering.
Unwelding from a legal point of view
From the point of view of law enforcement agencies, a boiled rim on a car is a change in its design. Such changes, regardless of whether it is a Niva with welding joints or a foreign car, require technical expertise. During the latter, experts check how safe the changes made are. The likelihood that widened wheels, not supported by modified suspension and appropriate tires, will be considered safe tends to zero.
Having installed welding joints on a VAZ-2107 or any other domestic car, you should be prepared for the fact that traffic police officers will issue a fine of five hundred rubles every day or ban the operation of the problematic car.
In addition, it will be impossible to re-register or deregister your vehicle. Such changes can be hidden only if the owner changes the wheels to standard ones before visiting the traffic police department.
Among car enthusiasts, tuning of wheel rims is very common - the so-called production of welding joints. It is as follows: the width of the rims is increased in order to be able to use wider tires. Unwelding has pros and cons, and in fact, this method can be considered artisanal, but it is widely used among craftsmen.
Among its advantages are the following factors:
- improving the adhesion of the wheel to the road, thereby increasing the driving performance of the car;
- low cost of such disks;
- giving the car a more stylish appearance;
- the ability to make welding joints with your own hands.
Advantages of welding on a car
However, before making welding, it is necessary to take into account that they also have disadvantages:
- increase in the moment of inertia of the wheel due to changes in mass and size;
- the need to use non-standard tires;
- reduction in the strength of the wheel structure due to the presence of welds;
- deterioration in vehicle handling due to the use of wheels with modified characteristics;
- the need to use tires of non-standard sizes.
If all this has not convinced you of the need to use standard products from the automotive industry, let's look at how you can make welding joints yourself at home. Let's do this using the example of the r13 wheel for a VAZ car - this example can be considered universal.
Disadvantages of using splices
Conclusion
At first glance, welding discs with your own hands seems like a simple way to change the appearance of a car.
But on the other hand, there is a change in the technical characteristics of the wheel, which affects the performance of the vehicle chassis and control.
As for the benefits of such modernization, the opinions of motorists differ - some are against it, while others are in favor.
Opponents of such tuning as welding, done on a car themselves, note that the wheel becomes less reliable, the car loses maneuverability, and in addition, the load on the chassis increases. At the same time, their opponents argue that these products are used on racing cars and, by their nature, cannot be less reliable.
One way or another, you can only draw final conclusions about whether welding made by yourself is suitable for your car or not. And you can be convinced of this only by installing these elements on your car.
Unwelding
(spreads) are wheel rims of increased width, made (usually with your own hands) from ordinary stamped disks by welding two wide rim flanges to each other, taken from two disks. Or by welding on an expanding insert. For the purpose of installing wider tires.
Materials and tools for making welds:
2 wheel rims (for making each unwelding);
Bulgarian;
Welding machine;
Seam sealant (required only when installing tubeless tires);
Paint for painting.
Preparation
At the initial stage, you need to fully understand the entire process. You should know that the starting material for manufacturing is stamped car wheels. Cast ones will not be suitable, since welding work will be carried out during the process - cast products do not withstand thermal loads.
The rim width of discs can be increased in 2 ways:
- a steel plate is welded into the middle;
- from two ordinary disks cut in half, one wide one is welded.
You should estimate what width of rims the design of your car allows. For VAZ cars, width 7j is usually chosen. But if you cut or roll out the wheel arches, you can increase the width to 10 j. So, first we need to calculate the width of the rim we want to get.
If we decide to use the method of welding two disks, we need to take this into account and stock up on the required number - for each welding we will need 2 disks.
Final stage: painting
And the last stage is painting. However, before this stage, you need to check the welds for runout and roll them. Once you're sure everything is in order, you can think about painting.
Once you have chosen the appropriate enamel, apply it in the following way:
- Carefully sand the surface of the product.
- Degrease using white spirit.
- Apply a layer of primer - it will fill all the micro-irregularities and increase adhesion, ensuring better adhesion of the paint to the metal.
- After the primer has dried, apply the enamel in several layers.
- When the paint dries, it is advisable to coat it with varnish - such a coating will be more durable and aesthetically pleasing.
Painting finished welds
How to make welding joints with your own hands
There are several technologies for making welding joints , but before you start making them yourself, you must remember that even the slightest inaccuracy during welding of a wheel rim can lead to the fact that it will be impossible to balance such a wheel in the future.
- And so, one of the options for making welding looks like this. The wheel rim is cut along the edges, after which a strip is welded between the sawn inner and outer parts, the width of which will depend on the planned width of the weld.
- In the second option for making welds, standard wheel rims are cut in certain places, after which these parts are welded. I would like to note that this method requires twice as many rims, but at the same time, the quality of such welding will be much higher.
- Well, the third method of making welding can be called the most expensive, which requires much more time and expense. Changes in the disk occur not only in the outer parts, but also in the inner parts. Also, with this combined method of making welding, it is possible to change the hub part of the wheel rim.