It’s hard to imagine a modern car without all sorts of little things designed to make the trip as pleasant as possible. One such addition is heated seats. Sitting in a cold car seat when it’s thirty degrees below zero outside is not particularly pleasant; the only thing worse than sitting in a chair upholstered in leather. Meanwhile, many car owners are forced to do this every winter. The solution to the problem may be to install heated seats yourself.
In car dealerships you can find capes or covers with heating elements, as well as built-in heated seats. The first two options do not require complex installation and are usually affordable, while the latter poses a lot of difficulties in installing. You can, of course, contact a workshop where they will do the work quickly and efficiently, but the cost of the services will not please anyone. At first glance, the option with a cape or cover seems to be the most preferable:
- low cost;
- ease of connection,
however, this heating method is not without its flaws.
Removal and disassembly of seats.
- Remove the front and rear seats. You will need a 12mm wrench. The rear seat is secured with one bolt located in the middle part between the seat and the backrest. In the front part it is fixed with latches. You just pull the seat towards you and they pop out of the body.
The front seats are attached to 4 bolts, which are unscrewed with the same key. We move the seat forward as much as possible and unscrew the rear bolts, move it back and unscrew the front bolts.
When removing the driver's seat, do not forget to first disconnect the seat belt sensor connector from it.
- After unscrewing 2 screws, remove the rear part of the center console. Seat heating buttons will be installed in it. Similarly, we remove the front part of the center console so that it does not interfere with the wiring.
When removing the front of the console, be sure to disconnect the cigarette lighter connector.
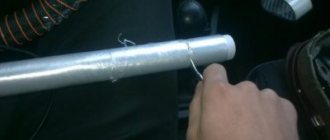
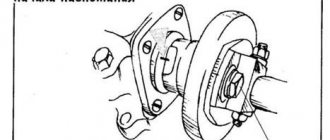
- Let's disassemble the chair. Namely, we remove the bottom pillow. To do this, you need to unscrew 4 M12 bolts. They are marked with red arrows in the figure.
Heated car seats – in the car, just like at home
A cozy, warm car, a heated seat that you climb into before your next trip - all this gives simple human pleasure to the motorist whose car has seat heaters installed. Considering that harsh Russian winters continue to amaze car enthusiasts every year, installing heated seats is the only way to preserve the health of car owners.
| Description of the car seat heating system | ||
| PILOT IN | Built-in electric heated seats “PILOT VO-1”, “PILOT VO-2”. Electrically heated seats “PILOT VO-1” (for 1 seat) and “PILOT VO-2” (for 2 seats). Fits into any type of seat. The delivery set includes a set of heating elements for 2 seats and heating buttons. The user can select one of 3 operating modes: - green - low heat (12% of maximum power) - orange - moderate heat (25% of maximum power) - red - high heat (50% of maximum power) When turned on, the " mode is activated turbo”, 100% heating power is supplied to the heaters within 2 minutes, which ensures quick heating of the seats. Technical characteristics: 1. Supply voltage - 12V/24V 2. Current consumption - 5A 3. Power consumption - 48W (for modification with index Ш - 60 W) 4. Max. temperature - 35C Certificate of Conformity No. ROSS RU. ME 01. B00156 No. 02144481 All products have a 1 year warranty | |
| System AWHL400W | Seat heating device System AWHL400W - These are thermocouples built into the back and bottom cushion of the seat. Their presence will not be noticeable outwardly, but will provide a lot of comfort when moving in the cold season. Heating control units are built into a convenient location in the center console and have three modes:
| |
| Prices for installing heated seats | |
| Installation of heating on 1 seat (PILOT VO-1) | 6,500 rub. |
| Installation of heating for 2 seats (PILOT VO-2) | 12,000 rub. |
| Installation of heating for 1 seat (System AWHL400W) | 7,000 rub. |
| Installation of heating for 2 seats (System AWHL400W) | 13,000 rub. |
Installing heated seat buttons in the center console.
- We first select the locations for installing the buttons. In addition to the function of turning on the heating, the buttons also allow you to adjust the heating and have 8 positions.
In our case, we decided to install controls for heating the front seats on the console to the right of the handbrake, and for the rear seat above the ashtray. We will not describe the process in detail. Briefly, point by point.
- We paste templates for cutting holes in the selected places. Templates are included.
If you have a drill bit of suitable diameter, you can drill the required hole in two passes. Due to the lack of such a drill, we drilled holes along the contour with a screwdriver and a 4 mm drill, after which we connected them together using the side surface of the same drill. The edges of the hole were processed with a file and a sharp knife.
It is important not to go beyond the edge drawn on the template, so that later there are no gaps along the button.
- We insert the seat heating buttons into their new “standard” places.
Buttons for heating the driver and front passenger seats.
Rear seat heating button.
Necessary components for heating the rear seats with your own hands
Winters in our latitudes are often too cold and frosty - such that it is not so easy to stay warm in the car, even with the heater on. Of course, recently almost all cars are equipped with such a function as heated front seats, but not all car models are equipped with the option of heated rear seats. Often, such a function is available only in expensive foreign cars, while cars in the budget segment are usually not equipped with anything like this. So, should the passengers sitting in the back freeze now, or can this problem still be solved somehow?
It turns out that there are no unsolvable problems, and heating the rear seats of a car is quite possible, and you can do it yourself. Below is a short little instruction that can help those motorists whose hands grow from the right place to independently install heated rear seats in their cars. Of course, there are still some difficulties in installing built-in heating systems, but the result will be worth it.
Interesting! There is an opinion that only the most expensive car models are equipped with a built-in rear seat heating function, however, in the model range of many manufacturers there are also quite affordable cars that have this option - their average cost is about 25-30 thousand conventional units.
In addition, installing seat heating of just this type provides a lot of advantages: firstly, if the work is carried out correctly, neither the interior of the cabin nor the appearance of the rear seats themselves will change, secondly, all the wiring will be hidden, and, thirdly, Such heaters can be connected directly to the car's electrical system, thereby leaving free access to the cigarette lighter.
Having decided to install heated rear seats in your car yourself, you should first take care of finding and purchasing all the components necessary for this. Nowadays, there are many appropriate kits for installing heated seats on sale, from which you can choose a product that suits your taste and price.
The most popular among us are built-in heating elements made in Germany (Weako), Russia (Emelya and VO), China (Autoline International) and Taiwan (Megalight). Naturally, all these kits and kits differ both in their cost and quality, as well as versatility and level of reliability.
Note! Chinese kits for installing heated rear seats are the most attractive in price, but at the same time, they have more frequent breakdowns, such as broken or shorted wiring, uneven heating of the seat surface, broken power buttons, etc.
Most of these sets have the ability to use several different operating modes: heating the seats, heating only the backs, and simultaneous heating of both the backs and seats. Also, such devices can have different temperature conditions.
After everything you need has been selected and purchased, you can begin the process of installing heated rear seats of your car yourself, but you should be prepared for the fact that installation of the selected kit will take at least several hours. Undoubtedly, everyone can choose for themselves the sequence of performing this work, but this article shows exactly this procedure.
Interesting fact! Some models of inexpensive cars without a heated seat function, however, are equipped with the necessary wiring and components to connect it, which makes the subsequent process of installing heated seats yourself easier.
It is quite logical and even necessary to recommend that you first prepare the built-in heating kit itself and all the tools necessary for installation (screwdrivers, knife and scissors, insulating tape, pliers, glue, and so on).
Installation and output of buttons in the armrest
First, you need to determine the place where the buttons that turn on and regulate the heating of the rear seats of the car will be located; for example, the option of placing them in the armrest will be very convenient. If the car does not have one, then it can be purchased separately, while choosing an armrest with existing openings for buttons. Otherwise, you will have to cut the holes for the heating buttons yourself.
Important! In some cases, it is better to place the buttons for turning the heated rear seats on and off on the dashboard in the direct line of sight of the driver, then he can control this function. This option will be especially useful if the heating is turned off as unnecessary.
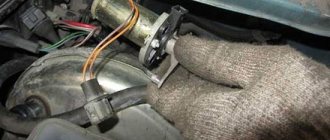
Wiring
The next step will be laying the wiring, and this task must be completed in such a way that the wires connected to the heating elements do not interfere with passengers and do not spoil the aesthetic appearance of the car interior. Therefore, it is advisable to lay the leads in such a way that it is possible to then hide them in the existing structural elements of the car.
Important! You should not lay wiring in places where it can be damaged; in particular, it is highly recommended not to have the wires under the feet of passengers.
Network connection
Next comes the actual connection of the laid wiring to the network. Of course, the easiest way would be to connect the seat heating kit to the cigarette lighter, however, this option will make it unavailable for use. An alternative, and a very good one, would be to connect the heaters directly to the car battery.
It is worth taking into account that in the cold season, when all the heating devices in the car are turned on, the load on the battery will be quite high, so some capabilities will most likely have to be sacrificed (for example, without listening to music).
Removing the rear seats
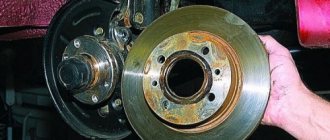
Well, in the end, you can move on to one of the most important stages of the process of installing heated rear seats yourself - installing the heaters themselves. But first, you will need to dismantle the seats and then carefully remove the upholstery from them.
Interesting to know! Some seat heating devices have an additional interesting feature - they do not turn on when no one is sitting on the heated seat.
Often this very task takes a lot of time and effort, since removing the rear seats can be quite difficult for a beginner.
It is also necessary to take great care when removing the upholstery from car seats - this must be done in such a way as not to damage the material in any way, and after all work is completed, install everything back.
Installation of heating elements
Well, now comes the moment of installing the heating elements themselves, which are attached under the seat upholstery and on the backrests (also under the upholstery). Standard rear seat heating kits include double-sided tape or adhesive to attach the heating surfaces to car seats, or the heating elements themselves are equipped with self-adhesive surfaces. But sometimes car enthusiasts secure them additionally in some other way.
It is important to know! When installing heated rear seats in frosty weather, it is advisable to carry out such work in a warm garage, since due to low temperatures, glue or self-adhesive may significantly lose their adhesive properties.
After the heating elements are secured to the seats and the wires are routed out, you will need to put the upholstery back on the seats and reinstall them in the car. After that, you just need to connect the heaters and check their operation.
Important! Not all seat heating installation kits have short circuit protection - in this case, it is recommended to purchase and connect fuses to the heating system yourself.
So, after all this dreary and painstaking work is completed, the car enthusiast will have the opportunity to use an additional option in his vehicle, however, this function will please, first of all, the rear seat passengers.
This is interesting: Motor oil marking according to SAE
Practice: how to make stationary heated seats with your own hands?
So, the choice has been made and the heating kit has been purchased. All that remains is to prepare the necessary materials and tools. These include:
- a set of screwdrivers and wrenches for disassembling the chair;
- electrical tape and heat shrink tubing;
- plastic clamps;
- multimeter;
- scissors and a knife with replaceable blades;
- pliers;
- soldering iron;
- marker;
- glue 88 or double-sided tape (available in the installation kit).
To all this, we can add that the set of materials may vary depending on the configuration of the product. For example, if there are no wires or a fuse connector, then you need to purchase them. A stranded wire with a cross-section of 2.5 mm² is suitable for wiring.
Before you organize the heating of the front seats with your own hands, special attention should be paid to the placement of the control buttons that are included in the kit. It is important to study the method of their fastening and dimensions, since there is a possibility that the buttons will not fit into their normal place. Then you will have to choose another place or purchase control elements for a specific car. Further, all work is performed according to the following scheme:
- dismantle the seats and carefully remove them from the car;
- disassemble the seats, remove the headrest and all plastic elements; work better at a desk;
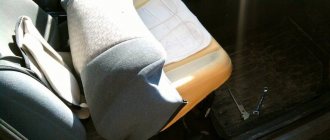
- remove the seat upholstery, which in most cases is fixed from below with metal rings or plates; You don’t have to remove it completely - just make room for heating mats;
- remove the trim from the back, to do this you need to remove the plastic bushings for the headrests;
- lay the heating fabric on the foam base and mark its contours with a marker;
- if there is a temperature sensor, fix it on the foam rubber;
- stick strips of double-sided tape along the marked lines or apply glue 88;
- fix the heating mats on the back and seat; in this case, be sure to pay attention to the position of the wires - for the driver’s seat they should be on the right, and for the passenger seat they should be on the left;
- bring out the power wires;
- install the casing on a foam base; in places where necessary, use plastic clamps;
- reinstall all plastic elements and headrests;
- install the seats in their standard places and lay the wiring to the locations of the controls and power connections.
Read also: Opel Corsa car with a wrench
Important! Motorists who already know how to make stationary heated seats with their own hands are recommended to pay attention to the laying of the wires that go from the regulators to the heating mats. Under no circumstances should they be stacked; it is necessary to leave a reserve in case the chairs need to be moved back.
Why built-in heated seats are better
The first problem is that the quality of many capes leaves much to be desired. It is not uncommon for a cape to catch fire directly under a person sitting on it. The risk of getting burned is quite high, not to mention the fact that the clothes will probably be ruined.
The second problem is that the capes heat up differently. For some, the temperature reaches 40 degrees, and this adversely affects reproductive function in men.
The third problem lies in the fact that there is usually only one cigarette lighter socket in a car, therefore, it will only be possible to connect the heated driver’s seat, and, as a rule, there are also passengers in the car. You can, of course, use a splitter, but the current consumption will be too high, and the fuse in the splitter will not withstand it. In addition, when using capes and covers, extra wires appear in the interior, which can interfere with driving the car. Using covers on the rear seats of a car is out of the question due to the insufficient length of the electrical cable.
Read also: Where to catch crayfish in the Moscow region
Installation video instructions
To be fair, we note that recently we have started to have such kits ready for self-installation. The average price is approximately 2000 rubles. For example, WAECO Magic Comfort MH-40GS has such capabilities.
- Function: heated seats
- Heated cape version
- Heating zones back and seat
- Heating element dimensions, cm 100×45
- Supply voltage 12 volts
- Thermostat controls
- Heating adjustment two-position switch
Every car owner should know this: Choosing a battery for a car
Choosing a car battery - some tips and secrets of a smart purchase. It should be noted that it is very important to choose the right battery for your car. Like any other...
| Replacing plain bearings How to replace plain bearings with rolling bearings in a small electric motor. I suggest not asking yourself “always... |
| Audi fuses Fuses in an Audi car are designed to protect electrical circuits from short circuit currents and overload currents. Advantages… |