We pull out the spar with our own hands
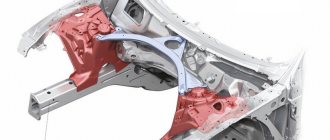
Cars can be framed or with a monocoque body. If in the frame version the entire load is taken by the frame (all other components and assemblies are attached to it), then, accordingly, in the version with a monocoque body, the body takes the entire load. In this article we will talk specifically about the version with a monocoque body, more precisely, about the power elements in it - spars .
Spars are hollow (in most modern cars they are not hollow, but more on that later) elements, most often of rectangular cross-section. The spars are located in the front and rear of the car (2 front and 2 rear). They are located parallel to the thresholds of the car. All other body elements, components and assemblies are welded and screwed to the side members.
Considering the quality of domestic roads and sometimes careless operation of the car, all power elements of the car are constantly subject to stress.
We repair side members
Do-it-yourself repair of side members can be divided into several successive stages.
Disassembly
The very first step will be to remove from the body those parts that will interfere. We dismantle everything that prevents free access to the side members. When removing parts from the body, be extremely careful; disassembly should be done after first disconnecting all electrical parts and wiring connected to them. If the wiring may be damaged when pulled, it should also be disconnected from the housing.
Pull
Having removed the body parts, you can begin to straighten the damaged spar to the shape it had before. To do this, we will need special grips that are attached to the car on the stand. The procedure itself can take quite a long time, but it must be done.
When stamping parts, the manufacturer usually provides so-called folds in the design. This solution helps to avoid uncontrolled deformation. A similar effect is achieved in two ways:
- by making slots and through holes in certain places;
- reducing the thickness of the metal section.
Article on the topic: Coarse and fine filters: trouble-free operation of a car engine
Repair
In case of minor damage, after the spar is pulled to its original position (you can check it using the table), straightening is performed - leveling with a hammer. Corners and edges should also be straightened.
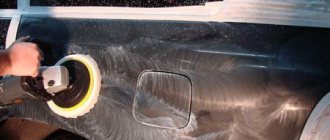
After this, you should check that the spar has not cracked or fallen off at the welding points. If everything looks fine, you can apply a primer coat. The final stage will be painting and anti-corrosion treatment.
Damage to the spar requires repair or replacement.
If the spar has shifted, but remains intact, then in any case it must be pulled out in order to return the correct geometry to the seat of this element. It is worth remembering that it is better to entrust such repairs to specialists. In a car service, the spar is pulled out on a special slipway. The car is fixed motionless on the slipway and pulled out using clamps, chains and hydraulic equipment. The car body is the most expensive part of vehicles to maintain. Consequently, its repair at a car service center can cost a pretty penny.
How to pull out the spar yourself
During accidents, vehicle side members are often damaged and their geometric dimensions change. To straighten simple models of spars, you can use the pulling method. For complex structures installed on foreign cars, in the form of an energy-absorbing cassette, replacement is carried out as an assembly. The pulling process has been worked out thoroughly.
First, you need to remove all parts from the body to provide free access to the spar. You must be sure to remove wiring and electrical parts located near the repair area.
Begin pre-stretching and straightening the damaged spar until you obtain a shape that is close to the original one. First, secure the vehicle to the stand using special clamps. After finishing pre-stretching, if necessary, cut off the parts of the spar to be replaced. If you change damaged elements of the spar without first pulling it out, you can complicate its subsequent repair. When you finish pre-pulling, be sure to check the doors and hinges.
In welding areas, the sealing tape and primer coating must be removed. To do this, you need to preheat the tape with a gas burner or an industrial hair dryer. Once heated, they should come off easily using a steel spatula.
You must check the spar geometry against the check points and the repair chart. To make it more convenient to work, control points can be marked on the spar itself and other elements. Next, you need to pull it out completely, achieving a coincidence of the control points on the spar with the points of the stand, and a coincidence of the dimensions with the body repair table. Use a disc sander to smooth out and sand any uneven surfaces on the side member. Check how parallel the side members and wheel arches are.
Straighten adjacent damaged parts and the wheel arch using a straightening hammer and mandrel. You should also align the welding edges of parts that have been damaged. Using a straightening hammer and mandrel, level the edges of the side members and arches to ensure they fit snugly.
At the places where the interior panels are connected, on the lower part of the side member and the inner surfaces of the wheel arches, it is necessary to reapply the sealing tape and apply a layer of a new primer coating. Then you need to paint the body. Before starting to work with paint and varnish coatings, it is necessary to ensure ventilation of the repair room.
After completing the painting work, take care to apply an anti-corrosion coating. Reinstall all previously removed parts. All damaged parts must be replaced with new ones. Moving parts must be lubricated with grease. Next, you need to fill in the coolant and charge the air conditioner with refrigerant. Upon completion of work, be sure to check the gaps between the body panels and the operation of the lock installed on the hood.
How to pull out the spar yourself
5:1 ratings
Rail saver repair tool
Tim Gerhards, an American auto body repair specialist who has been working in this field since 1986, has come up with a tool that helps remove dents and bends in side members by attacking the imperfections from the inside. This is a fairly new invention. The tool is called Rail saver (literally translated as spar saver). It is a metal body, to one end of which a hydraulic cylinder connected to a pump is screwed. There is a metal pipe inside the housing.
p, blockquote 23,0,0,1,0 –>
p, blockquote 24,0,0,0,0 –>
A hydraulic cylinder acts on one end of this pipe, and at the other end there is a wedge, which gradually lifts the part of the body where the wedge is also located. It turns out something like a long jack, which is inserted inside the spar to the place where the bend is located and the bend or dent is applied from inside the spar. Anvils of different shapes, which are included in the kit, can be screwed to the place in the tool that rises. Thus, this tool can work on dents and folds caused by the displacement of the side member from the inside.
p, blockquote 25,0,0,0,0 –> A tool for straightening the side members from inside the Rail saver is placed inside the side member. The arrow shows the place where the fold is located, which the tool will straighten.
If necessary, the unevenness is tapped from the outside with a hammer, and the tool for straightening the side members acts as support. Since a hydraulic cylinder with a pump is used to operate the tool, it is possible to remove deformation on the metal of a spar of any thickness without much effort. The most important thing is to correctly position the tool in the right place. To do this, you need to measure the location of the deformation and position the tool inside the spar to the desired length. There is a measuring scale on the body of the instrument.
p, blockquote 26,0,0,0,0 –>
Depending on the size of the spar, you can place wooden blocks in its cavity to position the tool as best as possible.
p, blockquote 27,0,0,0,0 –>
The Rail saver tool has been tested and approved by General Motors for repair of salvage vehicles at authorized service centers. The advantage of this tool is that it eliminates the need to cut segments in the spar to access the reverse side of the damage. There is no need to heat the metal, especially since modern high-strength steel is sensitive to heat and is significantly weakened and loses its properties.
p, blockquote 28,0,0,0,0 –>
The design of the Rail saver tool is quite simple and if it is thoroughly understood, you can make such a tool yourself.
p, blockquote 29,0,0,0,0 –>
On the left, at the top of the tool body, you can see a wedge on which another wedge acts, lifting it. The pipe with the wedge inside the housing is pushed by a hydraulic extension. The place with the wedge, which rises when exposed to hydraulics, must be installed opposite the fold, inside the spar. Special anvils/supports can be screwed to this part of the tool.
p, blockquote 30,0,0,0,0 –> p, blockquote 31,0,0,0,1 –>
Malfunctions and repairs
When load beams are deformed after an accident or improper repair, the driver notices bald tires on the side of the elongated part. This situation occurs due to incorrect wheel alignment.
Main spar malfunctions:
- The part burst. In this case, it is partially or completely replaced. Especially in the case of beams located at the front. To replace the part, you will first have to align it and then cut it out.
- The element is bent in the deformation zone. In this case, it is corrected on a special stand.
Such malfunctions of the power beams lead to changes in the position of the engine, disrupt the geometry of the suspension, and impair steering control. It is important to check beams even after a minor accident.
Correcting the deformation of the car side member can only be done on a carolin test bench. Most of the car will have to be disassembled. If the main structural elements remain intact, it is possible to partially replace the spar using gas welding. However, this method cannot restore the factory quality of the part, since the strength after repair will decrease.
If you have a ladder frame, it is easy to change the spar, except in cases where the part has gone too far in the supporting body. It is important that the new element has the original dimensions of the deformed beam. Features of partial replacement:
- In case of minor damage, the deformation zones have a small extent, so you can limit yourself to partial replacement of the part in places of severe creases and metal tears. Such a replacement can only be carried out in areas that do not bear the load. The damaged areas are cut out with a grinder, and new elements are welded in their place.
- Complete replacement. Often the damage is so great that the spar can no longer perform its functions. Since such damage cannot be repaired, the beam is pulled out to a state as close as possible to the original, and then cut off from the fastenings.
Taking into account the condition of the body, various restoration measures are chosen.
Disassembly
To extract the power element, several tools are prepared, since the work ahead is complex and lengthy. Necessary equipment:
- Bulgarian;
- welding equipment;
- gas-burner;
- sander;
- a hammer that will be used for straightening;
- stand;
- sealant-based tape;
- body repair table;
- spatula with primer.
Before repairs, remove all body parts that block access to the damaged spar. Wiring and electrical appliances are removed from the area being repaired.
How to pull out a spar with your own hands
Before work, you should check in which direction the spar needs to be pulled. At home, the procedure is carried out as follows:
- The machine is secured with chains to the stand. The gripping area is cleaned and a clamp is installed.
- Then a chain is attached to it and the spar stretching begins.
- They make a smooth stretch, simultaneously giving the damaged part its original shape.
- Since the spars are made of high-quality steel, for maximum stretch, they are first tensioned. Then, leaving the part under tension, add force and hold it again.
- Use a grinder to cut off the unrepairable parts of the beam.
- They try to stretch out the power element, simultaneously giving it its previous geometric shapes.
It will not be possible to remove the damaged area until the spar is pulled out. Otherwise, further repair of other body elements will be difficult. If the damage is significant, several pulls are performed in different directions.
If the beam is pulled by a winch, the direction of the pulling force can be changed by placing bars under the chain.
Sequencing
Before starting work with a VAZ car, you need to remove all the parts that stand in the way of the spar. It is also necessary to disconnect wires and electrical devices in vehicles. After all these manipulations, you will see the spar itself and can now easily reach it. Next, let’s begin the extraction process itself, fix the car and cut off the heavily damaged parts of the part with a grinder - this must be done carefully using a protective mask and gloves. We attach the chains to the spar and make a smooth tension, at the same time giving it its original appearance. After you have cut off the “unnecessary” parts and made a hood, check whether the car door can be closed correctly. If the door closes as it should, then you are on the right track, otherwise you will have to manipulate the tension several more times. Further in the work, using the table of technical characteristics of the VAZ car, we restore the geometry of the points of the body spar. To make it easier to set dots in such conditions, you can use colored tape to mark those same dots. It is necessary to pull out the spar so that the adhesive tape marks coincide with the marks indicated in the technical specifications. Don't forget to check if the side members and wheel arches are parallel.
There is no need to draw, we need to repair
To approach and crawl up to the “dead” spar, you need to remove all obstacles from the car, namely, body parts located on the way to it. Remove all vehicle wiring and any electrical devices from the area being repaired. Did you find the spar? Now try to stretch it out, at the same time and if possible giving it its original shape. Naturally, you won’t achieve anything perfect yet. But... Secure the car with chains on the stand and use a grinder to cut off the parts of the spar that cannot be restored. After pulling and cutting, check how the car doors close. Then, using a gas torch, remove the old layer of sealant and primer by simply heating it.
The geometric control points of the spar must be checked according to the repair table, and the notches of these points can be made with ordinary colored tape. Then pull the spar to the marks that coincide with those indicated in the table. To smooth out any rough spots, use a sander, and be sure to check the exact parallelism between the side members and the wheel arches. Use a straightening hammer to fix any damaged parts of the wheel arches. Then apply a new coat of sealant and primer and get ready to paint. After painting, you can reassemble the previously removed body parts in the reverse order, naturally, after the paint has dried.
Design
The body is based on elements of increased rigidity, which provides the car frame with the necessary strength. The first bodies were made on the basis of a rigid frame. The technology is still applicable in the production of SUVs. However, frame bodies have a serious drawback - the car acquires a large mass.
Spars serve to lighten vehicles and are included in the frameless layout of the vehicle. They are power elements that are located on the sides of the bottom of the car.
It is these parts that take on most of the structural loads: from vibrations during movement and from the weight of the vehicle. The car's handling and cornering behavior depend on the rigidity of the power elements.
If the front spar is damaged, it should be repaired immediately, since the slightest displacement is enough for the engine to detonate.
Functions
The main functions performed by the spar are:
- reduction in total body weight;
- increased torsional rigidity, which improves car handling;
- increasing body safety. Power beams are capable of damping (resistance to vibrations), which allows them to smooth out impacts during an accident;
- strengthening the underbody of the car;
- distribution of the total weight of passengers and body weight;
- creating a shock-absorbing effect.
The presence of side members in a car also has a significant drawback: if they are damaged, the body structure changes.
Main types
The spars are installed in different positions, which depend on the type of car:
- Parallel and horizontal.
- Horizontally and at an angle.
- Curved elements arranged vertically.
- Curved power beams placed horizontally.
Horizontal parallel beams are installed on trucks, while on SUVs they are placed at an angle, due to which the steering axis of the wheels is larger. Elements curved vertically allow the car's center of gravity to be lowered. The vehicle's horizontally curved side member improves passive safety in the event of a side impact.
Malfunctions and repairs
When load beams are deformed after an accident or improper repair, the driver notices bald tires on the side of the elongated part. This situation occurs due to incorrect wheel alignment. Main spar malfunctions:
- The part burst. In this case, it is partially or completely replaced. Especially in the case of beams located at the front. To replace the part, you will first have to align it and then cut it out.
- The element is bent in the deformation zone. In this case, it is corrected on a special stand.
Such malfunctions of the power beams lead to changes in the position of the engine, disrupt the geometry of the suspension, and impair steering control. It is important to check beams even after a minor accident.
Correcting the deformation of the car side member can only be done on a carolin test bench. Most of the car will have to be disassembled. If the main structural elements remain intact, it is possible to partially replace the spar using gas welding. However, this method cannot restore the factory quality of the part, since the strength after repair will decrease.
If you have a ladder frame, it is easy to change the spar, except in cases where the part has gone too far in the supporting body. It is important that the new element has the original dimensions of the deformed beam. Features of partial replacement:
- In case of minor damage, the deformation zones have a small extent, so you can limit yourself to partial replacement of the part in places of severe creases and metal tears. Such a replacement can only be carried out in areas that do not bear the load. The damaged areas are cut out with a grinder, and new elements are welded in their place.
- Complete replacement. Often the damage is so great that the spar can no longer perform its functions. Since such damage cannot be repaired, the beam is pulled out to a state as close as possible to the original, and then cut off from the fastenings.
Taking into account the condition of the body, various restoration measures are chosen.
Disassembly
To extract the power element, several tools are prepared, since the work ahead is complex and lengthy. Necessary equipment:
- Bulgarian;
- welding equipment;
- gas-burner;
- sander;
- a hammer that will be used for straightening;
- stand;
- sealant-based tape;
- body repair table;
- spatula with primer.
Before repairs, remove all body parts that block access to the damaged spar. Wiring and electrical appliances are removed from the area being repaired.
How to pull out a spar with your own hands
Before work, you should check in which direction the spar needs to be pulled. At home, the procedure is carried out as follows:
- The machine is secured with chains to the stand. The gripping area is cleaned and a clamp is installed.
- Then a chain is attached to it and the spar stretching begins.
- They make a smooth stretch, simultaneously giving the damaged part its original shape.
- Since the spars are made of high-quality steel, for maximum stretch, they are first tensioned. Then, leaving the part under tension, add force and hold it again.
- Use a grinder to cut off the unrepairable parts of the beam.
- They try to stretch out the power element, simultaneously giving it its previous geometric shapes.
Replace or pull out a damaged spar?
First of all, you need to decide whether to repair or replace the spar.
p, blockquote 7,0,1,0,0 –>
The decision to replace the spar should be made based on the degree of damage. With a smooth, not sharp bend, the spar can be repaired to a condition comparable to the whole.
p, blockquote 8,0,0,0,0 –>
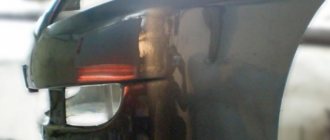
On this car, the right side member (in the left photo) was restored, and the left one (in the right photo) was replaced.
Sometimes both front side members, during a side impact, simultaneously (since they are connected to each other by the bumper reinforcement and the lower beam) are displaced a considerable distance, but are not even damaged. In this case, it is enough to secure the car and pull out both side members using lateral action (hydraulic extension or winch).
Functions
The main functions performed by the spar are:
- reduction in total body weight,
- increased torsional rigidity, which improves car handling,
- increasing body safety. Power beams are capable of damping (resistance to vibrations), which allows them to smooth out impacts during an accident,
- strengthening the underbody of the car,
- distribution of the total weight of passengers and body weight,
- creating a shock-absorbing effect.
The presence of side members in a car also has a significant drawback: if they are damaged, the body structure changes.