Required tools for replacing the Lancer 9 electric fuel pump
In order for the replacement of the fuel pump on Lancer 9 to be successful, you will need tools, the list of which is given in the table below.
Table - Tools required to replace the Lancer 9 electric fuel pump
| Tools and materials | Note |
| Screwdriver | With flat and cross blade |
| Round nose pliers | Can be replaced with pliers or narrow jaw pliers |
| Socket wrench | "at 8", "at 10" |
| Penetrating lubricant | For example, WD-40 |
| Socket wrench | "at 8" |
| Knife | Can be replaced with a flat blade screwdriver |
| Vacuum cleaner | To clean dirt |
| Brush | To prevent debris from entering the gas tank |
| Polyethylene film | To reduce the amount of gasoline vapors penetrating into the vehicle interior |
| Rubber bands | Can be replaced with small wires |
Replacing the FUEL FILTER in Mitsubishi Lancer 9, X and Outlander, Mitsubishi Filter replacement
In modern cars with a gasoline engine, a fuel filter is increasingly installed in the gas tank. On the one hand, replacing it has become a more labor-intensive process, and therefore more expensive (and the fuel filter itself is not cheap), on the other hand, it provides a higher degree of cleaning and is changed every 80-100 thousand. km.
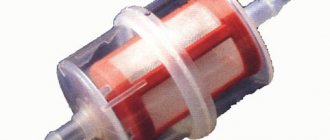
The fuel pump for Lancer 9, Lancer X, and Outlander cars is submersible type, electrically driven, with coarse and fine filters. The coarse filter is a simple mesh that is easy to wash and does not require replacement.
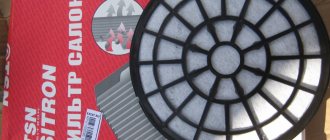
- Let's look at a fine fuel filter.
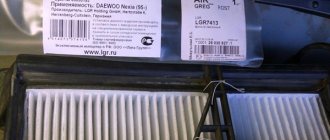
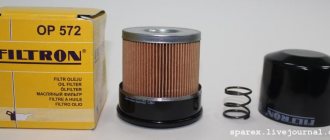
- Here is a filter in Lancer 9 (Lancer 9 - CS3A, CS3W, CS9A, CS9A) - MR552781
Outlander (not previous, not XL CU2W, CU5W) - MR514676
Such a filter in Lancer X (Lancer 10 - CY2A, CY4A):
- For CY4A - this is Lancer X 2.0 - 1770A106, 1770A116 or 1770A119.
- — For CY2A — this is Lancer X 1.5 — 1770A106
- Therefore, before purchasing a fuel filter, consult with the manager of our online auto parts store
- Pictured is 1770A106
Signs that the filter needs to be replaced
Replacing the Toyota Rav4 fuel filter
Of course, removing the Lancer 10 or 9 fuel filter every time for inspection is an extremely irrational and time-consuming undertaking. In addition, it will only be possible to check the coarse filter element, since it is visible to the naked eye, but its brother is in a closed container, as a result of which checking its condition becomes impossible. How then? The answer is extremely simple - carefully monitor the behavior of your car.
Many car owners with at least a little experience know that the breakdown of even an insignificant, at first glance, component of the car will make itself felt. A dirty fuel filter is no exception. In most cases, a clogged filter element on a Mitsubishi Lancer 9-10 provokes such phenomena in the car’s behavior as:
- increased fuel consumption;
- instability of the engine at idle and with increasing speed;
- poor engine starting “cold”;
- general loss of vehicle power and dynamics;
- during movement - tripping, spontaneous braking and jerking of the car.
It’s no secret that similar symptoms can appear with many other breakdowns of the fuel system of the Mitsubishi Lancer 9-10, however, with a problem specifically with the filter, there is one significant difference - a gradual increase in symptoms. That is, instability in the operation of the car will begin to manifest itself from the most insignificant phenomena and over time will begin to cause significant discomfort to its owner.
In addition, it is possible to determine the feasibility of replacing the filter based on the time frames that the manufacturer regulates for its models. According to information from the Japanese automaker, the fuel filter for Mitsubishi Lancer 9 and 10 is necessary:
- check - every 15-20,000 kilometers;
- replace - every 120,000 kilometers.
It is worth noting that given the poor quality of fuel in Russia and the CIS, it is advisable to reduce these terms by 15-30%. This is the only way to achieve truly truthful information.
Important! You can maximize the service life of many components of your Lancer only if you change the fuel filter on time. We strongly recommend replacing the part even if the repair time is right, but it works properly and generally does not affect the behavior of the car.
Mitsubishi fuel filter replacement
Replacing the fuel filter
Content:
Russian vehicle operating conditions are characterized by one feature - it is not always high-quality fuel.
It may contain various abrasive particles and contaminants, which, if they enter the engine, cause harm to the components and systems of the vehicle.
This is where a fuel filter comes to the rescue, removing all harmful impurities from the fuel and thereby significantly extending the life of the vehicle’s reliable operation. This article will discuss the features of replacing the fuel filter in Mitsubishi cars.
As we wrote above, the main function of the filter is to clean the fuel. It should be noted that the location of the fuel filter varies .
On diesel cars it is located under the hood, on petrol cars it is built into the fuel pump, and access to it can only be achieved by removing the gas tank, or through a special compartment under the rear seat of the car. There are also differences in the regulations for replacing the fuel filter.
In cars running on diesel fuel, the filter is changed very often (depending on the maintenance regulations for a particular model), in cars running on gasoline, the service life of the filter is equal to the service life of the fuel pump.
If you are the owner of a Mitsubishi with a gasoline engine, then if you have a question about changing the fuel filter in your car, it is better to contact the mechanic of the car service center where you are undergoing maintenance. However, we will not miss the opportunity to tell you with an example how to change the fuel filter in a gasoline car. More on this below. Now let’s talk about replacing the filter in a diesel Mitsubishi Pajero.
Difficulty of performing the work:
So, lift the hood of the car and find the fuel filter. It is located on the right, closer to the upper corner of the hood.
In order to remove the filter, you must:
- Disconnect the water metering sensor;
- Disconnect the diesel fuel supply hoses (there are 2 of them);
- Unscrew the two bolts holding the filter housing.
If fuel leaks out of the hoses or filter during the process, do not be alarmed, this is how it should be.
After unscrewing the last two bolts, it remains to remove one more sensor, which is hidden behind the filter housing. You can use a special tool - a clip cutter.
We take out the fuel filter from under the hood of our Mitsubishi.
Now you need to unscrew the water metering sensor. Keep in mind that there is an O-ring on the thread that will need to be replaced.
Now carefully unscrew the filter from the housing (you need to twist it counterclockwise). The filter seat must be cleaned of contamination with a universal cleaner, then carefully screw in the new filter and screw in the water metering sensor.
So we put the filter back together. Installing the filter under the hood is done in the reverse order.
Now a very important point. You need to pump fuel into the filter and pump air. To do this, you need to press on a special valve, like a pump (an arrow points to it in the picture below). This is how the fuel system is pumped. Important! This procedure must be carried out for at least 5-10 minutes.
After you have pumped air through the valve and filled the filter with fuel, you need to start the car and wait 10-15 minutes. Then start the car again.
If the car does not start the second time, you should bleed the valve on the fuel filter again, and then try to start the car.
Replacing the gasoline fuel filter
Difficulty of performing the work:
As we wrote above, the regulations do not require replacing the fuel filter in Mitsubishi cars with a gasoline engine. But in practice everything happens differently. In Russia and the CIS, very often the gasoline poured into the car is not of the best quality, and this affects the service life of the fuel filter. It is recommended to change the fuel filter approximately every 100 thousand km. mileage
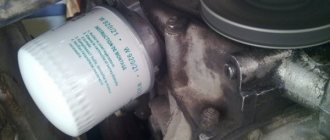
The gasoline filter is located in the gas tank and is built into the fuel pump itself.
- Before starting work, there should be no more than 25% fuel in the car’s gas tank. Also, 2-3 hours should pass after turning off the engine.
- The filter is accessible through a special compartment located under the rear seat of the car. Remove the rear seat (usually this compartment is located on the left).
- When you gain access to the compartment, clean it of dirt and dust. Otherwise, dust and dirt may get into the gas tank itself, which is unacceptable.
- In the compartment you will see a power connector, as well as drain and supply hoses. They all need to be disconnected. Cover the hoses with a clean rag to prevent dirt from getting into them.
- Now you need to unscrew the six nuts. Be careful, because... nuts and studs are fragile, the threads can be damaged and this will be very bad. To make the nuts unscrew easily, you can use WD-40 or phosphoric acid. Water it with liquid or spread it with phosphoric acid and leave it for a while. Then you will unscrew it.
- After the nuts are unscrewed, remove the filter assembly. We disassemble the filter and either blow out the coarse filter or replace it with a new one. Then we put everything back together in reverse order.
Important: We have described only the general principle of replacing a gasoline fuel filter. If you are not good at auto mechanics, then you should contact a car service center and do not try to change the gasoline fuel filter yourself.
Source: https://jrepair.ru/to-mitsubishi/zamena-toplivnogo-filtra-mitsubishi
Replacement
Mitsubishi Lancer 2.0 Logbook Replacing handbrake pads
Replacing the Lancer 9 and 10 fuel filter is not such a complicated procedure, so if you wish, you can save on having it done at a specialized service station. To carry out manual repairs of this machine component, you will only need basic car repair skills, some training and knowledge of the essence of this process. Our resource, of course, will not help you with the first ones, but we will be happy to provide you with information regarding the last two points.
So, first of all, purchase a new fuel filter. It is advisable to replace the entire assembly, however, if one of the fine or coarse filter elements is in normal condition, it is quite possible to get by by replacing only the damaged part
When buying a new filter, it is important to ensure that it is completely identical to your vehicle.
Secondly, prepare before the replacement itself. This stage includes the following procedures:
- Gather the necessary set of tools: a standard set of wrenches, a screwdriver, rags and pliers.
- Next, place your Mitsubishi Lancer 9-10 on a flat surface that has good space.
- And finally, be sure to take care of safety precautions: eliminate the presence of open flame sources nearby, place a fire extinguisher near the repair site and find protective equipment for yourself (rubber gloves are enough).
Direct replacement of the Lancer 10 and 9 fuel filter is carried out as follows and is absolutely similar on both models from Mitsubishi:
- First, relieve the pressure in the vehicle's fuel system. To do this, you need to turn off the battery, remove the fuel pump fuse from the mounting block, connect the battery and start the car. After it stalls, crank the starter a couple of times and disconnect the battery. This procedure is done in order to avoid gasoline leaks from disconnected fuel lines.
- Remove the rear sofa and dismantle the existing sound insulation.
- Unscrew the four fastenings of the soundproofing cover that prevents access to the gas tank, and remove this hatch.
- Clean the fuel tank and the filter module itself from dirt.
- After cleaning, remove all hoses and wires leading to the fuel module.
- Then unscrew the filter fasteners and dismantle the assembly.
- Now you can disassemble the module and replace the necessary filter elements. After replacing, restore the car and start it, letting it run for a couple of minutes.
Important! If, after replacing the fuel filter, any gasoline leaks or problems with the operation of the machine appear, be sure to eliminate them. Using a car with such violations is very dangerous. In general, replacing the fuel filter of Mitsubishi Lancer 10 and 9 is not so difficult if you know the basic nuances of this procedure
We hope the material presented above was useful to you. Good luck with the repair and on the road!
In general, replacing the fuel filter of Mitsubishi Lancer 10 and 9 is not so difficult if you know the basic nuances of this procedure. We hope the material presented above was useful to you. Good luck with the repair and on the road!
Video about replacing the fuel filter Mitsubishi Lancer 9-10:
https://youtube.com/watch?v=xA5hboqtVt4
- Coarse and fine fuel filters
- Fuel filter Hyundai-Solaris
- Fuel filter Nissan Almera Classic
- Fuse box Kia Sportage, Ceed, Rio
Mitsubishi Lancer 10. Fuel pump malfunction (does not pump gasoline)
One of the most important elements of the fuel injection system of a gasoline engine is the electric fuel pump, which is located in the fuel tank of the car. The fuel pump pumps fuel into the system from the gas tank, creating a certain pressure.
Auto repair experts identify the following common fuel system problems that are related to the fuel pump:
The fuel pump pumps poorly and does not create the required pressure; the fuel pump does not pump when the ignition is turned on; Considering that the fuel pump is an electromechanical device, the most common fuel pump malfunctions are related to both the mechanical and electrical parts. Next, we will look at what signs indicate a breakdown of the fuel pump and why the fuel pump stops pumping partially or completely.
Signs of fuel pump malfunctions
The main symptoms of fuel pump failure, as well as malfunctions in its operation, are:
the car starts with difficulty, the engine runs unstable, there are dips, jerking when pressing the gas pedal, etc.; the pump does not pump after turning on the ignition, does not turn the starter and does not pump the fuel pump, the engine does not start; There have also been cases when the fuel pump stops pumping while driving. In such a situation, the engine begins to malfunction and stalls immediately after the remaining gasoline in the fuel line is used up. The problem can occur either regularly or periodically.
The fuel pump does not pump: causes and diagnostics
Let's start with the fact that if the gas tank is full, the battery is charged, the spark plugs are dry and there is a spark, the starter turns the engine normally, but the engine does not seize, then you should pay attention to the gas pump. A common problem is that there is no power to the fuel pump after the ignition is turned on. In a similar way, the malfunction manifests itself in motion, when the power to the fuel pump is lost and the engine suddenly stalls.
An equally important point is how much the fuel pump pumps. In other words, the pump may hum and buzz (power is being supplied), but not create the required pressure in the fuel line. The pressure in the fuel system with a working fuel pump must be more than 3 bar (which depends on the specific car model). The indicated pressure is accumulated in the fuel rail and has an indicator of 300 kPa and above.
To check, you need to measure the pressure in the fuel rail with a pressure gauge, taking into account the indicators that are the norm for a specific car model. Using the example of injection engines, the pressure when the ignition is turned on is 3 atmospheres, at idle the indicator is 2.5 atmospheres, when pressing the gas 2.5-3 atmospheres. This method will help you accurately determine:
malfunction of the fuel pressure regulator in the rail; breakdown of the fuel pump or a noticeable decrease in its performance due to wear; severe contamination of filters (fuel filter and/or fuel pump mesh); In the second case, when you press the gas, the pressure does not increase; in the latter case, the pressure gauge needle rises, but very slowly or jerkily.
A decrease in pressure below the norm will lead to the fact that the engine may not start or start with difficulty, stall, jerk, operate unstably and with failures. If this happens due to the fault of the pump and not the fuel filter, then there is a high probability that the coarse filter screen of the fuel pump is clogged. In this case, there is no need to change the fuel pump itself, since it will be enough to replace or even clean the mesh.
If you suspect that there is no voltage to the fuel pump, there is a quick way to check. It is enough to turn the ignition key and listen, as when you turn the key you should hear a slight hum from the fuel pump. If such a buzzing noise is not heard, it means there is no power to the fuel pump, there are problems with the wiring, etc.
We add that this method of determining the operation of the pump by sound is not suitable for all cars. On some models (especially premium ones), sound insulation is at a high level and the fuel pump turns on immediately after opening the driver's door, and not when turning the key in the lock. In this case, it may seem that the fuel pump does not work when the ignition is turned on, and the sound of the pump may simply not be heard. Also in the general list of possible reasons why the fuel pump does not pump, the following are noted:
- failure of the fuel pump fuse; - breakdown of the fuel pump relay; - problems with the ground of the fuel pump; - malfunction of the electric motor of the fuel pump; - oxidation or damage to the contacts and terminals of the fuel pump; - the fuel pump itself is faulty;
Wiring to the fuel pump
On most cars, the wiring to the fuel pump consists of three wires: “plus”, “minus”, and also a wire for indicating the amount of fuel in the gas tank. If the fuel pump does not pump, then the cause may be a lack of power.
To check the power to the fuel pump, just take a 12-volt light bulb and supply it with power from the external connector of the fuel pump. After turning the ignition, the control lamp should light up. If this does not happen, then the problem is in the external circuits. If the lamp comes on, it will indicate the need to check the internal contacts of the fuel pump.
To check the external wiring, you should alternately connect the positive and negative contacts, which are removed from the fuel pump power connector, to the ground of the pump. The contacts must also be connected to the fuel pump relay. If you place the negative contact on ground, after which the ignition is turned on and the light comes on, then this means that this contact is faulty. If the light bulb does not light up, then problems with the “plus” are obvious. If you place a contact on the relay and the light comes on, there is probably damage to the wire on the section that connects the relay and the fuel pump itself.
Fuel pump electric motor
If checking the pressure in the fuel rail and the external wiring to the fuel pump gives positive results, then you should check the fuel pump motor. This electric motor is responsible for circulating gasoline inside the fuel pump.
When checking, you need to take into account that the terminals on the fuel pump themselves tend to oxidize, as a result of which power is not supplied and the pump does not pump. In this case, the motor is working, but the terminals need to be cleaned or re-soldered.
To check the fuel pump motor, you will need to attach the test lamp wires to a cleaned and serviceable terminal of the electric motor, after which you should turn on the ignition. If the light comes on, this will indicate that the fuel pump motor is not working.
Fuel pump ground contact
Problems with the fuel pump mass may be indicated by a fuel level sensor that is not working correctly. The mass may be poorly secured; in this case, the fuel pump does not pump fuel. The ground wire is usually located under the dashboard and runs through the cabin. It is necessary to find the specified wire, check and clean all contacts, then securely fasten the ground to the fuel pump.
Fuel pump relay
The fuel pump relay is often mounted next to the fuel pump ground, that is, under the dashboard. A normally operating relay after turning on the ignition for a couple of seconds allows the pump to create pressure in the system and immediately turns off.
When the ignition key is turned, the driver hears a characteristic click (the relay is turned on), then a similar click will indicate that the fuel pump relay is turned off. If such clicks are not heard, this indicates a malfunction of the relay or its contacts. The optimal solution would be to replace the fuel pump relay with a new or known-good device. Let us add that the cost of spare parts is quite affordable.
Fuel pump fuse
During diagnostics, be sure to check the fuel pump fuse. The specified 15 A fuse is usually located in the fuse box in the engine compartment and is marked FUEL PUMP, which means fuel pump.
The fuel pump fuse needs to be pulled out and its contact inspected. The integrity of the contact will indicate that the device is normal. A damaged contact will indicate that the fuel pump fuse has blown. In this case, you need to install a new fuse, which has a very low cost (as in the situation with the fuel pump relay).
Other causes of fuel pump malfunctions
Quite often, unprofessional installation of additional electrical equipment or security anti-theft systems leads to the fact that the power to the fuel pump is lost due to mixed up contacts or other connection errors.
Also, one should not exclude the possibility that a malfunction occurred in the car alarm or security system, after which the power supply to the fuel pump is blocked. In other words, the alarm blocks the engine from starting. Finally, let’s add that the gas pump in the gas tank is immersed in gasoline, in which it is actively cooled. The habit of driving with an empty tank can quickly damage the electric motor of the fuel pump, as it burns out.
content .. 27 28 29 30 ..
Required materials for replacement
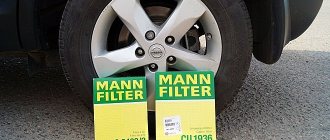
The number of the original Mitsubishi filter is MR552781, its cost is about 3,500 rubles. If you can’t afford this, you can take a closer look at analogues, there are quite a lot of them and their quality varies, from good to acceptable. In fact, the following options may be suitable: Japan Parts FC-523S, JS Asakashi FS6501U, Concord FL20016, Nipparts J1335052, Direct Parts 44095C, Sakura FS-1037, Ashika 30-05-523. Their cost varies from 800 to 1300 rubles.
If you are also concerned about the coarse filter, then this is MR204495, it costs about 700 rubles, there are also analogues. A more brutal option is to simply soak it in acetone for about an hour. A fairly simple and effective solution for those who want to save money.
Replacing the fuel filter in a Mitsubishi Lancer X 9 and 10
Content
The fuel filter is located in the upper part of the Mitsubishi Lancer 10 gas tank. It is combined with a submersible fuel pump. This ensures that there is no suction line, and also allows for additional fuel cooling of the pump.
According to the manufacturer's recommendation, replacing the filter on a Mitsubishi Lancer X is necessary every 60-120 thousand kilometers, depending on the quality of the fuel. Many car owners reduce this interval to 25 thousand kilometers.
Fuel filter device
The fuel filter in any car is a very important element, since its correct operation largely determines how well and how long the other components of the vehicle will work. The most important functions of the fuel filter are:
- protection of fuel lines, injectors and other elements of the vehicle’s fuel system from the adverse effects of impurities present in the fuel;
- protection of the internal cavity of the engine from the ingress of dirty fuel, which during the combustion process can negatively affect the engine and significantly reduce its service life.
Recommendation on how to change the fuel filter Lancer 9
At this stage, you should pay attention to 2 nuances:
The plastic plug is sealed with a small rubber ring. It is recommended to check its condition so that it is not damaged (relevant for those analogue filters that do not have a new plastic plug “from the factory” and need to be replaced from the “old” filter).
There is a rubber stop under the plastic cover of the electric fuel pump. It is also recommended to check its condition and replace it if necessary.
10.Pry up the plastic clip and disconnect the wiring harness block from the electric fuel pump. Nothing else interferes - we remove the electric fuel pump from the fuel pump module.
11.The next step is to remove the fuel coarse filter (mesh). To do this, you need to pry off the fixing washer with a thin screwdriver or a knife (I was able to do this almost immediately with a knife).
The washer will be difficult to remove, you need to be prepared for this and remove it slowly so as not to break it. If it becomes deformed after removal, it can be easily straightened.
12.Now it is possible to compare the meshes. We see that the “native” mesh from Mitsubishi is a little wider and shorter compared to the mesh from Toyota. But this is not of fundamental importance.
13.Next, remove the ground wire from the housing, press the latch, disconnect the block and remove the fuel pump module wires from its housing.
Workshop replacement of fuel pump and fuel filter for Mitsubishi Lancer 10
Manufacturers of Japanese car brands recommend replacing the fuel filter every 30,000 km.
However, for the CIS countries this interval is not relevant. The quality of the fuel is low and contains a high content of third-party chemical impurities, which negatively affect the performance of the vehicle as a whole. In order to prevent premature wear of parts and mechanisms, it is advisable to replace cleaning elements after 15,000 km - in fact, every subsequent maintenance. You can replace the filter element yourself, but it is advisable to have minimal experience in maintenance, otherwise you risk damage or incorrect installation. Such cases are not uncommon, and service station technicians have seen many unusual situations.
The following signs will indicate that the filter needs to be replaced: decreased vehicle acceleration, increased fuel consumption, unstable operation of the power unit at idle, as well as a number of other factors.
Fuses and relays Mitsubishi Lancer 9, 2001 - 2007
Most electrical circuits are protected by fuses. Powerful consumers (lighting system, cooling system fan motor, fuel pump, etc.) are connected via a relay. The information is relevant for Mitsubishi Lancer 9 (CS) 2001, 2002, 2003, 2004, 2005, 2006, 2007 models.
Lancer 10 fuel pump replacement and our other services
The automobile workshop provides repair services for passenger-class technical equipment, including those made by the Japanese manufacturer Mitsubishi.
Frequent requests from owners are related to the prevention of fuel equipment, namely:
- general diagnostics of the fuel system using readings from the on-board computer;
- replacement of fine and coarse filters;
- fuel pump prevention;
- cleaning injectors on a high pressure stand.
In addition to the listed work, the craftsmen will perform a major overhaul of the engine, chassis, transmission, steering, and brake system.
We provide services for reflashing the electronic engine control unit, entering correction data, and fine-tuning at the request of the owner.
Special painting boxes facilitate the acceptance and execution of orders for the restoration of body geometry after an accident, traffic accident, or collision. We also treat the underbody of the car with a special anti-corrosion mastic, apply a primer, and coat the surface with varnish.