The content of the article:
- What are the benefits of a fiberglass bumper?
- Necessary tools for work
- Initial work
- Main stages of work
- How to repair a fiberglass bumper yourself
- Conclusion
Making a fiberglass bumper with your own hands is one of the ways to give your car individuality and make it stand out from the crowd. However, the procedure is not the simplest, so you need to approach it well prepared. There is a certain guide that will help you do all the work yourself.
Features of fiberglass bumper
Fiberglass fabric is often used to tune vehicles, equipping them with original spoilers or non-standard fenders on wheel arches and other parts of the body. Some hobbyists are even engaged in the manufacture of automobile bodies based on a self-made matrix, gradually applying layers of fiberglass on it. The material can also be used to seal rusted body parts, as well as to restore part of a car bumper.
What are the advantages of a fiberglass power bumper?
Car owners highly appreciate the advantages of a fiberglass-based bumper.
After all, it has a number of advantages:
- ease. Fiberglass construction is much lighter than steel and even aluminum. In sports cars, where every gram is important in the fight for speed, fiberglass parts help reduce the weight of the car;
- non-standard. If desired, you can make a power part of any shape. After such tuning, the car will stand out noticeably among other cars. After the paint has dried, the bumper is difficult to distinguish from the factory one;
- long service life. The bumper retains its original appearance and shape for a long time, as it is not subject to corrosion. If used carefully, the product will last quite a long time;
- increased strength. The box-shaped structure, reinforced with stiffening ribs, is capable of withstanding significant loads and impacts.
Thanks to these advantages, fiberglass bumpers have gained wide popularity among car enthusiasts.
Pasting process
To make the product durable, it should be treated with fiberglass. These are glass mats impregnated with polyester resins. To prevent the foam itself from being destroyed by the action of the resin, it should be protected. Here you can simply paste it over with plasticine. Only technical.
If you have a styrofoam-based layout, cover it with several layers of masking tape and then cover it with aluminum foil. This will allow you to easily separate the layout and the workpiece. I will give a few more important recommendations:
- Pasting is carried out with glass mats, resin, and hardener. Additionally, prepare scissors for cutting and brushes for applying the material;
- Create indoor conditions with a temperature within 15-30 degrees Celsius;
- Provide good ventilation;
- The first layer is applied from glass mat No300. The surface is treated with resin with a brush, then glass mat is applied;
- When processing bends and joint areas, use resin with a thicker consistency;
- Do not prepare resin in quantities greater than 300 grams;
- Avoid air bubbles;
- The next layer is applied when the previous one has hardened. This takes 1-4 hours;
- A total of 3-5 layers are applied;
- Place a stiffer mat like No600 in the middle. Although this will lead to weight gain.
If you doubt your abilities, or simply cannot afford to spend so much time on modifying your car, contact a specialist. In cities such as Moscow, St. Petersburg, Volgograd, Krasnodar and many others, there are good tuning studios and manufacturing specialists.
We make our own bumper from fiberglass
Before starting work, you need to figure out how to make a fiberglass bumper with your own hands. Every car enthusiast who is ready for painstaking work can master the manufacturing technology. After all, this creative process will take at least a week. Everything will depend on the temperature conditions and the configuration of the power part.
Every car enthusiast can master the technology of bumper manufacturing
Having decided to form a bumper with your own hands, you will have to perform a number of operations:
- develop a sketch of a tuned part;
- assemble a layout or make a matrix based on the drawing;
- make a fiberglass part according to the shape of the matrix;
- apply a paint coating to the surface.
Before starting work, it is necessary to decide on the material for reinforcement - fiberglass. It is offered in various types, which differ in composition and properties.
The surface of the future bumper can be formed using the following materials:
- glass veil. It has low weight and increased flexibility. The material is suitable for forming a relief surface of a part and creating an outer layer;
- glass mat. It gives the future bumper an increased margin of safety after the resin has hardened. Using glass mat, the main part of the power part is formed;
- powder glass mat. In terms of strength characteristics, it is significantly superior to glass veil and glass mat. The material is alternated with glass mat when forming the bumper.
How to properly remove fiberglass when changing design?
Photo by: @tnlprofessional/@fiberglass_russia
Like any artificial material, fiberglass extensions need to be adjusted as they grow out and a new image is created. The choice of de-manicure method depends on what the fiberglass is coated with. If this is a gel for extensions, we remove it and the fibers by cutting it off with a milling cutter. For nails coated with gel polish, choose a special remover for shellac, i.e. We resort to soaking. If it is impractical to subject the applied gel polish to the soaking method, we choose the hardware option for removing the material.
Tools and materials for making a car bumper
If you are planning to make a bumper with your own hands from fiberglass, you should purchase and prepare everything you need according to the list.
It is necessary to prepare in advance all the materials for making the bumper
To complete the work you will need:
- fiberglass fabric;
- resin for lubricating layers of fabric;
- electric drill with a set of drills;
- grinder with cutting wheel;
- Sander;
- brushes of different widths for impregnation of the material;
- sandpaper of various sizes;
- masking tape;
- metal and rubber spatulas;
- ruler, scissors and glue;
- rubber roller for smoothing layers of fiberglass;
- hardener for adding to resin.
You should also stock up on technical plasticine, polystyrene foam, and polyurethane foam. To remove the finished product from the matrix, you will need a parquet polish or a special composition. It is necessary to worry about personal protective equipment. Use a respirator or protective mask. Wear glasses and protect your hands with gloves.
Materials for layout
Polystyrene foam and polyurethane foam, individually and together, are a simple, inexpensive material for making a model.
Thick sheets of foam plastic are glued together with “liquid nails” into a rectangular block slightly larger than the intended bumper. A sharp knife, a marker, skillful hands and several hours or days of work will lead to a life-size model of your future tuning.
Polyurethane foam is convenient to use when modifying an existing bumper. Before applying it, it is necessary to protect metal surfaces with masking tape or penofol. 3-4 cylinders are needed for initial use, 2 more will be needed during operation. After application, when cured, press the foam with gloved hands for greater density. To prevent the foam from dripping, use cardboard and tape. Work with the model can begin after gaining strength in two days. We remove all excess with a knife, add foam if necessary, the work, as in the previous version, will last you for several days.
These two materials can be combined: limiting surfaces, vertical narrow ribs, small parts cut out of foam, and the volume filled with polyurethane foam.
After covering the model with fiberglass, you will get a finished bumper, but if it needs to be replicated, then you need to make a matrix - a mold for making any number of parts. For a matrix, it is optimal to make a model from technical plasticine: it is malleable, easily takes the most complex shape, it is more convenient and faster to work with it, volumes in the right places can be easily removed and simply added.
How to make a fiberglass bumper - process features
Making fiberglass bumpers with your own hands is carried out using various methods:
- using a matrix filled with fiberglass on the inside;
- using a mock-up, on the outer surface of which fiberglass is glued.
Fiberglass bumpers are made using various methods.
Matrix technology is used to reproduce the shape of bumpers that have fallen into disrepair, and the breadboard method is used to produce new products. Using a car bumper, you can create a good basis for a future matrix.
To make a matrix you need:
- remove the bumper;
- remove damaged parts;
- cover the surface with tape;
- cover with a layer of warm plasticine;
- lay cold plasticine on the surface;
- compact and smooth the base.
After the materials have hardened, the matrix should be separated from the original bumper. Polyurethane foam or polystyrene foam is also suitable for making blanks. The working surface should be covered with putty and treated with sandpaper.
Making a bumper using a matrix is easy:
- coat the surface with paraffin;
- level the matrix with gelcoat;
- apply resin;
- lay down the glass veil.
Then build successively layers to the required thickness, applying the resin with a roller or brush. After hardening, all that remains is to remove the finished part. The process is similar to making a bumper using a matrix.
Step-by-step technology for modeling nails with fiberglass
The use of fiberglass to model artificial nails is one of the main trends in the nail industry this year. In order for the result to really take a minimum of time, and for the material to be well pressed, hold the arch perfectly and be invisible under a layer of gel polish or classic nail polish, you must strictly follow all the recommendations and rules for working with fiberglass.
Photo by: @planetbeauty.prom/@fiberglass_russia
Preparatory stage - preparing the material and nails for the procedure:
- We perform a hardware manicure, remove the gloss from the surface of the nails with a buff polisher, degrease and dehydrate the nail. If you are a beginner, apply the cut as carefully as possible so as not to injure the skin around the nail and the nail itself. Before laying out the gel, we determine the length of the free edge of the nail. Unlike working with forms, when extending onto fiberglass, it is better to leave a short length of the free edge without cutting it down to zero. Then it will be faster and easier to connect the native nail and the artificial material with gel on the inside of the nail. However, this option is not suitable for fingers with a pronounced pad;
- Apply the primer, let it air dry and cover the nails with a thick gel base or a thin layer of thick gel. The material must have a sticky layer on which the fiberglass will be leveled. Apply using rubbing movements, moving 1-2 mm away from the cuticle. This is necessary in order to subsequently make a smooth transition from the cuticle to the apex. Let the material spread, self-level and begin preparing the fiberglass;
- Using technical scissors or wire cutters, cut pieces of fiberglass to the required length. It should start from a point just above the apex of the nail and end at least half a centimeter from the free edge. In this case, when the nail grows, it will not break, injuring the soft tissues. And when adjusting the length, the cut pieces will be visible and will be easy to collect on a napkin without splintering the handles. Next, arm yourself with an orange stick: roll out each piece and straighten it on a hard and flat surface so that the fibers line up as much as possible in one row, without forming bald spots.
The main stage is the application of fiberglass, the formation of the shape and length of artificial nails:
Photo by: @fiberglass_russia
- Using tweezers, place a fiberglass blank on an undried layer of a thick base or thick gel just above the apex. Using an orange stick, we straighten the fiber so that it fits tightly to the nail, without voids between the individual fibers. We pay special attention to the area of the side rollers and the free edge, otherwise you will have to spend a lot of time eliminating these voids when applying the second layer of gel. In this case, there is a risk that the free edge will be too thick and will also require additional correction;
- Upon completion of the laying, when you have visually verified that the surface is absolutely flat, check that you have not forgotten to leave a margin for the growth of the natural nail. The reserve is a small indentation from the cuticle on the sides of the nail so that it does not break during the process of regrowth and detachments do not form. We send the nail to dry in the lamp;
- Let's start working on the free edge: carefully coat the entire length with a thin layer of modeling or camouflage gel, paying special attention to the sides (side rollers) and the place of the step. You should try not to put too much pressure on the hanging fibers, since they are essentially not firmly fixed to the nail. Before drying in a lamp, we check whether all the fiberglass fibers have united into a single dense layer. If there are delaminations, iron them until the gel and fibers become one;
- Using tweezers, cut off the excess length. For oval shapes, remove the corners; for others, immediately dry the material for about 10 seconds in a lamp. An important point when adjusting the length is not to cut the fiberglass above the palm, as it is difficult to remove it carefully later. If you do remove the length not above the napkin, do not squeeze your palm, do not blow on it or rub it. Go to the sink without turning your palm over, turn on the water with your other hand and rinse the area where the cut fibers have fallen. Try not to get water on your nails. After wiping your palm, check under the lamp to see if there are any remaining glass residues, and proceed to the next extension step;
- The stage of forming the volume and arch with a construction gel. We try not to thicken the free edge of the nail when laying out the gel. We hide the relief formed by the threads by coating the inside of the nail, and also smooth out the transition where the fiber is applied to the nail. Don't forget to work on the side areas of the nail and the end. Use your fingers or clamps (clothespins) to press the free edge of the nail, forming a beautiful arch. We send the result to dry in the lamp.
The final stage - we achieve the ideal shape, adjust the length, create a design:
Photo by: @french.com.ua/@leticiaaragonails
- Using a glass file (or a cylinder cutter), we process the surface and edge of the nail over the hood, always moving in the same direction, getting rid of excess thickness. Cardboard or metal files are less preferable, since due to the unevenness of the granular surface, microdamages may form on the surface layer of the modeled nail;
- Having obtained the desired length and shape, remove the sawdust with a lint-free cloth moistened with a degreaser or a means to remove the sticky layer. If you do not plan to cover your nails with gel polish or classic polish, apply a gel topcoat to both the outer and inner surfaces of the nail. Don't forget to seal the end. Using a thin brush, carefully distribute the top coat into hard-to-reach places. We send the finished nails to dry in a lamp. If a complex image is planned, immediately after removing the sawdust, the selected shade of decorative material (gel polish or varnish) is applied, dried in accordance with the application technology and covered with a fixative finish;
- If you want to create a French design on fiberglass, when building up using a tinted camouflage or building gel, cover the fiberglass fibers in the smile area with a white shade of the gel, and cover the nail bed with a selected shade of pink, beige or soft peach gel.
By carefully following all the steps of performing fiberglass extensions, you will end up with smooth and aesthetically pleasing nails that are as beautiful as natural ones.
The procedure for painting a power bumper
The final stage of work should be performed after fixing the bumper to the car. Procedure:
- polish the surface with zero sandpaper;
- apply a layer of primer;
- cover the base with paint.
When the paint is completely dry, you should coat the painted bumper with car varnish.
The fiberglass bumper is an important element of the car. If time does not allow you to do long and painstaking work, you should use the services of professionals who will qualitatively form the bumper according to your requirements and complete the order on time.
Many car owners strive to give their car individuality. This can be done in different ways. Some people put original drawings on the body, while others put a hand-made fiberglass bumper on the car. Many car enthusiasts will be interested in learning how to make this part in their garage and what is needed to paint it correctly.
Matrix: the first step towards a new bumper
The entire technological process of bumper manufacturing begins with the creation of a matrix. It is needed in order to construct another bumper based on it, so everything must be done with very high quality.
Otherwise, there is a high probability that the seats will be unfinished. After all, the fiberglass of the future design will differ significantly from the factory bumper, both in size and configuration. Ultimately, the new bumper will not be able to fit into its proper place, and the car owner’s hopes will not be justified. There are two ways to make a matrix:
- Cast from an old bumper.
- Matrix made of polyurethane foam.
Method for forming a matrix using a cast from an old bumper
This option is suitable specifically for those car owners who decided to make a bumper with their own hands without the help of professionals.
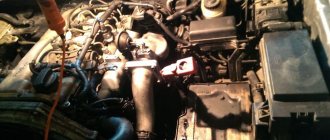
- First, you need to remove the factory bumper from the car, as it will act as a good basis for subsequent modernization. Then, using a grinder, you need to cut off all the damaged openings for the fog lights, as well as the lower edge of the bumper, if it has also become unusable.
It is advisable to make the matrix detachable (from several parts) to avoid deformation when removing the finished form from the base. In a similar way, a matrix is made from gelcoat and a reinforcing composition.
Method for forming a matrix from polyurethane foam
Often, when making a matrix, car owners resort to using polyurethane foam. First, it must be applied to the damaged car bumper, and then processed, cutting off the excess. Such manipulations are quite difficult to carry out: experts do not recommend using foam for “newly-minted” craftsmen, so it needs to be cut off very quickly. And at such an operational pace, you can remove the excess, but, unlike technical plasticine, you won’t be able to build it back up. The advantage of such a matrix is that it can be given absolutely any shape.
Fiberglass bumper manufacturing process
To make the product yourself, you will need not only components, but also competent guidance on how to make this tuning element.
What is needed to glue the product
An experienced car enthusiast can find most of the tools in his garage. Then you should check the list below and purchase the missing materials and equipment. You need:
- epoxy resin - 400 ml (if epoxy is not available, you can use polyester resin);
- fiberglass packaging (the best option is “Steklomat 300” and “Steklomat 600”);
- gelcoat hardener (taken at the rate of 1 cube per 200 ml of resin);
- Bulgarian;
- protective gloves, respirator, glasses;
- industrial plasticine - 5 kg;
- masking tape - 5 rolls;
- putty knife;
- rubber roller;
- sandpaper;
- Teflon polish.
Photo gallery: materials for work
The main thing that should not be forgotten is safety precautions. Under no circumstances should you work with fiberglass without a respirator and gloves!
Sequence of operations to create a part from scratch
The algorithm below will help you figure out how to properly glue the bumper:
- The standard bumper is removed from the car. Areas that have become unusable are carefully cut off using a grinder (this category usually includes the lower edge and openings of fog lights).
The standard Chevrolet bumper, which is planned to be replaced with a plastic one, is carefully removed from the car
On the left is adhesive tape, on the right is industrial plasticine applied to it
First, tape with markings is applied to one side of the bumper
Scotch tape applied to the lower half of the bumper
On the left - polish is applied to the bumper, on the right - epoxy resin
It is necessary to wait until the fiberglass fabric has completely dried and hardened.
All that remains is to sand the new fiberglass bumper with sandpaper
Video: making a homemade fiberglass bumper
Creating a Matrix
Having purchased all the necessary materials and created a plan for your project, you can begin to implement it. First you need to decide on the dimensions of the future product and make a matrix. The basis of the entire future design is the created copy of the bumper base. It is according to the dimensions and shapes of the matrix that a new bumper for the car will be created. There are two ways to make a matrix copy: using a cast from a factory bumper or by making a matrix from construction foam. A cast from an existing bumper is an ideal option for beginners who are just mastering this technology. The matrix is performed using the following technology:
- We remove and prepare the original bumper: cut off excess elements if they have become unusable. For example, holes for headlights or the bottom edge. This can be done using a grinder.
- The main material for creating a copy is technical plasticine. Apply plasticine to the bumper, which can be slightly heated for ease of use.
- Apply plasticine to the entire surface of the structure. Especially in those places where you have planned changes in the shape of the bumper.
- The next step is to give the shape and size of the future structure. Draw marking lines on the left side of the bumper, along which you can draw the right side of the structure. This technology of creating a copy of one side and transferring it to the other will achieve symmetry.
- After giving the basic shape, you need to check the sizes and shapes, check if the holes for the headlights match. The final stage will be sharpening sharp corners, giving the final shape to the product.
After completing these steps, the form must be removed from the bumper. It is advisable to make a matrix that will consist of several parts. This will allow it to be easily removed from the bumper without damage.
Foam or plasticine
A more professional way to make a matrix is to create a copy from construction foam. The main task is to apply the composition to the bumper and remove excess mixture. An important condition is that the matrix must be produced quickly in this way. Beginners will find it difficult to make a foam copy because the fast pace of work can cut off excess material that can no longer be added. In this case, a plasticine copy is an excellent option for making a matrix.
Subsequent work
After making the matrix, we level it and prepare the base of the bumper for subsequent finishing. The next step is to apply resin to the piece and apply fiberglass sheets. It is necessary to mix the resin with the hardener that will be used to glue the fiberglass sheets. Choose material with a density of 150 grams per half meter. It will be enough to glue 3 layers of fiberglass. Once the resin has hardened, the new bumper can be removed from the mold and further reinforced with fiberglass. This is necessary to give greater rigidity to the structure.
After creating the basis of the structure and working out its shape, you can begin the final finishing work. Putty your future bumper and give its final shape. After this, you can begin grinding, as well as the final leveling of the entire surface.
Be sure to place the bumper against the body of your car during all stages of work and make sure that the dimensions of your product match. After all the main work, you can begin finishing. Apply primer to the surface of the bumper, and then proceed to paint the structure in the paint tone of your choice.
The procedure for painting a power fiberglass bumper
Now we move on to the process of painting the manufactured bumper.
Consumables and tools
To paint a new bumper, you need to purchase the following “consumables”:
- polyester putty, universal;
- putty-filler, liquid;
- steel spatula, medium size;
- sandpaper (the best option is P80);
- priming liquid;
- automotive paint, quick-drying;
- car varnish;
- marker;
- spray;
- oil gun.