The steering rack is an integral and very important thing in a car, but over time it can wear out and produce an unpleasant knock, especially audible when turning and driving on uneven roads. And if this knock is not removed, the rack may simply jam, causing the steering wheel to lock in one position, which may lead to an emergency. Therefore, it is very important to immediately pay attention to such symptoms and eliminate the problem as quickly as possible. More on this later in the article.
How to tighten the steering rack on a VAZ-2114 yourself
No one will deny that a working steering wheel is one of the factors influencing the guarantee of the safety of the driver and passengers.
Regardless of the type of steering gear, they all need to be serviced periodically. All second-generation cars, including the VAZ-2114, have a reliable and easy-to-repair and adjust steering mechanism. It is not equipped with a hydraulic power steering, which allows you to tighten and service the steering rack without any problems. Before tightening the steering rack on a VAZ-2114, you need to consider the prerequisites indicating the need for its tightening or repair. AvtoVAZ provides a ten-year warranty. This is a fairly long service life of the steering mechanism. But do not forget that the guarantee is given for ideal conditions of use of the mechanism. The basis for calculating the service life is normal roads and constant high-quality lubrication located in the rack housing and a moderate driving style.
In real life, a ten-year service life is practically unattainable. Bad roads, questionable quality of spare parts and hard driving of the car end up with the mechanism making itself felt ahead of time.
How much can a knock in the steering rack cost?
If the steering rack has not been saved and needs to be replaced, it would be good to have an idea how much such a pleasure will cost. Naturally, the prices for spare parts for foreign cars are an order of magnitude higher than for domestic cars. But it is worth noting that the price range for steering gear parts among foreign cars is quite significant.
So, if the average price of a steering rack for a VAZ is about $130, then for foreign cars the price can range from 200 to 500 bucks. This is if you buy a steering rack without power steering, rods and ends. The price of a steering rack assembly is significantly higher - for a VAZ starting from $230, and the purchase of a steering rack assembly for a foreign car can range from $1000-1500 and more.
Of course, if you change the rack not yourself, but with the help of specialists, then their services are also not free and you will have to pay more for the knocking of the steering rack.
Signs of malfunction of the steering mechanism on the VAZ-2114
The first symptoms that indicate that the steering rack needs to be tightened are:
- large backlash of the left wheel;
- lubricant flowing through the rack seals;
- unexpected biting of the rack while driving;
- knocking noise under the hood when driving on a bad road.
Biting the steering rack in the middle of the road can lead to an accident, and in most cases a tightening is not enough, but this does not mean that it cannot be adjusted. There are two ways to tighten the steering rack: without removing it from the car or using a removed rack.
The second method is used after major repairs or replacement of the mechanism. We will look at a simple method, the purpose of which is to remove increased play and knocking under the hood.
Tightening and adjustment
As the practice and experience of VAZ 2114 owners shows, if problems arise with the racks, they can most often be repaired. The only condition is that you have an inspection hole at your disposal.
The first step is to tighten the rack. But how is this done? To do this, simply tighten the adjusting bolt. Adjustment is made with a 17 mm key.
After tightening the bolt, take your car out for a few kilometers to check whether the knocking or play remains. If these symptoms of the problem disappear after you have tightened and adjusted the steering rack, the repair can be considered complete.
But this doesn't always happen. The knock may remain, but the play may go away, or vice versa.
In any case, if at least one sign still remains, you will have to begin a full-fledged repair with your own hands. Now you can find a number of useful videos that describe in detail the procedure for repairing this unit. Take a look, it will be useful for you.
Self-tightening of the steering rack on a VAZ-2114
In most cases, all work to tighten the play comes down to adjusting the steering wheel and selecting the play in the engagement.
If the wear of parts is significant, then major repairs and installation of new spare parts cannot be avoided. The easiest way to check this is to tighten the steering wheel without removing it from the vehicle. To adjust the rack, you need a special key, which is inserted into the adjustment nut located on the steering mechanism housing. It is possible to make a key yourself, but it is better to purchase it, since its cost is low, and you can find it in almost any spare parts store. Having your own wrench in your arsenal will make adjustments easier, and will be essential when disassembling the rack.
Adjusting the steering rack on a VAZ-2114: instructions for action
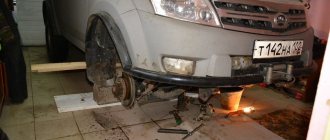
- The car is installed on an overpass or lift. You can, of course, adjust from the hood side, but in this case you will have to work almost blindly.
- The mudguard and crankcase protection are removed from the bottom of the engine.
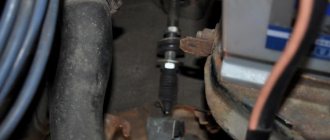
- The steering rack is cleaned of dirt and visually inspected. There should be no traces of leaked lubricant on it, and no damage on the anthers.
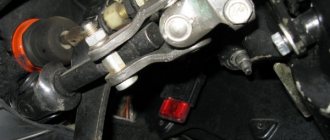
- You should check that the rack is tightly attached to the engine shield; the steering rods at the point of attachment to the rack should not have any play.
- Next, you need to find the steering rack adjustment nut and clean it of dirt. There is a plastic plug installed on it that needs to be removed.
- Using a special wrench, tighten the adjusting nut. In some cases, it is fixed with a core, so after adjustment you need to return the lock to its original position.
- The adjustment is made by tightening the nut all the way, after which the presence of play on the steering wheel is checked. If you need to exert a lot of force when turning the steering wheel, you need to loosen the nut a few degrees.
- After the nut is adjusted, it must be fixed to avoid spontaneous unscrewing.
After the play has been selected, it is necessary to make a test drive and make sure that the steering mechanism is working properly. If the steering wheel rotates freely and there is no play, the adjustment can be considered complete. If turning the steering wheel is uncomfortable, you need to loosen the nut a few degrees counterclockwise.
How it's done
The sequence of actions is as follows:
- Place the car on a level surface and immobilize it;
- It is better to jack up the car on the left side;
- Using open-end wrenches, unscrew the bolts securing the steering rods to the rack, having first bent the fixing plate;
- In the cabin, under the steering column, unscrew the bolt securing it to the steering gear shaft;
- Unscrew the 4 nuts securing the mechanism, and then remove the fastening clamps;
Unscrew the rack bolts. - We pull the mechanism onto the engine so that the gear shaft comes out, and then remove it through the technological hole in the left fender liner;
- With the mechanism removed, remove the retaining ring and rack bushing. Using a screwdriver, loosen and remove the clamps securing the protective cover, as well as the clamp of the protective cap on the right side of the mechanism. Then the cover and cap are removed;
- We unscrew the adjusting nut, which adjusts the gap;
- Rotating the gear shaft to the right, move the rack to the left and remove it. Then press out the rack bushing;
- If the gear is also being changed, then remove the boot from the gear housing, remove the sealing and retaining rings, the bearing, the gear itself and the roller bearing;
- We perform assembly in complete reverse order. At the same time, we change all worn-out elements, as well as consumables - boots, bushings, etc., and be sure to lubricate everything. After assembly, all that remains is to put the mechanism in place and attach the steering gear and rods to it. This is the entire sequence of restoration work with the mechanism with your own hands;
After all work, the toe angle must be adjusted.
The work on restoring the steering mechanism is not particularly difficult, but some of the operations can cause a few inconveniences, but in general it is quite possible to do everything yourself. The longevity of the operation of this mechanism in the future will depend on which manufacturer of the repair kit you have chosen.
Hi all! I'm tired of some kind of knocking from the front... I understand from the sound that it's not the suspension - that means the steering! And then the boot on the steering rack is torn... and the rack rattles... and the rack rattles... and the extraneous noise from the rack is unpleasant... And then I remembered what I saw about modifying the steering rack on the Internet! Yes, let me try, I think it’s a big deal to remove the steering rack. I went to the construction store, bought 1 meter of 50 mm plastic pipe and actually went to the garage! I warn you that the photos are not mine, but everything was done exactly the same. The photos were honestly taken from a user of the same site...
None
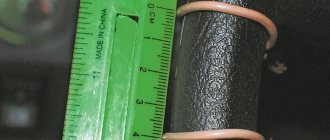
24 cm.
cut off a piece of pipe 24 cm long...
cut a strip 3.5 cm wide from this piece
actually those same 3.5 cm.
and stuff this miracle of engineering into the steering rack. The only thing is that I didn’t pull out the shaft itself from the steering wheel, unlike in the photo
the first one is ready!
do the same for the second piece... the third... and the fourth...
second…
third…
and the fourth... The last piece fits very tightly, I hammered it in there with a hammer. Then I trimmed all the plastic so that the steering rods would not touch it and move freely back and forth. After which we spare no grease and put everything back together.
I'll tell you about the result! I left the garage at about three in the morning... tried it... ... ... ... ... First impressions exceeded all my expectations... It feels like you are driving a good class foreign car! There was no limit to the joy! Then my brother sat down to try it (he drives a Mercedes himself), and it was nice to see his facial expression after he drove it)))) Everyone liked it! I've been driving like this for a month and a half now. Now there is no feedback from the steering wheel at all, there are no such vibrations, the cabin is quiet, comfortable and fun! The only negative is that it takes about two days to get used to the steering wheel (it gets a little heavier, then everything will rub in and everything will be great!). I advise those who wish not to even think about such a modification! thanks to all!
Issue price: 160 ₽
Greetings Dear Friends. I apologize for writing about the repair of another car in my on-board vehicle, I will soon correct myself and there will be a lot of information on my car.
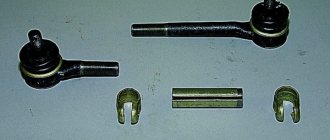
Today I will tell you about the repair of the steering rack of my friend’s VAZ 2108. Actually, I’m at work, I called. a friend asks which manufacturer to buy the rack from, why should I buy a new one, what about yours? It’s the same night, everything hangs out, you can’t catch the steering wheel, it knocks like an infection... To which I answer him. In the evening I’ll take the car to the garage to see what’s what, and then we’ll decide! We’ll meet later in the garage, put the car in the pit and... a quick inspection, play in the steering tips, broken silent blocks of the steering rods, and the rack is in question?!
The way out of the situation is to buy all of the above, except for the steering rack because it’s a toad to give 1200 grams))) We buy a steering rack repair kit for the garage.
Removing the steering rack is not a difficult task, but the stuck nuts of the steering tips did not slow things down much, but a Bulgarian named Bosch did a great job)) Next, we jack up the right side and take out the rack as an assembly. Then everything is quickly disassembled, washed, cleaned! I repressed the steering silent blocks rods, replaced steering tips.
The modification of the steering rack itself consists of the continuation of the plastic bushing along which the gear rack runs in the housing. Some people make this bushing from resin.
Actually the bushing.
But as for me, there is nothing more reliable than a solid bushing for the entire rack body, in which case there cannot be any vibrations or backlash! To do this, take a plastic canister, make a template and cut the blanks, and push, shove, shove until the rail in the middle moves smoothly without jamming. We lubricate the whole thing and put it back together in reverse order!
I already have 3 such slats on my account, all work perfectly! You must decide for yourself what to do, buy a new one or restore the old one. But for myself, I decided that I would do just that.
Good luck to everyone and enjoy watching. Subscribe to the channel so you don’t miss anything. It will be interesting.
Sources:
- 24techno-guide.ru
- nadomkrat.ru
- www.drive2.ru
- www.drive2.ru
Do-it-yourself repair and adjustment of the steering rack on a VAZ 2114
Every car owner wants his car not to fail at critical moments, to cause a minimum of problems and bring maximum benefit. But this directly depends on how the owner cares for, monitors, and repairs his car on time.
One of the most important components affecting safety is steering. VAZ 2114 owners do not have to repair steering racks very often, since these units have a fairly long service life. But a number of factors and time lead to the fact that you have to pay direct attention to the helmsmen, diagnose the problem in a timely manner and promptly fix it.
Today we’ll talk about how to repair this unit yourself, as well as what measures will bring your slightly worn steering rack back to life.
Preparatory work
If you want to repair the steering rack yourself, then you should purchase the following spare parts:
- Tubes for rack.
- 2 tips - they already come with nuts.
- Repair kit.
- 2 silent blocks.
- Cover for the rack.
Repair requires replacement of the above parts even if only the tubes are damaged. The wear of elements must occur simultaneously, so it is not recommended to skimp on parts. You will also need bearing grease, clamps, White Spirit, and a can of WD-40. It is worth preparing rags in advance, as you will need a lot of them. As for tools, repairs require sets of wrenches, screwdrivers, socket heads, and wrench extensions. Special tools include special wrenches for the adjusting nut, as well as a puller for tips.
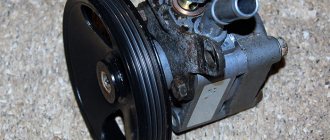
Rack in disassembled condition
Advice! When the defects in the operation of the steering rack are minor (for example, knocking), then it is better to start with adjustment. If the adjustment does not help, then you should move on to diagnostics and repair.
Before starting repairs, it is recommended to carefully study the structure of the steering rack, which is described in detail in the VAZ 2114 operation and maintenance manual. You should first apply WD-40 to the four nuts that secure the steering rack to the car body. You also need to shed the only tightening nut and the threads of all the tips. After 3-4 hours the work must be repeated. Repairs can only begin the next day.
Symptoms of a problem
To understand that the racks require repair, you need to monitor the behavior of the car and know the characteristic signs of a malfunction of this element.
Is it possible to determine whether the unit requires a complete replacement, or can you get by with simple repairs? We will tell you about this in the table below.
| Sign | Necessary actions |
| When turning the steering wheel, a knock is heard and play occurs | If the situation occurs while the car is moving, it is enough to carry out repair measures, use a repair kit |
| Knocking and play occurs when the steering wheel is turned when the car is stationary | This is clear evidence of the critical state of reiki. The problem can only be solved by completely replacing it. |
Malfunctions
Often the rack does not require complete replacement. The fact is that when knocks and backlashes appear, it is often possible to make a fairly quick repair; all that is required is the presence of an inspection hole. To do the repair yourself, you need to purchase a repair kit for the steering rack, which is sold in three versions - from basic to advanced.
The very first step will be to tighten the steering rack. It is enough just to tighten the adjusting bolt using a 17mm wrench.
After this, it’s worth taking a test drive and checking whether there is any play or knocking left. If there is no more play or knocking, then you can finish working on the steering rack for now. If nothing has disappeared (or, for example, the play has disappeared, but the knock remains), then more extensive work will be required.
The part itself costs about three thousand rubles. On average, the salon will charge 1500-2000 rubles for its replacement. Thus, in general, the entire replacement will cost about 5 thousand rubles.
We repair it ourselves
To get started, you will need a set of tools and repair kits.
Replacement kit
Be sure to include the following in your list of tools and materials:
- Repair kit for one of three configurations (more about them below);
- Bearings;
- Lubrication;
- Set of keys and screwdrivers.
Selecting a repair kit
Spare parts
As for repair kits, the standard minimum set includes four elements:
- Washers;
- Nuts;
- Bearings;
- Bushings made of fluoroplastic.
But is it enough for your specific steering rack situation? Let's try to understand the purpose and configuration of each of the three types of repair kits.
- The cheapest repair kit, the contents of which you are already familiar with, allows you to solve the most minor problems that have arisen with your slats.
- The middle kit additionally includes other bearings and shafts. Designed for more serious repair work.
- The most expensive repair kit may consist of whole new slats, that is, it involves not a repair, but a simple replacement of units.
Repair
To perform the repair, you will still have to disassemble the steering wheel. You can see detailed instructions in the material on replacing the steering rack.
Replacement process
Let's move on directly to the repair procedure.
- Remove the rail from its seat.
- Remove the thrust nut with a 17mm hexagon.
- Remove the thrust nut, remove the retaining ring, spring, and rack stop.
- First, the gear shaft boot is removed, after which you can easily get to the locking ring.
- Remove the nut that holds the gear bearing in place. Be prepared for the fact that it will be quite difficult to unscrew it; use some force. This is fine. It's worse if it practically doesn't hold on.
- The drive gear shaft is pressed out.
- The rail is removed from the housing.
- Next, remove the support sleeve, lubricate it and put it in place. It may take some effort to push it back.
- Replace all bearings present in the assembly. Some are difficult to extract, while others are almost impossible. But it needs to be done. If you cannot remove it at all, then cut the bearing with a chisel and remove it with pliers.
- Examine the condition of all surfaces, parts, and assemblies for any defects or damage.
- If you notice faulty elements, replace them using a repair kit.
- The design will have quite a lot of moving elements. Each of them must be lubricated with high-quality lubricant. Litol will perform well here.
- Reassemble by following the reverse disassembly sequence.
- You will definitely need help for reassembly. Therefore, agree in advance with a friend or someone else who can help you in this matter.
- Place the repaired rail in place and attach its fasteners.
- A rack is inserted into the spitz. This is where you will need an assistant. It is almost impossible to do this yourself.
- Use a chisel to loosen the clamps.
- Tighten all mounting bolts in place.
If you notice typical signs of a rack malfunction, do not delay repairing or replacing it. This can lead to tragic consequences when, at the most inopportune moment, the steering wheel stops responding to your efforts and you lose control of the situation. This is not an attempt to scare you, but a simple fact of life.
DIY repair
First you need to stock up on the necessary set of tools:
- repair kit for the steering rack (as mentioned above, they are sold in three variations);
- bearings;
- lubricant;
- necessary keys and screwdrivers;
- We should talk separately about repair kits.
Minimum basic sets. Such sets usually have only 4 elements:
This set can only fix the simplest faults. Medium priced sets. Here, in addition to the things described above, there are shafts and other bearings. Expensive sets. There may already be entire slats here.
When purchasing, please note that you are purchasing a set specifically for your car (the brand is indicated on the package). Sometimes it happens that a car has a non-original rack, then it is necessary to purchase a repair kit for the car from which this rack was removed.
Actually, any repair must begin with disassembling the steering rack. Often the problem is just a small bearing, and the entire rack does not require replacement.
Work order
- Removing the steering rack
- Unscrew the thrust nut using a 17mm hexagon.
- Remove the thrust nut, retaining ring, rack stop and spring.
- Remove the drive gear shaft boot, and then the retaining ring.
- Unscrew the nut holding the steering gear bearing. It goes quite tight - this is normal.
- Press out the drive gear shaft.
- Remove the rail itself from the housing.
- Remove the support sleeve, then lubricate it and insert it into place (this will need to be done with force)
- Replace all bearings. Some will be difficult to get (very difficult), so you can simply chop them with a chisel and pull them out with tongs.
- Inspect all parts for defects, replace broken ones with new ones (from the repair kit), lubricate all moving parts.
- Reassemble the rail in reverse order.
- That's all, if you did everything correctly, then the rack works with a bang. All that remains is to put it in place.
Putting the rack in place
- First, you need to enlist the help of a partner; without him, you won’t be able to do everything quickly and accurately.
- We install the rail in the same place and attach the fasteners.
- With the help of a partner, we insert the rail into the spitz.
- To loosen the clamp, use a chisel.
- We tighten the mounting bolt.
That's all, now the rack is in place, then we put the wheels on, tighten the nuts and remove the car from the jack. Now you know everything you need to repair your steering rack in a timely manner. The main thing to remember is that you shouldn’t delay repairs.
Steering Rack VAZ 2114 Knocks
Repair and replacement of the steering rack on a VAZ 2114
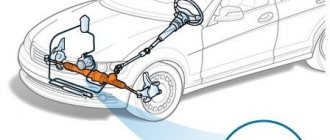
For the ability to change direction when traveling by car, the VAZ 2114 corresponds to a control mechanism. This machine uses a gear type mechanism. Railway "
The mechanism of operation of this mechanism is to convert the rotation of the gear wheel associated with the drive into the lateral movement of the rack with the gearbox. The movement of this guide is then transmitted through adjusting rods to the suspension mounts, which also act as cams.
These mechanisms have become widespread in the near future due to their simplicity of design and are applicable to many vehicles. The simplicity of the design provides adequate reliability, but steering faults are common. . Some faults can be repaired by replacing worn components, but some faults require replacement. steering rack VAZ 2114.
symptoms
Guiding Symptoms There are not many mechanisms, but each may indicate different components that are having problems. Signs:
- Zoom in on the loose layer of the helmet;
- Steering gear knocking ;
- Increase steering effort;
What can cause a malfunction
Let's take a look at each of the signs and what may cause them to appear. It should be noted that some problems, such as shocks, may not be related to the mechanism itself.
1. VAZ Forum 2108, 2109, 21099, 2113, 2114 and condition plus steering rack assembly with rack Klop. Steering rack knock | VAZ Forum 2108, 2109, 21099. Consequently, the free play of the steering wheel has increased, that is, there is more freezing, the increased travel can manifest itself even more in the appearance of beats in the steering wheel during braking.
Lada 2114 › Logbook › Steering rack - an eternal problem in Samara!
Greetings to everyone who reads my blog))) There was a lot to do during the May holidays and there was no time to dig deeper into the car, but yesterday I managed to escape to the garage for half a day... The problem with the steering rack, I think, is familiar to every owner of the Russian automobile industry, and especially this applies to VAZ cars of the 08-15 model family))) In my case, the rack has periodically bothered me since the moment I purchased the car. The defect, namely a knock in the steering rack, which is transmitted to the steering wheel, when passing uneven sections of the road (whether it be crushed stone or driving through railway crossings) was not permanent. At the first stage, the usual tightening of the slats saved me. The effect was good, but after about six months the problem appeared again, and after re-tightening, the rack began to bite, so I loosened the adjusting mechanism as before and continued to operate the car.
Yesterday I came to my friend Alexey to drink coffee and chat about life, after talking we decided to experiment with the steering rack, since neither he nor I had disassembled this mechanism before))) They removed it quite quickly, in about 15 minutes. But it turned out to be impossible to disassemble so simply, without having “special” keys with you. After a little torment and improvised means, the rail gave in and was completely disassembled. Next, all elements of the mechanism were washed in gasoline and thoroughly cleaned of old grease and contaminants. Upon a detailed inspection of the gear shaft and the worm that drives this shaft, no wear or other defects were found, but these defects were found in other elements))) The plastic cage in which the shaft moves is quite worn out, and wear was noticed in the rack adjustment mechanism ( I don’t know what the correct name for this part is, but it looks like an ordinary piston). Let's go to the store to do some shopping))))
The seller provided us with a “factory” rack assembly for inspection for 2,550 rubles and a steering rack repair kit for 300 rubles... The new rack certainly looks beautiful, but there was no desire to spend that kind of money for one reason - the quality of our spare parts! A couple of years ago we bought the same “factory” rack for my brother on 21099, with a smile on his face that nothing was knocking, he drove for exactly 3 weeks, then it knocked even worse than the original... No adjustment helped naturally... Here I am, remembering this incident shopping, I also thought about it. In general, we bought a repair kit for 300 rubles and went to try to put everything back in place...
As for buying a new rack, there were ideas to purchase a Pilenga rack; I didn’t find many reviews about this product, but these few were very satisfied with the purchase and the quality of the part. Naturally, in our city you won’t find anything other than “factory” steering racks, so you have to order Pileng on Exist and wait a month, maybe I’ll do that in the future. The price tag for this rack is 2090 rubles, even cheaper than the factory price. Of course, there is also such an option as the SS20 steering rack, but its price tag is simply out of pocket, I don’t argue that the quality is probably at the same level, but such things do not fit into my budget.
In general, upon arrival at the garage, we began assembling the mechanism... They assembled it even faster than they took it apart, since both were in a hurry to go about their business, and it was already nearing evening))) Wherever possible, they filled in new lubricant, collected all the elements, and installed anthers and installed the rail in its rightful place, although it only fell into place once from the 5th, perhaps due to the fact that this was the first time they were doing such work... Next, we carried out the process of adjustment and testing!
What we have at the moment, after the work done... Nothing knocks anywhere, doesn’t knock at all, doesn’t bite, there are no extraneous sounds either))) While I’m driving I’m happy, but I don’t know how long this joy will last, I just heard from many that installing a repair kit on the rack, this is a temporary solution, they say it will still knock in a month or two)))) In general, we’ll ride and we’ll see))))
Steering rack repair for VAZ 2113, VAZ 2114, VAZ 2115
The steering rack is a mandatory, indispensable element of the steering of a car. This device converts the driver's efforts on the steering wheel inside the car, ensuring the wheels of the car turn and, accordingly, change the direction of movement. Over time, like any part, it wears out, and an unpleasant knocking noise appears, especially audible when cornering and while driving on uneven roads. This knock, firstly, is annoying, but it clearly makes it clear that something is wrong with the car. You should not ignore the knocking, because one day the rack may simply jam, and the steering wheel will lock in one position, and only braking and a complete stop can save you.
Repair of rack on VAZ 2113-VAZ 2115
Disassembly
1) First, you need to remove the rack from the car, and we recommend that you read the details of the process in the article: “Replacing the steering mechanism on a VAZ.”
Note! By the way, do not rush to start repairing the rack if you only heard a knock for the first time. The first symptoms can be removed by pulling it up; the top link to the article contains information on this topic.
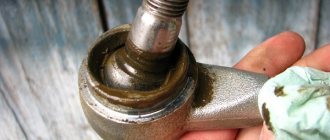
2) Now on the right side, remove the support and spacer ring from the end of the rail, as shown in the first photo. Then use pliers to cut through the clamps holding the protective cover in place (see photo 2, these clamps are disposable), and then remove the cover (photo 3) from the rail. On the other side (from the end), remove another support, now metal, and the protective cap. This operation is shown in the fourth photo.
3) Next, unscrew the special. using a 17 octagonal wrench on the rack stop nut (photo 1) and remove it. There is a spring located immediately behind the nut (photo 3), remove it and put it aside. Using a screwdriver, pry up the retaining ring as shown in the last photo.
4) Next, take the rail in your hands and knock on the board. Knock the crankcase until the stop falls out of the inside, look at photo 1. Then remove the bulkhead seal (photo 2) and use a screwdriver to remove the gear boot (photo 3) and the lock washer (photo 4).
5) Proceed to removing the gear that comes complete with the bearing. It is necessary to remove it from the crankcase by unscrewing the gear bearing mounting nut (photo 1), and then remove it from the shaft (photo 2). Then, taking the mounting blade and using it as a lever for a wrench, use a 14mm wrench to grab the flat of the gear (photo 3) and, leaning the wrench on the blade, remove the gear together with the bearing from the crankcase (photo 4).
Note! By the way, you won’t be able to unscrew the gear fastening nut so easily; you will need a special wrench with a 24-inch octagonal head. Instead, you can use a head with the same size (photo below).
6) Now remove the steering rack from the crankcase by simply tilting the crankcase - the rack will fall out on its own (photo 1). Using a flat-head screwdriver, pry up the support sleeve and remove it from the crankcase (photo 2). Install the new bushing in place of the old one, after putting new damping rings on it (photo 3). During installation, make sure that their thin part is against the cut of the bushing. We put the bushing in place (photo 4). Install the bushing very carefully, making sure that the protrusions do not stick out. Be sure to cut and remove any remaining rubber damping rings.
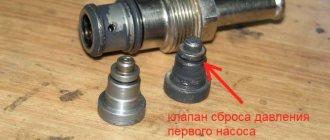
7) Remove the retaining ring from the worm with pliers (photo 1), and then press out the ball bearing with a special puller, removing it in this way (photo 2). Next, proceed to removing the needle bearing. You will need either a special puller, or stock up on available tools: a hammer and a drill. The required drill bit diameter for a drill is 2 mm. At the end of the crankcase (photo 3), drill two holes through which you will knock out the bearing. Insert nails into the drilled holes and, hitting them with a hammer, remove the needle bearing from the crankcase (last photo).
Assembly
The mechanism is assembled in the reverse order of disassembly, taking into account some important points:
- wash the inside of the steering gear housing;
- Lubricate the rack teeth thoroughly with FIOL-1 grease (see photo below);
- Lubricate the teeth of the worm with the same lubricant (the second name is the drive gear, it comes complete with a bearing);
- lubricate both bearings;
- fill the cavity above the drive gear bearing nut with UNIOL-1 grease;
- Reassemble the mechanism in reverse order.