Category: Articles Created 01 Oct 2019
The radiator grille on modern cars is not just a protective element. She is also directly involved in creating the look. The interior of a vehicle is an important component for many motorists. Therefore, they approach the choice responsibly. And designers take into account consumer preferences when creating the appearance of the model. Each element is an independent detail, but at the same time complements the others.
Why put a mesh on the radiator grille?
In the vast majority of passenger cars, the radiator of the engine cooling system is installed at the front, where it is intensively blown by the oncoming air flow. But, in addition to the air stream, various foreign objects inevitably enter the heat exchanger:
- insects of various sizes;
- poplar fluff and foliage;
- road dust, fine sand and dirt;
- gravel, pebbles from under the wheels of oncoming cars.
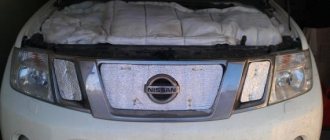
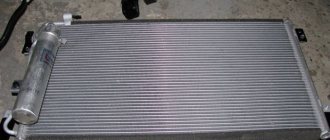
Radiator honeycomb clogged with insects and dust
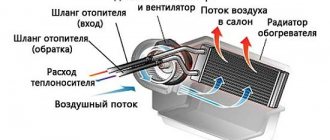
Cooling of the liquid in the radiator occurs due to its heat exchange with the air flow passing between the metal fins. When these openings become clogged with debris and insects, their flow area decreases and eventually becomes completely clogged. The intensity of heat exchange decreases, the radiator ceases to perform its function, and the engine begins to overheat.
Standard grilles installed by manufacturers protect the unit only from large stones, letting everything else through. That is why installing an additional protective mesh brings considerable benefits, increasing the service life of the radiator and the engine, which is not subject to overheating. A dirty mesh can always be cleaned and washed; this is more difficult to do with radiator honeycombs.
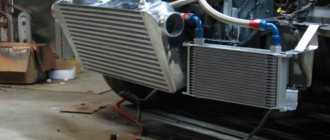
Car with intercooler for turbocharging
Reference. Since an increasing number of cars are equipped with air conditioning as standard, they are equipped with not one radiator, but two. The second serves as a freon cooler in the air conditioner and suffers no less from clogging with insects and dirt. In premium cars there is a third heat exchanger - an intercooler, designed to cool the air supplied to the turbine.
Purpose and functionality
All modern cars are characterized by a front location of the technical part. Since the vehicle's power unit is located at the front, the radiator grille no longer serves only visual functions. At the moment she has several appointments:
- Vehicle radiator protection. At the front of the car there is a radiator, the purpose of which is to cool and maintain the required temperature for stable engine operation. Its position is prone to damage. And to protect against them, a radiator grille is installed.
- Aesthetic component. Modern radiator grilles come in different shapes and styles. They are an integral part of the design. If you remove the radiator grille, the appearance of the car will no longer be so attractive and stylish.
- Airflow redirection. Since the radiator is located in close proximity to the grille, it directs the air flow so that it blows this device more efficiently. Thanks to this, the equipment begins to work more efficiently, especially in the summer.
Sports cars do not have a radiator grille. Their power plants are located on the rear side, so special air vents lead to them. If there is a grille located here, it is for decorative purposes only. Most often it is not done at all, since it can disrupt the aerodynamic properties.
Almost all modern grilles can be easily dismantled. Some manufacturers offer shaped replacements to improve the appearance of the car.
Mesh outside and inside the grille - pros and cons
Both methods have the right to life and are equally successfully used by car enthusiasts. But each of them has a negative and a positive side. Installing a mesh behind the radiator grille provides the following advantages:
- The mounting points are not visible from the outside, so it is easier to install protection, although you often have to dismantle the bumper;
- installation work is carried out once for the entire period of operation of the mesh material;
- you can use an inexpensive mesh and not pay much attention to the appearance, because it is difficult to see behind the standard grille;
- Implementation of this option will be cheaper.
The light mesh does not catch the eye when standing behind a dark grille
The disadvantage of this method is the difficulty of cleaning fine-mesh material. It’s good if in your car model the decorative grille is removed from the bumper, making it easier to access the mesh to be cleaned. Otherwise, for a major wash, the front body kit will have to be dismantled or you will have to go to a specialized car wash and pay money.
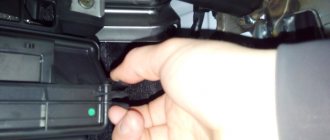
Note. When you begin internal installation, you risk encountering such difficulties as removing the front bumper. On Russian VAZs the work is done relatively simply, but with some foreign cars you need to tinker a lot.
Removing a bumper on a foreign car can be quite difficult
The option with external installation has more advantages:
- the protective element is easy to install and remove when necessary;
- to install the net, you do not need to disassemble the car;
- washing is carried out from the outside without removing fine-mesh material;
- the front part looks much nicer when the mesh is matched to the color of the car or painted.
Renault Kaptur with external mesh
There are no serious disadvantages with external installation, except that the price of finished products sold for specific car brands is “biting”. But we can overcome this drawback if you get down to business yourself and make an outer mesh with a frame with your own hands, which will be discussed later.
Factory set of nets for Renault Kaptur
Let's talk about the radiator grille as a design decision.
Even non-professionals can now recognize a car of various brands by the type of radiator grille. This makes it clear how important the design of the radiator grille is today for the appearance of a car. Radiator grilles can be mesh, made of vertical or horizontal stripes; the car brand logo may or may not be installed on the grille. There are also tuned grilles, including handmade ones, the appearance of which depends only on the imagination of the master. There are various radiator grilles available in the market today. There are sporty grilles made from aluminum, lightweight carbon fiber, more expensive chrome, cheaper ABS plastic, as well as alloys and stainless steel. All gratings are made taking into account the fact that they must withstand direct contact with small stones and long-term exposure to time. For installation on SUVs, stronger and more durable grilles are produced, which primarily perform protective functions. In the Lowstuff online store you can find many options for different designs of radiator grilles for all makes and models of cars.
How to make and install an outdoor version with your own hands?
To manufacture a protective element designed for external installation, you should purchase the following materials:
- aluminum fine mesh;
- universal glue;
- a piece of thick electrical cable 2-3 m long;
- tape and clothespins;
- a sheet of cardboard (mesh packaging works well);
- plastic clamps, preferably transparent or black, to match the color of the grille.
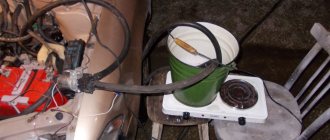
Materials and tools for DIY
Note. The amount of aluminum mesh and cable length are determined by the dimensions of one or more grilles installed on your vehicle. The cable insulation will serve as the edging of the future protective element.
To make a mesh frame and place it on the car, prepare a set of tools:
- stationery knife;
- regular scissors and for cutting metal;
- tape measure, ruler;
- marker.
A device for safely cutting the cable is made from a knife and a strip
Since this simple design is attached to the radiator grille from the outside with clamps, no tools are required to disassemble the bumper.
Advice. If the radiator grille on your car can be easily removed, then it is recommended to dismantle it and use it as a template, which will make the task easier for yourself.
The cable is cut lengthwise to remove the insulation
The production and installation of the outer mesh is carried out in the following sequence:
- Take a sheet of cardboard, apply it to the car grille and carefully cut out a template that exactly repeats its shape. If necessary, modify the template with scissors, achieving maximum coincidence of the contours.
- Place the template on the mesh and trace with a marker, then cut out the workpiece with metal scissors. Try it on the radiator on your car.
- Tape a utility knife to a wooden plank as shown in the photo. Using this tool, make a longitudinal cut in the cable insulation and pull out all the conductors from inside.
- Form the edging of the element by placing the cut and gutted insulation on the ends of the previously made workpiece. Fill it from the inside with glue at several points and clamp tightly with clothespins.
This is what a homemade external mesh looks like on a car
When the glue has completely dried, the clothespins can be removed and the mesh can be installed on the car. If you did everything correctly, it will fit tightly to the grille from the outside. All that remains is to tighten and secure the resulting element with plastic clamps. After tightening, cut off their ends and turn them so that the clamp clamps are inside and do not stick out in plain sight. When you need to remove the protective element, just cut the puffs with wire cutters.
The order of work in the photo
Video on installing external radiator protection
Is there a significant difference between factory and aftermarket grilles?
In fact, there is no specific answer to this question. It all depends on the make of the car. More modern models have good radiator protection, so additional protection is not required. A custom grille will sometimes be just decoration and a waste of money. But there is also another side to the coin. On the contrary, the factory grille can only act as a decorative element. For example, it will have a brand logo on it, and there will be no protective function. Simply put, each car owner will have a different answer based on their needs.
Choosing a new grille is not particularly difficult. If you select this element as an option when purchasing a new car, then you will be faced with a choice: take a regular grille or a sports one. It all depends on taste and wallet. To replace a grille already installed in a car, you can search by:
- VIN code. Searching by unique vehicle number gives reliable results. The likelihood of buying the wrong spare part is reduced to zero. But searching for analogues by VIN does not always give good results;
- Car data. Everything is simple here: you need to indicate the make, model of the car and year of manufacture.
The range of radiator grilles, even for a specific car model, is very wide, so how do you decide on the choice? If funds allow, you should take the highest quality, most expensive one. It will last longer than a cheap analogue, which means it will not cause trouble during further operation. If the owner is primarily interested in beauty, then a cheap grille will not be a suitable option either; chrome and carbon grilles have a high price. In a broad sense, the radiator grille today is a design element; a beautiful grille with a pronounced brand characteristic will attract the views of others and make your car more status. Remember: changing the grille alone can dramatically change the design of your car.
About internal installation
Motorists who want to install a fine-mesh mesh directly in front of the radiator need to prepare the following tools:
- a set of keys and screwdrivers for removing the front bumper or radiator grille (if possible);
- metal scissors;
- roulette, ruler.
Most often, plastic clamps are used to secure the mesh.
To fasten the mesh, you can use the same clamps or self-tapping screws, if the design of the body kit allows it. Instead of aluminum cellular material, it is possible to use a plastic mesh secured with a glue gun. The installation algorithm is as follows:
- Wash and dry the car. If fog lights are installed in the bumper, disconnect the negative terminal of the battery before starting work.
- Remove the front body kit by disconnecting the fog lamp connectors.
- Applying the mesh to the grille opening from the inside, cut out the blank with a margin of at least 1 cm on each side.
- Attach the workpiece to the body kit. Here you can use a combined method: first, tighten the mesh to the grille with clamps, and then screw the edges with self-tapping screws. Attach the plastic material with a glue gun at several points.
- Reinstall the front body kit, connect the headlights and battery.
Mesh attached to removed bumper
Advice. Do not screw the screws directly into the front parts of the grille, otherwise their ends will come out. For such fastening, choose jumpers and stiffeners facing inward, and screw in the screws from the side.
This is what the mesh installed inside looks like
Indoor Installation Video
DIY tuning
Having purchased the base, you can begin to act.
- The radiator grille is dismantled. In some models, for example, in the Renault Duster, it is combined into a single unit with the bumper. In such cases, you will need a screwdriver, since the structure is held not only by latches, but also by screws. On models where the grille is an independent element, simply snap off the latches;
- The removed parts are washed and dried
. At the same time, the space and equipment are cleared of accumulated debris and insects; - The mesh is cut out
. It’s easier for those whose radiator grille has simple shapes - they are carefully measured, and the required piece is cut off according to the data. Those who have figured outlines (here it is again appropriate to recall the Renault Duster) will either have to draw a pattern on cardboard and then transfer it directly to the base, or temporarily fix the grid and cut it along the existing contours.
When the blank is made and adjusted to size, it’s time to decide what appearance it should take on in the final stage. Most often it is painted to match the overall tone of the car, chrome or black. The most convenient way to do this is with an aerosol from a can - the paint will penetrate into all hard-to-reach places. And to consolidate the effect, you can spray car varnish on top.
Types of radiator grids
Radiator nets for cars are usually divided into external and internal.
External ones are installed in front of the radiator grille.
Such products have the following advantages:
- relatively simple installation;
- cleaning can be done directly on the car;
- With the right colors, it significantly improves the appearance of the vehicle.
A significant disadvantage of this type of protective nets is their cost. The price of original branded products starts from 2,000 rubles. If you want to save money, you can make an external device with your own hands.
Internal products can also be made independently, and cheaper material can be used, because the accessory will be located behind the bars.
The protective mesh located behind the radiator grille has the following characteristics:
- the requirements for the quality of the fastening used are much lower. The product can simply be installed on plastic clamps;
- It is much easier to make the internal mesh yourself, due to the low requirements for processing the material.
The disadvantages of this option for installing mesh protection for the radiator are much greater than when using a product with an external location. The main disadvantages of use include:
- more complex installation;
- difficult to clean.
Internal installation of a protective mesh on the radiator grill may be impossible without first dismantling the front bumper. The part is very difficult to remove on many foreign-made cars.
Therefore, before you start making your own mesh, you should thoroughly study the design of the bumper. If you cannot get to the installation site “painlessly”, then it is better to use an external device to protect the radiator.
How to make it yourself and install it
Do-it-yourself external protective mesh for the radiator grille is made using the following materials and tools:
- Fine mesh aluminum mesh.
- Thick cardboard.
- Glue "Moment".
- Clothespins.
- A thick electrical cable 2 - 3 meters long.
- Metal scissors.
- Stationery knife.
- Paper scissors.
- Marker.
- Roulettes.
To effectively protect the radiator, you will need an aluminum mesh, the size of which should be equal to the size of the car’s radiator grille. The insulation of the electrical cable is used for edging the homemade structure, so its exact length will be equal to the perimeter of this product.
After completing the preparatory work, you can begin making a homemade mesh for the radiator. The work is performed in the following sequence:
- Having attached a cardboard sheet to the radiator grille, you should carefully cut out a template that perfectly follows its contours.
- The template should be attached to the aluminum mesh and outlined with a marker.
- Using metal scissors, cut the material along the lines previously drawn with a marker.
- Using caution, make a longitudinal cut of the cable insulation along its entire length.
- Remove all conductors from the cable.
- Make a edging from the insulation, placing it on the ends of the mesh around the perimeter.
- Insulation should be glued to the workpiece in several places and the glued areas should be pressed with clothespins.
After the glue has dried, the clothespins are removed and the protective mesh is installed on the radiator grille. To securely fix this element, plastic clamps of suitable colors are used.
Manufacturing and installation of the internal mesh will take much longer due to the need for dismantling work. To perform this work you need to prepare:
- a set of keys and screwdrivers;
- metal scissors;
- roulette;
- plastic or metal mesh.
Work on installing the internal device begins with dismantling the radiator grille. If it is not possible to remove the grille, then the front bumper of the car is dismantled.
If fog lights are built into the bumper, then to eliminate the possibility of a short circuit, you should disconnect the negative terminal of the battery before performing work.
The further process of manufacturing and installing the internal accessory is carried out in the following sequence:
- The mesh is applied to the internal opening of the radiator grille and cut with a margin of at least 10 mm on each side.
- The mesh, cut to the size of the opening, is fixed to the radiator grille with plastic clamps with additional fixation with self-tapping screws in the corners.
After securely fixing the device, if the bumper was removed, it is installed in place in the reverse order.
When it was not possible to match the color of the metal or plastic mesh to the color of the car, the part can be painted using aerosol dyes. In order for the paint to stay on the surface for a long time, it is necessary to paint according to all the rules.
To complete the work you will need to purchase:
- solvent;
- primer for metal;
- spray paint;
- protective varnish.
The decorative mesh on the radiator grille is painted in the following sequence:
- The finished product is laid on the floor covered with old newspapers.
- The surface to be painted is thoroughly degreased with a solvent.
- Apply 2 layers of primer to the metal at intervals of 15 - 20 minutes.
- The paint is also applied in 2 layers with a break of 15 minutes.
- After the paint has dried, apply 3 layers of protective varnish at intervals of 10 minutes.
- When the varnish is completely dry, the mesh is installed on the car.
Conclusion
How to install a mesh to protect a car radiator using various installation methods is described in detail in the article. Despite the simplicity of making the accessory, purchasing a factory-made product will allow you to get the maximum aesthetic and practical effect.