Burnt out light bulbs on your dashboard are a nuisance. Without them, the driver cannot obtain all the necessary information about the condition of his car. The dashboard on the VAZ 2114 has never been reliable, so the owner of this car will sooner or later have to change one or more light bulbs in the dashboard. We will tell you below what manipulations you will need to do yourself to replace it.
How to replace burnt out light bulbs in the instrument panel
Initially, the VAZ 2114 dashboard contains ordinary 12-volt incandescent lamps, so any of them can be replaced with a new one. This is the cheapest option, although not the most durable. For this reason, many car enthusiasts prefer to replace incandescent light bulbs with LEDs. The most popular LEDs are Sho-Me brand. Colors: blue, red and white. Made in Korea. If it was decided to install traditional incandescent lamps, then the choice of car owners usually falls on products from Philips and Osram.
Preparing to replace the light bulbs on the instrument panel
When access to the instrument panel is open to us, all that remains is to unscrew the two bolts on the sides of the case and disconnect the power connectors.
We unscrew the bolt on one side and then on the other.
Now the panel is supported only by power chips
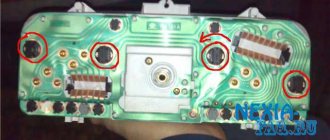
Upon visual inspection, it will be seen that there are a total of 13 lamp sockets on the dashboard of the VAZ-2114, of which only 8 can be replaced with analogues or LEDs.
Visual inspection
Pay attention to the general condition of the board, as if there are signs of oxidation or corrosion, they will need to be cleaned, regardless of whether the lamp is working or not. Because in most cases, the cause of failure is not the lamp, but the cartridge, which had traces of corrosion.
Selecting lamps for the VAZ-2114 instrument panel
Today, the market offers a wide variety of lamps for the VAZ-2114 instrument panel. Among them there are both conventional incandescent lamps and LED analogues, characterized by an increased service life, quality of light output, and low energy consumption.
Two different types of diode lamps: regular and diode
When purchasing new lamps, always buy several more elements, because the “legs” may break during installation.
Main conclusions
The process of replacing the backlight takes some time. The whole difficulty of the procedure lies in dismantling the front panel. The following conditions must be met:
- free the casing from handles, sliders and other elements;
- remove the handle from the gear shift lever;
- push the panel towards you, unscrew the shield and disconnect the terminal blocks from it.
The remaining operations are simple, performed quickly and without surprises. It is impossible to make a mistake during reassembly; the blocks with wires are made different and cannot be mixed up. Express your thoughts about replacing light bulbs in the VAZ 2114 dashboard in the comments.
Removing the instrument panel
To remove the shield you will need a flathead and Phillips screwdriver.
Unscrew the two top screws (as shown in the picture), then carefully remove the panel under the steering column. It is held on top by clamps, and on the bottom by 3 fasteners that just need to be turned.
Under the panel we see 2 more self-tapping screws for fastening the shield; we also unscrew them. Now lower the steering wheel to the lowest position and remove the plastic cover of the shield.
Now all that remains is to unscrew the two screws holding the dashboard itself. They should be unscrewed carefully, as the screws may fall under the panel. It is better to unscrew them with a screwdriver with a magnetized tip.
We pull the panel slightly towards ourselves and see the green block and wiring harness. Disconnect it by pressing the “tab” and pulling slightly upward. After which the instrument panel will be removed.
If you install LED lamps, be careful, they have polarity. Therefore, before installing the shield in place, connect the block, turn on the dashboard lights and check that all the lamps are on.
All vehicle control devices are combined into an instrument cluster. It includes an electronic speedometer and tachometer, coolant temperature and fuel level indicators, control and warning lights, and a trip computer indicator (see “Instrument Cluster”). The instrument cluster is secured in the instrument panel socket with two screws and is lined with a plastic shield.
Warning To avoid damaging the glass of the instrument cluster, do not clean it with solvents.
You will need Phillips and flat blade screwdrivers.
2. Lower the steering column all the way down, remove the steering wheel (see “Removing and installing the steering wheel”)...
3. ...and the cover of the fuse and relay box (see “Replacing fuses and relays in the mounting block”).
4. Unscrew the four screws securing the instrument panel panel... 5. ...and remove the panel from the instrument panel (for clarity, the work was performed with partial disassembly of the steering column).
Sequence of replacing the backlight lamps of the Kalina dashboard
The technology is very simple. To remove cartridges, turn them half a turn counterclockwise. Remove the burnt element with your hands or pliers, picking up the shank. Install a new spare part. Install the cartridge (turn clockwise).
Tip #1 for replacing Kalina dashboard lamps from experienced car owners - change all the lamps at once.
This will eliminate the need to repeat the procedure in the near future. Although it is simple, it is still labor-intensive. Another important advantage of this advice is the uniform illumination of the entire “tidy” (the elements produce a glow of different intensities over time). The work is quite simple, but you should not lose your vigilance - there is always a risk of damaging the threads or thin elements.
Replacing light bulbs yourself
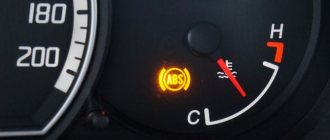
So, on your Priora the arrow indicators are not illuminated or the information on the LCD display is barely visible. One or more backlight bulbs have definitely burned out, and now we will try to replace them ourselves. In order to get to these bulbs, you need to remove the instrument panel.
Removing the instrument panel
To work, you will need a Phillips screwdriver about 10 cm long. A longer one will do, but it will be inconvenient to work in cramped conditions. First you need to remove the decorative trim of the dashboard. It is secured with 4 screws, the two lower ones being covered with a decorative trim under the steering column. The cover is secured with two latches at the top and three swivel fasteners. If you have ever looked into the mounting block, say, to replace fuses, then you can handle dismantling the cover in a few seconds.
Which lamps are suitable
Depending on the year of manufacture, the Lada Priora instrument panel is equipped with two types of backlight bulbs:
- The bulb of the light bulb is simply inserted into the socket, which is a kind of base.
- The bulb is inserted at the factory, and its leads are spot welded to this cartridge.
Comments
Repair manuals
Michael
wrote on November 27, 2014 It’s an unpleasant moment when they burn out. There is too much disassembly to remove the dashboard, you have to come up with something. In my Mercedes, the dashboard simply pulls out and has no fasteners, but the difficulty is in the cable that goes to the speedometer. To get to it, you have to remove the plastic under the steering wheel, from there stick your hand up a little more than your hand, feel for the cable, unscrew it, and then put it on in the same way. If you can do this, you can save a lot of time without wasting time disassembling the entire panel. I advise you to immediately install high-quality lamps, because after installing the cheap “Mayak” several times, I had to disassemble it several times.
DIY LED instrument lighting
I soldered the other ends of the wires to the socket of a standard light bulb. Watch the polarity, if the LED bulbs of the first two types can simply be turned over, then here, if the polarity is incorrect, you will have to resolder the wires. The main difficulty is to carefully disassemble the devices, trying not to wrinkle or scratch the chrome plating. And also, in the ring light filter opposite the LED, I used a needle to make triangular grooves that scatter the light and allow for more uniform illumination. For a watch, one LED turned out to be not enough; you need to install two.
Installation
Some buttons have green light filters inside, then the button must be disassembled and the light filter removed. The light filter that is installed on the instrument panel lights is green-blue. After experiments, it turned out that the best result is obtained if you leave it. Without it, the illumination is too uneven, and it does not affect the color of the glow in any way. Polarity must be observed when installing. Therefore, if the LED does not light up, you need to turn the LED bulb the other way.
Impression
The backlighting of the buttons is simply excellent. The panel was lit a little unevenly, but this was also the case when using light bulbs. But the main problem is that you can’t see the red arrows at night; apparently you’ll have to paint them blue. In addition, the brightness is adjusted unevenly; at the beginning, with a slight turn of the adjustment knob, it increases very quickly, and then almost does not change. This occurs due to the nonlinear dependence of LED brightness on current. You can try to partially cure it by installing a variable adjustment resistor with a nonlinear resistance characteristic, but I think that finding one is very problematic. Or install a PWM controller, for example on the NE555 timer. The illumination of the stove control panel turned out to be very uneven; you will probably have to install one or two more LEDs there. Haven't done the cigarette lighter illumination yet. The problem is that there is an orange filter, and I haven’t seen any blue ones on sale. I want to try putting it in green, maybe it will work. PS. I saw Chinese LED light bulbs for button illumination, 240 rubles. for a couple. One cost me 30 rubles 50 kopecks + fiberglass and labor.
Continuation
Resistors on LED light bulbs get very hot, since resistors of size 1206 have a power of 125 mW , but 250 mW . Although they come in the same standard size, I couldn’t find them. Since everything works, I decided to leave it as it is, but the best option is to either install two 330 Ohm (the second on the other side of the scarf), or install a larger resistance. Although the current will decrease, if you use bright LEDs, their brightness will decrease slightly. I installed a second LED to illuminate the stove control panel. I used the exact same light bulb. I painted the inside with white correction fluid (putty for correcting mistakes and typos) for a more uniform illumination. It didn't turn out too bad. I used the same putty to paint the arrows white, now they are clearly visible in the dark.
ATTENTION: do not remove the arrows, otherwise you will definitely not be able to put them back later.
I foolishly removed the temperature gauge needle, then had to warm up the engine until the fan turned on in order to install it back correctly.
There weren’t enough LEDs, I bought more, but their color is slightly different, so it’s better to buy them all at once from the same brand.
I bought a ten cigarette lighter with a pale green diffuser. As expected, great for blue lighting. For installation I had to enlarge the mounting hole, but a couple of problems remained. First , you need a special connector for connection. Secondly , the cigarette lighter sits too deep and is inconvenient to get out, you need to somehow redo the mount.
That's all for now.