Aston Martin Lagonda
Looking at this interesting interior, you get the impression of something futuristic. Back in the seventies, the model was restyled, during which the car received a completely new interior, unlike other car interiors of that era. The British development is an electronic instrument panel equipped with unique buttons. Whether this is good or bad is up to the driver to decide. After all, he will have to control this spaceship that came from a science fiction film.
By the way, some of the best engineers worked on the dashboard, the best minds of the company racked their brains. In the end, it still didn’t turn out what I wanted. Yes, and it worked every other time. Because of this, the driver could be left without the necessary numbers at any time or receive incorrect information.
Installation of LED lighting for VAZ-2107 devices
Tuning the instrument panel on a VAZ-2107, which includes installing lighting elements, will help create a truly spectacular and unique external image of the car’s interior. The work of installing such a structure is not particularly difficult, and the result often exceeds all expectations.
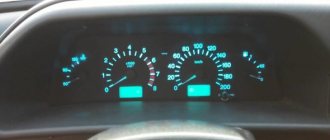
LED elements are mounted behind the instrument indicators, in grooves for attaching standard light bulbs. Also, diodes can be located around the perimeter of devices - for greater effect.
In addition to stylistic features, diodes help to illuminate the instrument panel with high quality, allowing the driver to easily observe the readings at night. When connecting light elements, it is important to pay close attention to their polarity: incorrect installation will result in the backlight simply refusing to work.
Spyker
Feel like the captain of a ship at such a helm! You can conquer the whole world with this. Maybe this was intentional, like a new steering system. Besides being amazingly maneuverable, it's also style for some. Would you like to turn this steering wheel? Probably, such a steering wheel is not difficult to control, which cannot be said about the bulky structures of real ships. In general, the interior is pleasantly unusual: it is leather, so cozy. There is something about this that amazes us and at the same time attracts us to the car.
Europanel
Note Some versions of cars of later releases (in particular, models produced) are equipped with a modified instrument panel - the so-called “European panel”.
- Left side deflector.
- Outdoor lighting buttons.
- Instrument cluster.
- Egnition lock.
- Right steering column switch (windshield wipers and washers).
- Hazard warning light button.
- Instrument lighting control knob.
- Immobilizer sensor with indicator.
- Rear window heating switch.
- Plugs (reserve places for installing switches for additional equipment).
- Central deflectors.
- Heater control panel.
- Covers for niches for installing car radios.
- Right side deflector.
- Left steering column switch (direction indicators and headlights).
- Hood release lever.
- Steering wheel.
- Clutch pedal.
- Brake pedal.
- Accelerator pedal.
- Socket for connecting a portable lamp.
- Gear shift lever.
- Ashtray cover.
- Cigarette lighter.
- Glove box.
- Parking brake lever.
- Side light switch.
- Indicator for turning on side lights.
- Indicator for turning on headlights.
- Headlight switch.
- Indicator for turning on the rear fog lights.
- Rear fog lamp switch.
- Plugs (reserve places for installing switches for additional equipment).
- Headlight level control.
- Tachometer.
- Left turn signal indicator.
- Speedometer.
- Right turn signal indicator.
- Coolant temperature gauge.
- Fuel level indicator.
- Left indicator panel.
- Information display.
- Right indicator panel.
- Button for resetting the daily mileage counter and setting the clock.
Vector W8
The interior looks out of format. There are a lot of toggle switches, all sorts of buttons, switches, there is a color digital display instead of the usual dials. A cosmic picture is created inside. Of course, you will be attracted by the luxurious leather seats and the unusual steering wheel, equipped with and distinguished by a huge core. It seems that its middle is like a diamond in a ring... And the overall picture of the interior resembles the interior of a fighter-bomber.
Chevrolet Corvette
Looking at this dashboard, it's hard to imagine that it was designed in the sixties. Externally it is quite stylish, it has a spirit of modernity, despite the fact that many years have passed. Even the gauges were moved to the driver's side, and there was a place for a round tachometer above the steering column. The panel has a clock and radio, they are located on the center console. On the passenger side there was a deep recess with a safety handle. Options included a heater, power windows, radio, and seat belts. In my opinion, everything you need is there and in its place.
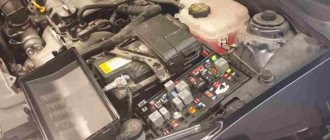
Wires
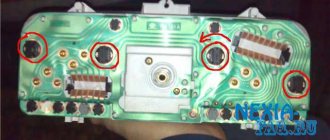
The number of wires is amazing. It would seem that the VAZ 2110 is far from the most modern car, which does not have a huge amount of electronics. However, there is wiring in abundance.
Many people believe that it is best to remove all the wiring in one big bunch. But this is not the best solution. Having removed all the wires, it will then be incredibly difficult for you to figure out which wiring is connected to what. If replacing the wiring is not planned, do things a little differently.
Disconnect only those wires that relate to the instrument panel. Label them, label them with self-adhesive labels, write down all the designations on a piece of paper. This will allow you to understand where which wiring is connected during the reassembly process.
The easiest way to disassemble the instrument panel is to contact professionals from a service station. After all, you planned to remove it for a reason, but in order to make some adjustments, replace dashboard elements, install LED backlighting, and so on. Therefore, it is not necessary to carry out dismantling yourself in order to go disassembled to a service station. Entrust the entire range of work to specialists.
If one or more lights on the panel of your car stop lighting, or the speedometer needle does not respond to an increase in speed, then you urgently need to diagnose the problem. Removing the dashboard of a car is a simple matter, the main thing is to approach it with all responsibility.
Let's look at how the panel is removed on the good old VAZ 2107 car.
Koenigsegg CCXR
Beauty and eccentricity. Can an ordinary dashboard evoke a lot of emotions... Yes, especially if it is a dashboard from a Swedish developer and famous automaker. What's special about it? The trick of this model lies in the dial itself. Here three devices are placed in it at once. This may not be convenient for some, but it looks unusual! Such a bold embodiment of the designers’ idea also affected the information content of the shield.
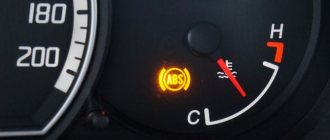
Coolant temperature indicator
The device operates in combination with a coolant temperature sensor, which is installed in the cylindrical heads. When the temperature indicator shows a resistance of approximately 650-1340 ohms on the board, the arrow should be located at the initial marks of the scale.
If the resistance results on the dashboard have reached 76-88 OM, then the arrow should reach the section of the scale marked in red. The arrow reaches the end of the red scale when the sensor resistance is 41-51 ohms.
If the resistance data and the arrow level do not match, then the machine requires repair or replacement of parts.
Lexus LFA
And this is a Japanese creation, who else could think of this! The dashboard seems a little strange. But, LFA is also capable of working mechanically. The special feature is that the panel will be rebuilt when necessary. Depending on the driving mode selected by the driver and driving speed, the panel adjusts accordingly to these parameters. The point of this development is to ensure that the motorist receives only the necessary data.
Honda Civic
Maybe someone is already familiar with this notorious two-story dashboard. By the way, this is not a new modification; it is already about fifteen years old. The trick is that the speed of the car can be seen on the indicator, which is located slightly above the circumference of the steering wheel. The remaining gauges, including the tachometer, are located on a monitor that fits inside the circle of the steering wheel. In principle, it’s convenient, but as they say, there are so many people, so many opinions.
Removing decorative elements
- The small plastic knobs on the heater switch will not allow you to easily remove the panel. To remove them, you need to pull them slightly to the side.
- Next, you need to remove the daily mileage reset button.
- To get to the screw securing the panel, on the right side near the heating switch levers, remove the decorative plug.
Now there is nothing stopping you from removing the panel, use a Phillips screwdriver to unscrew the self-tapping screw and move it to the side.
Before removing the dashboard, place a light-colored cloth or small box on the seat. You need to put all the plastic components and screws there so as not to lose them around the cabin.
Citroen CX
The creation of this car goes back to the distant middle of the last century. I don’t know why, but many experts attribute the most points to Citroen for creating strange things. Although, if you look at the dashboard of this developer, there may be an explanation for this. The speedometer and tachometer catch your eye. Here they are made in the form of rotating reels equipped with numbers. On top of everything else, they are also under a magnifying glass... It’s really strange.
What to do with the wires?
You will probably be amazed at the number of wires located in the panel space, intended to power various devices in your VAZ 2110. It would be more convenient to remove everything together with a lump of wires. But take your time. It is unlikely that you are going to change anything on a completely new car, so in the future you will spend a long time figuring out which wire comes from what, and how to connect it. So that it turns out that disassembly went quite smoothly, but reassembly led to a slight stupor.
So try to disconnect all the connectors and wires that you can. Now you can finally remove the panel and remove it from the car. For fresh traces, do not forget to separate (you can tie in a pile) the entire wiring harness that belongs directly to the instrument panel, and mark the rest with self-adhesives. This will help you a lot when you start installing new equipment.
The pinout of the instrument panel is discussed in detail in this article:
The dashboard of a modern passenger car is an independent part of the car’s interior. Moreover, one of the most important components, which must meet two requirements and solve two important problems. Provide the highest functionality and create a feeling of aesthetic satisfaction, combined with an awareness of the comfort provided by a particular panel, through conveniently located storage drawers, cup holders, instruments and control buttons, as well as pleasant, non-straining lighting.
Dashboard VAZ 2114
Cars of the Samara 2 family are equipped with a modern VAZ 2114 instrument panel, which is also called the “European panel”. The designers worked on it so that it allows for good forward visibility, a pleasant appearance, combines information content and ergonomics, and at the same time helps the driver cope with ordinary everyday needs. And they mostly succeeded. A block of instruments and sensors installed in front of the driver’s eyes, behind the steering wheel, provides him with the maximum possible amount of information:
- In the central part there are two dial instruments, on the left there is an engine speed indicator, by which the driver determines what load the power plant is working with at a particular moment and, if necessary, corrects this process by switching speeds; in the window under the arrow there is a digital clock. On the right is a speedometer or an indicator of the current speed of the car, in the window under the arrow there are digital readings of the kilometers traveled for the entire period of operation of the car and for the last trip;
- In the upper part, between the dial instruments, there is a turn signal indicator lamp with green arrows pointing left and right;
- In the lower central part there is a red “stop signal” triangle, and below it CHECK ENGINE is a red signal for engine emergency conditions according to information from the electronic on-board unit;
- In the left middle part of the instrument block there is a dial gauge for the engine temperature, or as it is called in the literature, a coolant temperature sensor, above it there is an icon that lights up when the engine overheats. Below it are icons for the throttle, oil pressure, handbrake and battery;
- In the right middle part there is a dial indicator for the presence of fuel in the fuel tank, above it is an icon for a fully filled tank, below it is an icon for the minimum amount of fuel in the tank, as well as icons for low beam, low brake fluid level and high beam.
Ergonomics is ensured by the convenient arrangement of instruments and information icons for visual perception of information, as well as keys, buttons and levers for manipulating them. A standard on-board computer is installed in the central part of the panel, usually a Gamma, Multitronics, Prestige or State computer. The location for its installation was chosen very well and with its help the driver receives expanded information about the state of the operating engine systems and vehicle components.
This information is reflected not only on the BC display, but is also transmitted through other control or information lamps and signs located on the instrument cluster and in other places on the dashboard. In addition, the on-board computer display displays other information, for example about the timing of the next inspection or maintenance.
The glove box, which can be closed, is conveniently located and has a backlight and a fairly large niche underneath it. The central beard also has a niche for storing something and an ashtray. The air duct outlets are quite well made, allowing for efficient glass blowing and preventing fogging.
During the operation of a car, problems constantly arise with malfunctions or failures in various systems. In order to get to some of them, it is necessary to remove the VAZ 2114 panel. Even to remove the instrument panel, you need to figure out how to remove the dashboard on the VAZ 2114 (instrument panel).
In addition, on the VAZ 2114 the panel must be removed completely if there is a need to repair air ducts and the stove, or the car owner wants to completely glue and seal the joints of the panel structure so that it does not creak.
Lamborghini Reventon
Inspiration from military aircraft gauges is evident in this instrument panel design. There is a certain similarity in this. The car is equipped with a TFT display that operates in one of two modes. Speaking of the first one, it is a classic, so there is nothing special about it. With the second, the situation is different; the speedometer becomes in the form of a fighter sight. The tachometer takes on the shape of an arsenal. An overload display may appear.
Installation of ready-made tuned devices on a VAZ-2107
As mentioned earlier, specialized stores and service centers sell a large number of ready-made kits for tuning the VAZ-2107 panel. The configuration, dimensions and connectors of finished electrical appliances intended for modernization are practically no different from the analogues installed on the standard version.
The work is not a particularly complicated process: it is almost impossible to mix up the connection points, all connectors differ in shape and simply do not fit into places not intended for them.
The only nuance regarding tuning the tidy using a ready-made kit is the procedure for installing the speedometer cable. The standard device provides for its free installation with a certain amount of play - the braid allows you to freely remove the element, moving it towards the car's interior. During dismantling, the cable may come out of the coupling with the speedometer drive on the gearbox, as a result of which the latter element simply will not function. Before fastening the nut, you should carefully inspect the position of the cable and make sure it is in good condition.
McLaren 720S
What's special about this dashboard? There are two modes: track and road. In the case of the second, the driver sees a familiar screen with information, the same as what most modern cars are equipped with. If the driver is in track mode, the panel can immediately change, showing a strip with speed and rpm indicators, as well as an indicator of the active gear.
Each of these panels is unique and strange in its own way. Nevertheless, the designers tried, carried away by the creative impulse, creating something special. And we can say that they succeeded.
Do you want to know more interesting things from the auto world? Then subscribe to the channel in Yandex Zen!
When disassembly is required
There are several reasons why car owners want to remove the tidy:
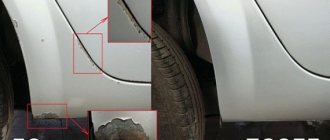
- It is damaged by mechanical shocks, as a result of hitting potholes, etc. In fact, the strength of the standard dashboard leaves much to be desired, so damage is not uncommon for dozens;
- There are scratches and abrasions on the surface of the device, the paint has peeled off somewhere, and there are signs of wear. That is, the appearance of the panel leaves much to be desired, so to correct the situation it needs to be removed;
- The desire to transform the interior of the car. Many VAZ 2110 owners decide to get rid of the old dashboard in order to put something more modern, original in its place, and change the backlight to LED lights.
To make any changes to the instrument panel, the first priority for the car owner is to remove the old structure. It's not difficult to do this yourself. Follow the instructions strictly, do not break the sequence of steps, and pay close attention to the markings of all elements and especially wires.
If you connect something incorrectly and reassemble the panel without checking, you risk not only having to re-disassemble the dashboard, but also encountering non-functioning devices, short circuits and even worse consequences.