Owners of cars with a manual transmission often encounter the problem of shifting gears, namely, after starting the internal combustion engine, one or more gears may not engage or engage, but with great effort. Also, when turning on the speeds, extraneous noise, vibrations, etc. may appear.
The problem may appear suddenly or progress gradually. Difficulties when switching gears can occur both on a “cold” and on a “warm” gearbox. In this case, the speed with the engine turned off will be switched on without much effort.
Next, we will look at why such malfunctions and failures occur, for what reason the gears do not engage when the engine is running, after replacing the clutch, first gear does not engage well, etc.
Principle of operation
The working diagram of the gearbox is as follows. The drive shaft receives rotation from the driven clutch disc and transmits it to the intermediate one. If the gearbox is set to neutral speed, there is no engagement of the intermediate shaft gears with the driven one, the car is immobilized, since rotation is not transmitted.
When a gear is engaged, the driver engages the driven element gear with a specific intermediate gear. And rotation begins to be transmitted from the driven shaft to the wheels. The car starts to move.
The necessary gears are engaged by a control unit consisting of three sliders and forks. Each of the forks is equipped with a special groove of the element. That is, the driver, using the gearshift lever and a special rocker, acts on a certain slider, moving it to one side. In this case, the fork on the slide pushes the gear, and it engages. The change in gear shift speed is influenced by engaging gears of different sizes and numbers of teeth.
To prevent the slider with the fork from returning to its original position, the box control unit is equipped with latches. The latter are spring-loaded balls that fit into grooves on the sliders. That is, the slide has grooves in certain places.
This is a simplified description of the design and operating principle of a manual transmission.
In some cars, the slider in the gearbox, which is responsible for engaging the first gear, also ensures that the reverse gear is engaged. It happens to them that the first and reverse gears are difficult to engage. Of course, this breakdown cannot be ignored.
On other gearboxes, first and reverse speeds are separated and different sliders are responsible for turning them on. In such cars, problems with engaging first gear may not be reflected in engaging reverse gear.
There are several options why first gear does not engage well. It also all depends on how the cause manifests itself - it is impossible to turn it on, and everything is accompanied by a metallic grinding sound from the side of the box, or the speed turns on, but immediately turns off on its own.
For those with automatic
If your car has an automatic transmission. It will not hurt you to know the modes in which your machine can operate:
- P – For parking and starting the engine. Switching to this mode is possible only after the machine has completely stopped.
- R – To move backwards. Switching to this mode is also possible only after stopping the car and with the brake pedal pressed.
- N – Neutral. When the engine is completely disconnected from the gearbox.
- D – Moving forward without restrictions on gear shifting (the most commonly used operating mode of the automatic transmission).
- D3(S) – Low gears for climbing and braking engines on descents.
- D2 – Mode for difficult conditions (slippery or mountainous roads). Gears above second are not shifted, that is, only first and second gears are engaged.
- D1(L) - Movement occurs only in 1st gear, used off-road on mud, snow or ice, where you need to drive without changing the throttle, and also to overcome steep climbs.
The automatic transmission also has a button on the mode shift lever with the inscription O/D OFF. When it is turned on, the inclusion is prohibited, increasing the gears of the analogue of the 5th gear of the manual transmission. That is, if your automatic machine has 4 gears for moving forward, then for more dynamic acceleration it will use only three lower gears.
About a faulty automatic transmission, an automatic transmission is much more complex than those encountered with a manual transmission, and the chances of repairing it in your garage are slim. But despite this, you still need to know something about it, if only in order not to harm it through improper use.
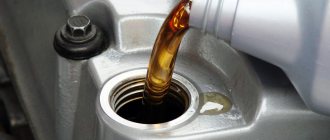
An automatic transmission is much more demanding in terms of accuracy in maintaining the oil level in it than a manual transmission. Both too low and too high oil levels are very harmful to her. Both of these can lead to serious damage. In both cases, oil foaming occurs. When there is a lack of oil due to the fact that the oil pump begins to capture air along with the oil. When there is excess oil, it foams on the rotating parts, which in this case are immersed in it. Foamed oil compresses better and has low thermal conductivity. Therefore, if you operate a machine with such oil, the pressure in its control systems will be low. Which will lead to slipping of the clutches and their intensive wear. Deteriorated thermal conductivity will not allow all excess heat to be removed. Which, together with low pressure, will lead to the machine failing and requiring serious repairs.
Foamed oil has more volume. Therefore, checking the oil will show the level is too high. If you find that the oil level has risen for no apparent reason, you need to turn off the engine and let the oil settle. After this, check the level again. If it turns out to be low, you need to safely add the required amount and repeat the test.
The oil level in the machine is checked using a dipstick or through a control hole closed with a plug.
How to check the oil level using a dipstick
- Warm up the oil to operating temperature (to do this you need to drive about 15 km).
Select a flat horizontal area for measurement. Put the car on the handbrake.
- Move the lever to select the operating mode of the box through all positions, holding in each position for 3 to 5 seconds, until the machine operates.
- Leave the mode selector in position P, and in this position determine the oil level.
- Without turning off the engine, remove the oil dipstick, wipe it dry and reinsert it into the tube until it stops, then pull it out and read the readings. The upper limit of oil traces on a dry dipstick should be at the mark with the inscription “hot” or in an area with intersecting notches.
If the level is insufficient, you can add oil through the tube into which the dipstick is inserted. Do not forget that the automatic transmission is afraid of dirt, so add only clean new oil. Wipe the dipstick with a clean cloth from which the threads do not fall out.
When checking the oil level, pay attention to its appearance. Dark liquid with a burning smell indicates that not everything is in order in the unit. First, try changing the oil and filter in the automatic transmission. The milky color of ATF indicates that coolant has entered the box. The coolant softens and swells the material from which the clutches are made. Do not hesitate to change such oil, having first eliminated the cause of antifreeze getting into the box, otherwise significant damage will be caused to the machine. Coolant may enter the box due to a leak in the oil section in the radiator of the cooling system. In this case, the emulsion will be observed both in the box and in the engine cooling system.
The most common machine malfunctions
- The car does not move forward or reverse normally. Possible reasons: wear of the forward clutch clutches, a defect in the piston of this clutch, breakage of the rings of the same clutch, jamming of the valve body valves.
- There is no reverse speed, forward there are only 1 and 2. Probable causes: wear of the reverse clutch clutches, a malfunction of the piston of this clutch, damage to the spline joint in the drum body, another defect of this drum.
- There is no rear, everything works forward. Reasons: wear of the brake band, malfunction of the piston of this band or breakage of its rod, defects in the braking package.
- There is no movement either forward or backward when you turn on any mode, there is a shift push, but the car stands still. Causes: torque converter malfunction, lack of oil, clogged filter.
- Only reverse, 1st and 2nd gears are engaged. Reasons: valve jamming in the valve body, low oil level, general wear of pistons and clutch clutches that do not engage.
Poor activation due to the slider
First, let's look at why first gear doesn't engage well and the problem is with the transmission.
Often the problem with turning on the speed lies in the latch and slider. The appearance of a burr near the groove for the retainer on the slide can easily prevent the ball retainer from entering the groove. When moving the slider, the latch rests on this burr and cannot overcome it without significant effort from the driver. In this case, the gears come very close to each other, but do not engage, and the teeth of one gear hit the other.
Elimination methods
When all the causes of the malfunction have been identified, you can proceed directly to considering the issue of eliminating the problems. In order to understand the whole essence of the issue, it is worth understanding, at least superficially, the design of a car engine and gearbox. So, let's look at how to troubleshoot problems associated with turning on the speed when the engine is running.
Engine problem
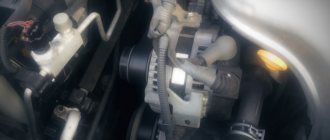
To change gears, the engine has a clutch. It is usually of the dry type and has three components: a disc, a release bearing and a basket (pressure plate). Failure of the first two elements can result in difficult gear engagement. On most modern cars, this design is replaced as an assembly.
Another element that can affect gear shifting is the clutch master and slave cylinder. As practice shows, when parts on the cuffs wear out, they begin to leak, which in turn leads to loss of fluid. Accordingly, the lack of lubrication reduces the pressure in the system, which leads to the clutch jamming.
A frequent cause of poor gear engagement is oil getting on the clutch disc lining. So, for most cars the disc should be dry. But, during operation, between the internal combustion engine and the gearbox there is a build-up on the oil seals of the crankshaft or the input shaft of the box, which allows oil to get onto the disc.
The problem can only be diagnosed and corrected by disassembling the parts. To do this, you will have to work hard, since the car enthusiast needs to disengage the engine and the gearbox, since it is between them that the clutch kit is located.
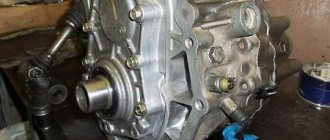
Gearbox problem
When the engine is running, the gears do not want to engage - the problem may be hidden in the gearbox. So, the failure of some elements can lead to such an effect.
How to identify and fix the problem? To do this, you will have to remove the gearbox from the car and disassemble it.
During the disassembly process, it is determined whether there is wear on the drive shafts, the condition of the seals, synchronizers and gears. As practice shows, gears usually perform poorly precisely because of wear on the synchronizers. To fix the problem, they do a major overhaul of the gearbox, which for the most part is not cheap.
Disassembling the gearbox is an individual process for each vehicle, and before starting work it is worth studying the repair manuals offered by the manufacturer.
After repairing the gearbox, start the engine and try to engage the gear. The shift lever movement should be smooth and without any extraneous sounds. As practice shows, when carrying out a major overhaul of a gearbox, the clutch is usually changed, since both elements often have significant wear.
Knocking out the speed
If it turns on, but immediately turns off, then the latch may be stuck in the squeezed position, so it no longer does its job. It is also possible that the spring that presses the ball retainer is destroyed. Without the force of the spring, it will not be able to hold the slider in the desired position.
If significant force is applied while shifting into gear, the shift fork may bend.
Poor switching may also be caused by incorrect installation of the gearshift knob. In this case, the rocker does not bring the gear to full engagement.
Troubleshooting gearbox
Troubleshooting the gearbox is done by removing it from the car, disassembling it, and troubleshooting parts if it is found that some of them are badly worn. Particular attention should be paid to the condition of the sliders and clamps. If burrs are noticed on the sliders, they must be removed with a file. You also need to check the condition of the springs and retainer balls. The springs must be intact, and the latch must move without problems in its seat. If necessary, worn or damaged elements must be replaced.
You should also carefully inspect the power forks for bending. Even a slight bend can affect the ease of gear engagement.
After assembly, gear shift adjustment must also be performed. To be precise, the position of the scenes is set.
Defection and assembly of the GAZelle Next gearbox
Before assembly, check the condition of the gearbox parts. Cracks of any shape and length are not allowed on crankcase parts. The bearing housings, the holes for the shift rods and the steel babbit bushing of the rear housing extension must be smooth, without nicks, signs of scuffing or noticeable wear.
When assembling, we are guided by the article on disassembling the gearbox (article - Disassembling the gearbox of a Gazelle Next car), since you need to assemble the box in the reverse order
The bearings should fit into the sockets tightly, by hand force or by lightly tapping through the spacer. The crankcase gaskets must be intact, without ruptures, delaminations or breaks. We check shafts, axles and rods for cracks, noticeable signs of wear, scuffing and metal envelopment. This also applies to the splined parts of the shafts; the mating parts should move easily on the shafts, without noticeable play or jamming. Remove minor traces of scoring, as well as possible corrosion (on the splines), with a velvet file and very fine sandpaper, and polish the shaft journals with thin GOI paste or diamond paste. On the teeth of gears and synchronizer couplings, chips, traces of jamming and chipping are not allowed; on the cones of synchronizers there should also be no traces of jamming, severe wear and enveloping of bronze on steel. Ball and roller bearings must be in perfect condition. Their rotation should be easy, without jamming, clicking, play or vibration. Fatigue chipping (pitting), noticeable wear and chips are not allowed on raceways, balls and rollers (needles). Ball bearing cages must not touch the rings or have cracks or breaks. In general, after a mileage of about 100 thousand km, it is better to replace ball bearings, regardless of their condition. We also replace the cuffs of the sliding fork of the propeller shaft and the cuff of the input shaft, regardless of their condition.
Before assembly, thoroughly wash all parts in kerosene or diesel fuel, and degrease the crankcase threaded holes with acetone or solvent for nitro paints. We coat the rubbing surfaces of the gear shift mechanism, the steel-babbit bushing, cuffs and splines of the secondary shaft with CV joint-4 lubricant, and the rest with transmission oil. Bearings and their seats should also be lubricated with transmission oil before assembly.
Synchronizer assembly
Lubricate the synchronizer parts with a thin layer of transmission oil.
Install one spring into the synchronizer hub.
Install the cotters into the synchronizer hub
Install the sliding clutch on the hub in accordance with the marks.
Install the second spring so that the bent ends of both springs are in the same crack, and the coils of the spring are directed in different directions.
Check the ease of axial movement of the synchronizer parts.
The lateral clearance between the hub and the sliding clutch should be within 0.01–0.05 mm.
| rice. 5 |
Check the gap between the gears and the corresponding locking rings, which should be within 1.1–1.5 mm. Otherwise, the locking ring must be replaced.
| rice. 6 |
Press two oil seals into the rear crankcase extension flush with the end of the extension, if they were removed. Their working edges should be directed inside the amplifier.
| rice. 7 |
Install the retaining ring of the secondary shaft ball bearing into the groove of the rear crankcase, if it was removed.
Place the 5th gear and reverse synchronizer sliding clutch on the secondary shaft to the reverse position.
Place the input shaft onto the secondary shaft so that the bulk rollers do not fall out. At the same time, make sure that the protrusions of the blocking ring on the input shaft fit into the grooves of the 3rd and 4th gear synchronizer hub.
Connect the secondary shaft assembly with the primary shaft as a set, with the gear block and the axis of the reverse intermediate gear, engaging the corresponding gears.
| rice. 8 |
For ease of further installation, you can tie the resulting set with a rope, belt or wire.
Place the rear part of the crankcase in a vertical position in a vice.
Clutch faults
Often the reason why first gear does not engage well is not the gearbox itself, but the clutch.
Modern gear transmissions are equipped with synchronizers that equalize the speed of rotation of the gears, ensuring ease of engagement.
However, the first speed is not equipped with a synchronizer. If the clutch “drives”, then when the pedal is depressed, the transmission of torque from the engine to the gearbox does not completely stop.
Because of this, there is a difference in the rotation of the shafts and gears of the first gear, in particular.
It is quite possible that the reverse gear will also not engage, or it will be difficult to engage. Moreover, if you manage to engage the gear, the car begins to move even with the clutch pedal fully depressed. An additional sign of clutch problems is that the car jerks when changing gears, especially if any of the gears do not have synchronizers.
Why is it difficult to engage manual transmission gears?
manual gear shifting
- The most common problem is clutch failure. In such a situation, reverse gear turns on with a bang. This happens because the gear overlaps the tooth. Reverse speed is the only gear in the box that does not have synchronizers. For this reason, clutch failure is so obvious on it.
- The second reason is a defect in the mechanism responsible for selecting the gear. This breakdown occurs when the car is stationary and you try to shift into gear.
- The third is severe wear of the gearbox synchronizers. Mostly, breakdowns occur with those that are most often used. These are first, second and third gear. Severe wear of the synchronizers only appears when switching while driving.
To prevent possible gearbox malfunctions, perform regular maintenance, change the oil on time, and in case of minor failures, rush for diagnostics . This will save you time and money in the future.
Watch the video for what not to do with a manual transmission:
What to do if it is difficult to engage reverse gear?
If you have difficulty engaging reverse gear, do one of the following :
- When you feel that the gear has not reached the end, release the clutch slightly, and the gear will be inserted all the way.
- Fully depress the clutch and only after a few seconds engage reverse gear.
- Depress the clutch, set the gear to neutral and release the clutch. After this, press down and engage reverse gear.
- Shift into reverse through another gear. For example, first engage 4th and then shift to reverse.
How to check the clutch?
The car engine can help indicate a malfunction of the clutch, not the gearbox. If, with the engine turned off, all speeds are switched on easily, no problems arise, but when the engine is running, first and reverse gears are difficult to engage, or impossible to engage at all, you should pay attention to the clutch.
The reason that the clutch “leads” is often due to its incorrect adjustment.
Transmissions are not included. Appears when the engine is running - the main problems
As you already understand, we will talk specifically about a manual “box” and about shifting gears (or rather, not shifting) on it. I have quite a lot of experience in this area; I personally repaired cars such as VAZ 2114, VAZ 2110 (and the 10th family in general). To say that there are global differences between foreign cars, there really aren’t any! So if your speed is not cut off, then the reasons may be similar. In general, the article will be useful, at the end, as usual, there is a video...
THE CONTENT OF THE ARTICLE
A fairly large number of such questions come to me, especially from novice drivers of our VAZs! Especially with front-wheel drive, because in rear-wheel drive cars the lever was installed in the manual transmission itself. I want to answer everyone right away - the problem of non-inclusion may not always be cardinal! Often it’s a small matter, something just got loose or unscrewed from time to time, as a rule, this happens in 50% of cases.
Therefore, I will try to break the material into two large components - simple and complex faults.
I suggest starting with simple faults.
Clutch adjustment and repair
The first thing to do if you have problems with the clutch is to make an adjustment.
If the adjustment does not help, then you will have to dismantle the clutch from the car, carry out troubleshooting and replace worn elements. Sometimes, over time, all components of the system wear out. In this case, the clutch is completely replaced - the drive and driven discs, the release bearing.
Difficulty engaging first gear Rating:
#1 Stirlitz
- Supreme shaman