The lambda probe sensor on the fourteenth is part of the system that powers the engine. It estimates how much oxygen is contained in the exhaust pipe. This is necessary in order to adequately regulate the mixture for the operation of the wheelbarrow. By the way, such devices are installed only on the injector.
Oxygen sensor (lambda probe) VAZ 2114
Before you check the lambda probe, you need to understand the main characteristics of its operation.
The sensor, or rather what works in it, is a housing made of ceramics with platinum. The operating temperature is from 350 degrees, while it is dialed by the lambda probe, the mixture is combined by the engine power system according to the readings of other sensors.
It works like this: the exhaust fills the body (working) of the oxygen sensor, it reads the difference in the oxygen level from the exhaust and the atmosphere and sends it to the electronic control unit, which already processes it.
Oxygen sensor location by engine type
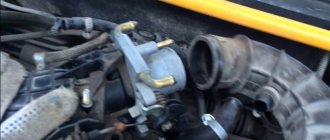
On engines of different sizes, lambdas are located in different places in the exhaust system.
- 1.5 liters: stands on the exhaust pipe, screwed in from above, exactly in front of the resonator. It’s easy to find, there’s only one on the exhaust system, you can see it by driving the car into a pit.
- 1.6 liters: this engine is equipped with two oxygen sensors, they are located on the catalytic collector. There may be one - for euro 2, and for euro 3 - 2 pieces.
As always, part of the fourteenth system tends to break down, but don’t rush to run to the spare parts store. It is necessary to check the lambda probe for suitability; diagnostics often reveal completely different causes of malfunctions in the exhaust system.
Why does the sensor break?
There are many reasons for accelerated wear. The main problem is low-quality gasoline with a high content of heavy metals. They form a lot of soot, which quickly covers the electrodes.
Worn oil scraper rings and caps also harm it. Because of this, lubricant often gets into the fuel and then into the exhaust pipe.
- supply of an incorrectly composed fuel-air mixture, which is caused by the failure of other sensors;
- unadjusted ignition timing - this leads to overheating of the catalyst.
How to check the oxygen sensor of a VAZ 2114?
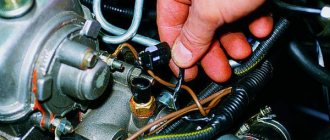
For basic diagnostics you need the following: get instructions showing what an oxygen sensor looks like, you also need an oscilloscope and a multimeter. Warm up the engine before checking the oxygen sensor.
But that's not all! Be sure to check out what the oxygen sensor pinout is:
- A is a wire from the lambda sensor with positive potential,
- C is a wire from a lambda sensor with a negative potential,
- B is the heating element wire on the lambda probe.
Now the check action plan:
- We look at the diagram of the sensor and check those parts of the system (their indicators!) on which the lambda probe has an influence: the power supply on board, the ignition system, the fuel supply system, look at the sensor housing and wiring - so that there is no damage.
- The oxygen sensor must be removed and checked with a multimeter, which must be switched to voltmeter mode: start up, press the gas to the floor up to 2500 rpm, then reduce it to 2000.
- The fourteenth is the injector, therefore, removes the vacuum pipe from the fuel pressure regulator, charges it into a voltmeter, if the reading is close to 0.9 W, the lambda probe is in perfect order, if the figure is less than 0.8 or is not there at all, then the sensor has become unusable.
- You can do a mixture test: take the same vacuum pipe and create air suction. When the lambda is running, the number on the voltmeter will be up to 0.2 W.
- You should look at the behavior of the oxygen sensor during the process: put it back on the exhaust system, parallel the multimeter with it. We press the gas to the floor up to 1500 rpm, look at the numbers: if 0.5 W, then everything is fine.
A simple check of the lambda probe requires basic knowledge of what can break and what most often breaks on it:
- If the heating in the oxygen sensor does not work,
- If the device does not respond, has lost sensitivity to exhaust gases and the level of oxygen in them,
- Breakdown of the contact system.
In the latter case, the on-board computer will give you an error, which will indicate a faulty sensor. In other cases, nothing will show you the fact of a dying sensor except self-diagnosis.
CLEANING
If the oxygen sensor does not work, there is no need to rush to throw it away. Often, due to oil waste, carbon deposits form on the ceramic electrodes. You can try to remove carbon deposits, but do not use metal objects or sandpaper. To clean carbon deposits, use rust removers, for example, WD40. Perhaps the performance of the lambda probe will be restored.
Unfortunately, not all car owners know what a lambda probe is and why it is needed. A lambda probe is an oxygen sensor that allows the electronic system to monitor and balance the correct ratio of air and gasoline in the combustion chambers. It is able to promptly correct the structure of the fuel mixture and prevent destabilization of the engine operating process.
This rather fragile device is located in a very aggressive environment, so its operation must be constantly monitored, since if it breaks down, further use of the car is impossible. Periodic checking of the lambda probe will guarantee stable operation of the vehicle.
Reading errors
Checking the VAZ 2114 oxygen sensor may be limited to simply reading errors from the board, here are the most common ones related to lambda:
- Error P0131 is a problem with the signal level coming from the device; it is too low, indicating that the mixture is concentrated.
- Error P0132 is a similar problem with the signal, only in the case of errors, the signal is high, indicating a lean fuel mixture.
The errors issued are not a panacea; they relate more to the fuel system, and not to fixing problems with the lambda probe. Therefore, we saw errors - look at what’s wrong with the fuel pressure indicator and whether there is any air leakage from the atmosphere. Then do diagnostics of the sensor itself.
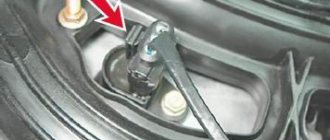
The voltage on the oxygen sensor is one of the stages of checking its functionality. Before replacing or repairing a lambda probe with your own hands, you need to carefully check whether the device is receiving the necessary power and what the condition of the contact circuits is. To do this process, you need to open the hood of your fourteenth and remove the sensor (its connector is secured with a small clamp on the cooling system pipe). We will look at two circuits - the heating element of the device and the oxygen reading element on the sensor body.
- To look at the circuit of the heating element, you need to take a multimeter, connect its negative terminal to the engine, and the positive terminal to wire B. Turn the key in the ignition, look at the numbers on the multimeter: if 12 V, then good, less - this is a discharged battery (in a rare case ), open circuit of contacts (most likely). Another option is to blame the electronic control unit, but here the on-board computer usually gives an error.
- To check the circuit of the sensitive element, you need to measure the voltage between wires A and C. We put the negative terminal of the multimeter on wire C, the positive terminal on wire A. We look at the indicator on the screen: if 0.45 V, then everything is in order. If there is no number or it fluctuates within 0.02 V, the problem is in the power circuit. Again, the option is to blame the ECU, but it is not common.
Device and symptoms of malfunction
To completely burn 1 kilogram of fuel mixture, about 14.7 kilograms of air are needed. Therefore, data is very important in the fuel supply system, since its performance directly affects the smooth and stable operation of your car’s engine. Periodic checking of its performance is very important, however, before checking the lambda probe, we need to study the device, as well as the principle of operation. The oxygen concentration meter sensor, otherwise called a lambda probe, (in our case, VAZ 2112 lambda probe) contains the following elements:
- Metal body with threads for mounting
- Sealing ring
- Ceramic insulator
- Electrical signal current collector
- Wires
- Cuff that seals wires
- Live contact for heating circuit
- Protective shell (outer) with ventilation hole
- Ceramic tip
- A special tank with an incandescent coil in it
- Protective screen, with a hole for the passage of exhaust gases
All parts of the lambda probe are made of materials resistant to high temperatures, since the sensor itself has a fairly high operating temperature, so it is not afraid of overheating, while overheating, for example, a motor will have dire consequences (and this is possible if the probe faulty). Probe sensors can have from one to four wires in the device, respectively, the name comes from them: one and so on up to four wire sensors. By the way, some “craftsmen” claim that the VAZ 2112 works well without a lambda probe, but they are mistaken, it’s just that until the engine is warmed up, the readings of the sensor are not taken into account during injection, since it has not reached its operating temperature, therefore, you can trust such advice drive without it, only on a cold engine. Failure of the oxygen sensor is often caused by violations in the maintenance and care of internal engine parts and some other factors, such as:
- Cleaning the body (washing) with products that are not intended for this purpose
- Accidental contact with cooling fluid or
- Increased content of lead (metal additives) in fuel
- Severe overheating (red hot) of the sensor housing, which is caused by an unrefined combustible mixture
- In addition, the ingress of highly contaminated gasoline may occur due to a malfunction of the gasoline pressure regulator, or the DTOZh (coolant) temperature sensor, or a clogged fuel filter.
As a rule, if the lambda probe of the VAZ 21124 is faulty, this causes the following very noticeable problems in the operation of the engine:
- Its need for fuel increases, its consumption increases
- The car jerks when driving
- Unstable motor operation occurs
- The operation of the catalyst is disrupted
- Exhausts exceed permissible toxicity standards
Therefore, it is necessary to carefully monitor the operation of the probe and the condition of the exhaust gases; it is recommended to check its condition every 5,000-10,000 kilometers, especially this is necessary before the vehicle is certified for exhaust toxicity. In order not to bother with checking and replacing, no one bothers you to go to the service station, they will replace the sensor, they may not even look for what the problem is, or even find a couple of additional (not always existing) faults, which will raise the cost of repairs, and the quality of work may require the best.
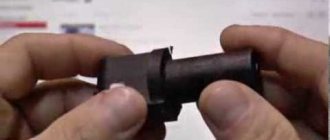
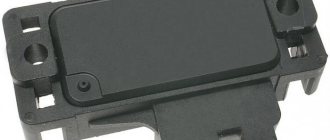
In the photo above we see what a replacement probe looks like, which is worth purchasing to replace it yourself.
Checking the probe status
So that you can check the performance of your oxygen sensor with your own hands, you will need the following items:
- Operating instructions for your car, which will tell you where the lambda probe is located in the car
- Digital voltmeter
- Oscilloscope
We have listed only the basic necessary auxiliary tools. The engine will need to be warmed up during the test. Now we’ll tell you how to check the lambda probe on a VAZ 21124 yourself, it’s simple:
- We first study the manufacturer's instructions; we are interested in the main parameters of our sensor. We check those indicators that will be affected by its unstable operation: voltage in the vehicle’s on-board circuit, ignition timing, condition and functioning of the gasoline supply system. In addition, we pay attention to the external condition of the mechanisms, for example, the presence or absence of mechanical damage to the housing and wiring
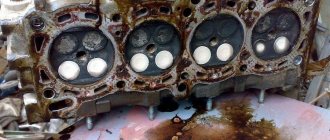
- Then we look into the engine compartment, find the lambda probe there. We inspect its condition for contamination. When the tip of the probe is covered with a layer of soot or lead, as well as a white-gray coating, it will most likely need to be replaced. The coating of the device with various deposits is usually caused by poor-quality gasoline composition. When the sensor tip is clean, then we continue checking further
- We disconnect the oxygen sensor from the car circuit and connect it to a digital voltmeter. We start the car, press the gas pedal, and increase the engine speed to 2500 rpm. We use a device to enrich your fuel mixture, reduce the speed down to 200
- If your car is equipped with an electronically controlled fuel system, remove the vacuum tube located in the gasoline pressure regulator. Now look at the voltmeter readings. And if the instrument needle approaches the 0.9V mark, this means that your lambda probe is in working condition. If the sensor malfunctions, the voltmeter needle will indicate a lack of response, as well as readings below the 0.8 Volt mark
- Do a lean test. To do this, you need to take a vacuum tube and provoke an air leak. When yours is working properly, then the voltmeter readings are about 0.2 Volt and below
- We check the operation of the probe in dynamics. We connect the sensor to the connector of our fuel supply system, install a voltmeter parallel to it. We increase the engine speed to 1500 rpm. If the sensor is working properly, the voltmeter should show 0.5 Volts. Any other value will indicate that the lambda probe for the VAZ 2112 is broken
GENERAL INFORMATION AND OPERATING PRINCIPLE
As can be understood from the name of the part, an oxygen sensor (OS) is a device through which the ECU receives information about the amount of oxygen remaining in the exhaust gases.
The DC is a rather complex device in terms of design. It consists of a ceramic electrolyte that can withstand extremely high temperatures, up to four hundred degrees. The electrolyte is made of zirconium dioxide, the surface of which is treated with yttrium oxide. The surface of the oxide is coated with platinum. The use of platinum is due to the fact that it is a material with maximum thermal conductivity.
In addition to the main electrolyte, the design of the lambda umbrella consists of the following parts:
- Protective shielded tips on both sides of the electrolyte, on which there are holes for air intake and exhaust gas. The tips, paired with an electrolyte, are the main functional part of the oxygen sensor, by which the analyzing device determines the potential difference;
- The tips are a kind of housing, inside of which there is an element with high current conductivity (collector);
- Between the tips there is a device that reads the resulting electrical signal;
- All structural elements of the oxygen sensor are located inside a metal housing. The lambda probe is connected to a wiring of four wires: 2 white wires, which are responsible for powering the device, and two black wires - the first transmits the received data to the ECU, the second is grounding.
The principle of operation of a lambda umbrella is as follows: the electrolyte, located in the exhaust gas flow of the car, is heated to a temperature of 300 to 400 degrees thanks to the built-in heating element. This temperature is necessary for the zirconium to reach its maximum conductivity and for the system to start working. The DC is installed in such a way that the tip on one part of it is in contact exclusively with exhaust gases, and the second tip is in contact with clean atmospheric air.
What is a lambda probe, principle of operation and its types
So, an air sensor is a small device that is installed in the exhaust manifold of any modern car and serves to assess the concentration of residual oxygen in the exhaust gases. Thanks to the readings of this device, the computer unit of your car receives data on the basis of which it prepares a combustible mixture. The lambda probe takes into account the residual oxygen concentration in the burned fuel and sends a signal to the electronics that the newly incoming combustible mixture needs to be either enriched or depleted of air. It goes without saying that any malfunction of the lambda probe may affect the performance of the car’s engine.
Remember! For combustion of 1 kg. mixture of fuel and air, you need to spend about 15 kg . oxygen.
Lambda probe device
A modern air sensor is a small structural device inside which there are a number of interconnected parts.
Lambda probe design
- A metal body with threads. It is designed to fix the sensor in the mounting hole;
- Insulator made of ceramic;
- O-ring seal;
- Conductors;
- Protective shell with hole for ventilation;
- Contact;
- Ceramic tip;
- Electric heater;
- Gas outlet;
- Steel shell.
As a rule, the start of exhaust gas measurements occurs at a temperature of 310-400 degrees . It is at this temperature that the special filler in the sensor becomes electrically conductive. Until the temperature reaches the desired value, the car’s electronic control unit takes readings from other sensors, and only then from the lambda probe. The peculiarity of its operation is that the exhaust gases and atmospheric air are separated by a container with a current-generating composition. As a result of certain chemical effects on this capacity from the exhaust side and from the air side, a difference in oxygen concentration occurs, on the basis of which an electrical potential is generated. The values of this potential are sent to the vehicle control unit.
All oxygen sensors are divided into four types depending on the number of wires in their design:
1. Single-wire; 2. Two-wire; 3. Three-wire; 4. Four-wire.
Types of lambda sensors
All of the above lambda probes come in narrowband and broadband .
CHECKING THE LAMBDA PROBE
You can determine that the DC is faulty and the lambda umbrella needs to be checked by the following signs:
- Problems with the engine at low speeds - the fourteenth stalls or does not pick up speed well;
- Gasoline consumption has increased;
- After the engine is turned off, distinct crackling sounds are heard at the location of the DC.
The fact that it is necessary to check the oxygen sensor is also indicated by the presence of errors 131 and 134 on the dashboard. These errors indicate that the device is sending an incorrect signal, and the problem must be sought in the wiring of the sensor, or in poor grounding of the device on the car body. The presence of error 132 indicates that the supplied fuel mixture is too lean (large amount of oxygen in gasoline).
Before handling any electronic equipment, you need to familiarize yourself with its features. The oxygen sensor pinout looks like this:
Pinout
- A – contact of the positive sensing element;
- C – contact of the negative sensitive element;
- B – power wire of the heating device.
Knowing what the lambda probe pinout looks like, you can start checking the device. First, let's study the location of the oxygen sensor according to the type of engine of the fourteenth:
- In cars with a 1.5 liter engine. it is located on the top of the receiving pipe, next to the resonator;
- Navaz 2114 with a 1.6 liter engine, the lambda probe is located in the engine compartment, directly on the engine exhaust manifold. Keep in mind that on the new models of the fourteenth, 2 DCs are installed at once: the second one is located next to the first one, it is not difficult to find it.
DK
You can check the oxygen sensor on a VAZ 2114 at home with a regular multimeter, which you can purchase at any auto store for 300-500 rubles.
- We start the fourteenth and warm up the engine so that the DC reaches operating temperature;
- Let's go to the engine compartment to check the lambda probe with a tester. We connect one multimeter probe to the negative terminal of the engine, the second to contact “B” of the oxygen sensor. If the tester shows that the voltage at the oxygen sensor is 12 Volts, then the device is fully operational; if the result differs to a lesser extent, the DC contact circuit has broken.
- Next, we check the contacts of the sensitive elements “A” and “C”. We place the negative probe of the tester on contact “C”, the positive probe on contact “A”. If the sensor is working properly, the tester will show 0.45 V. If the readings are different, the DC must be changed.
How lambda works
There is a continuous comparison of the air in the exhaust gases. A special galvanic cell acts as a kind of air battery. The difference in the conditions of chemical reactions outside and inside the lambda leads to the appearance of voltage at the contact terminals.
The amount of oxygen in the reference air is almost unchanged, and its content in the exhaust gases depends on the completeness of combustion of the fuel mixture:
- oxygen in excess - tension increases;
- low O2 content - voltage drops.
Since the oxygen sensor of VAZ or other brands operates at high temperatures, its body and electrodes are made of especially durable materials: zirconium, titanium, ceramics. For effective reaction with oxygen, platinum coating is applied to the electrodes.
In addition, the measuring electrode can only operate at a certain temperature. Until the sensor is warmed up by exhaust gases, the temperature is maintained by the heating element.
FEATURES OF REPLACING THE OXYGEN SENSOR
It is necessary to replace a failed lambda probe with a completely similar device.
When traveling to a car dealership, take the broken device with you and check the markings located on the device body.
The VAZ 2114 lambda probe must be connected with the ignition off and the engine completely cooled.
The algorithm of actions is as follows:
- Disconnect all wiring from the device;
- Unscrew the DC with a wrench;
- Screw in the new sensor. Be careful as threads can be easily stripped;
- According to the pinout diagram, we connect the sensor contacts.
As you can see, replacing the DC is not difficult. Knowing how to check a lambda probe, you can determine the malfunction and install a new device in an hour and a half. It is worth noting that all the technology described above is also suitable for the VAZ 2115.
We hope this article was useful to you, car owner!
How to check the lambda umbrella yourself? This issue is faced by a large number of car owners of both domestic production and foreign cars. In today's article, I will tell you about four complete ways to test oxygen sensors. By the way, checking these sensors may be required if the scanner shows an error related to the lambda probe, for example, a low signal level from the oxygen sensor or increased fuel consumption .
Correct probe replacement
Replacing a lambda probe on a VAZ 2112 requires the following actions:
- First, disconnect the probe wire from the electrical wiring. The procedure is carried out with the engine completely cooled and the ignition off. To replace an old device, you should purchase a sensor with the same markings as the previous one
- Then, using the key we need, we unscrew the old sensor. From a dead point, it is best to rip the device off with the ignition on, and, of course, the hot sensor and exhaust pipe, otherwise there is a risk of damaging, pulling or stripping the threads; in a cold state, any metal shrinks, and you will have to unscrew it with considerable effort. When you've pulled it off, you can turn off the engine. It will be much easier to unscrew further
Attention: when the engine is hot there is a danger of getting burned, so you should use thick cloth gloves and be careful
- The new probe is screwed in until it stops in order to create a tight seal.
- Connecting the electrical wiring
- We check the performance of the new oxygen sensor using an oscilloscope, and a voltmeter, as well as an ohmmeter, the engine temperature is not lower than 350 degrees, at this point the replacement of the VAZ 2112 lambda probe is completed
That's all, good luck in replacing and checking your sensor, and in addition we recommend video material on replacing it.
Exhaust systems with a catalyst began to be used on front-wheel drive cars of the VAZ family with the introduction of Euro-2 and Euro-3 environmental standards; an integral part of engines with a catalytic converter is the VAZ-2110 lambda probe. The oxygen sensor (another name for this part) is designed to monitor the level of toxic substances in the exhaust gases and, if the CO level is exceeded, transmit an alarm signal to the engine control unit.
Like all parts in a car, the lambda probe (LZ) can fail over time, causing various malfunctions in the engine. In this article we will look at the main signs of sensor malfunction, the reasons for their occurrence, features of replacing the part, as well as possible breakdowns of the catalyst, and methods for eliminating them.
Lambda probe sensors - what are they?
Modern oxygen sensors have a 4-wire system, but there are exceptions! One, two and three wire lambda probe sensors are often found.
Modern oxygen sensors
A four-wire sensor has two wires going to the heating circuit and one wire to the signal circuit. Also, one wire goes to ground for checking the lambda probe, which you can do yourself.
Restoring the performance of the lambda probe by cleaning
In some cases, the oxygen sensor stops working only because the holes in the protective screen and the ceramic tip itself are covered with soot. To restore the working capacity of the part, it is necessary to clean the lubricating zone from soot, but when performing such work, you must follow certain rules. It is important not to use for cleaning:
- metal brushes;
- sandpaper;
- files;
- other objects that can damage the ceramic element.
The best method to get rid of contaminants is to soak the ceramics of the lambda probe in a solution of orthophosphoric acid, but to do this, you must first carefully saw off the protective cap. If acid cannot be found, you can use a rust converter, which is sold in stores selling auto chemicals. Of course, to clean the part from soot deposits, the sensor must be removed.
To soak a ceramic tip, it must be placed in liquid for 15-20 minutes; the soot should disappear from the surface on its own. If the deposits are not completely removed, they can be cleaned with a soft toothbrush. After the procedure, you need to secure the protective screen using camp welding. When it is not possible to restore the lambda's functionality, there is only one option left - to buy a new oxygen sensor.
The operation of internal combustion engines of modern cars is controlled using special electronic devices (controllers). One of the main tasks of the controller is to regulate the composition of the fuel mixture supplied to the cylinders of the power unit. It is on this that the fuel consumption, the stability of the engine, as well as its power and traction properties depend. To do this, the electronic control unit collects and analyzes information coming from various sensors. Based on the received data, the ECU sends the necessary commands to the appropriate devices.
In this article we will talk about what the VAZ-2110 oxygen sensor is and what it is intended for. We will also look at its design, possible malfunctions and diagnostic methods.
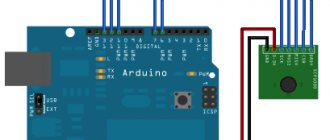
Checking the voltage in the sensor heating circuit
To check the voltage in the oxygen sensor heating circuit, we need a voltmeter.
- Turn on the car ignition
- We pierce the wires with sharp probes or stick the probes from the voltmeter into the connectors of the wire going to the oxygen sensor.
- We measure the voltage.
The voltage on these wires should be equal to the battery voltage, approximately 12.45V. The plus usually comes to the oxygen sensor heaters directly through the fuses, and the minus is supplied from the engine control unit. Therefore, if there is no positive signal coming to the oxygen sensor heater, then look at the circuit, battery, fuse and oxygen sensor. By the way, some car models may have a relay in this circuit. But if there is no minus, then look at the entire circuit up to the control unit. Perhaps contact has been lost in some connector, or the control unit for some reason does not see the minus.
Catalytic Converter Malfunctions
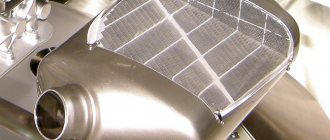
The catalyst (also known as a catalytic converter) is designed to purify exhaust gases from harmful impurities and plays the role of a kind of filter. Inside the catalyst can there are ceramic or metal honeycombs coated with a catalytic layer of precious metal. Over time, soot from the exhaust gases accumulates, clogs the honeycombs, and the exhaust gases pass through the catalyst with difficulty.
It is not always possible to clean the catalytic converter; in many cases it must be replaced. But since the catalyst is quite expensive and clogs quite quickly (premature failure often occurs due to low-quality gasoline), many car owners try to get rid of this part in various ways:
- remove the catalytic element by knocking out the honeycomb from the can;
- Instead of a catalyst, a flame arrester is installed;
- If the catalytic converter is an integral part of the manifold, it is replaced with a special insert (stinger).
On VAZ-2110 cars with a 1.6 liter engine, two oxygen sensors are installed, and if the catalyst is removed, the lower lambda probe will detect an increased CO content in the exhaust gases, and the diagnostic lamp will light up, indicating an error. Simply turning off the oxygen sensor will not work; the Check Engine light will still light up. To get rid of this problem, a special blende is used, which is a special spacer supplemented with a mesh filter.
The deception does not reduce the level of toxicity in the exhaust gases, but it limits the exhaust from reaching the lambda probe itself, as a result of which the sensor records the normal CO content, and the error does not light up. If it is not possible to deceive the LZ in this way, the only way out is to reflash the engine control unit.
Checking the serviceability of the lambda probe heater using a tester
In order to check the lambda probe heater itself by measuring the resistance, we need an Ohmmeter, that is, a tester or multimeter in resistance measurement mode. Disconnect the oxygen sensor connector and measure the resistance between the heater wires. The resistance may vary, but usually it is in the range of 2-10 ohms. If resistance is not shown at all, then most likely there is a break in the oxygen sensor heater (lambda probe) and it requires replacement.
Lambda probe life and reasons for its failure
On average, a VAZ lambda probe can work conscientiously for 5-7 years or 120-150 thousand kilometers. But this is subject to normal operation of the car, excluding constant overloads, low-quality fuel and off-road driving.
The main malfunctions of the “tens” oxygen sensor are critical overheating that occurs when using poor fuel, the ingress of various process fluids into the device, carbon deposits on working elements, as well as natural wear and tear, from which no device is insured.
Checking the reference voltage of the oxygen sensor (lambda probe)
And so the first test of the lambda probe, which we can carry out ourselves, is checking the reference voltage. For this we need a tester in Voltmeter mode. Turn on the ignition and measure the voltage between the signal wire and ground. In most car models, this voltage should be 0.45V. Small deviations from the norm are allowed in both directions, but here everything depends on the quality and condition of the wiring in the car.