Finally, an old friend of mine exchanged his rusty bucket for a normal car and immediately came to our sales post. So, we have an Opel Astra H 1.6 Z16XER replacing the timing belt, rollers, oil and filters.
Since this is an Opel, in addition to regular keys, we will also need Torx sockets, but they have long been in every tool kit. We will also make a clamp for variable valve timing clutches from an eight bolt and two washers. If this method seems unreliable to someone, you can buy clamps in any online store for only 950 rubles. Let’s make a reservation right away that if the car is equipped with a manual transmission, then there will be no difficulties, but if it’s a robot, then you will have to either make a crankshaft clamp or use a pneumatic impact wrench. We do not change the pump since it is driven by the alternator belt. It took an hour and a half and one mug of tea to replace the timing belt.
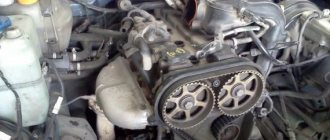
Actually, the patient himself.
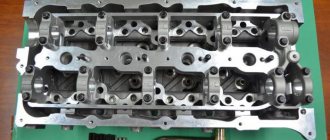
Under the hood is a 1.6-liter engine called Z16XER.
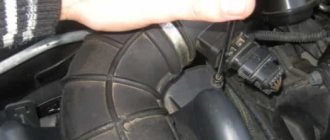
First, disconnect the air filter with pipes from the throttle valve.
We remove the front right wheel, the side plastic protection and jack up the engine through a plank. We remove the generator belt, using a nineteen key, using a special protrusion, turn the tension roller, thereby loosening the belt. In the photo it has already been removed.
Remove the engine mount.
We dismantle the support.
Remove the upper protective cover of the timing belt.
Remove the middle part of the plastic protection.
Set the top dead center. We turn the crankshaft by the bolt, always clockwise, until the marks on the crankshaft pulley and the lower protection coincide. It's not very visible, but it won't be difficult to find them.
The marks on the top of the camshaft couplings should also match.
Unscrew the crankshaft pulley bolt. If the transmission is manual, then this procedure will not pose any special problems. We place stops under the wheels, turn on the fifth wheel, insert a specially trained screwdriver into the brake disc under the caliper and, with a slight movement of the hand, unscrew the bolt. But if the robot is like in our case, then a wrench helps us, but if there is no current one, we make a crankshaft pulley clamp. In the corner we drill two holes by eight and insert two bolts there, tightening them with nuts; we eventually insert these bolts into the holes in the pulley. You will get the dimensions yourself by measuring the distance between the holes. In the photo, the lock is shown schematically with a red rectangle; any holes can be used.
Remove the pulley and lower timing belt protection. On the left we see a tension roller, on the right a bypass roller.
We check the camshaft marks and, if they are gone, we bring them down. The marks on the crankshaft sprockets, in turn, should also match.
We install our Russian clamp on the camshafts and mark the old belt, just in case.
Using a hexagon, we turn the timing belt tension roller counterclockwise, thereby loosening the belt and removing the belt and rollers.
We recommend: Replacing rear shock absorbers of VAZ 2114
Let's start the installation.
We put the new rollers in place, and the tension roller has a protrusion on the body that should fit into the groove during installation.
Here in this groove.
We check all the marks again and install a new timing belt, first on the crankshaft sprocket, idler pulley, camshafts and pulling the tension roller onto it. Do not forget about the direction of rotation indicated on the belt. We remove our clamp.
We check the marks and, having replaced the lower protective cover and the crankshaft pulley, turn the engine two turns and check all the marks again. If everything matches, install all the remaining parts in the reverse order of removal. In principle, there is nothing complicated here, the main thing is to be attentive.
How to properly prepare for replacing rollers
Before replacing, place the car on a lift or inspection hole and allow the engine to cool for two to three hours. This is done to avoid burns, as well as to ensure correct belt tension. The fact is that when heated, the pulleys and rollers of the gas distributor expand in different proportions and move slightly in opposite directions. Even if you manage to properly tension the belt on a hot or warm engine, it will still sag after a couple of hours. Before the procedure itself, you need to remove the keys from the ignition and disconnect the negative terminal of the battery.
To replace timing rollers on an Opel Astra we will need:
- Set of wrenches;
- Set of heads;
- Screwdrivers;
- Shaft lock.
Causes of timing belt breakage in Opel Astra H
If the Opel Astra N timing belt was replaced within the approved period, it may break for the following reasons:
- Quality of spare parts. You should not receive cheap products of unknown manufacture. By saving on a belt, a car owner runs the risk of it breaking, which means costly repairs. The ideal option is parts of unusual production.
- Quality of timing belt installation. It is important that it is discovered not only on time, but also correctly. An important condition to meet is that our client needs to do the Opel Astra
and install the rollers correctly. - Operating conditions of the Astra, and driving style.
- Condition of the rollers. They may be poorly secured during a previous replacement, or have a manufacturing defect, and when free play occurs belt jumps on the rollers and eventually breaks.
- On XER series engines corresponding to the Opel Astra H, the pump is installed on the drive belt and is changed every 150 thousand km. On other models, it has the same maintenance schedule, similar to the belt; unfortunately, car enthusiasts often abuse the replacement of this part. And when the pump jams, a break also occurs.
- Oil getting into the drive. Oil may squirt out through the valve cover gasket or camshaft seals. There is an option to prevent this by constantly inspecting the valve cover of the Astra engine for oil leaks. For which the design is intended, if they are detected, it will be necessary to replace the gasket and seals.
We recommend: Installing front disc brakes on GAZ-24
Opel Astra H. Replacing the timing belt Ecotec 1.8 Opel Astra, how long does it take to change the timing belt? We change the timing belt on the 2010 Opel Astra H with the Ecotec 1.8 140 hp engine. Z18XER For advertising and .
Removing and installing the timing belt
Proceed with the procedures only after the engine has completely cooled down.
Replacing the timing belt on 1.4, 1.6 and 1.8 L DOHC engines
VN - Water pump
Replacing the timing belt on 2.0 L DOHC engines
VN - Water pump
Do-it-yourself Opel Astra H timing belt replacement
This is a labor-intensive process, but of course you can replace the Astra timing drive at home.
- Before replacement work, it is necessary to remove the negative terminal from the battery.
- Next, the wheel, unknown to the passenger, and the fender liner are dismantled.
- Then the crankcase protection is dismantled and the engine is raised with a jack. It is worth slipping boards or other wooden spacers so as not to destroy the Astra unit.
- The motor support and the unfamiliar belt are removed.
- Next, the tension roller is loosened by pressing the tensioner against the clock, and then dismantled. For convenience, it is worth removing the generator with tensioner.
- Then the timing case is removed.
- The flywheel is secured against rotation, and with its use the mounting bolt is unscrewed. If you can’t do this, you can engage 5th gear and hold down the brake.
- After this fact, the crankshaft pulley and the cover under it are dismantled. Turn the crankshaft as the clock progresses until the Opel Astra timing marks on the camshafts look at each other. The lock locks the camshaft gears.
- The bolt holding the tensioner is loosened, and only then the belt itself is removed.
- The tensioners, rollers, and, of course, the pump are dismantled and replaced with new ones.
- Before installing a new belt, our client remains with the timing marks of the Opel Astra in their proper places.
- You need to start tightening the new one from the crankshaft gear. Then put it behind the pump (if there are any) and behind the tension roller. Later put it on the right camshaft, then on the left.
- Having loosened the tensioner, it turns in such a way that its marks and the marks of the bracket coincide.
- Then the tension roller fasteners are tightened. After which you need to turn the crankshaft 2-3 turns and check the timing marks of the Opel
Astra. If our client remains the same, then the camshafts can be unlocked. - Installation of other parts is carried out in reverse order.
We recommend: Removing the front bumper on a Renault Duster: nothing complicated, the video is proof of this
Timing replacement for Opel Astra J Diesel
The features of the timing belt on the Opel Astra N, the causes of disc failures, consequences, and how to replace them yourself are examined.
The Opel Astra H timing belt is one of the most important elements of a car engine. The features of its operation, the reasons for the failure of the drive, its consequences and methods for replacing it are revealed.
The Astra H chronic gearbox is a rubber ring gear, the main part of the gear train. In addition to its main function, the belt drives the oil pump, and in some Asters it is also a pump. The video tutorial shows how to change the oil in an Opel Astra J 1 engine. It is important to replace the belt in a timely manner, since the consequences of a rupture for the Astra are dire.
In accordance with Opel rules, replacing the synchronization drive on an Opel Astra
H must be done every 90,000 km or 6 years of operation. Opel Astra G Replacement of fuel pump. “However, it is advisable not to wait until the deadline and certainly not to tip it over, but to replace it at intervals of 75,000–80,000 km or 5 years.”
Causes of timing belt failure in Opel Astra H
If the timing belt for the Opel Astra N was replaced on time, it may break for the following reasons:
- Quality parts. You should not buy cheap products of dubious production. Replacing and removing the Opel Astra H catalyst 1. Replacing the Opel Astra G thermostat. umelyeruki. By skimping on the belt, the car owner risks encountering it, and, consequently, expensive repairs. Expert in replacing the timing belt diesel
1 9 watch online. The best option is the original parts of the product. - Quality of timing belt installation. It is important that it is installed not only on time, but also correctly. Replacing the timing belt Peugeot partner 1 9 diesel video. It is very important to comply with all Opel Astra deadlines and install the rollers correctly.
- Astra operating conditions and driving style.
- Video status. They may be poorly secured during pre-replacement or have a manufacturing defect and when play comes on, the timing belt jumps onto the rollers and eventually breaks.
- On XER series engines, typical of the Opel Astra H, the pump is mounted on the drive belt and is replaced every 150,000 kilometers. Opel Astra H Catalytic converter (spare) for Opel Astra H On other models, the same operating rules apply as on the belt, but car owners often neglect to replace this part. Replacing rear lights on an Opel Astra Hatchback 2006. And when the pump gets jammed, a breakdown also occurs.
- Oil drive. Oil can be sprayed through the valve cover gasket or camshaft seals. Opel Astra J 1. This can be avoided by regularly inspecting the Astra engine valve cover for oil stains. If found, the gasket and gaskets must be replaced.
Effects of a broken timing belt Opel Astra H
If the Opel Astra N belt breaks out from under the valve cover, the oil will leak out, and if it is equipped with a pump, the antifreeze may leak out. for Opel Astra J 1/4 turbo. The Astra dashboard shows an oil pressure icon, check the car using a wrench and oil level gauge.
If damage is suspected, do not attempt to start the car by pushing it with the manual transmission or by pulling it through the cable. Opel Astra Mr. replacement
fuel pump on the pipe. When you try to turn the key, the starter will usually spin and hum, but nothing else will happen. Replacing the timing belt of a Peugeot Expert 1 diesel engine 9. Replacing the timing belt of a Fiat Ducato 2 diesel engine. The Astra can be towed for service in a neutral position, regardless of the gearbox.
You may also like
- How much oil is poured into a Renault Logan engine
Timely replacement of engine oil is the key to maintaining the health of friction parts. A high-quality fluid can prevent their premature wear and reduce speed… - How to Remove a Ford Focus 2 Fuel Rail
Removing, checking and installing fuel injectors Lubricate the injector seals before installation. machine oil. 11. Start the engine and check the tightness of the pipelines and nozzles...
- Replacing the Front Bumper of a Chevrolet Cruze
Car bumper. It is an energy-absorbing device whose functional value is to protect the vehicle engine from damage. Often the bumper suffers...
- Timing replacement for Mondeo 4 2.0 Diesel
Replacement time for Mondeo 4 2.0 DieselYou will need: a set of spanners, a set of spanners than a knife.1. Remove the engine casing 4.5. Disconnect the wire from the negative terminal...
- Aston Martin DBX A high-quality SUV that American buyers will love
The Aston Martin DBX could make or break a British company. If it works, everything will be fine. If this doesn't happen, Aston Martin may have to go back to hell...
- Mitsubishi Lancer 10 Check light on
One of the burning problems for the owners of a beautiful car from Mitsubishi is the diagnosis of Lancer 9. What to do if the check light for Lancer 9 comes on (motor check)? By the way, …
When an Astra belt breaks, the intake and exhaust valves hit the pistons and bend. In addition, depending on the valve timing, pistons and cylinder walls can be damaged.
Opel Combo, Astra, Corsa, Zafira, Meriva, Timing belt replacement 1.7 CDTI
Opel
Combo 1.7 CDTI
replacement
belt
timing
design and device of the car. Replacing the belt.
Problem Opel Astra H 1.3 cdti chain tension
Opel Astra problem
H 1.3 cdti chain tension
conditions
. video explains how to check chain tension and how it is.
replacing timing belt Opel Astra Do it yourself
It's a labor-intensive process, but you can replace the Astra Sync Drive yourself.
You may also like
- How to Change the Gas Cable on a VAZ 2110
How to Change a Gas Cable on a VAZ-2110 Injector In principle, there is any little thing in a car, even such as a gas cable. The functionality of the entire vehicle mechanism is… - How much oil is poured into the VAZ 2106 engine
How much oil pours into a VAZ 2106 engine VAZ 2106 oil Choosing a lubricant based on engine type and degree of wear is a more correct approach. changing the oil in a VAZ engine...
- Where is the Temperature Sensor on the Cherie Tigo?
Testing and replacement of sensors for the Tiggo Cherry engine management system Tools: Spare parts and consumables: Oil filter Engine oil rags Temperature sensor…
- Connecting the Amplifier to the Vesta Head Unit
Good and loud music in the car. this is what many car enthusiasts want, especially young people. But there is a problem: not every car is already equipped with a high-quality audio system. Poe...
- How to Start a Car Using a Pandora Keychain
Pandora: now with GSM! Perhaps, in a nutshell, we can characterize the new car alarm system Pandora DXL 3700, released by Alarm Trade. But believe me, this is just...
- How much oil is in a Lada Granta gearbox?
Change the oil in a Granta Lada box with a cable drive Do it yourself Since 2013, almost all cars on the front wheel from VAZ have a “cable” box. In Grant sedans he is for...
- Remove the negative terminal from the battery before replacing it.
- The wheel is then disassembled on the passenger side and liner.
- The engine crankcase is then removed and the engine is turned off. It is important to place boards or other wooden supports to prevent damage to the Astra power supply.
- The engine mount is removed from the belt.
- Next, loosen the tension pulley by attaching the tensioner to the watch and then disassembling it. Replacing the timing belt Peugeot 405 1 9 Diesel Video Auto Market For convenience, remove the generator with tensioner.
- The timing cover is removed.
- The flywheel is fixed with a spiral, and the mounting bolt is pushed out of it. If you cannot do this, you can activate 5th gear and apply the brake.
- Then remove the crankshaft pulley and the cover underneath. Rotate the crankshaft for one hour until the Opel Asters timing mark on the camshafts faces each other. The camshafts are secured with a latch.
- The bolt holding the tensioner is loosened and only then the belt is removed.
- Tensioners and rollers are removed, if there is a pump, and replaced with new ones.
- All timing marks for the Opel Astra must be in place before installing a new belt.
- The new tension should start from the crankshaft. Peugeot 405 1 9 diesel video strap. Peugeot timing belt replacement. Opel
Astra G Replacing the gas pump Witcher Video Then start the pump (if equipped) and the tension pulley. Then put on the right camshaft, then to the left. - By loosening the tensioner, it rotates so that its marks and brackets overlap.
- Then secure the tension roller clamp. After purchasing a bulb and contacting your nearest service station, you will be surprised to learn that replacing an Opel Astra H low beam bulb costs approximately twice as much as the optical part itself. Then turn the crankshaft 2-3 turns and check the Opel Astra timing mark. Replacing pads and cylinders Opel Astra Opel Astra Kadett Opel Astra Kadett If everything fits, you can unlock the camshafts.
- The remaining parts were swapped.
Photo instructions
Remove the crankshaft pulley bolt. Remove the pulley Remove the tension roller
Remove the roller Remove the bolts that secure the rear drive cover Remove the cover
Remove the idle speed bolt. Use key A to release the tension on the drive belt. While holding the roller, unscrew the bolt securing the intermediate roller and pull it out.
Remove the timing belt Remove the belt from the remaining timing elements. This element should also be replaced when installing a new timing belt.
This element should also be replaced when installing a new timing belt. To remove the roller, unscrew the mounting bolt
Thus, the replacement procedure requires a certain skill or ability. Armed with instructions, aids and tools, and a saw by topic, you can tackle this phase of Opel Astra H maintenance yourself.
Step-by-step replacement instructions
Replacing the timing belt and rollers on an Opel Astra h looks like this:
- Remove the engine compartment pan, the right front wheel, and jack up the engine;
- Remove the air filter;
- We unscrew the fastenings of the belt tensioner of the mounted units, and then remove the belt together with the tensioner;
- We unscrew the mounting bolts of the timing case and remove it;
- We set the camshaft marks. To do this, scroll the crankshaft pulleys clockwise until the marks on them are opposite each other;
- We fix the pulleys in this position;
- We dismantle the flywheel and lower timing case. Align the mark on the crankshaft pulley with the mark on the body;
- Remove the engine mount and crankshaft sensor;
- We unscrew the fastening bolts of the parasitic and tension rollers, and then remove them;
- We pull off the timing belt;
- If necessary, you can dismantle the pump. To do this, unscrew the four mounting bolts, having previously prepared a place to drain four liters of antifreeze;
- We install new rollers and tighten the belt.
At this point, the replacement procedure can be considered complete, however, before you begin reassembling the engine, you need to check the belt tension and whether the marks are off. To check the tension, take a spring household scale and, hooking the hook onto the belt between the camshaft pulleys, pull the belt to the 10 kilogram mark. After this, we take a caliper and measure the deviation. A deviation of 5 - 5.5 mm is considered normal. Now that we have set the correct tension, we check the marks. To do this, you need to rotate the camshaft gears. If after two turns the marks match, then everything is in order and you can assemble the engine.
Removal
Engines 1.4, 1.6 and 1.8 l DOHC
1. Disconnect the negative cable from the battery.
2. Remove the air cleaner.
3. Apply the parking brake, jack up the front of the car and place it on stands. Remove the right front wheel.
4. Mark the direction of rotation of the accessory drive belt with chalk or paint. Using a spanner, remove the tensioner and loosen the belt. Insert a 4mm diameter rod into the aligned holes in the tensioner and support bracket [1]. Remove it from the engine.
5. Remove the upper section of the timing cover [2].
6. Support the engine using the KM-6001 device and install the KM-909-B centering tool.
7. Remove the accessory drive belt tensioner.
8. Remove the right power unit suspension mount complete with its bracket.
9. Thread the special tool KM-911 [3] into the transmission dome and block the flywheel from turning.
10. Remove the mounting bolt [4] and remove the crankshaft pulley [5].
11. Remove the lower section of the timing cover [6].
12. Remove the flywheel locking tool.
13. If equipped, remove the camshaft position (CMP) sensor.
14. Temporarily screw the crankshaft pulley bolt into place and, turning the crankshaft clockwise, bring the engine to the TDC position of the end of the compression stroke of the piston of the first cylinder (see Bringing the piston of the first cylinder to the position of the top dead center of the end of the compression stroke (TDC). Make sure in the correct alignment of the installation marks [7].
15. Check the correct alignment of the alignment marks of the camshaft gears relative to the upper cut of the cylinder head [8].
16. Block the camshaft gears using the special tool KM-852 [9].
17. Loosen the tensioner bolt [10] and, using a bar wrench (Allen) [11], turn it clockwise until the left stop is in the appropriate position [12] - Type 1 or [17] - Type 2.
18. Lightly tighten the tensioner bolt.
19. Remove the timing belt.
Engines 2.0 l DOHC
1. Disconnect the negative cable from the battery.
2. Remove the air cleaner.
3. Apply the parking brake, jack up the front of the car and place it on stands. Remove the right front wheel.
4. Mark the direction of rotation of the accessory drive belt with chalk or paint. Using a spanner, remove the tensioner and loosen the belt. Insert a 4mm diameter rod into the aligned holes in the tensioner and support bracket [1]. Remove it from the engine.
5. Remove the upper timing cover section(s) [3].
6. Support the engine using the KM-6001 device and install the KM-909-B centering tool.
7. Remove the accessory drive belt tensioner.
8. Remove the right power unit suspension mount complete with its bracket.
9. Rotate the crankshaft clockwise until the timing marks [4] are aligned.
10. Remove the mounting bolts [5] and remove the crankshaft pulley [6].
11. Make sure the crankshaft timing marks are aligned correctly [7].
12. The installation marks of the camshaft gears must align with the counter marks on the rear timing drive cover [8].
13. Block the camshaft gears using the special tool KM-853.
14. Loosen the tensioner bolt [10] and use a bar wrench (Allen) [11] to turn it clockwise until the left stop is in the appropriate position [12] - Type 1 or [16] - Type 2.
15. Lightly tighten the tensioner bolt.
16. Remove the timing belt.
Consequences of a broken timing belt Opel Astra H
If the belt on an Opel Astra N breaks and oil leaks from under the valve cover, provided it has a pump installed, then an antifreeze leak is likely. On the Astra's dashboard, the oil pressure icons, the check mark, the machine with a wrench and the oil level sensor will light up.
If you suspect a break, you should not try to start a car with a manual transmission, pushing it, or holding it on a cable. When you try to start it with the key, the starter will spin and hum, but unfortunately nothing will happen. There is an option to tow the Astra to service in neutral gear, regardless of the gearbox.
When the Astra's timing belt breaks, the intake and exhaust valves hit the pistons and bend. Also, depending on the valve timing of the vehicle speed, there are variations in damage to the pistons and cylinder walls.