How to bleed a diesel fuel system?
For diesel engines, timely removal of air from the fuel system is extremely important. Only diesel engines have a high-pressure fuel pump, and if air leaks occur, the pressure in the pump does not reach the required values for effective fuel injection into the diesel cylinders. Under such conditions, the diesel engine has difficulty starting, is unstable and may even stall while driving. If air gets in, you need to bleed the diesel fuel system (see video “How to remove air from a diesel fuel system” below).
How can you tell if air has entered the fuel system? To do this, you need to disconnect the high pressure fuel lines from the injectors and unscrew the nuts securing the pipelines so that they move away from the injectors. Now let your assistant rotate the crankshaft with an electric starter, and you watch whether fuel appears from the pipelines. If it does not appear, it means there is air in the system and you need to bleed the fuel system.
First you need to bleed the filter:
A) use a wrench to unscrew the screw on the filter housing, just a couple of turns;
B) pump fuel using a manual pump until it flows out of the screw hole in its pure form (without bubbles);
C) also tighten the screw with a wrench.
If your car does not have a manual priming pump, then pumping the fuel filter will be a little more difficult, for the reason that the fuel priming pump will also not work when the filter is airy. Unscrew the screw on the filter housing with a wrench, and a second person should, at the same time, turn the engine crankshaft with the starter. But this is not the best way, since there is a possibility of draining the battery. Still, it is best to do this in the garage, using a starter-charger.
Now you need to bleed the injection pump:
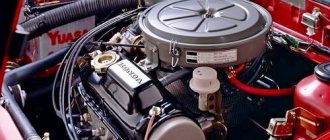
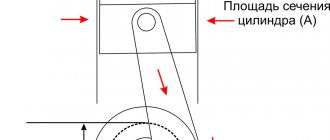
A) using a 12mm socket, unscrew the release bolt (no. 7 in the picture), which is located in the center between the four fittings of the high pressure pipelines;
B) turn on the ignition and start pumping using the manual pump; It is necessary that, during pumping, fuel appears from the hole for bolt No. 7;
C) return bolt No. 7 to its place and tighten it slightly - so you can see the air bubbles that come out when pumping the fuel system;
D) if, during pumping, fuel does not appear from the hole for bolt No. 7, then turn the crankshaft with the starter and pump further until air bubbles stop coming out of the hole for bolt No. 7;
E) if air bubbles no longer come out, completely unscrew bolt No. 7 again; Now your assistant should turn the crankshaft with the starter, and at this time you look at the hole under the bolt. You may find that:
1) fuel is pushed out of the hole at intervals, in certain portions. This is a good sign that says that everything is fine with the fuel pump and the engine stalls only because air has accumulated in the system;
2) or fuel flows out of the hole in a continuous stream. This is a bad sign, indicating a malfunction of the fuel injection pump (breakage of the plunger and its drive);
3) or fuel does not appear from the hole at all. The rotary vane booster pump, which is built into the injection pump, has probably malfunctioned. It is even possible that the plunger and its drive are in perfect order.
In the second and third cases, you need to submit the fuel injection pump for repair. First, before dismantling the fuel pump, you need to install all the engine pulleys according to the marks.
If fuel appears from the hole intermittently, in certain portions
As already said, this is good, and you need to pump the diesel fuel system to the end. Now you need to install bolt No. 7 in its place and tighten it with a wrench. No. 9 indicates four fuel injection pump fittings (4-cylinder engine). You need to move the fuel line of any one fitting to the side, then the assistant should rotate the crankshaft with the starter, and you look: fuel should appear from this fitting.
If the fuel is not shown, then you need to unscrew this fitting (on average 2 or 3 turns) using a spanner wrench (use not an open-end wrench, but a special spanner designed for brake or fuel lines). Then try again: the assistant turns the crankshaft, and you watch whether fuel appears from the fitting.
If fuel begins to appear, then tighten this fitting and do the same with the other three fittings. As a result, fuel should appear from all fittings while the assistant turns the crankshaft. Then you need to put the union nuts of the fuel lines on the injection pump fittings and tighten them.
Let your assistant continue to rotate the crankshaft with the starter while you put the union nuts of the fuel lines on the injectors. If fuel begins to leak from under the nuts, you can tighten the injector nuts - not earlier. If you do the opposite - first tighten the nuts on the injectors, and then tighten them on the injection pump fittings - then it will take a very long time to expel the air, and there is a risk of damaging the battery.
And finally, after continuous operation of the electric starter for about 12 seconds, it must be turned off and given a break of 1 minute. Only this can be turned on again for the same period of time.
Video: How to bleed a diesel fuel system
Source mob.autoinfa.com
A distinctive feature of a diesel engine from many gasoline analogues is the absence of an ignition system, since the mixture of fuel and air in the diesel cylinders ignites independently (from strong compression and heating). In this case, it becomes necessary to supply fuel to the combustion chamber under high pressure.
It is quite obvious that for diesel engines, maximum tightness of the entire fuel system is extremely important. If air gets in, then the required injection pressure cannot be achieved. Moreover, excess air can damage expensive elements of the fuel supply system. Next, we will look at why and how to de-air the fuel system of a diesel engine.
Read in this article
Diagnostics
To check your car for leaks, you can use the ELM327 scanner, you can read how to do this here. This scanner is capable of diagnosing your car and indicating whether it has this malfunction. But, checking with a scanner will not always be a reference, since the leak may be insignificant and the ECU simply may not notice it.
It is best to check the suction using the old proven method, or rather several, which are given below.
First way
It is necessary to unscrew the mass air flow sensor from the air filter housing. It is secured with two 10mm key bolts. We take out the mass air flow sensor and start the engine.
This is interesting: Replacing front and rear shock absorbers (struts)
With the internal combustion engine running, we close the sensor hole with our hand or a bag, the car should stall and the intake corrugation should shrink. A vacuum is created in the engine, which, in the absence of air leaks, will persist for a long time and the corrugation will remain compressed.
Compressed corrugation due to vacuum
If the corrugation on your car instantly expands or does not shrink at all, then this indicates the presence of suction.
Second way
To diagnose using this method, you will need a pump or compressor.
Here, just like in the first case, you need to unscrew the mass air flow sensor from the body and insert the bag between it. Then screw it back, thereby blocking air access to the engine.
On the receiver we find a fitting with a plug. We remove the plug and connect the pump there, pump up pressure into the receiver and listen to where the hissing will come from. To more accurately determine the location of the leak, you can use a soap solution with a spray bottle. We spray the areas of possible leakage with this solution and look for the appearance of bubbles.
Third way
This method is widely used at service stations. The search for suction is carried out using a smoke generator. This method is similar to the second, but instead of air, smoke is pumped into the receiver. If the engine has a choke, then smoke will flow out of this place.
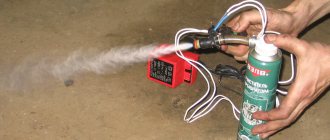
Many will notice that checking air leaks with a smoke generator is done at a service station and not everyone has such a device in the garage. But who is stopping you from making a smoke generator yourself with your own hands, because in reality, there is nothing complicated here.
Prepare:
- 12V car compressor or regular pump.
- A food container with a volume of at least a liter. Please note that the container must have a tight lid, preferably silicone.
- Two tubeless nipples. In one there should be a spool through which pressure from the compressor will be supplied, in the second - unscrew the spool, since through it smoky air will be supplied to the system.
- 2-3 cigarettes.
Make holes on both sides of the container at the same level and insert tubeless nipples into them. Sealant can be used to seal.
Connect the hose to the nipple without spool. The hose can be taken from the return valve of the absorber purge valve.
Further procedure:
- Disconnect the pipe with the flow meter from the air filter and close it in any way possible.
- Disconnect the crankcase ventilation hose and plug it. Instead, connect the hose coming from the container.
- We insert the smoked cigarette into the nipple without a spool with a filter and close the lid tightly.
- Connect the compressor to the first nipple and turn it on.
The forced air will create pressure, and the smoke from the cigarette will begin to spread throughout the system and, where there is suction, it will begin to come out.
Another variation of the smoke generator.
Why is there a need to bleed the fuel system of a diesel engine and how to do it
As mentioned above, diesel fuel is supplied under high pressure. The specified pressure is created by the injection pump (high pressure fuel pump). If air leaks occur, the pressure in the pump does not reach the required values for effective fuel injection into the cylinders of a diesel engine.
Naturally, in such a situation, the diesel engine does not start well, operation at idle and under load may be unstable (diesel throttles), the speed begins to fluctuate, the power unit may stall while driving, etc. Note that not only airing manifests itself in the form of these symptoms, but it may also well be one of the causes.
Next, you need to invite an assistant who will turn the engine with the starter. The main thing is to determine whether fuel is flowing or not flowing from the pipelines. If there is no supply, there may be air in the system and it needs bleeding.
- First of all, the fuel filter is pumped first. To do this, use a wrench to slightly unscrew the screw on the filter housing.
- Next, you need to pump fuel with a manual pump. Pumping continues until fuel begins to flow out through the screw hole, without air bubbles. The screw on the filter housing can now be tightened.
Note that not all diesel engines have a manual pump. On such engines, it will be somewhat more difficult to bleed the diesel fuel filter, since the fuel priming pump also does not work if the filter becomes airy.
To solve the problem, the screw on the filter housing is unscrewed, then an assistant turns the motor using the starter. Please note that the procedure may take a long time and there is a risk of completely draining the battery. For this reason, it is recommended to bleed the starter in a garage or use a booster (starter-charger) to minimize battery discharge.
How to bleed the injection pump
After the fuel filter has been pumped, you next need to begin removing air from the high pressure fuel pump.
- First you need to unscrew the central bolt, which is located centrally between the fittings of the high pressure lines;
- Next, the ignition is turned on, after which pumping is carried out using a manual booster pump. Pumping continues until fuel appears from the hole under the previously unscrewed central bolt.
- Now the bolt can be tightened a little to make it easier to control the presence or absence of air bubbles in the escaping fuel.
- If during the pumping process diesel fuel does not appear in the bolt hole, then you can crank the engine with the starter and continue pumping until clean fuel without air appears.
- After the air bubbles disappear, you need to unscrew the bolt again and start turning the engine from the starter. In this case, you should pay attention to how the diesel fuel is pushed out of the hole.
- Normally, fuel should come out with a pulsation and in doses. In this case, we can assume that the fuel injection pump is working properly, and problems with the operation of the motor arose due to airing in the system. The bolt can be tightened.
In a situation where fuel does not appear in the hole, there is a high probability of failure of the booster pump, which is integrated into the injection pump. In both the first and second cases, the injection pump must be removed, after which the service will diagnose and repair the high-pressure pump.
- After bleeding the injection pump and tightening the bolt, you will need to loosen the fittings on the fuel lines and move each one to the side. Next, the assistant turns the engine with the starter until fuel begins to flow out through the fitting. If the diesel fuel does not flow out, you still need to unscrew the fitting with a spanner. Then the pumping is repeated.
After making sure that fuel has flowed through the unscrewed fitting, the specified fitting is tightened, after which similar actions are performed one by one with other fittings. A successful result can be considered when diesel fuel is supplied from all fittings while the starter rotates the crankshaft.
Now you can return the union nuts of the fuel lines to the injection pump fittings, after which they are tightened. The engine must continue to be turned with the starter, while the union nuts of the fuel lines are placed on the injectors in parallel.
Also note that the starter every 15 seconds. continuous work, it is recommended to give a break of about 60-120 seconds. Ignoring this recommendation may lead to damage to the starter or a significant reduction in its service life.
Symptoms
- Unstable engine operation at idle speed. At idle, the mechanical throttle valve is closed, and air enters the intake manifold through the bypass duct. In this mode, the vacuum behind the throttle valve is maximum, so the symptoms of air leaks appear most clearly. By opening the throttle valve, we increase the flow area for air flow, so the negative impact of suction on engine operation is reduced.
- Increased idle speed.
- Unstable engine operation after abrupt release of gas (stalls when braking).
- The Check Engine light comes on on the dashboard due to error P0171 - lean mixture. Error codes can be read through the diagnostic connector using a multi-brand scanner with suitable software or a specialized diagnostic device. If, after removal, the error appears again at idle speed, there is a high probability that the reason is due to air leaks, and not a breakdown of the mass air flow sensor or oxygen sensor.
It should be borne in mind that individually, each of the symptoms does not yet indicate the leakage of unaccounted air and can be caused by malfunctions of the power supply system, mass air flow sensor, IAC, throttle assembly or lambda probe.
Effect on engine operation
The cause of air leak symptoms lies in unaccounted for oxygen entering the cylinders. It’s time to remember the purpose and operating principle of the mass air flow sensor. The sensor is installed behind the air filter. Consequently, the ECU can only count the flow passing through the heating element. A leak is said to occur when there is a leak in the intake tract behind the mass air flow sensor, through which unaccounted air is sucked into the intake manifold. Since the ECU calculates the fuel portion based on the MAF readings, the mixture at idle turns out to be lean (excess oxidizer).
In systems with a MAP sensor (DBP), the ECU relies on pressure in the intake manifold. But for normal operation, the flow area of the bypass channel, which is controlled by the extension of the IAC rod, and the degree of opening of the throttle valve must correspond to the calibrations included in the engine ECU. Of course, the intake of unaccounted air creates confusion in the operation of the control unit, so it tries in every possible way to synchronize the operation of the actuators and the sensor readings. Therefore, the revolutions begin to float, and in general the idle speed is unstable.
This is interesting: Which ones are better and how to replace spark plugs for KIA Sportage 3 (Kia Sportage)
Other methods of bleeding the fuel system of a diesel engine
So, above we looked at the main way to bleed a diesel fuel system. At the same time, many specialists and experienced car enthusiasts separately point out that in some cases such attempts to bleed the pump can have serious consequences for the power system.
Please note that the reason for this concern is that if there is mechanical damage, bleeding in this manner can cause irreparable damage. Let's look at other existing methods.
- First of all, the bolt on the fuel return line (the so-called “return”) is loosened. Next, you should carefully monitor how the fuel comes out. If air bubbles are visible, then this means that the system is airy.
If so, you can use a simple tire inflator or compressor. Next, the hose is removed from the fuel pump and the air pump hose is installed in its place. The basic idea is that pumping occurs, which allows the pressure in the system to increase. This pressure makes it possible to pump diesel fuel into the fuel pump.
- Another pumping method can be described as “household”, since it involves the use of a home vacuum cleaner. The main thing is that the device has sufficient power.
Having prepared the vacuum cleaner, you also need a regular medical syringe and a hose 30-40 cm long. For these purposes, it is recommended to use a transparent type of hose. The syringe is inserted into the hose, and the other end of the hose is put on the bleeder fitting.
Next, the piston is pulled out of the syringe, and the vacuum cleaner tube is inserted into the syringe. The main thing is to achieve reliable fixation and a tight fit. Also, the joints can be sealed by putting on pieces of hoses of different diameters, winding electrical tape, etc.
Now you can unscrew the fitting a little, after which the vacuum cleaner turns on. After a few seconds, yellowish foam can be seen in the syringe. This is a mixture of diesel fuel and air. Further pumping comes down to ensuring that the syringe is filled with clean diesel fuel instead of foam.
Let's consider another solution that allows, in some cases, to quickly pump the diesel fuel system. To do this, it is enough to completely fill the fuel filter housing with diesel fuel, after which the engine starts. Next, you need to let the engine run at high speeds, as a result of which the power system is pumped.
Let's sum it up
As you can see, the main method of bleeding a diesel fuel supply system is a labor-intensive procedure that requires certain skills. It is important to maintain cleanliness and prevent dirt, dust or debris from entering the pump.
As for pumping through the “return” using a compressor or the method described above with pumping with a vacuum cleaner, the effectiveness of such methods in some cases may be low or even questioned. For this reason, it is strongly recommended to bleed the diesel engine power system at a specialized car repair and maintenance center.
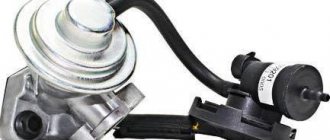
Finally, I would like to note that if the power system is regularly aired out, and the reason is difficult to determine, a solution to the situation may be to install an additional fuel priming pump on the injection pump.
Why is a low-pressure booster pump needed in the diesel engine power supply system? Operating principle and design of low pressure pumps, types of pumps, features.
Airing of the diesel fuel system: signs of malfunction and diagnostics. How to find the location of the air leak yourself, ways to solve the problem.
Design of a high-pressure diesel fuel pump, potential malfunctions, diagram and principle of operation using the example of a fuel supply system.
What fuel injection systems are installed on diesel internal combustion engines. Diagram with mechanical injection pump, pump injector, Common Rail. Device, pros and cons.
Purpose of the high pressure fuel pump in the fuel injection system of a diesel engine. Types of injection pumps, design features of pumps.
Common diesel engine malfunctions and diagnostics of units of this type. Checking the fuel system of a diesel engine, useful tips.
Source krutimotor.ru
Modern car engines tend to draw air. This is especially true for units with an installed fuel injection pump. You can easily cure the “disease” if you know how to expel air from the fuel system and eliminate the causes of the leak.
Consequences of air leaks
An air leak will cause unwanted air to enter the engine where it is not intended. This reduces engine performance and causes some systems that rely on vacuum to malfunction.
Because air leaks cause engine inefficiency, you will notice the "Check Engine" light on your dashboard. You will also experience acceleration problems - this is because fuel is not delivered efficiently to the combustion chambers. Vacuum is used to operate actuators, sensors or brakes.
If there is a vacuum leak, some of the sensors may begin to malfunction, forcing you to make unnecessary repairs.
How does air get into the vehicle?
ATTENTION! A completely simple way to reduce fuel consumption has been found! Don't believe me? An auto mechanic with 15 years of experience also didn’t believe it until he tried it. And now he saves 35,000 rubles a year on gasoline! Read more"
The vehicle of a modern car is a unit that stores and supplies fuel to the cylinders of the power unit. Most engines are designed so that the unit sucks in air, which is mixed at this time with the fuel injected into the vehicle, directly near the cylinders or directly into them (direct injection).
The first symptoms of air getting into the vehicle are associated with difficulties in starting the internal combustion engine. A system in which there is air can no longer function normally, which leads to difficulties.
Of course, a malfunction of the power unit itself is possible. Therefore, it is recommended to check the engine thoroughly first. If it does not start at all, then there is reason to believe that the problem lies with itself. However, if unstable operation is observed - normal startup, then a failure, then normal again, this is definitely air.
Another sign of air in the system is the response of the gas pedal. You press it, but it has no effect, because there is no air in the system, no fuel is supplied to the cylinders.
It is for this reason that, in order to test whether fuel is flowing into the cylinders, there is an exhaust test method. The driver must ask the assistant to hold the starter for about 40 seconds (provided that the car does not start). He himself must observe the exhaust to see if there is smoke coming from the muffler. If so, then fuel enters the cylinders and there is no air in the system. The reason for the difficult start must be sought elsewhere.
Air gets into the fuel line for various reasons. This mainly happens on used, old cars, the service life of which is more than three or five years.
The reason is that the seals responsible for the tightness of the entire system are aging. We are talking about clamps, connections, seals. There are plenty of them in the TS. In addition, the lines themselves through which fuel is supplied become obsolete, rust, and break over time. In a word, there is a whole series of circumstances that determine the failure of the fuel supply.
Of course, the designers provided something. If the seals become damaged, fuel begins to flow back into the tank. Some of the fuel remains in the pump, it is enough for the next engine start, no more.
Where to look for the air leak?
As a rule, “unaccounted air intake” occurs at the joints of various connections; less often, it can be cracks or defects in parts. This is how you should check:
- Throttle assembly;
- Vacuum booster pipe;
- Intake manifold seal;
- The corrugation that goes from the air filter to the throttle assembly;
- IAC (Idle Air Controller);
- Various seals, such as nozzles;
- Old hoses, loose clamps.
On diesel engines, air leaks, as a rule, occur at the joints between the fuel tank, between the filter and the injection pump, as well as in the fuel lines.
Typical air leaks
Of course, each case is individual, but leakage usually occurs in the following places in the engine:
- throttle body gasket;
- connection of the intake manifold to the cylinder head;
- vacuum brake booster;
- adsorber valve;
- pipe connecting the throttle assembly and the air filter housing;
- vacuum hoses, their connections and tees;
- sealing rubber bands for fuel injectors;
- idle speed controller.
In the case of cars equipped with carburetor engines, finding the choke is much easier. There aren't a lot of electronics or sensors, and extra air usually enters the engine through the brake booster or one of the elements in the carburetor itself.
Air leak in carburetor:
- gasket (the leak can be easily detected by the presence of soot);
- throttle axles;
- mixture quality adjustment screw;
- leaky throttle valve connection;
- Damage to the economizer diaphragm, throttle damper vacuum diaphragm, or starter diaphragm.
Remove the air lock from the Priora vehicle
Here's how it's done:
- the VAZ 2107 tank is checked to make sure there is fuel in it;
- the air release fitting on the fuel filter opens;
- Fuel is pumped up with a hand pump until fuel flows through the fitting without air bubbles;
- without stopping the pumping, close the air release fitting;
- Continue pumping until resistance is felt.
Now we need to try to start the engine. If this does not work, it means that air has entered the vehicle and must be expelled from there. On Priora it is done like this:
- the union nuts on the injection nozzles are loosened;
- the starter spins until the fuel comes out;
- Now the nuts are tightened and the engine can be started, as the air will escape along with the fuel.
In this way, the system of the Priora car is de-aired.