Our tire fitting specialists have prepared detailed instructions for you.
To unscrew a wheel without a lock you will need: a jack, any support for the wheel, a spanner.
- Place the vehicle on a level road surface so that it does not roll forward or backward on its own.
- Use a spanner wrench to loosen the bolts. This step is carried out while the wheels are firmly on the ground. To do this, turn the key counterclockwise, and also lift the special caps covering the nuts. And don't forget to remove the caps covering the rims.
- Apply the handbrake.
- Place a support under the wheel that is diagonal to the one you will be working on.
- Remove and position the jack using the manufacturer's instructions.
- Unscrew the nuts completely.
- Pull the wheel towards you.
If you don’t know how to unscrew a wheel because it’s stuck to the hub, don’t tighten the bolts all the way, get into the car and drive a couple of meters at a slow speed. Or kick the wheels up.
Important points and conditions for proper disassembly
There are a number of nuances, the observance of which will help with proper disassembly at home. Here they are.
- When preparing to disassemble wheels using mounting blades, you need to remember that this is a labor-intensive task and working with mounting tools requires a lot of physical strength. To make it easier to work with a spatula, it makes sense to increase its length by putting a piece of metal pipe on it, for example. The lever arm will thus be longer, and less effort will be spent.
- Before starting work, you should inspect the edges of the mounting blades. They shouldn't be too sharp. If necessary, they should be blunted with a file.
- You should never use a screwdriver in tire fitting work, even if its tip seems dull: in this case, the risk of damaging the tube increases many times over.
- Do not start removing the tire from the place located next to the spool. If you start from there, you can simply tear it away from the camera. You need to start inserting the mountings on the side opposite to the spool.
- If the tire is being changed on only one wheel, the tire must be the same type as the others. If these are summer tires, all tires must be summer tires. If it’s winter, everyone should wear winter clothes. You should also keep in mind the tire size. It should match the tires on the other wheels.
- Tire fitting work must be done on a hard, level surface. Under no circumstances should sand, small stones or dirt get inside the tire being mounted. When the car is moving, all this will act as an abrasive material and will lead to very rapid wear of the camera (even if it was new).
As you can see from the article, even a novice car enthusiast can replace a tire on a car with his own hands. The main thing is to be careful and not to use too much force when separating the tire from the rim. Because even minor damage to the tire during this operation significantly reduces its service life.
Modern car owners are accustomed to a huge number of tire shops providing their services on virtually every corner. But, unfortunately, developed tire service is typical for large cities, and we have plenty of so-called “bear corners”, where there are no workshops for several kilometers. Of course, in this case, a spare wheel can help out, but it often happens that two wheels are broken at the same time. Therefore, even theoretical knowledge about do-it-yourself tire fitting can be useful to any motorist. More on this later in the article.
- We dismantle the wheel and clean it of dirt.
- Let the air out of the wheel and place it with the nipple facing up.
- We pass the tow rope through the hole in the disk.
- Place the jack on the sidewall of the tire as close to the rim as possible. If the tire has a tube, do not place the jack opposite the fitting, otherwise there is a risk of tearing it off the tube.
- We throw the cable over the bracket or platform for lifting the jack and fix the ends of the cable together.
- We rotate the handle of the end of the jack drive so that it pulls the cable up, and the base moves the seat ring down, resting against the sidewall of the tire.
- As soon as this side of the tire separates from the disk, proceed to the next procedure.
- If you only need to change or repair the tube, then using two mounting tools alternately, we lift the sidewall of the tire near the fitting to the end of the rim.
- Push the fitting in and remove the tube from under the tire.
- We remove the nipple from the working chamber and squeeze out the air from it.
- To install a working tube, bend the sidewall of the tire and insert the fitting from the inside into a special hole designed for it. Then we place the tube under the tire.
- To avoid puncturing the tire tube with a tire iron when installing the tire, slightly inflate it without inserting the nipple.
- After beading, insert the nipple into the fitting, inflate and install the wheel in place.
How to unscrew the nuts on a wheel?
If you don't know how to unscrew a wheel nut, start by looking for the bolt heads, which are often protected with caps.
Caps with metal clips are removed with a flat-head screwdriver. Caps with bolts are removed by unscrewing the bolts.
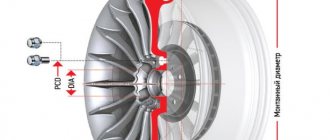
Then proceed to unscrewing the bolts. Take a straight or cross-shaped wrench. Turn it counterclockwise. First, you should loosen all the star bolts so as not to disturb the alignment of the wheel, and then use a jack to remove the wheel.
Tire changing machine, how to make it yourself, in detail
In this case, the tire changing machine consists of two tools: a bead beating device and the tire changing machine itself, combined into one.
The bottom of the machine frame, H-shaped, 90×60 centimeters, is made from a rectangular steel pipe.
We weld a two-inch round pipe with a height of about one and a half meters to the jumper at a right angle thirty centimeters from the edge. We reinforce the welding area with gussets in the form of right triangles five millimeters thick. To attach the wheel, we put the old hub on the pipe and weld it to it. We select the mounting height of the hub to suit the person’s height, so that the wheel lying on it is approximately waist-high.
It is necessary that the pipe rises above the cylinder by at least thirty centimeters and does not interfere with work. A little below the hub we weld a bracket for attaching the side trim device. It can be made from a piece of steel sheet four to five millimeters thick, drilling a special hole in it for a bolt.
The structure of the beating tool is clearly visible in the picture. The pipe for making this unit should be taken wider - a long lever should be inserted into it. The lever for mounting and dismantling tires is made of a steel pipe approximately one and a half meters long. The tips for it are made of steel rod, the diameter of which is twenty millimeters.
The length of the lever can be made different, it all depends on the size of the free space in the garage and the strength of your hands. It is advisable to make the lever tips on a lathe, but they can also be cut using a grinder with a grinding wheel, and then sanded with a flap wheel.
You can see the sizes of the tips in the pictures.
If the bolts cannot be removed (for example, due to rust), then try unscrewing the wheel without a key:
- Apply lubricant or spray to them.
- Remove them with precise blows with a hammer or mallet.
To avoid over-tightening the bolts, use a wrench with a dynamometer in the future.
- Do you still have questions?
- Is it still impossible to unscrew the wheel?
Come to our tire shop or call a visiting team - we will help diagnose and solve the problem. Our workshop has been operating for more than 3 years, has more than 1,717 positive reviews, goes to any address in St. Petersburg within 5 minutes and issues a guarantee for all types of work.
How to protect your wheels from theft?
Below are recommendations that can make it difficult or completely eliminate the theft of wheels from a car:
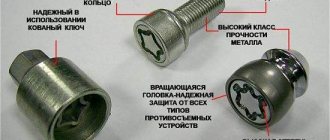
- Installation of "secrets" . A “secret” is a bolt with a special design and shape that can only be unscrewed using a special key. It is not a panacea, but for most thieves it will be an insurmountable obstacle.
- Secure parking/parking . If you don’t have a garage, you can leave your car for storage in such places. Most parking lots and lots are guarded. And in case of theft, you can make a claim to the administration and demand payments from it.
- Connecting tilt angle sensors to the alarm system . The latter is activated when body roll occurs.
- Connecting the recorder to the alarm system . It also turns on when there is an alarm. However, attackers may not be able to reach the camera's coverage area.
How to disassemble wheels by running into a car wheel
The main difficulty in the process is due to the fact that even the car owner’s own weight is not enough to create an effort to separate the tire from the bead, which can also be affected by the loss of elasticity of the rubber.
For separation, even running a car over the wheel being repaired is used. To distribute the load, a wide and durable board approximately 1-1.5 meters long is used. The disadvantages of this shockless method are based on the fact that sometimes the rubber deteriorates. It is advisable to carry out this activity together to adjust the force and speed of the car. This option is perfect for those who want to learn how to dismantle the wheels of a car themselves, but at the same time their vehicle is on the move.
Rear wheel installation
The installation process is also similar to installing the front wheel, with a small exception: the chain must be installed correctly. To do this, we bring the wheel to the mounting points, put the chain on the sprocket and then put the wheel in place. True, a situation may arise in which it seems to you that the chain is twisted, and in order to untangle it you will need to remove it. This is wrong. You just need to twist it back and forth, imagine how it was installed before on the sprockets, and most importantly, don’t panic. That seems to be all. Now you have mastered the art of removing and installing wheels.
How to remove a document from a car?
Drivers often face the problem of removing the spare tire from their car. Many simply do not know where such a backup assistant is located.
And it turns out that at the right moment, when it is necessary to quickly remove a punctured wheel and replace it with a tire, not everyone can cope with this task.
Most modern trunks have a special compartment located “under the floor”.
rice. Standard placement of the stowage compartment under the trunk floor
But there are also models where the spare tire is located under the bottom.
Unlike a standard wheel, re-rolling is a temporary solution. It is lighter in weight. The recommended speed limit with such a wheel is no more than 80 km/h.
One more thing - this method is only good for the rear axle. Therefore, having broken through the front wheel, it is better to transfer the rear one to the front axle, and then install the tire in the free space.
To remove it, you must:
- Remove the plug. Some models may require a screwdriver to remove the plug.
rice. Stub
- Insert the wheelbrace.
rice. Opening the plug
- Unscrew the screw counterclockwise
- Get the document and change it.
rice. Special compartment for a spare wheel in the trunk
Remember that every car has a replacement guide - you will find it in the manual. It also shows how to open the trunk compartment. There is also the option of ordering on-site tire fitting if you don’t want to deal with these procedures yourself.
What do you need to replace a flat tire?
- Spare tire or so-called spare tire.
- Balloon wrench.
- Jack.
- Reflective vest and emergency triangle.
Optionally, it's a good idea to have gloves in the car (if you don't want to get your hands dirty) and a telescopic wheel spanner (in case the screws that haven't moved in a while get stuck).
Before driving a car, it is better to check whether all the elements are in the car. In addition to those mentioned above, it may be worth having a flashlight (if an unexpected stop occurs at night) and a blanket to place under your knees.
Approach responsibly the precautions and recommendations of the traffic police.
On expressways and highways, the triangle should be 100 meters behind the car. On other roads - 30-50 meters, respectively (outside populated areas) or up to 1 meter from the car stop (in populated areas).
How to use a jack?
Every car manufacturer specifies in your vehicle manual how to properly use a jack.
rice. Jack
It is usually placed near the threshold of the car. Be sure to provide the device with a hard, level surface.
Raise the car to a level where the damaged tire is a few centimeters above the ground.
Tire installation
Before work, check the technical condition of the wheel and tire. They must not have any damage. Also be sure to remove any old balancing weights from the wheel. Installation is carried out in reverse order. Before work, lubricate the edge of the rubber with soapy water.
The most difficult thing is to inflate the tire. With tube tires it is a little easier; just inflate the wheel with high pressure and the tire will fall into place. It is impossible to seal a tubeless tube in this way; services use a compressor for this. If it is not there, you can use another wheel; it is inflated to 3 atm
., after which they connect the hose to the newly assembled wheel, the excess pressure will be sharply released, and the tire will fall into place.
conclusions
. Despite the inexpensive tire fitting services, knowing how to remove and put on tires from a rim yourself can help you out in a variety of situations. Therefore, it is advisable for every car enthusiast to master this simple skill.
Source autoflit.ru
Car enthusiasts often change tires - either from summer to winter, or from winter to summer, or when buying new tires, or when they are damaged or punctured. Replacing tires is usually entrusted to service station workers. But, in order to save money or for other reasons, car enthusiasts can master this procedure on their own. To replace tires with your own hands, you need a wheel wrench, a pair of mounting blades, a jack and a car pump. However, without knowing some “secrets” it is difficult to replace a tire yourself. We will now talk about the tricks of changing a tire.
Removing an old tire from a rim
First you need to remove the old tire from the rim. To do this, lift the car with a jack, unscrew the mounting bolts with a wheel wrench and remove the wheel from the car. Place the wheel on the ground with the valve facing up, remove the nipple from the valve and release the air from the tube or tire (if the tire is tubeless). After this, push the valve inside the tire and stand with your feet on the wheel so that the sidewalls of the tire are pressed away from the rim. Sometimes the tire “sticks” to the rim and you have to make an effort. After you have succeeded in pressing the sidewalls, insert the mounting blade into the gap between the rim and the sidewall of the tire. Working with two mounting blades, move the sidewall of the tire beyond the wheel rim, and pull the tube out into the resulting gap. In the same way, bring the other sidewall of the tire through the same rim and remove it from the disk. Work carefully to avoid damaging the disc. Particular care must be taken when handling fragile alloy wheels.
Installing a new tire on a rim
Before installing a new tire on a rim, check its condition - carefully inspect it for defects and damage, make sure that the tire and rim match each other in size. Also check the condition of the disc for mechanical damage, absence of dirt and rust, and wear of the rim flanges. Remove the old balance weights and the old valve if the tire is tubeless.
When installing new tires, do not forget to pay attention to the colored marks and indicators on the tire. Namely, the recommended direction of rotation, which is usually indicated by an arrow on the sidewall of the tire. For easier and more gentle installation of the tire, you need to apply a special lubricant or soap solution to its bead and to the bead heel. Do not overdo it with lubrication, otherwise the tire will slip on the rim!
Mounting the tire on the disk is carried out in the reverse order in relation to dismantling, that is, first one sidewall is put on the disk rim and, if it is a tire with a tube, then the tube is inserted, and its valve must fit into the hole of the rim. After this, the second sidewall of the tire is put on.
Option number 4. Inconvenient parking
This may sound funny, but if you choose a parking place in such a way that access to the car becomes inconvenient for thieves, then you can protect the wheels no worse than the locks, alarms and garages combined. Most often, armed with a tool, thieves take off several cars in the same yard or on the same street. But a car that is parked in such a way that a jack cannot be rolled up will prefer something else.
In this case, it is enough to shovel the snow from under the wheels, but usually parking in a snowdrift will greatly complicate the work of thieves
Parking in a deep puddle, on a hill, driving one wheel onto a curb, or parking close to a wall can make life difficult for robbers. If you do not park the car under a prohibiting sign, on the sidewalk, playground or places for the disabled, then this method of protection is completely free.
The procedure for reinstalling the front wheel of a bicycle
The same steps are involved here as during withdrawal, only the procedure is reversed.
- Place the bicycle wheel into the mount so as not to confuse the rotation. Information about the direction of rotation is on the tire, but we must not forget that the bike is still “upside down”. This is important, otherwise “eights” may appear on the rim;
- Secure the axles with a cam or nut. Check the strength of the fastening so that the wheel cannot fall off while driving;
- Turn the bike over;
- Return the brakes to their original position (in case of rim brakes).
Upon completion of all manipulations, check the functionality of the “hero of the occasion” and the correct operation of the brakes.
When should you remove a bicycle wheel?
Wheel removal may be necessary if such problems occur.
- Significant damage to the rim;
- Damage to the tube, tire rupture;
- Knitting needles and balancing;
- Bushing bulkhead;
- Replacement of bicycle chain and rear sprockets.
As for tools, a wrench of the appropriate size is sufficient: open-end or box-end. It is not advisable to use an adjustable wrench, since it “licks” the corners of the nuts due to an insufficiently tight fit.
To cope with the eccentric fastening, no additional tools are needed.
Option No. 3. Garage or parking lot
We have never come across a more reliable method than an illuminated, guarded parking lot. At least there are few cases where attackers took off the shoes of a car located behind the fence. If trouble does happen, you will know from whom to demand compensation for stolen tires and wheels.
It happens that wheels are removed even in the dealer lot, but this is rare
A garage is more attractive, but only if it is located in a protected area, and not somewhere in a dark alley or in the corner of the yard. Strangers are not allowed into garage cooperatives, and it’s not possible to get in with a tool and come out with a set of wheels. In addition, using a jack in a garage of 18 square meters. m - that’s another pleasure. In a garage without security, they can remove the wheels and take out the winter tires with other stuff.
The wheels won't fit through such a gap, but they can pull out other stuff.
Cost: effective, but not the most affordable method of protection. Overnight stay in a guarded parking lot costs 200 tenge, that is, more than 70,000 tenge per year. Renting a garage is even more expensive - at least 7,000 tenge/month. (or 84,000 per year), although not as expensive as building your own garage.
Features of speed bike hub maintenance
The bushing is a part that requires periodic maintenance. Maintenance frequency is every 2 thousand kilometers. This corresponds to approximately 2-3 months of active use of the bike. If a squeak appears and the bike starts to ride worse, then the problem is most likely in the bushing. It needs to be removed and inspected.
The main causes of problems associated with the bushing are poor lubrication of the bearings and backlash. Increased friction or poor fit causes the part to wear out very quickly. To gain access to the sleeve, you need to remove the cassette using a puller.
- Insert the puller into the cassette nut;
- Using a wrench, rotate the puller. The final goal is to unscrew the spline nut;
- Remove the small stars and set them aside;
- Remove the cassette.
Before you start disassembling the hub, use a wrench to loosen the tension on the spokes (you will need a wrench with holes knocked out). Loosen the spokes by ¼ turn. The bushing has to be replaced if the bearings along with the axle are completely worn out. If this is not the case, lubrication is sufficient. Soak the removed parts in solvent and then lubricate. It is better not to adjust skewed bearings, but to replace them, since in this condition they are clearly faulty.
Removing tires using a tire changing machine, step by step
- We clean the wheel from dirt and remove the nipple from it.
- We place a rubber mat on the base of the machine under the rebound lever so as not to scratch the disc, then place the wheel on it.
- Raise the bump stop tab and install it on the sidewall of the tire closer to the rim.
- Lubricate the tire seat ring with soapy water.
- We insert the lever into the bumper pipe.
- By pressing down on the lever, we knock off the tire bead over the entire area of the wheel.
- We do the same on the other side.
- We put a wheel on the pipe and screw it to the machine hub using bolts.
- Using a mounting tool, we lift the tire bead and insert the straight tip of the lever under it.
- Lubricate the rim edge, bead and tip with soapy water.
- We pull the lever towards ourselves, resting it on the pipe above the wheel, while the tire bead will be removed from the disk.
- Remove the tube from the tire.
- Using a mounting tool, we lift the other side, place a lever under it and remove the tire from the rim, proceeding in the same way as described above.
What will you need?
First you need to prepare all the tools necessary for the process. This will simplify the task and also reduce time costs.
- A pair of montages;
- Pump or compressor.
But this is only a basic list of tools. You will also need devices for removing rubber from the disc. It all depends on the method you use.
The following tools are typically offered
:
- Sledgehammer;
- Corner;
- Rope;
- Jack;
- Boards;
- Special devices.
Select the tool that is most suitable for your upsetting method; we will describe what and how to use below, but now we will take a closer look at specialized tools. They are divided into two groups. One of them is mandrels. Essentially, these are cylinders through which the rubber bounces off the bead. Another group is more modern devices, which are a set of stops and levers. Their main task is to simply tear the rubber out of place.
Please note that specialized tools can be purchased at the store, but they are quite expensive, which limits their use. Therefore, below we will look at options for removing a tire using improvised means. Moreover, in terms of labor costs, “old-fashioned” methods are no worse than using modern hand tools.
Methods for tearing off a stuck tire
Several methods are used to break the “welding” using improvised means. The most common of them is percussion. It does not require any special equipment and all you need is a good hammer (or better yet, a small sledgehammer) and a piece of metal corner (10 cm long and 4-5 cm on sides).
- remove the wheel from the car;
- To avoid internal problems, completely unscrew the spool;
- install the corner (the edge of one side is driven between the rim and the tire);
- standing on the opposite side of the tire corner, we hit it with a hammer (due to the damping of the rubber, the corner can fly out, so there should be no one nearby);
- after 2-3 blows, we move the corner to a new place and strike again, and so we go around the entire circumference;
- We carry out the procedure until the edge of the tire leaves the rim;
- we beat the tire around the entire circumference;
- turn the wheel over and repeat the procedure completely.
This beating method is very simple, but it has a number of disadvantages. Using a corner with non-rounded edges will certainly lead to, albeit insignificant. And as a result of inaccurate blows, the edge of the rim can be bent, so at the first opportunity you need to contact a service station to have the disc rolled.
There are also non-impact methods for tearing the tire off the rim, but some of them require other materials or improvised means.
The first option is to use a regular board, but it can only be used if you have a car that can move. The essence of the work is very simple - we lay a board (you need a strong one), so that one side of it lies close to the rim. And then we ask the driver of the car to drive over this board. The weight of the car will cause the edge to come off. And then we tear it off around the circumference with our foot. Then we turn the wheel over and repeat everything.
Jack to the rescue
This method is simple, but you need another car, which may not exist. In this case, you can use a jack (a side screw jack will not work). Additionally, you will need a tow strap and a large wrench or pry bar.
The technology of work is as follows:
- Remove the wheel from the car and unscrew the spool.
- Place a key or pry bar under the wheel.
- We install a jack on the tire (close to the rim).
- We secure one end of the sling to the mount, then stretch it so that it rests on the supporting heel of the jack and again pull it to the mount, where we secure it (in this case, everything must be done so that the sling is stretched to the maximum).
- We use the jack, and in order to properly fix the wheel, it is necessary to stand on the disk. With this installation, the sling will act as a support for the jack, and with its body it will press on the tire until it comes off.
- Next, we tear off the edge along the circumference with our foot.
We perform this operation on both sides. There are several variations of lifting with a jack - instead of a sling, a supporting surface is used, which can be the car itself or something else.
In garage conditions, you can make a special lever or use something else to carry out work. In general, the main thing is to separate the edge of the tire from the rim, but how this is done is not important.
Tools for changing a wheel: what will you need?
First thing's first - the jack
When changing wheels, the car must be raised - for this you need a jack. Nowadays there are many options for jacks. They differ not only in appearance and price, but also in the degree of impact. Jacks are divided according to their impact into the following types:
- Hydraulic jack – runs on liquid. The principle of operation is to move the piston using fluid in the drive pump. A distinctive feature is the high load capacity in relation to low operating effort.
- Mechanical or screw jack - consists of a cylindrical base, inside which one or two screws are placed. It is quite reliable in operation, durable and stable, and, importantly, works without additional stands.
- Pneumatic - the operating principle is to supply gas, the source of which is mobile and stationary compressors. Most often they are used on loose, uneven, swampy soil, as well as for rescue and installation work.
- Inflatable - for it to work, you need to lay the jack on a specialized mat and inflate it using gas from the exhaust pipe. It is very convenient to use off-road, on sand, in snow, and takes up little space in the car. It has a lifting capacity of three tons.
Why can't you drive on a flat tire?
Driving with punctured wheels or a flat tire is not only discomfort, but also a danger for the driver. If possible, call a mobile tire service and they will help you solve these problems for around 1500-2000 rubles in Moscow. Read the article and you will find a lot of useful information.
- Don't ignore warning messages about low tire pressure.
- A flat tire significantly reduces their service life.
- Reduced maneuverability and stability of the car.
- Increased fuel consumption.
- Damage to disks.
rice. A flat tire means increased danger and additional fuel consumption.
At the slightest sign of tire damage, be it a puncture, cut or rupture, you need to calmly stop the car in a safe place, get out of it and assess the situation.
Unlike repairing punctures and cuts in a tire, even a beginner can easily handle changing a tire.
The main thing is to strictly follow the instructions and carry with you all the tools necessary for this.