Stages of replacing coolant Volkswagen Polo Sedan
Like most modern cars, this model does not have a drain plug on the engine block. Therefore, the fluid is partially drained, after which flushing is required to completely remove the old antifreeze.
This model is very popular not only here, but also abroad, although there it is produced under a different name:
- Volkswagen Polo Sedan;
- Volkswagen Vento.
In our country, petrol versions with a naturally-aspirated 1.6-liter MPI engine have gained popularity. As well as turbocharged TSI 1.4 liter models. In the instructions, we will analyze the correct replacement with our own hands, using the Polo Sedan 1.6 version.
Coolant drain
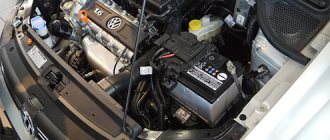
We install the car on an overpass to make it easier to unscrew the plastic engine boot, also known as protection. If a standard one is installed, then most likely you need to unscrew 4 bolts. Now access is open and you can start draining antifreeze from our Polo Sedan:
- At the bottom of the radiator, on the left side in the direction of travel of the car, we find a thick hose. It is clamped with a spring clamp, which must be compressed and moved (Fig. 1). To do this, you can use pliers or a special puller.
Fig.1 Lower radiator hose
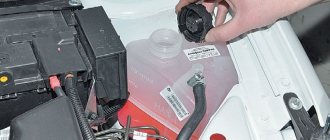
- We place an empty container under this place, pull off the hose, and the antifreeze will begin to drain.
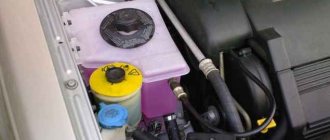
- Now you need to open the cap of the expansion tank and wait until the liquid is completely drained, about 3.5 liters (Fig. 2).
Fig.2 Expansion tank cap
- To drain the cooling system as completely as possible, it is necessary to apply pressure using a compressor or pump to the expansion tank. This will yield about 1 more liter of antifreeze.
As a result, it turns out to drain about 4.5 liters, but as we know, the filling volume is 5.6 liters. This means there is still about 1.1 liters left in the engine. Unfortunately, it cannot be simply removed, so you need to resort to flushing the system.
Flushing the cooling system
We will rinse with distilled water, so we install the removed hose in place. Pour water into the expansion tank 2-3 centimeters above the maximum mark. As it warms up the level will drop.
We start the Volkswagen Polo engine and wait until it warms up completely. Complete heating can be visually determined. Both radiator hoses will be evenly hot and the fan blower will switch to higher speed.
Now you can turn off the engine, then wait for it to cool down a bit and drain the water. It will not be possible to wash out the old antifreeze in one run. Therefore, we repeat the flushing 2-3 more times until the drained water comes out clean.
Filling without air pockets
Many users, when replacing antifreeze on a Volkswagen Polo Sedan, are faced with the problem of air locks. This entails the engine operating at elevated temperatures, and cold air may also blow from the stove.
To avoid such problems, we will fill the coolant correctly:
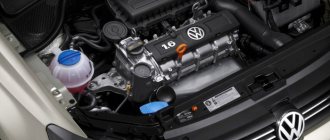
- It is necessary to disconnect the pipe going to the air filter to get to the temperature sensor (Fig. 3).
Fig.3 Air filter pipe
- Now we take out the sensor itself (Fig. 4). To do this, you need to pull out the plastic half-ring towards the interior. After this, you can pull out the temperature sensor.
Fig.4 Retaining ring on temperature sensor
- That's it, now we fill in antifreeze until it flows from the place where the sensor was located. Then we put it in place and snap the locking ring. We attach the pipe going to the air filter.
- Add coolant to the required level in the reservoir and close the cap.
- We start the car and wait until it warms up completely.
By pouring antifreeze in this way, we avoid an air lock, which will ensure the engine operates normally, preventing overheating. The stove, when set to heating mode, will also blow hot air.
All that remains is to check the fluid in the reservoir after the engine has cooled, and if necessary, top up to the level. It is advisable to carry out this check within the next few days after replacement.
temperature sensor
If you understand what kind of antifreeze you need to fill in your car, then you can talk about temperature sensors. The purpose of this device is to display the level of refrigerant temperature in the cooling system in digital form. The sensor can be used in Volkswagen vehicles that are equipped with a GAN digital information bus.
Device specifications:
- supply voltage – from 10 to 15 volts;
- 50 mA current consumption.
This device is a microprocessor sensor that connects to the GAN information bus and monitors it. At the moment when information about the temperature level in the motor from the control unit appears on the bus, the device receives and processes it, and then displays it on a small screen. If installed correctly, the sensor will not affect the operation of the tire in any way, since it does not transmit any information through it.
What will you need for installation?
Many motorists need to install the device, since the problem of failure of the stationary sensor on the instrument panel in Volkswagens is quite common. Therefore, we will tell you how to properly install and connect the device. In practice, the sensor is most often mounted instead of a plug in the area of the gearbox lever. You will need:
- T15 star screwdriver;
- pliers;
- flat screwdriver;
- stationery knife;
- clamp terminals;
- new sensor.
The new sensor is a spare part, so Volkswagen Polo cars are not equipped with this device. You can buy the device at any car store that sells parts for Volkswagens. If you are not sure about the quality of the sensor sold in auto stores, order it online on the official website or contact the dealer. Having collected all this, you can begin installation.
Step-by-step instruction
Let's start installing the device:
- First, open the hood and disconnect the battery.
- Now you need to dismantle the instrument panel. To do this, lower the steering wheel all the way down.
- Next, you need to remove the plastic plug under the instrument panel: use a screwdriver if necessary.
- Then use a star screwdriver to unscrew the two screws and disconnect the instrument panel, and also disconnect the connector with the wires.
- Disconnect the plug located next to the gearshift lever.
- Take your new sensor and install it in place of the plug. There are cases when the device socket is slightly smaller than the sensor itself. In this case, take a utility knife and carefully trim the connector until the sensor fits freely into it.
- After this, you need to stretch the wires from the sensor itself to the instrument panel connector.
- Take the pre-prepared clamp terminals and connect the temperature sensor wires to the instrument panel wiring harness - the corresponding diagram is provided below. In particular, there are four wires coming from the sensor. The red wire of the device must be connected to the red-yellow wire of the instrument panel harness. The black wire of the device must be connected to the brown wire of the harness, the yellow wire to the orange-black wire, and the blue wire of the sensor to the orange-brown wire. To make installation of the instrument panel easier, the connection point of the wires should be at least 10 cm from the connector.
- Now the instrument panel can be installed in its place.
- Get under the hood again and connect the battery terminals. At this moment, the device firmware version may appear on the temperature sensor, after which the device should turn off.
- Turn the key in the ignition switch, at this moment the engine temperature will appear on the sensor.
At this point, the installation of the sensor can be considered complete. If you have any questions or doubts about the correctness of the actions described in the instructions, write about it in the comments. The device will not function if any wires are connected incorrectly or if there is a fault in the electrical circuit. In this case, contact an electrician to correct the problem.
Replacement frequency, what antifreeze to fill
Recently produced models use modern antifreeze, which, as the manufacturer assures, does not require replacement. But car enthusiasts do not share such optimism, since the liquid sometimes changes its color to red over time. In earlier versions, the coolant had to be replaced after 5 years.
The manufacturer recommends filling the Polo Sedan with the original product Volkswagen G13 G 013 A8J M1. It complies with the latest TL-VW 774 J approval and is supplied as a purple concentrate.
Among analogues, users highlight Hepu P999-G13, which is also supplied in the form of a concentrate. If you need ready-made antifreeze, Coolstream G13, which has official VAG approval, is a good option.
You need to understand that if the replacement is carried out by flushing the cooling system, then it is better to choose a concentrate as the liquid to be filled. With its help, you can achieve the correct proportion, taking into account distilled water that has not been drained.
How much antifreeze is in the cooling system, volume table
| Model | Engine capacity | How many liters of antifreeze are in the system | Original liquid / analogues |
| Volkswagen Polo Sedan | gasoline 1.4 | 5.6 | VAG G13 G 013 A8J M1 (TL-VW 774 J) |
| gasoline 1.6 | Hepu P999-G13 | ||
| Coolstream G13 |
How to check the antifreeze level in the Polo expansion tank?
The system is filled with coolant through the filler neck of the expansion tank. The expansion tank is mounted in the engine compartment on the bracket of the right shock absorber cup. The tank is made of translucent plastic, which allows you to visually monitor the level of coolant in the tank. It is necessary to constantly maintain the antifreeze level between the MIN and MAX marks.
Expansion tank VW Polo sedan:
1 – inlet hose fitting; 2 – marks of minimum and maximum liquid levels; 3 – filler neck; 4 – fitting for steam exhaust hose; 5 – tank mounting bracket.
Which one is suitable?
Which refrigerant is better? This question was probably asked by every Volkswagen Polo owner. And not without reason, because German cars are very sensitive to antifreeze and it is not recommended to fill them with any refrigerants. That is why engineers of the Volkswagen automobile concern invented special coolants that can be poured into cars of their own production. And these coolants are classified as G11, G12 and G13, which has been recognized by leading refrigerant manufacturers and has become the global standard for the production of such products.
Adapting to these standards, coolant manufacturers produce refrigerants in accordance with the standards of the automobile concern. If previously Volkswagen owners filled the expansion tanks of their cooling systems with G12 class coolant, then several years ago this standard was replaced by G13. The German car manufacturer recommends that consumers use substances based on this classification.
Class G13 coolant is based on propylene glycol, which is used instead of ethylene glycol. Propylene glycol is considered a more environmentally friendly substance because it itself is non-toxic and decomposes much faster. However, this substance is also more expensive, which is why the cost of coolant for Volkswagen cars is much higher than that of other market analogues. It is for this reason that refrigerants are not manufactured in the post-Soviet space.
According to official data, G13 standard coolant is recommended for use in cars operating in extreme conditions. This may surprise some, but driving on domestic roads is already an extreme condition. Increased traffic flows, traffic jams, atmospheric pollution and dust on our roads affect this.
Today, many well-known global antifreeze manufacturers are engaged in the production of coolants according to Volkswagen standards. In particular, these are Liqui Moly, and Mobil 1, and many others. However, it is best to fill a Volkswagen Polo with genuine refrigerants - they are called “VW VAG G13”. This German-made coolant is manufactured in Germany specifically for Volkswagen, Audi, Seat and Skoda cars. As stated above, “VAG G13” replaced “VAG G12”.
Antifreeze in the expansion tank Volkswagen Polo
According to its characteristics, the color of the coolant is purple, although yellow or orange was usually used for the G12 standard. The freezing point of the liquid in the cooling system is -80 degrees Celsius.
According to official information, if this antifreeze is mixed with water in a 1:1 ratio, the substance in the expansion tank will freeze at a temperature of -36 degrees. In this case, the mixture will not be able to form solid particles, but will resemble jelly in its shape. As a result, the vehicle's cooling system is more reliably protected. Pipes and hoses will not crack or rupture even in severe winter frosts, as often happens with low-quality refrigerant.
If you mix coolant in a ratio of 2:3 (where 2 is antifreeze and 3 is distilled water), then this mixture will freeze in the system if the ambient temperature drops below 24 degrees. If you mix coolant in a ratio of 3:2 (where 3 is VAG substance and 2 is distillate), then the mixture will freeze at -52 degrees Celsius. It is also worth noting that the coolant manufacturer allows mixing “VAG G13” with coolant standards G 12, G12+ and G12++.
Note! Recently, the domestic car market has been teeming with counterfeit coolants from well-known manufacturers, and VAG is no exception in this case. If you see that the refrigerant label shows signs of non-original production (the original is manufactured in Germany), then this is most likely a fake. You must understand that using low-quality antifreeze can subsequently negatively affect the functioning of the car, so it is better not to purchase such products.
G12
VAG G12 antifreeze is a traditional red carboxylate coolant (often referred to as Carboxilate coolants, OAT-Organic Acid Technology). Contains organic corrosion inhibitors that “shoot” pointwise, concentrating in places where destruction processes occur, without creating a film on the entire surface of the cooling system. Due to this process, thermal conductivity is not reduced. Volkswagen G12 antifreeze does not contain silicates, nitrites and phosphates that can harm the internal combustion engine.
The Volkswagen G12 coolant complies with the VW TL 774 D standard.
The replacement interval for red VAG G12 antifreeze is from 3 to 5 years, depending on operating conditions and the recommendations of the car manufacturer. You can interfere with your brothers G12+ and G12++, but absolutely not with G11.
Product code: G012A8FA1.
1.5 liter G12 plus
Required Tools
In order for the coolant replacement on a Volkswagen Polo to be successful, the car owner will need a set of tools and materials, which are listed in the table below.
Table - Tools and materials needed to replace antifreeze
| Tools and materials | Note |
| Torx head T-25 | If the car has plastic protection |
| Ratchet | With a set of heads |
| Pliers | You can use pliers. The tool is required to remove the spring clamp from the hose. |
| Container for draining antifreeze | Volume 6 - 7 liters |
| Distilled water | Liquid volume from 5 to 15 liters |
You cannot fill a Volkswagen Polo with pure coolant concentrate. To prepare the coolant, the car owner will need a container, a measuring cup and distilled water.
The cooling system of Volkswagen Polo with 110 and 90 liter engines includes 4.6 liters of liquid. 1.4 liter and 125 liter engines consume 7 liters of antifreeze.
The proportion in which concentrate and water must be mixed to obtain finished antifreeze is 40:60. It is also permissible to dilute the concentrate 1:1. This liquid will not harm the cooling system, but will only increase the consumption of concentrated antifreeze.