For what reasons do interruptions occur?
There can be many reasons why gears do not shift when the engine is running. However, all of them, in one way or another, are connected with the two most important units of the car - the engine or gearbox. In case of serious damage, you should contact a good car service.
If the problem is in the gearbox, it will need to be removed for further disassembly and troubleshooting. If the problem is with engine components, they may need to be replaced. However, there are cases when, to eliminate a malfunction, it is enough to carry out preventive maintenance: removal, lubrication and careful adjustment of the components.
Rear Derailleur Settings
Make sure the switch is not bent. If the chain tensioner (the tab with two rollers at the bottom of the rear derailleur) is parallel to the cassette sprockets, then everything is fine. If not, then most likely it is not the switch itself that is bent, but the cock - the fastening of the switch to the frame. It's easy to straighten by pulling on the derailleur, but don't pull on the chain tensioner alone! - he will bend before the rooster straightens, and it is no longer so easy to straighten him.
Let's start making adjustments. We choose a higher speed, at which the chain stands on the smallest sprocket of the cassette (the sprocket block on the rear wheel). There are 2 screws on the switch marked H and L (see picture). Turn the H (High) screw so that the derailleur roller is in line with the smaller star. Now we select a lower speed - the largest cassette. And now we turn the screw marked L (Low) until the roller is aligned with the large star.
After this, you need to tighten the cable, while the rear derailleur shifter should be set to maximum speed. Make sure that the cable fits neatly into the groove near the fixing bolt (indicated by number 1 in the picture) and tighten it. The cable must be secured with good tension. If high gears are difficult to engage (when accelerating on a bicycle), loosen the cable tension with the adjuster (indicated by number 2 in the picture). If they are poorly reset (when driving speed decreases), then you need to tighten the cable by unscrewing the tension regulator. If the bike’s body kit is more expensive, then there is a regulator on the shifter, which allows you to adjust the cable tension on the go.
Now for the final adjustment. Place the chain on the smallest sprocket at the front and the largest sprocket at the rear and pedal backwards. By turning the tension screw (indicated by number 3 in the picture), ensure that the upper roller of the rear derailleur is as close as possible to the sprocket, but does not touch it. This is necessary for the smoothest gear shifting. Now set the maximum speed - the largest sprocket in front, the smallest in the back, and make sure that in this position the roller does not touch the cassette sprocket. Cheap switches may not have this adjustment.
Troubleshooting methods
Once the source of the problem has been found, you can begin to eliminate the causes of the malfunction.
If the problem is in the engine
The simplest cause of problems when shifting gears can be a leak of brake fluid, which is the working fluid for the clutch. If there is insufficient lubrication in the clutch hydraulic system, it will not engage fully. Therefore, first check the fluid level in the car's tank. If the level is low, check for leaks, repair defects and bleed the clutch. When the fluid level is at the normal level, the clutch elements should be inspected.
Clutch problems
The clutch consists of three main components:
- disk;
- release bearing;
- baskets (pressure disk).
Malfunctions of these units can lead to problems with gear shifting when the engine is running.
The fact that the bearing is failing may be indicated by the appearance of a rustling or distinct hum when the engine is running and the clutch pedal is pressed to the floor. When you release the pedal, the noise should stop. When the bearing completely jams, it will no longer be possible to operate the gear shift mechanism. In this case, the unit will need to be replaced.
A faulty basket can also cause the problem. This often results from critical wear of the petals. In this case, the basket stops performing its functions when heated, and it is not possible to completely remove the pressure disk. Therefore, after removing the box, it is necessary to carefully inspect the basket for deformations and other defects. If the condition of the unit is not satisfactory, it should be replaced with a new one.
Finally, the last reason for problematic gear shifting associated with the clutch is wear or deformation of the disc and the friction linings on it.
Important! After the failed elements are replaced, during assembly the box should be centered and the clutch should be pumped.
The problem is at the checkpoint
The most common cause of a gearbox malfunction is wear of the synchronizers. You may have previously been warned about this by a characteristic crunch when changing gears. Synchronizers that smooth out the angular speeds of the shafts are usually made of copper and are therefore subject to wear.
Much less often, the gearbox shafts themselves can fail. In this case, a separate transmission may not be included. The degree of wear and the need for replacement is also determined after dismantling and disassembling the transmission.
Important! To eliminate faults that have arisen in the box, a major overhaul may be required, which is not cheap and does not happen quickly. Therefore, you need to be prepared for the fact that your car will be delayed in service.
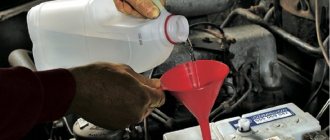
However, you should not immediately think about the bad. Sometimes a problem with gear shifting can be caused by a lack of oil in the gearbox. Loud noise while driving or a metallic grinding sound in the box may indicate insufficient oil level. If there is a complete lack of oil, you will not be able to change gears at all: the synchronizers will not function properly. Changing the gearbox oil is recommended every 60-80 kilometers.
In addition to checking the oil level in the gearbox, you will also need to inspect the unit body for damage and the absence of lubricant leaks through the gaskets and seals.
Terminology
To properly adjust speeds, you need to have at least a superficial knowledge of what parts are involved in the gear shifting process. It’s even better to study their structure in detail. Switching speeds is controlled using, which are located on. The shifters transmit force through the system to the derailleurs, which are located on the front sprockets and rear sprockets of the bicycle. The derailleurs move the chain over different sized sprockets, allowing you to change gear ratios and optimize pedal effort in different road conditions.
Problems with switching to automatic transmission
Shifting problems with automatic transmissions are not uncommon. Problems with the automatic machine arise for several reasons.
- backstage malfunction . This mechanism is the most problematic in old-type automatic transmissions. To eliminate the malfunction, the unit will need to be replaced. In most cases, it will be necessary to dismantle the gearbox for these purposes;
- insufficient oil level . The presence of lubricant leaks on the automatic transmission housing may indicate wear of the sealing gaskets, which are not difficult to replace yourself. After this, you need to change the oil in the box. Also, owners of cars with an automatic transmission are recommended to visually inspect the gearbox for oil leaks at least once every 2000 km;
- problems with the transmission control unit can ultimately cause the automatic transmission to completely lock up. To fix the problem, you will need to replace the failed mechanism and thoroughly inspect the electrical part of the gearbox.
Important! To solve problems with automatic transmission, it is recommended to conduct computer diagnostics of transmission faults.
Front derailleur setup
.
- Move the chain to a smaller sprocket.
- Release the cable by unscrewing the fixing screw.
- Find the screw marked "L". Use it to adjust the position of the frame so that the chain is located exactly between the plates of the frame and does not touch them.
- Pull the cable and tighten the fixing screw.
- Use the rear derailleur to move the chain in the cassette to the smaller sprocket.
- Use the front derailleur to move the chain onto the middle sprocket. If the chain, located on the second sprocket, touches the outer side of the frame, increase the cable tension using the drum on the left shifter.
- Shift gear to the largest sprocket. If the chain touches the sides of the frame, move the frame so that the chain is in its center using the screw marked “H”.
Gearbox linkages and rods
I remember I was “infuriated” on the VAZ 2114 by the fact that the gearbox lever was swinging from side to side like a “spoon in a glass”; I always wanted to make it stiffer, in some way. But there was only one way, to climb down the car and play with the scenes and rods. In principle, they can be released, tightened, the lever can be adjusted for tilt, etc. In general, I played around, but I noticed that if I press the lever too hard to the left, the ability to engage gear (first and reverse) disappears. This manifests itself when the car is not running, I’m already silent about the running engine.
Often the slides break, or they fly out of the fastenings, or the wear is simply enormous and they need to be replaced (this happens with high mileage). The very first thing we do is climb under the car and look at them.
Setting up the third star
Initially, the chain may touch the frame. To fix this, you need to use the adjusting screw labeled “H” to move it away from the bike. This will increase the space between the frame and the chain. Once everything is aligned, the chain should not touch anything.
The switch settings are identical everywhere, and there is no difference - the bike has 6 speeds or 32 gears. It's just that six- or eight-speed ones only have a rear derailleur. After all, they have one star on the connecting rods. This results in one less component in their design.
In this article, we discussed how to change gears on a bicycle correctly so that its components work properly and reliably, and we also learned how to adjust gears - both reverse and forward, it is not as difficult as it seems. It’s worth trying once, figuring it out, and then you can set up the equipment in a matter of minutes. Separately, it is worth mentioning about chain lubrication, it must be specialized, in no case should you use grease, it will kill the chain. So take good care of your bike and it will repay you with great performance and a comfortable ride.
A bicycle, especially a high-speed one, is a complex technical device that requires certain skill and experience to set up. Most beginners who have recently bought a new bike have a lot of questions about setting it up. Despite the fact that almost all new bicycles are already prepared for use, there quickly comes a time when the bike's gear shifters need to be adjusted. This fact raises a lot of questions among novice cyclists.
It’s almost impossible to figure out how to properly set up your bike’s gears on your own. It often happens that due to a slight inaccuracy in switching, a cyclist without proper experience, trying to figure it out on his own, puts the switches in such a state that they become completely out of adjustment, and sometimes even damages them. When adjusting your bike's speeds, it's important to know exactly what you need to do. In our material you will find useful instructions for adjusting bicycle speeds, both front and rear.
Drive and clutch cables
For rear-wheel drive models (VAZ 2101 - 2107), the gears are engaged hydraulically. That is, when you press the clutch, the fluid pushes the piston, which in turn pushes the clutch fork, which retracts the disc. For front-wheel drive models (VAZ 2108 - 2115), there is no hydraulic connection; everything is done here by mechanics, or rather by the clutch cable, which is connected to the pedals. If your slave cylinder leaks on a rear-wheel drive car or the cable breaks on a front-wheel drive car, the car will not engage in gear. The “fork” simply won’t work. We just check and replace damaged parts.
How to Adjust Rear Derailleur Speed on a Bicycle
- To adjust the rear derailleur, set the chain to the second sprocket on the front sprocket system. At the rear we place the chain on the smallest sprocket. These movements are made by holding the rear wheel in weight and turning the pedals by hand.
- When switching to a small chainring, problems may arise. The chain does not reach or makes strange sounds - you need to adjust the limiter. There are two bolts behind the switch, each such limiter performs its own function. One marked High (adjusts high gears, on a small sprocket), the other Low (adjusts low gears, on a large sprocket). It happens that there is no marking. Then we focus on the external location of the bolts.
- The High limiter is carefully tightened (fixing the stars of the required size) until the problem disappears (extra sounds, jumps, for example).
- We tighten the Low limiter, also fixing the corresponding stars. With optimal settings, the chain does not jump over the sprocket and does not sound.
- The operation of the front derailleur is checked (the stars click).
- Adjust the tension of the bicycle cable. The regulator responsible for cable tension is located on the shifters, or on the rear derailleur near the cable. If the settings are correct, the entire system should not make any unusual sounds, and there should be no other obvious problems.
Engine mounts
I personally have never had this happen, but many people write that this is a fairly common problem. Actually, the problem is this: the engine hangs on cushions, the gearbox is connected to it (manual transmissions, by the way, have their own cushions). It happens that the fastening breaks, or it unscrews. The engine or “box” may sag, the scenes may break, or they will hit something.
THEN there is another not very serious problem - these are pillows! If the programs don’t turn on, then we watch them.
These malfunctions, AS I THINK, ARE NOT PROBLEMS AT ALL! Anyone can identify them on pits or lifts, and this is done quite quickly. Personally, I came across rockers and cables, using the example of a VAZ, a clutch cable.
However, if you have checked everything, and the gears do not engage with the engine running. Then it’s worth looking at the box itself and the accompanying attachments. Let's move on to complex faults.
Rear Derailleur Settings
.
So, you have no transmission defects, all parts are relatively new (or completely new). And now you need to set up clear gear shifting.
- Using the right shifter that operates the rear derailleur, move the chain to the smaller sprocket.
- Find the screw marked "H". Using a screwdriver, adjust the position of the switch with this screw so that the smallest star lies on the same plane as the rollers (stars) located in the foot.
- Pull the cable by hand and secure with the fixing screw.
- Check the operation of the speed switch. If the chain does not shift well to large sprockets, tighten the cable more tightly using the drum on the shifter or on the switch (not available on all switches, located at the point of contact between the cable jacket and the switch).
- Move the chain to the largest sprocket in the cassette.
- Using the screw marked “L”, adjust the position of the shifter so that the star and the tab are in the same plane, and there is no possibility of the shifter.
Clutch basket
Over time, the clutch basket fails on all cars with a manual transmission. Sometimes it’s due to wear and tear, sometimes the petals or the so-called “spider” break. Let me start, perhaps, with the “spider”, this is a mechanically fixed release bearing on several extensions (done like this on some VAZs), if the extension breaks, then it cannot be effectively fixed to the basket - the gears do not engage.
Next, the petals of the box break, or they become weakened. This leads to the fact that it is very difficult, almost impossible, to release the clutch disc. Therefore, the “speeds” do not switch – we just change the basket.
Well, the last wear and tear is the basket disk. It has a metal disk inside, and over time, especially from high mileage, wear forms there. When starting, the car will shake, and if the wear is very large, the gears may not shift.
In any case, we need to change the clutch basket.
Front derailleur setup
The front derailleur will be even easier to adjust than the rear. But it is important that it is properly secured to the bicycle frame. When the chain is on the largest sprocket, there should be 1 to 3 mm from the sprocket to the derailleur frame. And the frame should be parallel to the stars. If everything is so, then you can start setting up.
Set the minimum speed - the largest one at the back and the smallest star at the front. Loosen the tension of the cable and turn the screw marked L (Low (where it is located in the picture) until a millimeter gap remains between the chain and the switch frame. After this, secure the cable with the screw (marked 4 in the picture) with good tension. You need to make sure that it fit into a special groove near the screw.
Now we set the maximum speed when the chain is on the largest sprocket in front, and on the smaller cassette, and turn the screw marked H (High) so that the gap between the chain and the inner plane of the frame is a millimeter. If after this the chain is still reluctant to climb onto the large sprocket, unscrew screw H a little.
Now we get on the bike and try how successful the adjustment of the speed switches was. If the chain does not shift well to lower speed (smaller sprockets), turn the cable tension adjuster located on the front derailleur coin on the handlebar to loosen the cable tension. When the chain sluggishly climbs onto large sprockets, tighten the cable with the same adjuster.
Problems
If the chain slips when pedaling with force, this means that it has stretched and it’s time to change it. If you haven't changed it for a long time, you may also have to change the sprockets and cassette, because... a worn chain quickly renders the sprocket unusable.
If certain speeds are difficult to engage, check whether the cable moves freely in the jackets and whether there are any breaks, as well as places with unraveled cable windings. Shirts with breaks and those in which the cable passes through are difficult to replace, as is a damaged cable. The same problem can be caused by a bent cock.
If the switch suddenly stops working altogether, then the problem is clearly in the cable: either it is not tightly screwed with the fixing bolt, or it is torn.
And another important point. When switching gears, make sure that there is no skew of the chain, due to its location simultaneously on opposite sprockets of the connecting rod and cassette, as well as on the middle sprocket and outer sprockets of the cassette. The incorrect location of the circuit is shown schematically in the picture. Because of this, rapid wear of both the chain and sprockets occurs.
In general, setting up your bike's derailleurs is quick (30-40 minutes) and effortless.
Many people, when buying a modern bicycle, do not know how to use all its amenities. They are scared by all these cables, switches and many different things. Naturally, they don’t know how to change gears on a bicycle to make it easier to ride. However, if you delve into all this equipment and understand how it works, then the ride will become much more pleasant and comfortable. And fixing this or that unit will become an exciting hobby.
Experienced cyclists have no problem switching gears. But beginners should explain all the nuances related to the question of how to change gears on a bicycle. Illiterate switching can sooner or later lead to a circuit break or even breakage of the switches. And if you're on a long trip, this can seriously take you by surprise. Proper gear shifting is not only the key to the health of your bike, but also to the most productive ride in any terrain.
To make everything clear, let's look at the design of the bicycle. The left trigger coin is responsible for switching forward gears on the device. The right trigger coin is responsible for shifting reverse gears.
Clutch disc and flywheel
In fact, wear occurs both at the clutch disc and at the flywheel itself. However, here, most likely, the gears will shift, but slip! You release the clutch pedal, but slippage occurs, that is, the car does not move, and it may jerk.
We look at the disk, maybe change it. We also look at the wear on the flywheel! If it is large, then we change it completely.
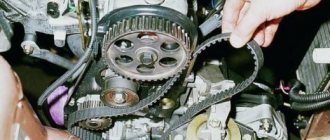
From experience I can say that our working VAZ 2111 was used mainly intercity, after 2 - 3 years the mileage was very high. The following symptoms began to appear: the gears turned on very poorly when the engine was running! We removed the manual transmission, looked at the basket - clutch disc - flywheel. And everything went for replacement, there was a lot of wear, and one petal on the basket was cracked. They even changed the release lever and the fork.
If the reason is not eliminated even now, then the problem is in the gearbox itself! It's worth taking it apart and looking at it
Methods for correcting defects
Your transmission will work best with a new or not very old cable, intact and not dry jackets, and not too deformed chain and sprockets. The parts of the cable located inside the jacket, chain, sprockets, switches MUST be lubricated with special lubricants.
If the cable stretches, you just need to tighten the cable tension drum on the shifter. If the cable breaks or begins to tear, it must be replaced.
For this:
- unscrew the screw fixing the cable on the crossover,
- pull the cable out of the shirts (if it bristles too much, cut it off),
- disassemble the shifter, if necessary, and remove the cable from it,
- insert the new cable with a metal tip into a special groove in the shifter,
- lubricate the entire cable with thick grease,
- pass it through the shirts,
- install the shirts into the grooves on the frame,
- secure the cable to the crossbar with the fastening screw.
The return spring must be clean and lubricated. Rinse it with a strong stream of water, then.
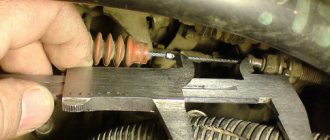
A bent cock can be recognized by the askew frame of the rear derailleur, or by using a special tool, which is usually found in good bike shops. If the rooster is not very bent, it can be straightened by hand. To do this, take the rear derailleur attached to the rooster in your hand, and hold the frame with your other hand. Slowly stretch the cock until the hind leg is relatively level. But remember, this is a temporary method
. The rooster is a consumable and should be replaced, not leveled.
The deformation of the switch also occurs upon impact. A deformed rear derailleur is more common; it will be difficult to bend the front one. On the front derailleur, only the frame can bend - it must be bent manually or using a simple tool. In case of severe damage, it is better to purchase a new one
.
The frame on the rear derailleur may bend - it can be bent. May bend or crack, parallelogram mechanism, the only way out is to replace the part
. The adjustment screw or the lug in which it is attached may break. Not fatal, but switching will be much worse, it is better to replace it in the near future.
Remember, you should not ride for a long time on deformed or bent parts yourself. Comfort while driving, and even your safety, may depend on this.
Manual transmission bearings
And the last thing that could be the bearings - although they are very strong in the box, sometimes they also “stick”. The box will work like a tractor, especially when warm.
In any case, if you have problems in the gearbox itself, then this is an expensive repair. It is also better to entrust it to professionals, because the gearbox is a very complex mechanism.
As you can see, there are quite a few reasons, but in fairness it is worth noting that mechanical transmissions are a fairly reliable unit; they themselves break down quite rarely, especially if you change the transmission fluid on time and pour a branded one of very good quality.
If the gears do not engage, then these are most likely “attached” problems, starting from the rockers and cables, ending with the basket, clutch disc and flywheel.
Now let’s take a look at a short video version of my article.
And that's ALL for me! I think the information will definitely be useful, read our AUTOBLOG.
( 10 votes, average: 4.70 out of 5)
How to Adjust Front Derailleur Speed on a Bicycle
- The front derailleur is adjusted in the same way as the rear derailleur. It also has a High and Low control.
- The rear sprocket system switches to a large sprocket. The front star system remains on the middle star. There may be problems with the chain rubbing against the guard. In this case, the Low limiter is adjusted until the problem disappears. You can visually see how this works.
- The High limiter is reconfigured. To do this, on the rear sprockets the chain is dropped onto a small sprocket, and on the front sprockets the largest sprocket is placed.
- If the chain rubs against the protection, we move to adjusting the cable, the regulator of which is located on the steering shifters. The reaction of the system to the movements of the regulator is carefully studied, this will help to better navigate the settings.
- The stars are switched to check for extraneous sounds and unnecessary movements.